

Recently Gesture controlled Laptops or computers are getting very famous. This technique is called Leap motion which enables us to control certain functions on our computer/Laptop by simply waving our hand in front of it. It is very cool and fun to do it, but these laptops are really priced very high. So in this project let us try building our own Gesture control Laptop/Computer by combining the Power of Arduino and Python.
We will use two Ultrasonic sensors to determine the position of our hand and control a media player (VLC) based on the position. I have used this for demonstration, but once you have understood the project, you can do anything by just changing few lines of code and control your favorite application in your favorite way.
Pre-requisites:
We have already covered few projects which combines Arduino with Python. So I assume that you have already installed Python and its serial library and have successfully tried out few basic projects like blinking LED. If not, don’t worry you can fall back to this Arduino-Python Led Controlling tutorial and get along with it. So make sure you have installed Python and pyserial library before proceeding.
Concept behind the project:
The concept behind the project is very simple. We will place two Ultrasonic (US) sensors on top of our monitor and will read the distance between the monitor and our hand using Arduino, based on this value of distance we will perform certain actions. To perform actions on our computer we use Python pyautogui library. The commands from Arduino are sent to the computer through serial port (USB). This data will be then read by python which is running on the computer and based on the read data an action will be performed.
Circuit Diagram:

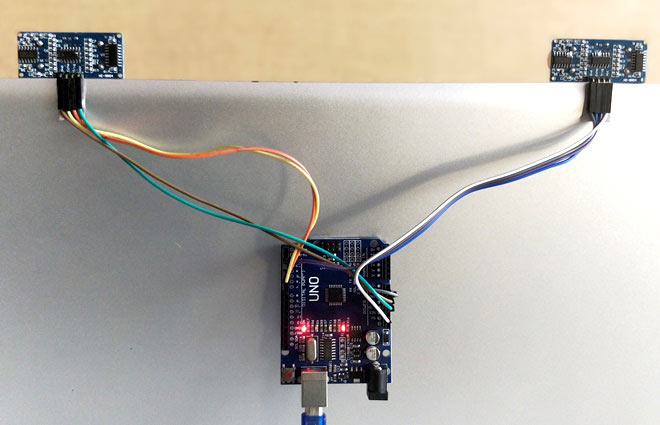
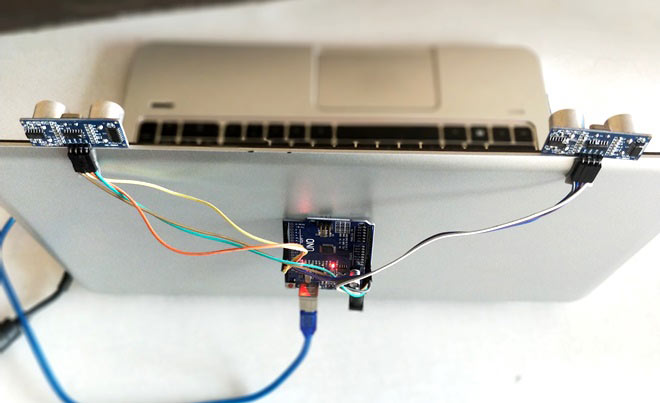
To control the PC with Hand Gestures, just connect the two Ultrasonic sensors with Arduino. We know US sensor work with 5V and hence they are powered by the on board Voltage regulator of Arduino. The Arduino can be connected to the PC/Laptop for powering the module and also for Serial communication. Once the connections are done place them on your monitor as shown below. I have used a double side tape to stick it on my monitor but you can use your own creativity. After securing it in a place we can proceed with the Programming.
Programming your Arduino:
The Arduino should be programmed to read the distance of hand from the US sensor. The complete program is given at the end of this page; just below I have given the explanation for the program. If you are new to Ultrasonic sensor, just go through Arduino & Ultrasonic Sensor Based Distance Measurement.
By reading the value of distance we can arrive at certain actions to be controlled with gestures, for example in this program I have programmed 5 actions as a demo.
Action 1: When both the hands are placed up before the sensor at a particular far distance then the video in VLC player should Play/Pause.
Action 2: When right hand is placed up before the sensor at a particular far distance then the video should Fast Forward one step.
Action 3: When left hand is placed up before the sensor at a particular far distance then the video should Rewind one step.
Action 4: When right hand is placed up before the sensor at a particular near distance and then if moved towards the sensor the video should fast forward and if moved away the video should Rewind.
Action 5: When left hand is placed up before the sensor at a particular near distance and then if moved towards the sensor the volume of video should increase and if moved away the volume should Decrease.
Let us see how the program is written to perform the above actions. So, like all programs we start with defining the I/O pins as shown below. The two US sensors are connected to Digital pins 2,3,4 and 5 and are powered by +5V pin. The trigger pins are output pin and Echo pins are input pins.
The Serial communication between Arduino and python takes places at a baud rate of 9600.
const int trigger1 = 2; //Trigger pin of 1st Sesnor
const int echo1 = 3; //Echo pin of 1st Sesnor
const int trigger2 = 4; //Trigger pin of 2nd Sesnor
const int echo2 = 5;//Echo pin of 2nd Sesnor
void setup() {
Serial.begin(9600);

pinMode(trigger1, OUTPUT);
pinMode(echo1, INPUT);
pinMode(trigger2, OUTPUT);
pinMode(echo2, INPUT);
}
We need to calculate the distance between the Sensor and the hand each time before concluding on any action. So we have to do it many times, which means this code should be used as a function. We have written a function named calculate_distance() which will return us the distance between the sensor and the hand.
/*###Function to calculate distance###*/
void calculate_distance(int trigger, int echo)
{
digitalWrite(trigger, LOW);
delayMicroseconds(2);
digitalWrite(trigger, HIGH);
delayMicroseconds(10);
digitalWrite(trigger, LOW);

time_taken = pulseIn(echo, HIGH);
dist= time_taken*0.034/2;
if (dist>50)
dist = 50;
}
Inside our main loop we check for the value of distance and perform the actions mentioned above. Before that we use two variables distL and distR which gets updated with current distance value.
calculate_distance(trigger1,echo1);
distL =dist; //get distance of left sensor

calculate_distance(trigger2,echo2);
distR =dist; //get distance of right sensor
Since we know the distance between both the sensors, we can now compare it with predefined values and arrive at certain actions. For example if both the hands are placed at a distance of 40 mc then we play/pause the video. Here the word “Play/Pause” will be sent out through serial port
if ((distL >40 && distR>40) && (distL <50 && distR<50)) //Detect both hands
{Serial.println("Play/Pause"); delay (500);}
If the Right hand alone is placed before the module then we fast forward the video by one step and if it is left hand we rewind by one step. Based on the action, here the word “Rewind” or “Forward” will be sent out through serial port
if ((distL >40 && distL<50) && (distR ==50)) //Detect Left Hand
{Serial.println("Rewind"); delay (500);}

if ((distR >40 && distR<50) && (distL ==50)) //Detect Right Hand
{Serial.println("Forward"); delay (500);}
Foe detailed control of volume and track we use a different methodology so as to prevent false triggers. To control the volume we have to place the left hand approx. At a distance of 15 cm , then you can either move it towards the sensor to decrease the volume of move it away from the sensor to increase the volume. The code for the same is shown below. Based on the action, here the word “Vup” or “Vdown” will be sent out through serial port
//Lock Left - Control Mode
if (distL>=13 && distL<=17)
{
  delay(100); //Hand Hold Time
  calculate_distance(trigger1,echo1);
  distL =dist;
  if (distL>=13 && distL<=17)
  {
    Serial.println("Left Locked");
    while(distL<=40)
    {
      calculate_distance(trigger1,echo1);
      distL =dist;
      if (distL<10) //Hand pushed in
      {Serial.println ("Vup"); delay (300);}
      if (distL>20) //Hand pulled out
      {Serial.println ("Vdown"); delay (300);}
    }
  }
}
We can use the same method for the right side sensor also, to control the track of the video. That is if we move the right hand towards the sensor it will fast forward the movie and if you move it away from the sensor it will rewind the movie. Based on the action, here the word “Rewind” or “Forward” will be sent out through serial port
You can now read over the complete code for this gesture controlled PC given at the end of the page and try understating it as an whole and then copy it to your Arduino IDE.
Programming your Python:
The python program for this project is very simple. We just have to establish a serial communication with Arduino through the correct baud rate and then perform some basic keyboard actions. The first step with python would be to install the pyautogui module. Make sure you follow this step because the program will not work without pyautogui module.
Installing pyautogui module for windows:
Follow the below steps to install pyautogui for windows. If you are using other platforms the steps will also be more or less similar. Make sure your computer/Laptop is connected to internet and proceed with steps below
Step 1: Open Windows Command prompt and change the directory to the folder where you have installed python. By default the command should be
cd C:\Python27
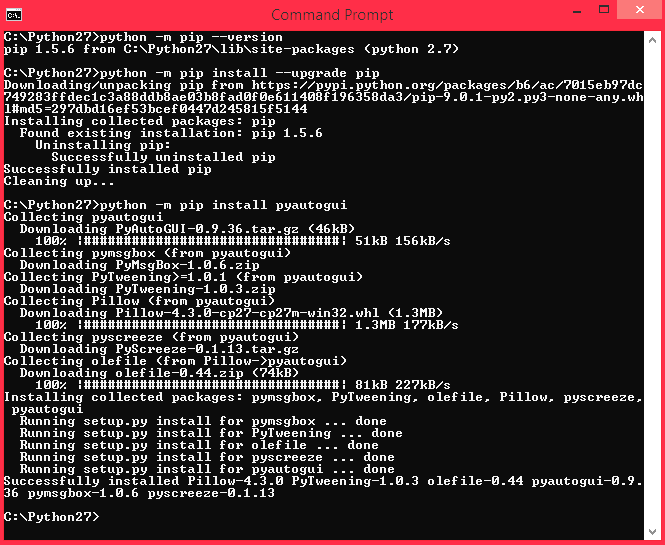
Step 2: Inside your python directory use the command python –m pip install –upgrade pip to upgrade your pip. Pip is a tool in python which helps us to install python modules easily. Once this module is upgraded (as shown in picture below) proceed to next step.
python –m pip install –upgrade pip
Step 3: Use the command “python –m pip install pyautogui” to install the pyautogui module. Once the process is successful you should see a screen something similar to this below.
python –m pip install –upgrade pip
Now that the pyautogui module and pyserial module (installed in previous tutorial) is successful installed with the python, we can proceed with the python program. The complete python code is given at the end of the tutorial but the explanation for the same is as follows.
Let us import all the three required modules for this project. They are pyautogui, serial python and time.
import serial #Serial imported for Serial communication
import time #Required to use delay functions
import pyautogui
Next we establish connection with the Arduino through COM port. In my computer the Arduino is connected to COM 18. Use device manager to find to which COM port your Arduino is connected to and correct the following line accordingly.
ArduinoSerial = serial.Serial('com18',9600) #Create Serial port object called arduinoSerialData
time.sleep(2) #wait for 2 seconds for the communication to get established
Inside the infinite while loop, we repeatedly listen to the COM port and compare the key words with any pre-defied works and make key board presses accordingly.
while 1:
    incoming = str (ArduinoSerial.readline()) #read the serial data and print it as line
    print incoming

    if 'Play/Pause' in incoming:
        pyautogui.typewrite(['space'], 0.2)

    if 'Rewind' in incoming:
        pyautogui.hotkey('ctrl', 'left')

    if 'Forward' in incoming:
        pyautogui.hotkey('ctrl', 'right')

    if 'Vup' in incoming:
        pyautogui.hotkey('ctrl', 'down')

    if 'Vdown' in incoming:
        pyautogui.hotkey('ctrl', 'up')
As you can see, to press a key we simply have to use the command “pyautogui.typewrite(['space'], 0.2)” which will press the key space for 0.2sec. If you need hot keys like ctrl+S then you can use the hot key command “pyautogui.hotkey('ctrl', 's')”.
I have used these combinations because they work on VLC media player you can tweak them in any way you like to create your own applications to control anything in computer with gestures.

Gesture Controlled Computer in Action:
Make the connections as defined above and upload the Arduino code on your Arduino board. Then use the python script below and launch the program on your laptop/computer.
Now you can play any movie on your computer using the VLC media player and use your hand to control the movie as shown in the video given below.
Hope you understood the project and enjoyed playing with it. This is just a demo and you can use your creativity to build a lot more cool gesture controlled stuff around this. Let me know if this was useful and what you will create using this in the comment section and I will be happy to know it.
Complete Project Code
Arduino Code:
/*
 * Program for gesture control VLC Player
 * Controlled uisng Python
 * Code by B.Aswinth Raj
 * Dated: 11-10-2017
 * Website: www.circuitdigest.com
 */
const int trigger1 = 2; //Trigger pin of 1st Sesnor
const int echo1 = 3; //Echo pin of 1st Sesnor
const int trigger2 = 4; //Trigger pin of 2nd Sesnor
const int echo2 = 5;//Echo pin of 2nd Sesnor
long time_taken;
int dist,distL,distR;
void setup() {
Serial.begin(9600);
pinMode(trigger1, OUTPUT);
pinMode(echo1, INPUT);
pinMode(trigger2, OUTPUT);
pinMode(echo2, INPUT);
}
/*###Function to calculate distance###*/
void calculate_distance(int trigger, int echo)
{
digitalWrite(trigger, LOW);
delayMicroseconds(2);
digitalWrite(trigger, HIGH);
delayMicroseconds(10);
digitalWrite(trigger, LOW);
time_taken = pulseIn(echo, HIGH);
dist= time_taken*0.034/2;
if (dist>50)
dist = 50;
}
void loop() { //infinite loopy
calculate_distance(trigger1,echo1);
distL =dist; //get distance of left sensor
calculate_distance(trigger2,echo2);
distR =dist; //get distance of right sensor
//Uncomment for debudding
/*Serial.print("L=");
Serial.println(distL);
Serial.print("R=");
Serial.println(distR);
*/
//Pause Modes -Hold
if ((distL >40 && distR>40) && (distL <50 && distR<50)) //Detect both hands
{Serial.println("Play/Pause"); delay (500);}
calculate_distance(trigger1,echo1);
distL =dist;
calculate_distance(trigger2,echo2);
distR =dist;
//Control Modes
//Lock Left - Control Mode
if (distL>=13 && distL<=17)
{
  delay(100); //Hand Hold Time
  calculate_distance(trigger1,echo1);
  distL =dist;
  if (distL>=13 && distL<=17)
  {
    Serial.println("Left Locked");
    while(distL<=40)
    {
      calculate_distance(trigger1,echo1);
      distL =dist;
      if (distL<10) //Hand pushed in
      {Serial.println ("Vup"); delay (300);}
      if (distL>20) //Hand pulled out
      {Serial.println ("Vdown"); delay (300);}
    }
  }
}
//Lock Right - Control Mode
if (distR>=13 && distR<=17)
{
  delay(100); //Hand Hold Time
  calculate_distance(trigger2,echo2);
  distR =dist;
  if (distR>=13 && distR<=17)
  {
    Serial.println("Right Locked");
    while(distR<=40)
    {
      calculate_distance(trigger2,echo2);
      distR =dist;
      if (distR<10) //Right hand pushed in
      {Serial.println ("Rewind"); delay (300);}
      if (distR>20) //Right hand pulled out
      {Serial.println ("Forward"); delay (300);}
  }
}
}
delay(200);
}
Python Code:
import serial #Serial imported for Serial communication
import time #Required to use delay functions
import pyautogui
ArduinoSerial = serial.Serial('com18',9600) #Create Serial port object called arduinoSerialData
time.sleep(2) #wait for 2 seconds for the communication to get established
while 1:
    incoming = str (ArduinoSerial.readline()) #read the serial data and print it as line
    print incoming
    if 'Play/Pause' in incoming:
        pyautogui.typewrite(['space'], 0.2)
    if 'Rewind' in incoming:
        pyautogui.hotkey('ctrl', 'left')
    if 'Forward' in incoming:
        pyautogui.hotkey('ctrl', 'right')
    if 'Vup' in incoming:
        pyautogui.hotkey('ctrl', 'down')
    if 'Vdown' in incoming:
        pyautogui.hotkey('ctrl', 'up')
    incoming = "";
Comments
where is the other ultrasonic
where is the other ultrasonic sensor's Vcc connected to? Since's there is only one 5v on the board. the 3.3v doesn't work. And there is no use of the breadboard in the above project so how to do it?
how to install pyautogui? can
how to install pyautogui? can you help me?
everything is ok but iam not
everything is ok but iam not getting hand gesture?even iam getting python output
i'm making my code and
i'm making my code and circuit in tinkercad and cant get python to import into tinkercad
I face this problem
I face this problem
C:\Python27>py -m pip install --upgrade pip
Downloading/unpacking pip from https://files.pythonhosted.org/packages/e1/63/7c0e553ae0513ebf1858f0803…
Running setup.py (path:c:\users\abs\appdata\local\temp\pip_build_ABS\pip\setup.py) egg_info for package pip
Traceback (most recent call last):
File "<string>", line 17, in <module>
File "c:\users\abs\appdata\local\temp\pip_build_ABS\pip\setup.py", line 7
def read(rel_path: str) -> str:
^
SyntaxError: invalid syntax
Complete output from command python setup.py egg_info:
Traceback (most recent call last):
File "<string>", line 17, in <module>
File "c:\users\abs\appdata\local\temp\pip_build_ABS\pip\setup.py", line 7
def read(rel_path: str) -> str:
^
SyntaxError: invalid syntax
----------------------------------------
Cleaning up...
Command python setup.py egg_info failed with error code 1 in c:\users\abs\appdata\local\temp\pip_build_ABS\pip
Storing debug log for failure in C:\Users\ABS\pip\pip.log
I am not able to re-create
I am not able to re-create this error to test, but it is most likely a problem with python or pip verssion
after launching my python
after launching my python code it simply prints the output for several time and the control of the video is changing in accordance with the repeating output and doesnt consider my motion or guesture ....the code and connections are correct


hey i connected the Vcc of one of the sensors to the 5v but where to connect the other sensor on the arduino? can we connect it to IOref or Vin? since it doesn’t work when connected to the 3.3v
because the sensor needs 5v in order to work.