
In previous Getting start with NodeMCU tutorial, we saw What is NodeMCU and how we can program it using Arduino IDE. As you know NodeMCU has Wi-Fi chip inside so, it can also connect to internet. It is very useful to build IoT Projects. We previously used ThingSpeak with Arduino to make IoT thermometer, but here we will create our own webpage to display temperature.
In this tutorial we will explore more about this interesting MCU and slowly we dive in Internet of things world by connecting NodeMCU with the Internet. Here we will use this module to get room temperature on web browser i.e. we will make a web server to display the temperature using LM35 as temperature sensor.
Components Required:
- NodeMCU - ESP12
- LM35 Temperature Sensor
- Breadboard
- Male-female connectors
LM35 Temperature Sensor:
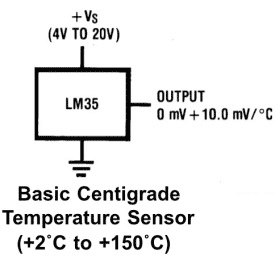
LM35 is a analog linear temperature sensor. Its output is proportional to the temperature (in degree Celsius). The operating temperature range is from -55°C to 150°C. The output voltage varies by 10mV in response to every oC rise or fall in temperature. It can be operated from a 5V as well as 3.3 V supply and the stand by current is less than 60uA.
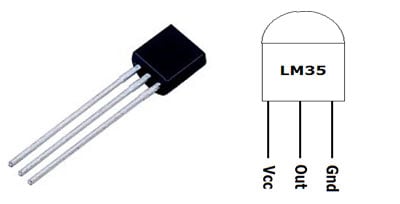
Note that LM35 is available in 3 series variations namely LM35A, LM35C and LM35D series. The main difference is in their range of temperature measurements. The LM35D series is designed to measure 0 to 100 degree Celsius, where as the LM35A series is designed to measure a wider range of -55 to 155 degree Celsius. The LM35C series is designed to measure from -40 to 110 degree Celsius.
We have already used LM35 with many other microcontrollers to measure the temperature:
- Digital Thermometer using LM35 and 8051 Microcontroller
- Temperature Measurement using LM35 and AVR Microcontroller
- Digital Thermometer using Arduino and LM35 Temperature Sensor
- Room Temperature Measurement with Raspberry Pi
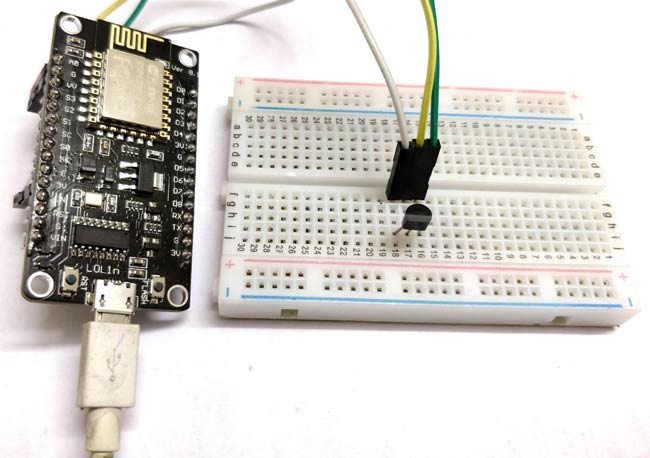
Connecting LM35 with NodeMCU:
Circuit diagram for connecting LM35 with NodeMCU is given below:

LM35 is an analog sensor so we have to convert this analog output to digital. For this we use ADC pin of NodeMCU which is defined as A0. We will connect the output of LM35 to A0.
We have 3.3 V as output voltage on NodeMCU’s pins. So, we will use 3.3V as Vcc for LM35.
Code Explanation:
Complete code with Demonstration Video is given at the end of the article. Here we are explaining few parts of the code. We already explained to upload code into MCU using Arduino IDE.
First, we have to include ESP8266wifi library to access the Wi-Fi functions..
#include <ESP8266WiFi.h>
Then enter your Wi-Fi name and password in ssid and password field. Also initialized the variables and start the server on port 80 with baud rate 115200.
const char* ssid     = "*********"; // Your ssid
const char* password = "***********"; // Your Password
float temp_celsius = 0;
float temp_fahrenheit = 0;
WiFiServer server(80);
void setup() {
 Serial.begin(115200);
Connection of Wi-Fi is established by calling these functions.
Serial.println();
Serial.println();
Serial.print("Connecting to ");
Serial.println(ssid);
WiFi.begin(ssid, password);
Connection can take few seconds to establish so keep showing ‘…’ till connection will not establish. Then system will keep waiting and checking for a client to connect…
while (WiFi.status() != WL_CONNECTED) {
delay(500);
Serial.print(".");
}
Serial.println("");
Serial.println("WiFi is connected");
server.begin();
Serial.println("Server started");
Serial.println(WiFi.localIP());
}
In loop section, read sensor values and convert it into Celsius and Fahrenheit and display these values on serial monitor.
void loop() {
temp_celsius = (analogRead(A0) * 330.0) / 1023.0;   // To convert analog values to Celsius We have 3.3 V on our board and we know that output voltage of LM35 varies by 10 mV to every degree Celsius rise/fall. So , (A0*3300/10)/1023 = celsius
temp_fahrenheit = celsius * 1.8 + 32.0;
Serial.print("  Temperature = ");
Serial.print(temp_celsius);
Serial.print(" Celsius, ");

HTML Code to display Temperature on WebPage:
We are displaying the temperature on a webpage so that it can be accessible from anywhere in the world through internet. HTML code is very simple; we just have to use client.println function to echo each line of the HTML code, so that browser can execute it.
This part shows HTML code to create a web page which displays the temperature value.
WiFiClient client = server.available();
client.println("HTTP/1.1 200 OK");
client.println("Content-Type: text/html");
client.println("Connection: close");  // the connection will be closed after completion of the response
client.println("Refresh: 10");  // update the page after 10 sec
client.println();
client.println("<!DOCTYPE HTML>");
client.println("<html>");
client.print("<p style='text-align: center;'><span style='font-size: x-large;'><strong>Digital Thermometer</strong></span></p>");
client.print("<p style='text-align: center;'><span style='color: #0000ff;'><strong style='font-size: large;'>Temperature (*C)= ");
client.println(temp_celsius);
client.print("<p style='text-align: center;'><span style='color: #0000ff;'><strong style='font-size: large;'>Temperature (F) = ");
client.println(temp_fahrenheit);
client.print("</p>");
client.println("</html>");
delay(5000);
}
Working:
After uploading the code using Arduino IDE, open serial monitor and press the Reset button on NodeMCU.
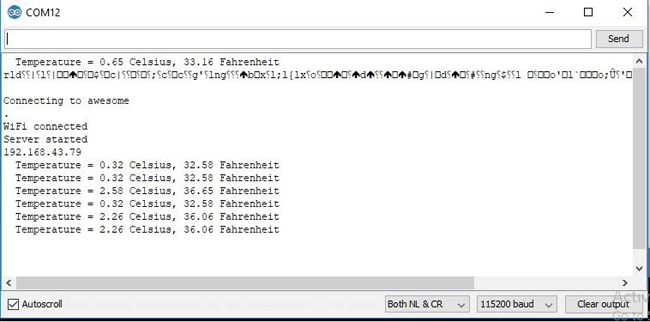
Now, you can see the board is connected to the Wi-Fi network which you have defined in your code and also you got the IP. Copy this IP and paste it in any web browser. Make sure your system on which you are running the web browser should connected to the same network.
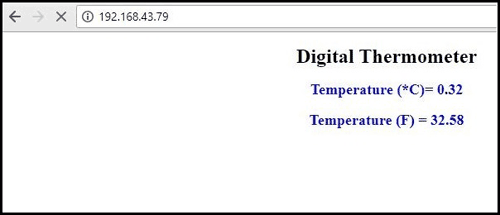
Your digital thermometer is ready and the temperature will be refreshed automatically in web browser after every 10 Sec.
To make this webpage accessible from the internet, you just need to set Port Forwarding in you router/modem. Check the complete code and Video below.
Also check:
Complete Project Code
#include <ESP8266WiFi.h>
const char* ssid     = "*********"; // Your ssid
const char* password = "***********"; // Your Password
float temp_celsius = 0;
float temp_fahrenheit = 0;
WiFiServer server(80);
void setup() {
 Serial.begin(115200);
  pinMode(A0, INPUT);
Serial.println();
Serial.println();
Serial.print("Connecting to ");
Serial.println(ssid);
WiFi.begin(ssid, password);
while (WiFi.status() != WL_CONNECTED) {
delay(500);
Serial.print(".");
}
Serial.println("");
Serial.println("WiFi is connected");
server.begin();
Serial.println("Server started");
Serial.println(WiFi.localIP());
}
void loop() {
temp_celsius = (analogRead(A0) * 330.0) / 1023.0;   // To convert analog values to Celsius We have 3.3 V on our board and we know that output voltage of LM35 varies by 10 mV to every degree Celsius rise/fall. So , (A0*3300/10)/1023 = celsius
temp_fahrenheit = celsius * 1.8 + 32.0;
Serial.print("  Temperature = ");
Serial.print(temp_celsius);
Serial.print(" Celsius, ");
Serial.print(temp_fahrenheit);
Serial.println(" Fahrenheit");
WiFiClient client = server.available();
client.println("HTTP/1.1 200 OK");
client.println("Content-Type: text/html");
client.println("Connection: close");  // the connection will be closed after completion of the response
client.println("Refresh: 10");  // update the page after 10 sec
client.println();
client.println("<!DOCTYPE HTML>");
client.println("<html>");
client.print("<p style='text-align: center;'><span style='font-size: x-large;'><strong>Digital Thermometer</strong></span></p>");
client.print("<p style='text-align: center;'><span style='color: #0000ff;'><strong style='font-size: large;'>Temperature (*C)= ");
client.println(temp_celsius);
client.print("<p style='text-align: center;'><span style='color: #0000ff;'><strong style='font-size: large;'>Temperature (F) = ");
client.println(temp_fahrenheit);
client.print("</p>");
client.println("</html>");
delay(5000);
}
Comments
Sorry, but this does not work
Hi ya, I've looked at your example and actaully got it working already in so much as I can also get readings of 0.32, then 1.23, then <1, then over 2, etc. Degrees C, but there's two things wrong with this:
1) It is not almost freezing in my room, so why it is reading almost freezing in Degrees C.
2) Why it is so wildly variable?
You example shows numbers, but I doubt it was also almost 0 Degrees C in the place you tested it?
I'm not trying to be snarky :-) I'm just saying, I don't get why it's not wokring and though the solution provided is off?
Any help you can provide would be great.


It is very useful for our mini projects.