
Thermometers are useful apparatus that have been used for a long time for temperature measurement. In this project, we have made an Arduino based digital thermometer to display the current ambient temperature on a 16x2 LCD unit in real time. It can be deployed in houses, offices, industries, etc., to measure the temperature. We can divide this Arduino based thermometer into three sections: the first section senses the temperature by using the temperature sensor LM35, the second section converts the temperature value into a suitable number in Celsius scale, which is done by Arduino, and the last part of the system displays the temperature on a 16x2 LCD. The same is demonstrated in below block diagram.

In this digital temperature sensor with Arduino, Arduino Uno is used to control the whole process. An LM35 temperature sensor is used for sensing the environment temperature, which gives 1 degree temperature for every 10mV change at its output pin. You can easily check it with a voltmeter by connecting Vcc at pin 1 and Ground at pin 3, and the output voltage at pin 2 of the LM35 sensor. For example, if the output voltage of the LM35 sensor is 250m volt, that means the temperature is around 25 degrees Celsius.
Arduino reads the output voltage of the temperature sensor by using Analog pin A0 and performs the calculation to convert this Analog value to a digital value of the current temperature. After calculations, Arduino sends these calculations or the temperature to the 16x2 LCD unit by using the appropriate commands of the LCD. We have also built other digital thermometer projects using DHT11, DS18B20 and other temperature sensors.
Table of Contents
What is a Digital Thermometer Using Arduino?
A digital thermometer using Arduino is an electronic temperature measuring device that is an integrated electronics unit that uses an Arduino microcontroller, (LM35) temperature sensor, and LCD display for real-time temperature measurement. An Arduino based digital thermometer provides accurate temperature measurements in the home, in the office, and in industrial settings.
Key Components Required
- Arduino Uno microcontroller
- LM35 temperature sensor
- 16x2 LCD display
- Connecting wires
- Breadboard
- 9V power supply
Circuit Components
Arduino
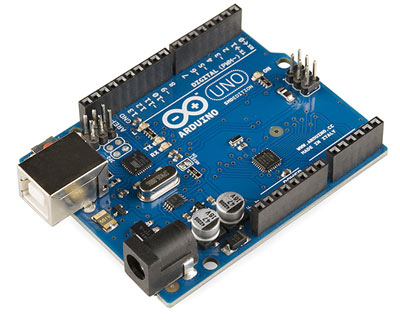
In this project, we have used an Arduino to control the whole process of the system. Arduino is a controller which runs on an ATmega AVR controller. Arduino is an open-source hardware platform and is very useful for project development purposes. There are many types of Arduino boards, like Arduino UNO, Arduino Mega, Arduino Pro Mini, Lilypad, etc., available in the market, or you can also build an Arduino by yourself.
LM35 Temperature Sensor
LM35 is a 3-pin temperature sensor which gives 1 degree Celsius for every 10mVolt change. This sensor can sense up to 150 degrees Celsius. The 1-number pin of lm35 sensor is Vcc, the second is the output, and the third is Ground. LM35 is the simplest temperature sensor and can be interfaced easily with any microcontroller. You can check various Temperature Measurement using LM35-based projects here.
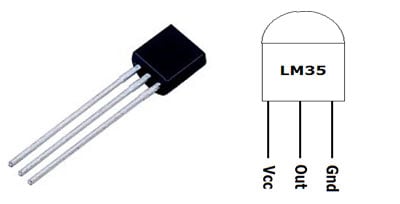
Pin No | Function | Name |
1 | Supply voltage; 5V (+35V to -2V) | Vcc |
2 | Output voltage (+6V to -1V) | Output |
3 | Ground (0V) | Ground |
LM35 can be easily interfaced with Raspberry Pi, NodeMCU, PIC microcontroller, etc, to measure the temperature and can also be used standalone with an Op-amp to indicate temperature levels.
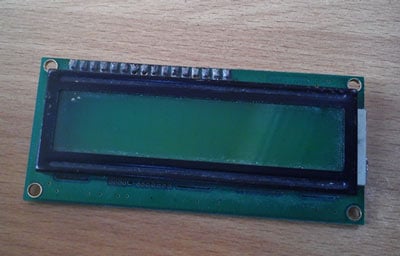
LCD
16x2 LCD unit is widely used in embedded system projects because it is cheap, easily available, small in size and easy to interface. 16x2 has two rows and 16 columns, which means it consists of 16 blocks of 5x8 dots. 16 pins for connections, in which 8 data bits D0-D7 and 3 control bits, namely RS, RW and EN. The rest of the pins are used for supply, brightness control and backlight.
Power Supply
Arduino Board already have an inbuilt power supply section. Here, we only need to connect a 9-volt or 12-volt adaptor to the board.
| Component | Function | Connection |
| LM35 Sensor | Temperature detection | Analog Pin A0 |
| Arduino Uno | Signal processing & control | Main controller |
| 16x2 LCD | Temperature display | Digital Pins 2-7 |
| Power Supply | System power | 9V/12V adapter |
Digital Thermometer Using Arduino Circuit Diagram
Arduino Uno serves as the brain of this digital thermometer using Arduino programming.

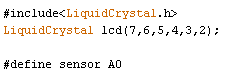
A circuit diagram for a Digital Thermometer using Arduino and an LM35 Temperature Sensoris shown in the above figure. Make the connections carefully as shown in the schematic. Here 16x2 LCD unit is directly connected to the Arduino in 4-bit mode. Data pins of LCD, namely RS, EN, D4, D5, D6, D7, are connected to Arduino digital 7, 6, 5, 4, 3, 2. A temperature sensor LM35 is connected to Analog pin A0 of Arduino, which generates 1 degree Celsius temperature on every 10mV output change at its output pin.
The digital thermometer project works in three steps:
» Temperature Detection: An LM35 will sense the ambient temperature
» Signal Recovery: The Arduino will take in the analog signal and convert it to a digital value for the temperature.
» Output Display: A 16x2 LCD will show the temperature readings in Celsius.
If you are new to Arduino, then learn to interface a 16x2 LCD with Arduino in our previous tutorial.
Digital Thermometer Using Arduino Programming
The code for Temperature Measurement using LM35 is simple and given at the end of this tutorial. First, we include a library for the LCD unit, and then we define data and control pins for the LCD and the temperature sensor. The LM35 temperature sensor is a precision integrated circuit that provides a linear voltage output proportional to temperature
After getting analog value at analog pin, we read that value using analog read function and store that value in a variable. And then convert the value into temperature by applying the below given formula.
float analog_value=analogRead(analog_pin);
float Temperature=analog_value*factor*100
where
factor=5/1023
analog_value= output of temperature sensor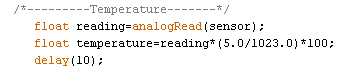
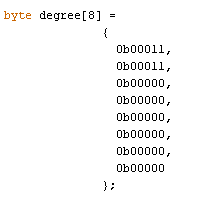
Here degree symbol is created using the custom character method
Technical Summary and GitHub Repository
The Technical Summary provides a concise overview of how the project is designed and how it operates. The GitHub Repository has all project assets, including the source code, the wiring diagrams, and documentation. They provide a consistent reference to build, adapt, or learn from the project.


So this is how we can build a simple Digital Thermometer to measure temperature with Arduino. Complete code with a demo video is given below.
Frequently Asked Questions on the Digital Thermometer Project
⇥ 1. How precise is an Arduino digital thermometer with LM35?
The LM35 sensor has ±0.5°C precision at room temperature, and hence Arduino digital thermometers are good for general use where medium accuracy temperature measurement is needed.
⇥ 2. What is the temperature range provided by the LM35 sensor?
LM35 temperature sensor provides a temperature range from -55°C to +150°C, which covers most general environmental and industrial temperature monitoring applications effectively.
⇥ 3. Can I use a different temperature sensor instead of LM35?
Yes, you can use DS18B20, DHT11, DHT22, or thermistor sensors, but they require different adjustments to code, as well as a different method to apply it to Arduino.
⇥ 4. How do I calibrate my Arduino digital thermometer?
Compare with a known accurate thermometer, and in your Arduino code, add or subtract the value of the offset to make the measurements accurate.
⇥ 5. Why is my LCD display blank?
Verify power connections. Set the contrast potentiometer. Check pin connections. Make sure to perform correct LCD initialisation in the Arduino code.
⇥ 6. Can we convert this thermometer to wireless?
Yes! Add an ESP8266 or ESP32 module to enable WiFi-based temperature monitoring, which also gives you the ability to access it remotely from anywhere and log the data to the cloud as well.
⇥ 7. What power source does this project require?
A 9V or 12V DC power adapter through the power jack on the Arduino, or a 5V USB power source, will power the entire system sufficiently.
⇥ 8. How often should I refresh the temperature reading?
If you are doing a real-time application, every 1-2 seconds is fine. If you a doing a logged data application, it's a good idea to use a longer time scale. This will help save battery and give better stability.
Practical Projects Using LM35 Sensor
Discover how the LM35 Sensor was applied in various practical projects by checking the links provided below.

How Does a LM35 Temperature Sensor Work and how to Interface it with Arduino?
So, in this Arduino tutorial, we will learn how to wire up a LM35 Temperature Sensor with Arduino and also we will output the temperature data in the serial monitor window.

LM35 Temperature Sensor Not Working? - Here is what you should do
So today we are writing this article describing our failed attempts and observations in hopes of finding a solution to this problem once in for all.

Digital Thermometer using LM35 and 8051 Microcontroller
We have also used LM35 to build a digital thermometer using Arduino, NodeMCU, PIC, Raspberry Pi and other microcontrollers. This project will also serve as a proper interfacing of ADC0804 with 8051 and 16*2 LCD with 8051 microcontroller.
Complete Project Code
/*-----------Arduino LM35 Code-------------*/
/*-----------Digital Thermometer Using Arduino-------------*/
#include<LiquidCrystal.h>
LiquidCrystal lcd(7,6,5,4,3,2);
#define sensor A0
byte degree[8] =
              {
                0b00011,
                0b00011,
                0b00000,
                0b00000,
                0b00000,
                0b00000,
                0b00000,
                0b00000
              };
void setup()
{
  lcd.begin(16,2);
  lcd.createChar(1, degree);
  lcd.setCursor(0,0);
  lcd.print("    Digital    ");
  lcd.setCursor(0,1);
  lcd.print("  Thermometer   ");
  delay(4000);
  lcd.clear();
  lcd.print(" Circuit Digest  ");
  delay(4000);
  lcd.clear();
}
void loop()
{
  /*---------Temperature-------*/
     float reading=analogRead(sensor);
     float temperature=reading*(5.0/1023.0)*100;
     delay(10);

  /*------Display Result------*/
    lcd.clear();
    lcd.setCursor(2,0);
    lcd.print("Temperature");
    lcd.setCursor(4,1);
    lcd.print(temperature);
    lcd.write(1);
    lcd.print("C");
    delay(1000);
}
Comments
how to create your own programme code sir
i want to make new project
and how to understand that code line
pls tell that
it is a correct temperature or not
Go through our initial Arduino projects to learn coding and Arduino like :LED Blinking with Arduino Uno. And yes Temperature is correct.
It is very good and must project.Thank you sir.
Hello there ,
I am using an lm35 dz and arduino r3. My readings are varied from 0 to 500 degree celcius. What should i do for this.
Have you followed the code properly? Apply the given formula to convert the Analog temp reading into Degree C.
i have same problem with it
Dear sir,
please tell me the soluion if you get a correct ans.
my problem is that if i not connect the sensor to the arduno uno however arduno generat temoreture in -18 to 500 c range.
warm regard
thummar bhadresh
(=918758236036)
Hi,
You are not supposed to read anything from a pin if it is not connected to anything. If the pin is left free, it is said to be in floating condition and the value read from it can be anything from 0 toso yes there is no suprise that you are getting random calues as output.
If you want to read zero, use a pull down resistor. That is connect a 10 resistor from the analog pin to the ground pin and you will be able to read zero
good project
Sir here is a code for Arduino based digital thermometer how can i add buzzer to alert if temperature increase
(if temperature >50) then buzzer beeps
#include<LiquidCrystal.h>
LiquidCrystal lcd(2,4,7,8,9,10);
const int Sensor = A0;
byte degree_symbol[8] =
{
0b00111,
0b00101,
0b00111,
0b00000,
0b00000,
0b00000,
0b00000,
0b00000
};
void setup()
{
pinMode(Sensor, INPUT);
lcd.begin(16,2);
lcd.createChar(1, degree_symbol);
lcd.setCursor(0,0);
lcd.print(" Digital ");
lcd.setCursor(0,1);
lcd.print(" Thermometer ");
delay(4000);
lcd.clear();
}
void loop()
{
float temp_reading=analogRead(Sensor);
float temperature=temp_reading*(5.0/1023.0)*100;
delay(10);
lcd.clear();
lcd.setCursor(0,0);
lcd.print("Temperature in C");
lcd.setCursor(4,1);
lcd.print(temperature);
lcd.write(1);
lcd.print("C");
delay(1000);
}
gd eve sir ! I am beginner in using arduino.Could I ask what codes i should add if I put a beep sound /alarm buzzer to alert if temperature increase.. thank you so much sir.
I tried this project n got output ...plz ping code for buzzer also
I am not getting the output on lcd
I want to make one thermometer like that but some different things, like using an arduino mini, extend the range and seal the temp sensor (to put it on boiling water) and add a computer speaker to know when you reach a determinate temp. do you think that can be possible?
if the code is incorrect ,errors been detected what should l do
What is A E S shown below the LCD
It is a potentiometer, it can be used to adjust the contract of the LCD. The pins AES are the three pins on a potentiometer respectively
How to get view with just one digit after,
someone got the buzzer code?
how can i add a voice to this thermometer where it will be giving me a reading on the lcd and also a sound output of that same reading

TRIED WORKING VERY GOOD