
Today we are going to build an Arduino wight machine, by interfacing Load Cell and HX711 Weight Sensor with Arduino. We have seen weight machines at many shops, where the machine displays the weight just by placing an item on the weighing platform. So here we are building the same Weighing machine by using Arduino and Load cells, having a capacity of measuring up to 40kg. This limit can be further increased by using the Load cell of higher capacity.
The main component required to build this Arduino weighing scale is a sensor that can convert weight into an equivalent electrical signal. This sensor is called as the load cell, so in this project, we will using this load cell as our Arduino weight sensor. We have also used the same load cell in few other projects as, like the Portable Arduino Retail Weighing Machine, Raspberry pi Weighing scale, etc, you can also check them out if interested.
Required Components to build an Arduino Weight Scale:
- Arduino Uno
- Load cell (40kg)
- HX711 Load cell Amplifier Module
- 16x2 LCD
- Connecting wires
- USB cable
- Breadboard
- Nut bolts, Frame, and base
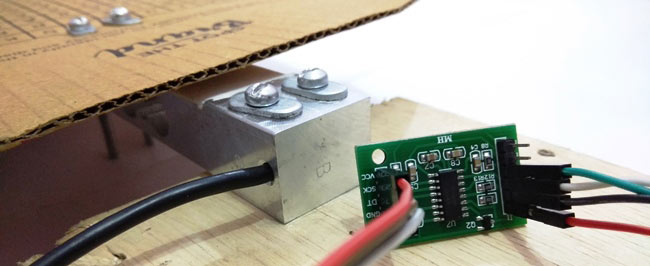
Load Cell and HX711 Weight Sensor Module:
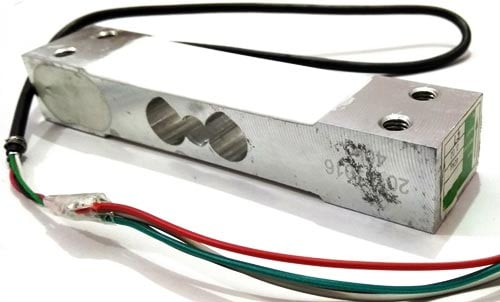
The load cell is a transducer that transforms force or pressure into electrical output. The magnitude of this electrical output is directly proportional to the force being applied. Load cells have a strain gauge, which deforms when pressure is applied to it. And then strain gauge generates an electrical signal on deformation as its effective resistance changes on deformation. A load cell usually consists of four strain gauges in a Wheatstone bridge configuration. Load cell comes in various ranges like 5kg, 10kg, 100kg and more, here we have used Load cell, which can weigh up to 40kg.
Now the electrical signals generated by the Load cell are in few millivolts, so they need to be further amplified by some amplifier and hence HX711 Weighing Sensor comes into the picture. HX711 Weighing Sensor Module has HX711 chip, which is a 24 high precision A/D converter (Analog to digital converter). HX711 has two analog input channels and we can get gain up to128 by programming these channels. So HX711 module amplifies the low electric output of Load cells and then this amplified & digitally converted signal is fed into the Arduino to derive the weight.
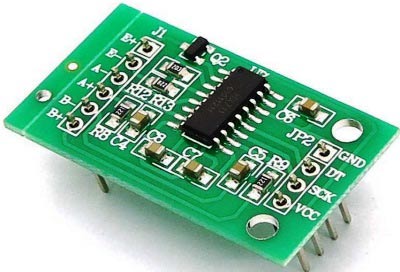
The load cell is connected with the HX711 Load cell Amplifier using four wires. These four wires are Red, Black, White, and Green/Blue. There may be a slight variation in the colors of wires from module to module. Below the connection details and diagram:
- RED Wire is connected to E+
- BLACK Wire is connected to E-
- WHITE Wire is connected to A-
- GREEN Wire is connected to A+
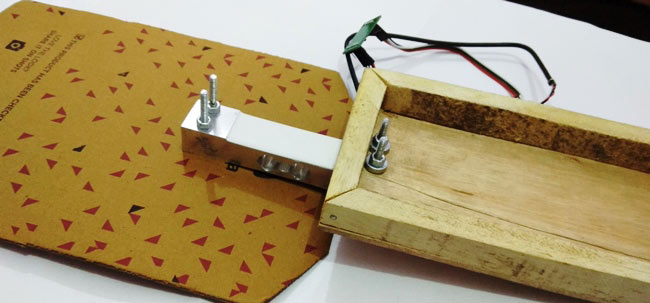
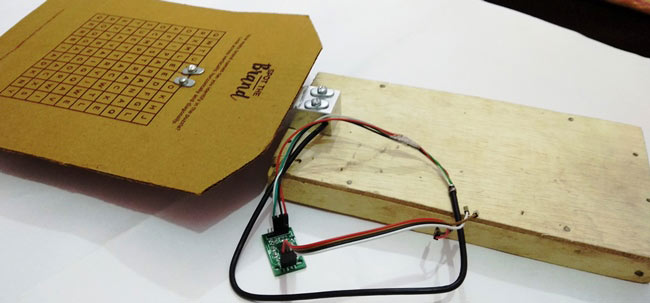
Fixing Load Cell with Platform and Base:
This step is optional and you can directly put the weights on the Load cell without a Platform and can simply clamp it without fixing it with any base, but it’s better to attach a platform for putting the large things on it and fix it on a Base so that it standstill. So here we need to make a frame or platform for putting the things for weight measurement. A base is also required to fix the load cell over it by using nuts and bolts. Here we have used hard cardboard for the frame for placing things over it and a wooden board as a Base. Now do the connections as shown in the circuit diagram and you are ready to go.
Circuit Explanation:
Connections for this project are easy and the schematic is given below. 16x2 LCD pins RS, EN, d4, d5, d6, and d7 are connected with pin numbers 8, 9, 10, 11, 12, and 13 of Arduino respectively. HX711 Module’s DT and SCK pins are directly connected with Arduino's pins A0 and A1. Load cell connections with the HX711 module are already explained earlier and also shown in the below circuit diagram.

Working Explanation:
The working principle of this Arduino Weight Measurement project is easy. Before going into details, first, we have to calibrate this system for measuring the correct weight. When the user will power it up the system will automatically start calibrating. And if the user wants to calibrate it manually then press the push button. We have created a function void calibrate() for calibration purposes, check the code below.
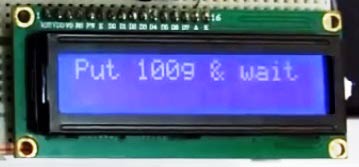
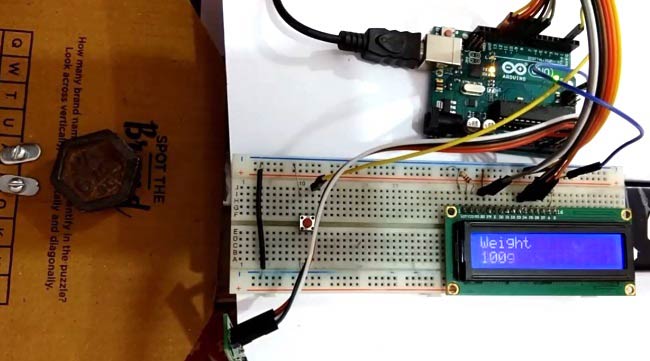
For calibration, wait for LCD indication for putting 100 gram over the load cell as shown in the below picture. When LCD will show “put 100g” then put the 100g weight over the load cell and wait. After some seconds the calibration process will be finished. After calibration user may put any weight (max 40kg) over the load cell and can get the value over LCD in grams.
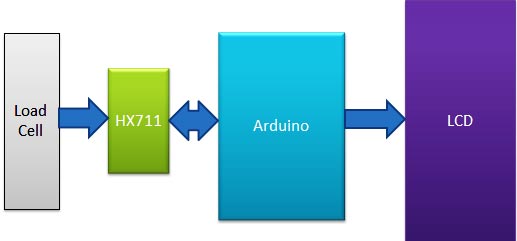
In this project, we have used Arduino to control whole the process. Load cell senses the weight and supplies an electrical analog voltage to HX711 Load Amplifier Module. HX711 is a 24bit ADC, which amplifies and digitally converts the Load cell output. Then this amplified value is fed to the Arduino. Now Arduino calculates the output of HX711 and converts that into the weight values in grams and shows it on LCD. A push-button is used for calibrating the system. We have written an Arduino program for the whole process, check the Code and demo Video at the end of this tutorial.
Arduino Weighing Scale Code:
The programming part of this project is a little complex for beginners. In this project, we did not use any library for interfacing the HX711 load sensor with Arduino. We have just followed the datasheet of HX711 and application notes. Although there are some libraries present for this purpose, where you only need to include that library and you can get the weight using one line of code.
First of all, we have included a header file for LCD and defined the pins for the same. And for push-button also. Then declared some variables for calculation purpose.
#include <LiquidCrystal.h>
LiquidCrystal lcd(8, 9, 10, 11, 12, 13);

#define DT A0
#define SCK A1
#define sw 2

long sample=0;
float val=0;
long count=0;
After it, we have created the below function for reading data from the HX711 module and return its output.
unsigned long readCount(void)
{
  unsigned long Count;
  unsigned char i;
  pinMode(DT, OUTPUT);
  digitalWrite(DT,HIGH);
  digitalWrite(SCK,LOW);
  Count=0;
  pinMode(DT, INPUT);
  while(digitalRead(DT));
  for (i=0;i<24;i++)
  {
    digitalWrite(SCK,HIGH);
    Count=Count<<1;
    digitalWrite(SCK,LOW);
    if(digitalRead(DT))
    Count++;
  }
  digitalWrite(SCK,HIGH);
  Count=Count^0x800000;
  digitalWrite(SCK,LOW);
  return(Count);
}
After it, we have initialized LCD and give directions to input and output pins in void setup().
void setup()
{
  Serial.begin(9600);
  pinMode(SCK, OUTPUT);
  pinMode(sw, INPUT_PULLUP);
  lcd.begin(16, 2);
  lcd.print("    Weight ");
  lcd.setCursor(0,1);
  lcd.print(" Measurement ");
  delay(1000);
  lcd.clear();
  calibrate();
}
Next in void loop() function, we have read data from HX711 module and converted this data into weight (grams) and sent it to the LCD.
void loop()
{
  count= readCount();
  int w=(((count-sample)/val)-2*((count-sample)/val));
  Serial.print("weight:");
  Serial.print((int)w);
  Serial.println("g");
  lcd.setCursor(0,0);
  lcd.print("Weight            ");
  lcd.setCursor(0,1);
  lcd.print(w);
  lcd.print("g             ");

  if(digitalRead(sw)==0)
  {
    val=0;
    sample=0;
    w=0;
    count=0;
    calibrate();
  }
}
Before this, we have created a calibration function in which we have calibrated the system by placing the 100gm weight over the Load cell.
void calibrate()
{
    lcd.clear();
  lcd.print("Calibrating...");
  lcd.setCursor(0,1);
  lcd.print("Please Wait...");
  for(int i=0;i<100;i++)
  {
    count=readCount();
    sample+=count;
    Serial.println(count);
  }
  ..... ....
  ..... .....
So here we have learned the basic Interfacing of Load cell and HX11 Weight Sensor with Arduino to measure the weights. In our text tutorials, we will create some applications based on weight measurement like Smart container, Automatic gate etc.
Complete Project Code
#include <LiquidCrystal.h>

LiquidCrystal lcd(8, 9, 10, 11, 12, 13);
#define DT A0

#define SCK A1

#define sw 2
long sample=0;

float val=0;

long count=0;
unsigned long readCount(void)

{

  unsigned long Count;

  unsigned char i;

  pinMode(DT, OUTPUT);

  digitalWrite(DT,HIGH);

  digitalWrite(SCK,LOW);

  Count=0;

  pinMode(DT, INPUT);

  while(digitalRead(DT));

  for (i=0;i<24;i++)

  {

    digitalWrite(SCK,HIGH);

    Count=Count<<1;

    digitalWrite(SCK,LOW);

    if(digitalRead(DT))

    Count++;

  }

  digitalWrite(SCK,HIGH);

  Count=Count^0x800000;

  digitalWrite(SCK,LOW);

  return(Count);

}
void setup()

{

  Serial.begin(9600);

  pinMode(SCK, OUTPUT);

  pinMode(sw, INPUT_PULLUP);

  lcd.begin(16, 2);

  lcd.print("    Weight ");

  lcd.setCursor(0,1);

  lcd.print(" Measurement ");

  delay(1000);

  lcd.clear();

  calibrate();

}
void loop()

{

  count= readCount();

  int w=(((count-sample)/val)-2*((count-sample)/val));

  Serial.print("weight:");

  Serial.print((int)w);

  Serial.println("g");

  lcd.setCursor(0,0);

  lcd.print("Weight            ");

  lcd.setCursor(0,1);

  lcd.print(w);

  lcd.print("g             ");
  if(digitalRead(sw)==0)

  {

    val=0;

    sample=0;

    w=0;

    count=0;

    calibrate();

  }

}
void calibrate()

{

    lcd.clear();

  lcd.print("Calibrating...");

  lcd.setCursor(0,1);

  lcd.print("Please Wait...");

  for(int i=0;i<100;i++)

  {

    count=readCount();

    sample+=count;

    Serial.println(count);

  }

  sample/=100;

  Serial.print("Avg:");

  Serial.println(sample);

  lcd.clear();

  lcd.print("Put 100g & wait");

  count=0;

  while(count<1000)

  {

    count=readCount();

    count=sample-count;

    Serial.println(count);

  }

  lcd.clear();

  lcd.print("Please Wait....");

  delay(2000);

  for(int i=0;i<100;i++)

  {

    count=readCount();

    val+=sample-count;

    Serial.println(sample-count);

  }

  val=val/100.0;

  val=val/100.0;        // put here your calibrating weight

  lcd.clear();

}
Comments
Where to buy just like this?
Where to buy just like this? Especially the load cell (40Kg).
You can buy Load cell and
You can buy Load cell and HX711 online from ebay/amazon or get it from local electronics shop.
Good Day Sir, how to make the
Good Day Sir, how to make the weight stable in the LCD display? and also is it possible to determine the weight of an LPG tank using these materials? THANK YOU.
You can tweak in the code to
You can tweak in the code to make the reading stable and it can measure anything below 40kg.
Arduino Weight Measurement using Load Cell and HX711 Module
Dear Sir,
If i would like to measure 200 kg. Can i use back the code and just change the load cell to 200 kg?
Thanks
Sebastian Lim
I have problem with XH711
I have problem with XH711 reading the load cell?
Pls help
program stuck in infinite loop
sir when i run this program it gets stuck her
while(count<1000)
{
count=readCount();
count=sample-count;
Serial.println(count);
}
the value of count is never above 1000 and sometimes it is negative also. what should i do. please reply fast. it is very urgent.
Please send me proteus hx711
Please send me proteus hx711 and load cell library
Proteus library
I Hassan, did you get the proteus library?
I try to find, but nothing.
Thanx, if you found this library, to send me a copy.
Didier
Arduino Weight Measurement using Load Cell and HX711 Module
Anyone use this circuit and found it work?
thank
Frequency
Circuit and code is perfectly
Circuit and code is perfectly tested.
how can i adjust the codes for my 200kg load scale?
Hi, can you please give me a sample code for 200kg load cell?
Unstable reading
I have done the project according to this page, but I have found two problems, the reading is very unstable with a 20kg cell, every time you power on the calibration should be done, it would be nice if the calibration value will save it.
Try with another load cell of 40kg and the reading is unstable, the author fails to explain this project better.
Thank you
How to change the code to make it works for 2 load cells
Hello. Is there any way to change the code to make two load cells in series, and just show the sum of two load cells' readings?
Yes it is possible and you
Yes it is possible and you can connect multiple Load cells with Arduino.
sir your code is not working
sir your code is not working perfectly
i dont want to calibrate each time i on the arduino
i dont want to calibrate each time i on the arduino. Calibration should occur only wen the switch is pressed. what should i do?
Is it weight or mass u are
Is it weight or mass u are measuring because weight is measured in Newton while mass is grams
Unstable reading on the LCD.
Unstable reading on the LCD. Way out pls?
Im using 5kg load cell. Do i
Im using 5kg load cell. Do i need to change the code? One more thing. How can I add buzzer?
For reset button
Hello bro project is good but I want to add reset button in this because when I want to measure weight then I need to place sometime like dish or anything so it's give me output value include with that dish so I want to add reset button because when j place dish on that then after reset the value then it's show the exact value so please help me hot to add reset value ?????
Need a Help
Dear sir, I had an assignment about Arduino project. In my assignment, me not using load cell instead of body weight (180 kg). Wht I m asking for is could u tell me how to makebthe program inout for kilograms since yours was in gram and I m planning on not using calibrate button. Thank You for all your kindness
Im using load cell 5kg. I
Im using load cell 5kg. I used the code but i just show (put 100g & wait) on lcd display. Can u pls help me with this sir
Hi, i have a question, if the
Hi, i have a question, if the modulo convert analog to digital signal, why do you connect and use analog pins in arduino? I have reading other tutorials and they use a digital pins for this module, what is the correct conection?
Thanks.
hi, can i get the library of
hi, can i get the library of loadcell for proteus?
alarm system
Hi, Can i get the detailed explanation of how the alarm goes off due to excess weight on the load cell.
How to make the reading faster?
I lift pin 15 to make the rate to 80SPS, but how to modify the code to make the data rate is 80 hz? Thank yo u so much! BYW, how to make the reading smoother?
hello my project is not
hello my project is not working please help me out in display nothing is showing except lighting
no output
Hi,programming is compiling, circuit connection is fine and all the arrangements are done, but not getting the output on LCD screen and on serial monitor some random numbers (80563 or something), so what would be the problem and how to resolve it. Please someone help me, thanks in advance.
all the wiring is done,
all the wiring is done, getting a notification on the screen (put 100 g an weight), if we apply the standard weight, no further notifications are available. Please help me
Hi, is there any way to have
Hi, is there any way to have the Hx711 library that you used on proteus ? I actually really need it ! Thanks a lot. (If not, can someone explain me the way to simulate it ?)
Where can I download?
Can I have the download link of your schematic capture? I need the load cell library for my thesis. Thank you!
electrical components
Hello! My question is what is the value of resistor you used. Is it a 10k resistor?
Is it necessary to put 100g
Is it necessary to put 100g other than any value for calibration..?? Code gets restarts at calibrating point.
Sir how to conver load cell
Sir how to conver load cell weight convert into percentage form. Help me for programing design
Sir can a 10 kg module
Sir can a 10 kg module differentiate between weight of 100gm and 150gm?
Hello sir ,
Hello sir ,
How could I upload a program to arduino , where making a buzzer and lifting a glass door near a cook gas to protect a child , that we want to make an alarm under 20 kg/, for example and makes a barrier between the child and the cook gas
thank you very much
Franko., follow the circuit
Franko., follow the circuit diagram, the 10K resistor in the diagram and the video is optional it just controls the contrast of the LCD display
small doubt
can u tell me what did you connect for pin 2 arduino??
how can i resolved this error??
Global variables use 364 bytes (17%) of dynamic memory, leaving 1684 bytes for local variables. Maximum is 2048 bytes.
avrdude: ser_open(): can't set com-state for "\\.\COM4"
can i change load bar 40 kg
can i change load bar 40 kg with load sensor cell 50kg?? and it is necessary to put the calibration code or can if we not put calibration in coding it still working or not?
Where can I get the app
Where can I get the app (Circuit Digest) ?
App? Which app are you
App? Which app are you talking about? If you are asking for the code it is given in this same page
loadcell arduino programing for 1ton = 1000kg
thank u for the above arduino code using hx711..
.its perfectly working for me in grams for cantilever loadcell of capacity 2kg..
but i want the above code weigh upto 2000kg and also the calibration code for 2000kg since my loadcell capacity is 2Ton=2000kg .... can u please help me with it
it is possible to measure
it is possible to measure weight above 350kgs
Weight measurement
Can I use load cell in highways to measure gross weight of trucks in dynamic weight . Will it be affected by high speed . Is the code same .
I dont think it is
I dont think it is practically possible to measure the dynamic weight of a moving vehicle. However I am not sure through..
If it is possible then yes a load cell can be used since this is the most common and feasible method for your project idea
Loadcell with Hx711
Hi..
I just need to know ...can we connect the trigger in above scenario...mean when trigger in "ON"...the weight will be store and, when trigger off it will show count of weighs....
Help to resolve my query
Thanks
Prashant
change circuit and code
You cannot use the same code and circuit
I want one clarification. In
I want one clarification. In doing automatic bmi calculator project it's limitation of weight should be only 350kgs why it so? You are saying that u used 500 load cell but it's limit is only 350kg why it so
I need the proteus library of the hx711 and load cell
can you pls give me the library for the load cell and hx711 i need it for my thesis
library for the load cell and
library for the load cell and hx711??
There is no library for load
There is no library for load cell and hx711. The code is given above
Module Load Cell and HX711
Hello! You has module load cell and HX711 for Proteus? Has possibility you send for me?
It is just a illustration you
It is just a illustration you cant simulate it
Calibration
Hi!
Can you please explain this formula used in getting the actual weight?
w=(((count-sample)/val)-2*((count-sample)/val));
celda de cargar
Buenas, si quiero configurar para una celda de carga de 3 kg, deberia modificar algo, por que solo me aparece el mensaje de please wait, y de calibration, deberia de modificar algo ??
Hi friends, Im Rajasekar from
Hi friends, Im Rajasekar from India, I have one clarification, Is it possible to convert the kilograms into newtons in the LCD display by adding the conversion factor in arduino codes.
Hi friends, Im Rajasekar from
Hi friends, Im Rajasekar from India, I have one clarification, Is it possible to convert kilograms into newtons in the output LCD display by adding the conversion factor in the arduino codes. If possible somebody please help with the codes. please add the codes in the comments. Thanks in advance.
Hi, where did you get the
Hi, where did you get the HX711 and load cell library for Proteus? Could you provide me the link to download it?
Hi can I ask where should I
Hi can I ask where should I connect the 10k resistor?
thanks for this article, can
thanks for this article, can I get a contact to discuss my project? I would like to ask how to go about outputing weight over wifi or bluetooth instead of lcd screen. I would also be connecting several load cells to aruduino.. maybe 100 or above.. what is the best way to go about it
In the case of limitations in
In the case of limitations in automatic bmi calculator why it's load cell range is up-to 350 kg? Plz answer me
I am working to understand…
I am working to understand how to program load cells. I want to make a very simple program that does not use a library and measures ounces. Your page is the first one that I have found that gives me part of what I am looking for. It is for my model railroad. I will not be able to calibrate every time I start it up. I am trying to figure out how to piece this together and I work better when I have others to bounce ideas off of. I am also looking for the smallest load cell for this project.
I made a circuit in which if…
I made a circuit in which if I put weight more than I want then buzzer beeps. I want programming code for this particular circuit to work. This circuit also has lcd display. I think the circuit may have some wrong connections, please correct them if any. .png)

will it measure the weight below 10g????