
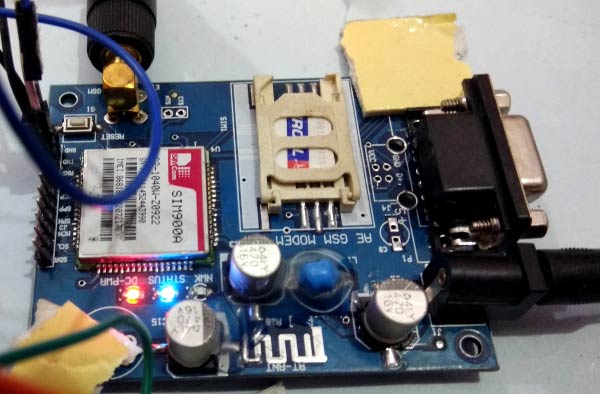
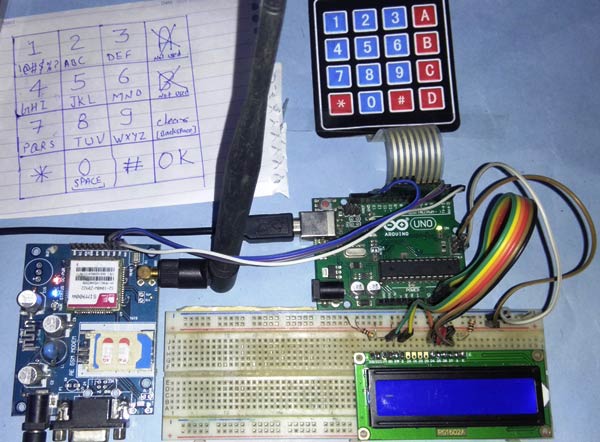
Today we are here with an interesting project in which we will Send Data to the SparkFun server using Arduino and GPRS. This is an IoT based project in which we will use GPRS, present on the GSM Module SIM900A board, to send some data to the web service on the internet.
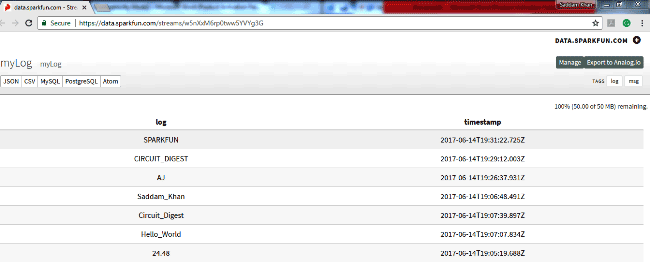
In this project, we will simply enter some text using 4x4 Alphanumeric keypad and send it to SparkFun website using Arduino and GPRS, from where you can see that data from anywhere in the word through internet. Here we have also attached a 16x2 LCD to see the data locally. This data sending technique is very useful in IoT projects where you want to monitor things from anywhere in the world like Monitoring Temperature & Humidity, Monitor Vehicle Location, Monitor Heart Beat, Monitor Air pollution level etc.
Components Required:
- Arduino
- GSM Module SIM900A
- 16x2 LCD
- 4x4 Matrix Keypad
- Breadboard or PCB
- Connecting jumper wire
- Power supply 12v
- SIM Card
Using GPRS in GSM Module:
Here we have used a normal GSM Module with a SIM card for GPRS connection. In this project, GPRS is responsible for sending data to the Sparkfun server. Previously we have done many projects where we have used Wi-Fi module ESP8266 to send data to different servers over internet. But this time we have used GPRS. Check the detailed Video at the end of this tutorial.
GPRS stands for General Packet Radio Services which is a packet based wireless communication service that works with data rate of 56-114kbps and provides a connection to the internet.
For GPRS, we do not need to buy any special module or hardware because GSM already has GPRS facilities inbuilt. We only need to access it by using the same method or AT commands that we used for GSM interfacing in our previous projects. There are many AT commands already mentioned in the datasheet of SIMCOM SIM900A GSM module.
Now for sending data to server by using GPRS, first we need to initialize GSM module.
Commands for initializing GSM:
AT :- this command is used to check whether GSM module is responding or not.

AT+CPIN? :- this command is used to check whether SIM card is inserted in GSM Module or not.
ATE0 :- is used for disabling echo

ATE1 :- is used for enabling echo
Commands for initializing GPRS internet connection:
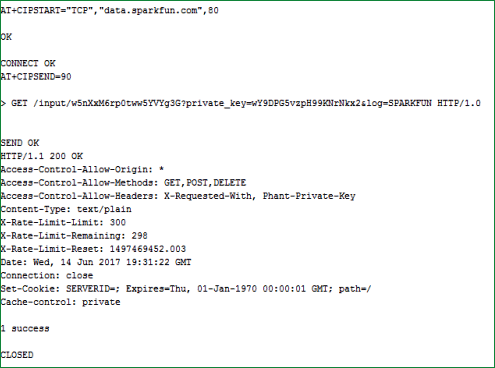
AT+CIPSHUT :- to close TCP Port Explicitly means disconnect connection if any

AT+CGATT? :- Checking SIM card has internet connection or not

AT+CSTT = "APN","userName","Pass" :- connect to internet

(ex; AT+CSTT="airtelgprs.com","","")

AT+CIICR :- bring up with the wireless network. Checking SIM card has data pack or balance

AT+CIFSR :- get IP (sometimes without this command GSM do not work so use this command)

AT+CIPSTART = ”TCP”,”SERVER IP”,”PORT” :- is used for creating TCP connection with the server that we provide in place of SERVER IP

AT+CIPSEND :- this command is used for sending data to the server. After input, this command server asks for data.
After inputting the data we send 26 to the server. If everything will be fine then data will be posted successfully to the server and SparkFun server responds with a pass or fail string.
Working Explanation:
Process of Sending Data from GPRS of GSM Module is easy. Here in this project, we are sending some string or words to the server by typing using keypad. Same string or word will appear over the LCD, then press D/OK to send the input string to the server. Here we have created an Alphanumeric Keypad for inputting the characters or numeric values to Arduino or LCD. C/clear is programmed for backspace.
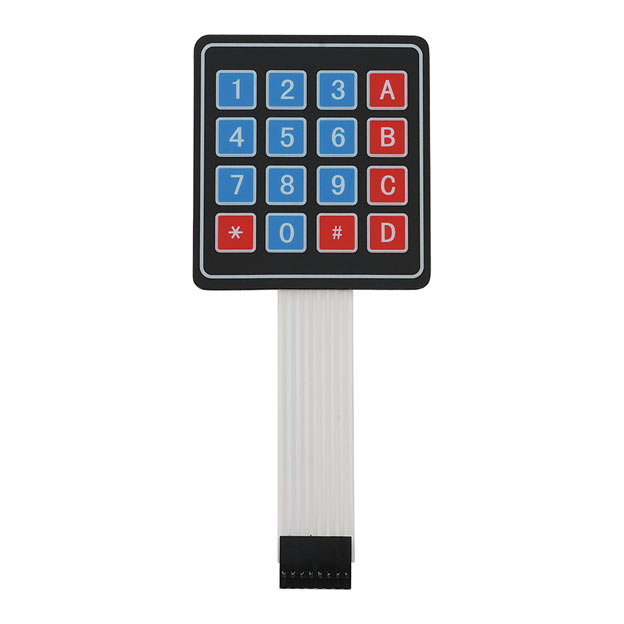
Alphanumeric is a method to enter numbers and alphabets both by using the same 4x4 matrix Kepad keypad. Here we have coded the same 4x4 keypad for Arduino to accept alphabets also. Check the full code at the end of the article.

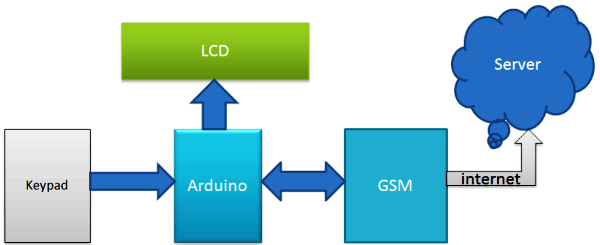
Circuit Explanation:
For Sending Data to SparkFun Server, we need to interface Keypad and GSM module to Arduino. In this project we have used Arduino to taking input string from the keypad and sending commands to GSM/GPRS module. GSM/GPRS is used to communicate with the Internet for sending data to the Sparkfun server. GSM Module’s Rx and Tx pin is directly connected with Arduino's pin D3 and D2 respectively (Ground of Arduino and GSM must be connected with each other). A 16x2 LCD is used for displaying input strings and showing welcome message and data sending status as well. Pins of this 16x2 LCD namely Rs, en, d4, d5, d6, and d7 are connected with pin number 14, 15, 16, 17, 18 and 19 of Arduino respectively. A 4x4 keypad is used for input string to Arduino and its Row pins R1, R2, R3, R4 are directly linked to pin number 11,10, 9, 8 of Arduino and Colum pin of keypad C1, C2, C3 are linked with pin number 7, 6, 5,4 of Arduino.
Here we have also connected GSM Tx pin to Tx of Arduino to get response data over the serial monitor.

Programming Explanation:
Programming part of this project is a little complex for beginners but by doing a little bit practice and paying attention you can understand it. In this code, we have used keypad library for interfacing simple keypad for entering numbers. And for entering alphabets we have used the same library and keypad but used one more function to make it alphanumeric keypad. Means we have made every key multi-functioning and can enter all the characters and integers by using only 10 keys.
If we press key 2 (ABC2), it will show ‘A’ and if we press it again then it will replace ‘A’ with ‘B’ and if again we press it then it will show ‘C’ at the same place in LCD. If we wait for some time after pressing a key, the cursor will automatically move to next position in LCD. Now we can enter next char or number. And same procedure is applied to other keys. It works same as keypad in old mobile phones.
Below we have included Keypad.h library and define array matrix for the keys:
#include <Keypad.h>               // keypad library for interfacing keypad
const byte ROWS = 4; //four rows
const byte COLS = 4; //four columns
int x=0;
int y=0;
int n=0;
int minValue=0;
int maxValue=0;
char keyPress=0;
int keyPressTime=100;
String msg="";

char hexaKeys[ROWS][COLS] =
{
  {'1','2','3','A'},
  {'4','5','6','B'},
  {'7','8','9','C'},
  {'*','0','#','D'}
};

byte rowPins[ROWS] = {11, 10, 9, 8}; //connect to the row pinouts of the keypad
byte colPins[COLS] = {7, 6, 5, 4}; //connect to the column pinouts of the keypad
And given void getkey function is used for input alphabets
void getkey(int minValue, int maxValue, char keyPress)
{
   int ch=minValue;
   int pressed=1;
   char key=keyPress;
   lcd.noBlink();
   for(int i=0;i<keyPressTime;i++)
   {
      if(key==keyPress)
      {
         lcd.setCursor(x,y);
         lcd.print(alpha[ch]);
         ch++;
         if(ch>maxValue)
         ch=minValue;
         i=0;
      }
      ....
      .....
Below void initGSM() and void initGPRS() functions are used for initializing GSM module and GPRS
void initGSM()
{
  connectGSM("AT","OK");
  connectGSM("ATE1","OK");
  connectGSM("AT+CPIN?","READY");
}
void initGPRS()
{
  connectGSM("AT+CIPSHUT","OK");
  connectGSM("AT+CGATT=1","OK");
  connectGSM("AT+CSTT=\"airtelgprs.com\",\"\",\"\"","OK");
  connectGSM("AT+CIICR","OK");
  delay(1000);
  Serial1.println("AT+CIFSR");
  delay(1000);
}
Below part of the code is used to create URL and send the data to server via URL.
else if(key == 'D')
    {
      lcd.clear();
      lcd.noBlink();
      lcd.print("Sending Data");
      lcd.setCursor(0,1);
      lcd.print("To Server");
      url="GET /input/";
      url+=publicKey;
      url+="?private_key=";
      url+=pvtKey;
      url+="&log=";
      url+=msg;
      url+=" HTTP/1.0\r\n\r\n";
      String svr=Start+","+ip+","+port;
      delay(1000);
      connectGSM(svr,"CONNECT");
      delay(1000);
      int len = url.length();
      String str="";
      str=SendCmd+len;
      sendToServer(str);
So this is how we can send any data, on the SparkFun server through GPRS, to be monitored from anywhere in the world. For creating SparkFun page where we can view the sent data over the internet; watch the below video.
Complete Project Code
#include <SoftwareSerial.h>  // serial software library for interfacing gsm module

SoftwareSerial Serial1(2, 3); // RX, TX  // connect gsm Tx at D2 and Rx at D3
#include<LiquidCrystal.h>     // LCD library for interfacing LCD

LiquidCrystal lcd(14,15,16,17,18,19);   // connect rs,en,d4,d5,d6,d7 respectevely
String pvtKey="wY9DPG5vzpH99KNrNkx2";     // private key for posting data to sparkfun

String publicKey="w5nXxM6rp0tww5YVYg3G";  // public key for open page of sparkfun

String url="";

String ip="\"data.sparkfun.com\"";        // sparkfun server ip or url

int port=80;                              // sparkfun server port
String SendCmd="AT+CIPSEND=";           // sending number of byte command

String Start="AT+CIPSTART=\"TCP\"";     // TCPIP start command
// strings and variables

//String msg="";

String instr="";

String str_sms="";

String str1="";

int i=0,temp=0;
#include <Keypad.h>               // keypad library for interfacing keypad

const byte ROWS = 4; //four rows

const byte COLS = 4; //four columns

int x=0;

int y=0;

int n=0;

int minValue=0;

int maxValue=0;

char keyPress=0;

int keyPressTime=100;

String msg="";
char hexaKeys[ROWS][COLS] =

{

  {'1','2','3','A'},

  {'4','5','6','B'},

  {'7','8','9','C'},

  {'*','0','#','D'}

};
byte rowPins[ROWS] = {11, 10, 9, 8}; //connect to the row pinouts of the keypad

byte colPins[COLS] = {7, 6, 5, 4}; //connect to the column pinouts of the keypad
Keypad customKeypad = Keypad( makeKeymap(hexaKeys), rowPins, colPins, ROWS, COLS);
String alpha="1!@_$%?ABC2DEF3GHI4JKL5MNO6PQRS7TUV8WXYZ9* 0#";
void setup()

{

  Serial1.begin(9600);    // init serial1 for GSM

  lcd.begin(16,2);        // init LCD

  lcd.print("Sending Data  ");

  lcd.setCursor(0,1);

  lcd.print("to Server");

  delay(2000);

  lcd.clear();

  lcd.print("Circuit Digest");

  lcd.setCursor(0,1);

  lcd.print("Saddam Khan");

  delay(2000);

  lcd.clear();

  lcd.print("Initializing GSM");

  initGSM();      // init GSM module

  lcd.clear();

  lcd.print("Initializing GPRS");

  initGPRS();     // init GPRS in GSM Module

  lcd.clear();

  lcd.print("System Ready");

  delay(2000);

}
void loop()

{

  int n=0;

  lcd.clear();

  lcd.noCursor();

  while(1)

  {

    lcd.cursor();

    char key = customKeypad.getKey();

    if(key=='1')

      getkey(0, 6, key);
     if(key=='2')

      getkey(7, 10, key);
     else if(key=='3')

      getkey(11, 14, key);
     else if(key=='4')

      getkey(15, 18, key);
    else if(key=='5')

      getkey(19, 22, key);
    else if(key=='6')

      getkey(23, 26, key);
    else if(key=='7')

      getkey(27, 31, key);
    else if(key=='8')

      getkey(32,35, key);
    else if(key=='9')

      getkey(36, 40, key);
    else if(key=='*')

      getkey(41, 41, key);
    else if(key=='0')

      getkey(42, 43, key);
    else if(key=='#')

      getkey(44, 44, key);


    else if(key == 'C')

    {

         x--;

         lcd.setCursor(x,y);

         lcd.print(" ");

         n--;

         msg[n]=' ';

         lcd.setCursor(x,y);

    }
    else if(key == 'D')

    {

      lcd.clear();

      lcd.noBlink();

      lcd.print("Sending Data");

      lcd.setCursor(0,1);

      lcd.print("To Server");

      url="GET /input/";

      url+=publicKey;

      url+="?private_key=";

      url+=pvtKey;

      url+="&log=";

      url+=msg;

      url+=" HTTP/1.0\r\n\r\n";

      String svr=Start+","+ip+","+port;

      delay(1000);

      connectGSM(svr,"CONNECT");

      delay(1000);

      int len = url.length();

      String str="";

      str=SendCmd+len;

      sendToServer(str);

       Serial1.print(url);

      delay(1000);

      Serial1.write(0x1A);

      delay(1000);

      lcd.clear();

      lcd_status();

       //  clearmsg();

       n=0;

       i=0;

       x=0;

       y=0;

       msg="";

    }

  }

}
void getkey(int minValue, int maxValue, char keyPress)

{

   int ch=minValue;

   int pressed=1;

   char key=keyPress;

   lcd.noBlink();

   for(int i=0;i<keyPressTime;i++)

   {

      if(key==keyPress)

      {

         lcd.setCursor(x,y);

         lcd.print(alpha[ch]);

         ch++;

         if(ch>maxValue)

         ch=minValue;

         i=0;

      }

      key=customKeypad.getKey();

      delay(10);

    }
     if(pressed)

     {

        x++;

        msg+=alpha[ch-1];

        n++;

        if(x>15)

        {

          x=0;

          y=1;

        }

     }

    pressed=0;

    lcd.blink();

}
void lcd_status()

{

  lcd.clear();

  lcd.print("Data Sent to");

  lcd.setCursor(0,1);

  lcd.print("Server");

  delay(2000);

  lcd.clear();

}
void sendToServer(String str)

{

  Serial1.println(str);

  delay(1000);

}
void initGSM()

{

  connectGSM("AT","OK");

  connectGSM("ATE1","OK");

  connectGSM("AT+CPIN?","READY");

}

void initGPRS()

{

  connectGSM("AT+CIPSHUT","OK");

  connectGSM("AT+CGATT=1","OK");

  connectGSM("AT+CSTT=\"airtelgprs.com\",\"\",\"\"","OK");

  connectGSM("AT+CIICR","OK");

  delay(1000);

  Serial1.println("AT+CIFSR");

  delay(1000);

}

void connectGSM (String cmd, char *res)

{

  while(1)

  {

    Serial.println(cmd);

    Serial1.println(cmd);

    delay(500);

    while(Serial1.available()>0)

    {

      if(Serial1.find(res))

      {

        delay(1000);

        return;

      }

    }

    delay(1000);

   }

 }

/*

 Public URL

http://data.sparkfun.com/streams/w5nXxM6rp0tww5YVYg3G

Public Key
w5nXxM6rp0tww5YVYg3G

Private Key
wY9DPG5vzpH99KNrNkx2

Keep this key secret, and in a safe place.  You will not be able to retrieve it.
Delete Key
xxxxxxxxxxxxx

This key can only be used once.  Keep this key secret, and in a safe place.  You will not be able to retrieve it.
Logging using query string parameters

Format:

http://data.sparkfun.com/input/[publicKey]?private_key=[privateKey]&log=[value]

Example:

http://data.sparkfun.com/input/w5nXxM6rp0tww5YVYg3G?private_key=wY9DPG5vzpH99KNrNkx2&log=22.21
*/
Comments
Dear sir,
Can I use GSM module SIM900 of another company (other than Simcom).
Hi
Thanks for explanation
I have some question about a project that I want to make it with GPRS/GSM module
I want to control three stepper motor with a Joystick module that there is a distination between stepper and Joystick then I decieded to use GPRS module
Do you think it is possible and I can make it?
Thanks
Good tutorial guys! I would like to ask if it's possible to transfer data/file of let say 10MB with GSM/GPRS without internet.
I am working on a project where internet connection is big problem. Hope I will get some assistances here.
Thanks guys
very nice tutorial..
but i found that https://data.sparkfun.com/ is not operating now ,where i should sent data now. any alternative if known , please tell.
what is the means of code segment
1.url+=" HTTP/1.0\r\n\r\n";
String svr=Start+","+ip+","+port;
2. connectGSM("AT+CSTT=\"airtelgprs.com\",\"\",\"\"","OK");
SIMCOM900 and SIMCOM800 are GSM module that can be used for wireless data transmission to a server. Further this modules can be integrated to a micro-controller by serial interface and establish communication with the modem using "AT commands". Now assume that you have a library named "simcom_900_and_800.h" that has a function named sendCommandToModem(char* cmd, char* response, int max_response_length), that can be used to send command to the GSM module and the response of the module will be stored in the variable "response". For example: char command[10] = "AT"; char response[100]; int maxRespLen = 100; sendCommandToModem(command, response, maxRespLen); After execution of the above four line the response variable contains "AT\nOK". AT command is used to check if modem is working fine or not. Similarly there are other set of commands that can be used to interface the GSM Modem with the controller to send data to a server. (you can go through internet for more details about SIMCOM900/800 and AT commands set ). Now wirte a function named "transmitDataToServer" that will use the above library and "sendCommandToModem" function to interface with the modem and transmit data to the server with IP = "192.168.0.1" with port = "12121". Use proper arguments for the function(at least one argument named "txData" that contains data to be transmitted. [ Hint: there are series of AT commands that can be sent to the modem to initialize, connect to network and connect to a specified server.]
how to send gps data without using keypad?
Hi All,
I am trying to connect my aws server also i am using Neoway_N720 4G module.
Can some one help me on this?
Thanks

prject IOT