
There are many types of Robots, from the simple ones like a Toy car to the advanced ones like industrial Robots. We have already covered many types of Robots using different technologies, have a look at them:
- Arduino Line Follower Robot
- Line Follower Robot using 8051 Microcontroller
- Line Follower Robot using Arduino
- DTMF Controlled Robot using Arduino
- Cell Phone Controlled Robot using 8051 Microcontroller
- Computer Controlled Robot using Arduino
- RF Controlled Robot
- Edge Avoiding Robot Using 8051
- Accelerometer Based Hand Gesture Controlled Robot using Arduino
- Bluetooth Controlled Toy Car using Arduino
And now we are adding one more Robot in our ‘Robotics Projects’ section, this time we are going to make a Wi-Fi controlled Robot using Arduino and Blynk App. This Arduino based Robot can be controlled wirelessly using any Wi-Fi enabled Android smart phone.
For demonstration of Wi-Fi Controlled Robot, we have used an Android Mobile App named “Blynk”. Blynk is a very compatible app with Arduino, to make IoT based project. This App can be downloaded from the Google Play Store, and can be easily configured.
Steps for configuring Blynk App:
1. First download it from Google Play Store and install it in Android mobile phone.
2. After this, it is required to create an account. You may use your current Gmail account.
3. Now select Arduino Board and give a name for your project.
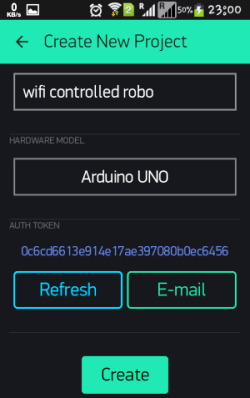
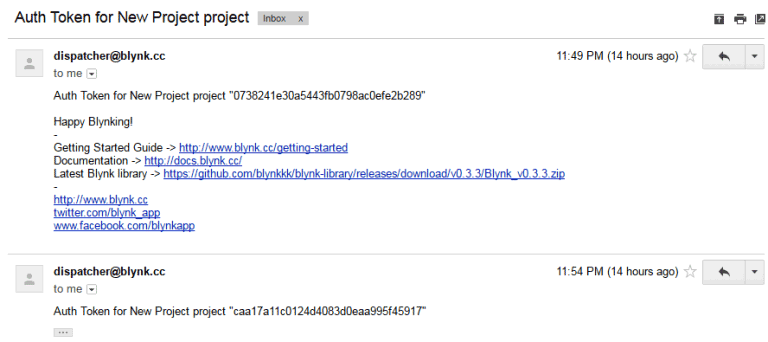
4. Note down the Auth Token Code or simply mail it to your Email Account and then copy and paste in Arduino sketch (Program Code).
5. Enter this Auth Token Code in Arduino sketch.
// You should get Auth Token in the Blynk App.
// Go to the Project Settings (nut icon).
char auth[] = "caa17a11c0124d4083d0eaa995f45917";
6. Then click on create button in Blynk app.
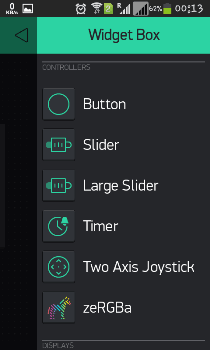
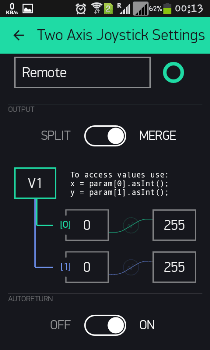
7. Now Select the Joystick Widget, Click on Joystick, Configure the Joystick (see the Video at the end) and hit the back button.
8. After it press Play button at the right top of screen.
All this process, of using the Blynk App, has been clearly explained in Video, given in the end.
Required Components:
- Arduino UNO
- ESP8266 Wi-Fi Module
- USB Cable
- Connecting wires
- L293D
- DC Motors
- Batteries
- 10K POT (optional)
- Robot chassis plus wheel
- Roller caster
- Android Mobile phone
- Blynk App
Circuit Explanation:

Circuit Diagram of Wi-Fi controlled robot is given below. We mainly need a Arduino and ESP8266 Wi-Fi module. ESP8266’s Vcc and GND pins are directly connected to 3.3V and GND of Arduino and CH_PD is also connected with 3.3V. Tx and Rx pins of ESP8266 are directly connected to pin 2 and 3 of Arduino. Software Serial Library is used to allow serial communication on pin 2 and 3 of Arduino. We have already covered the Interfacing of ESP8266 Wi-Fi module to Arduino in detail.
A L293D Motor Driver IC is used for driving DC motors. Input pins of motor driver IC is directly connected to pin 8, 9, 10 and 11 of Arduino. And DC motors are connected at its output pins. Here we have used 9 Volt battery for driving the Circuit and DC motors.
Working Explanation:

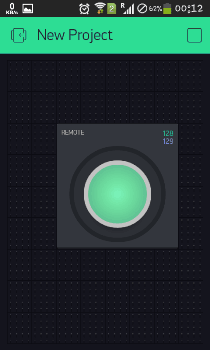
Working of the Wi-Fi controlled Robot is very easy, we just need to Drag or Slide the Joystick in the direction, where we want to move the Robot. Like if we want to move the Robot in Forward direction then we need to Drag the Joystick ‘circle’ in Forward direction. Likewise we can move the Robot in Left, Right and Backward direction by Dragging the joystick in respective direction. Now as soon as we release the Joystick, it will come back to centre and Robot stops.
Blynk App sends values from Two Axis Joystick to Arduino, through Wi-Fi medium. Arduino receive the values, compare them with predefined values and move the Robot accordingly in that direction.
Programming Explanation:
Program is almost readymade available in Arduino IDE. We just need to download Blynk Library for Arduino. And after making some modifications, user can make own Wi-Fi controlled robot.
First we have included all the needed libraries to run this code in Arduino IDE, and then entered Auth Token, from the Blynk app, in the auth string. Here we are connecting Wi-Fi serial pin with Software Serial of Arduino. Selected pin 2 as RX and 3 as TX.
#define BLYNK_PRINT Serial    // Comment this out to disable prints and save space
#include <ESP8266_SoftSer.h>
#include <BlynkSimpleShieldEsp8266_SoftSer.h>

// Set ESP8266 Serial object
#include <SoftwareSerial.h>
SoftwareSerial EspSerial(2, 3); // RX, TX

ESP8266 wifi(EspSerial);

// You should get Auth Token in the Blynk App.
// Go to the Project Settings (nut icon).
char auth[] = "caa17a11c0124d4083d0eaa995f45917";
Then we defined output pins(8,9,10,11) for motors and wrote some direction functions to move the Robot in particular direction: void forward(), void backward(),void right() and void left()
After this, in setup function we initialise all the required devices, like giving direction to motor pins, begin serial communication, providing Wi-Fi username and password.
void setup()
{
  // Set console baud rate
  Serial.begin(9600);
  delay(10);
  // Set ESP8266 baud rate
  // 9600 is recommended for Software Serial
  EspSerial.begin(9600);
  delay(10);

  Blynk.begin(auth, wifi, "username", "password");  // wifi username and password
  pinMode(m11, OUTPUT);
  pinMode(m12, OUTPUT);
  pinMode(m21, OUTPUT);
  pinMode(m22, OUTPUT);
}
Now we have checked some conditions for controlling the robot. Here we have selected virtual pin 1 (V1) for taking input from Blynk App to control the robot. As we have used marge option in app so we will get x and y axis values at same pin.
BLYNK_WRITE(V1)
{
  int x = param[0].asInt();
  int y = param[1].asInt();
  if(y>220)
  forward();
  else if(y<35)
  backward();
  else if(x>220)
  right();
  else if(x<35)
  left();
  else
  Stop();
}
At last we need to run blynk function in loop, to run the system.
void loop()
{
  Blynk.run();
}
Complete Project Code
#define BLYNK_PRINT Serial    // Comment this out to disable prints and save space

#include <ESP8266_SoftSer.h>

#include <BlynkSimpleShieldEsp8266_SoftSer.h>
// Set ESP8266 Serial object

#include <SoftwareSerial.h>

SoftwareSerial EspSerial(2, 3); // RX, TX
ESP8266 wifi(EspSerial);
// You should get Auth Token in the Blynk App.

// Go to the Project Settings (nut icon).

char auth[] = "caa17a11c0124d4083d0eaa995f45917";
#define m11 8

#define m12 9

#define m21 10

#define m22 11
void forward()

{

  digitalWrite(m11, HIGH);

  digitalWrite(m12,LOW);

  digitalWrite(m21,HIGH);

  digitalWrite(m22,LOW);

}
void backward()

{

  digitalWrite(m11, LOW);

  digitalWrite(m12,HIGH);

  digitalWrite(m21,LOW);

  digitalWrite(m22,HIGH);

}
void right()

{

  digitalWrite(m11, HIGH);

  digitalWrite(m12,LOW);

  digitalWrite(m21,LOW);

  digitalWrite(m22,LOW);

}
void left()

{

  digitalWrite(m11, LOW);

  digitalWrite(m12,LOW);

  digitalWrite(m21,HIGH);

  digitalWrite(m22,LOW);

}
void Stop()

{

  digitalWrite(m11, LOW);

  digitalWrite(m12,LOW);

  digitalWrite(m21,LOW);

  digitalWrite(m22,LOW);

}
void setup()

{

  // Set console baud rate

  Serial.begin(9600);

  delay(10);

  // Set ESP8266 baud rate

  // 9600 is recommended for Software Serial

  EspSerial.begin(9600);

  delay(10);
  Blynk.begin(auth, wifi, "username", "password");  // wifi username and password

  pinMode(m11, OUTPUT);

  pinMode(m12, OUTPUT);

  pinMode(m21, OUTPUT);

  pinMode(m22, OUTPUT);

}
BLYNK_WRITE(V1)

{

  int x = param[0].asInt();

  int y = param[1].asInt();
  // Do something with x and y

/*  Serial.print("X = ");

  Serial.print(x);

  Serial.print("; Y = ");

  Serial.println(y);*/

  if(y>220)

  forward();

  else if(y<35)

  backward();

  else if(x>220)

  right();

  else if(x<35)

  left();

  else

  Stop();

}
void loop()

{

  Blynk.run();

}
Comments
Iam looking to do this
Iam looking to do this project. Could me tell me exactly where i should install the libraries. I got an error saying that error compuiling library
Mechatronics
you need to find the network using your mobile phone, if the wifi network provided by your esp is not showing there are alot of possible reason for that
why u have taken the decesion
why u have taken the decesion of left right and up down on 35 and 220
these value used as reference
these value used as reference value. if value less or greater than these value, then we takes an action for robot.
I can't connect esp8266 with
I can't connect esp8266 with my wifi
what to do
Learn to properly connect
Learn to properly connect wifi module with arduino here: How to Send Data from Arduino to Webpage using WiFi
Blynk + robot control in loop() ?
I have a program for controlling a robot that is 1000 lines of code that runs on a Mega2650. Can I use Blynk to add smartphone inputs to the program? I see there is nothing else running in loop so I'm wondering what else can be done if you use blynk. Thanks.
Need help to add other Widgets
Hello,
I really appreciate that project you did, infact i'm doing same for my final year project.
Can you please help me add the following, i'm having lot of troubles with the libraries and Arduino code.
I need to add the followings:
2 sliders for 2 servo motors (for pan & tilt camera)
2 buttons for switching LED on/off
Video Streaming
Any help would be really appreciated.
Better use Raspberry Pi for
Better use Raspberry Pi for Video streaming, it has dedicated Camera port.
I am having "Failed to
I am having "Failed to disable echo" please help
Need the BLYNK library version that works with this code- URGENT
Tried to run the code with the BLYNK library latest version v0.4.2 but it said the <ESP8266_SoftSer.h> was missing !!! Tried downloading v0.3.4 but still throwing error !!!
Please let me know which library version you all are using and also give me the link where I can download.
Thanks in advance
Check here https://github.com
Check here https://github.com/blynkkk/blynk-library/releases/ and install the library properly, may be you made some mistake while installing it.
CC3000 Wifi
Can you modify the code for me? I've 4 wheeler , L293D Shield and CC3000 Wifi Shield.
Esp8266_softSer.h: No such
Esp8266_softSer.h: No such file or directory
#include <ESP8266_SoftSer.h>
Compilation terminated
Error compiling for board Arduino /genuino Uno
What I will do for???
I have same problem like you.
I have same problem like you. Do you have any solutions?
esp 8266 library
Sir I need library Esp8266
Esp8266_softSer.h: No such file or directory
#include <ESP8266_SoftSer.h>
Compilation terminated
Error compiling for board Arduino /genuino Uno
What I will do for???
after run the code i get this
after run the code i get this type of message when i try to connect it via wifi ..............( Failed to disable Echo
)
Why I cant control it
Why I cant control it wireless?
I can control it while my arduino port is connected to laptop. But when I am changing the source or I transfer the source to battery, I am not able to control it. I think it is because the wifi shield is turning off.
I am using guizduino uno, wifi shield esp8266 and blynk
showing error
showing error
Tried to run the code with the BLYNK library latest version v0.4.2 but it said the <ESP8266_SoftSer.h> was missing !!!
what to do??
modification
how can we add extra motors or switches for lights or any other function
Failed to disable Echo
[19] Blynk v0.3.4
[520] Connecting to username
[1536] Failed to disable Echo
what should i do !!!!?
i want that header files plz
i want that header files plz somebody help
I was reading the L293D
I was reading the L293D datasheet... on the Vcc1 (Pin 16) only 5V supply for internal logic translation and the Vcc2 Power for drivers 4.5 V to 36 V . So from your schematic shouldn't that be PIN 8 and PIN 16 reverse?
Sir I m working on this
Sir I m working on this project done all connections and portals according to this site but still on blynk app it's showing the device is offline ..And reconnecting to the server .... The phone is connecting to the WI Fi module BT it cannot receive input from blynk as device is coming offline... Can u suggest something plz it's urgent
#include<ESP8266_softser.h>
#include<ESP8266_softser.h> is missing in my lib. how to silve
from where to download the
from where to download the blynksimpleshield_softser.h library ???
wifi control robo code error
Dear programmer,
In this code the blynk library does not support..
EspSerial haven't declare in this scope error occurs.
Please help me.
help me
Arduino: 1.8.1 (Windows 10), Board: "Arduino/Genuino Uno"
C:\Users\prithvi\AppData\Local\Temp\arduino_modified_sketch_891604\sketch_jun08a.ino:2:29: fatal error: ESP8266_SoftSer.h: No such file or directory
#include <ESP8266_SoftSer.h>
^
compilation terminated.
exit status 1
Error compiling for board Arduino/Genuino Uno.
This report would have more information with
"Show verbose output during compilation"
option enabled in File -> Preferences.
bro, how to solve this
bro, how to solve this problem.
have you solve it .
please tell me steps to solve
nice project
Useful to me.i like it. Would u provide some more information about it to my mail
I do I get the Softser
I do I get the Softser library... ?? please help
#include <ESP8266_SoftSer.h>
#include <ESP8266_SoftSer.h>
#include <BlynkSimpleShieldEsp8266_SoftSer.h>
are deprecated and removed long time ago.
Yes prithi, Blynk does not
Yes prithi, Blynk does not seem to be a very good option nowadays
Bluetooth should work for 20
Bluetooth should work for 20 meters i guess
wifi esp8266 is continuosly
wifi esp8266 is continuosly diconnecting .. what is the issue? is it required to use seperate power source for esp8266 module?
No such file or directory
No such file or directory error. what might be wrong, I have installed latest version library also.
Serial monitor displays
Serial monitor displays 'failed to disable echo' and also how to create local server for blynk?
issue: esp8266 sof ser.h not found
i tried all the possible ways to resolve this error
but I cant fix it
it shows that the esp8266soft ser not found
but iincluded all the blynk librarieris
"motor_wifi_bot.ino:2:29: fatal error: ESP8266_SoftSer.h: No such file or directory
compilation terminated.
Error compiling."
Hi. Im doing a project using
Hi. Im doing a project using nodemcu , mdd10a driver and 2 power window motors. i tried the code but whenever i tried to upload it, it says espcomm_failed. could you please help me?

I like this project