
We love tinkering with our LiteWing ESP32 drone, and this time we gave it a simple but exciting upgrade, a WiFi camera module! With this addition, the drone can now stream live video while flying, perfect for hobby flights, aerial experimentation, or just having fun seeing the world from above.
On the technical side, the setup remains straightforward. The camera module uses its own built-in WiFi to stream video directly to a nearby device, while the LiteWing supplies stable power from its onboard battery during flight. Because the camera operates independently from the flight controller, the drone continues to fly normally while continuously transmitting live video. This build gives you real-time aerial footage without spending on a commercial drone with a camera.
Beyond its core functionality as a flying drone with a camera, the ESP32-based system can be further enhanced by integrating a Bluetooth speaker for wireless audio output. This upgrade enables the drone not only to capture live aerial footage but also to broadcast real-time voice announcements, making it suitable for surveillance, public addressing, or smart monitoring applications. For detailed guidance, refer to the project titled “How to Add a Loudspeaker to LiteWing ESP32 Drone for Wireless Audio Announcement”.
LiteWing ESP32 Drone with Camera – Overview
| Parameter | Detail |
| Drone platform | LiteWing ESP32 Drone |
| Camera type | Dual WiFi camera module (toy-drone type) |
| Camera operating voltage | 3.3 V (onboard regulator accepts up to 5 V) |
| Power source | 1S LiPo battery (high C-rating recommended) |
| Data connection to flight controller | None required |
| Camera WiFi password (default) | 12345678 |
| Viewing app | WebCam / IP Camera (Android & iOS) |
| Control app | LiteWing drone control app (separate WiFi) |
| Key troubleshooting fix | Use higher C-rating battery to reduce video jitter |
Components Required for the LiteWing ESP32 Drone Camera Build
This project requires only a compact flight platform with essential components for smooth aerial operation. The LiteWing ESP32 drone serves as the core system, paired with a dual WiFi camera module for real-time video streaming. A lightweight Li-Po battery powers the setup, while basic wiring and mounting accessories ensure secure assembly. Together, these components create a streamlined and efficient mini drone with camera designed for stable flight and live monitoring.
- LiteWing ESP32 Drone
- WiFi - Camera Module
- 1S LiPo Battery(Need High C Rating)
How the LiteWing ESP32 Drone with Camera Works
This drone system works through two separate pathways that don't interfere with each other. The LiteWing ESP32-Drone connects to your phone's Drone Control Application through its own Wi-Fi network, letting you fly the drone smoothly.
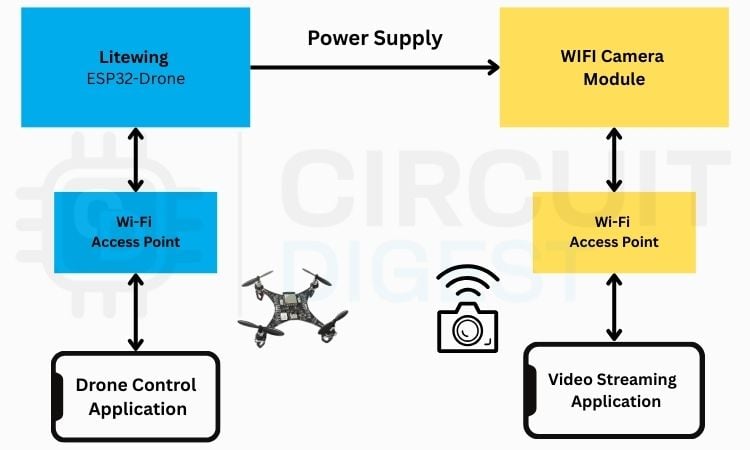
By splitting control and video into two separate channels, you get lag-free flying even while watching live video Feed. Use a high-C-rating battery to ensure the camera receives stable and sufficient power during flight. It’s like having two walkie-talkie frequencies, one for giving directions and one for receiving updates, so neither signal gets jammed or slowed down.
Workflow Summary:
» Channel 1 - Flight control - The LiteWing ESP32 has an in-built WiFi Access Point (AP). Your phone will connect to the LiteWing's drone control application to control throttle, roll, pitch, and yaw.
» Channel 2 - Live video - The WiFi camera module establishes its own Access Point (AP) and is completely separate from the LiteWing. You will connect to this Access Point (AP) through your phone using the WebCam application.
» No interference from either system - Because each system operates on its own WiFi Network, neither system's signal will slow down or jam the other system's signal; therefore, you will be able to fly with zero lag while simultaneously receiving smooth real-time video.
WiFi Camera Module Details
We used a dual-camera module from a toy drone. The module features two cameras, allowing you to switch between them easily, which is great for capturing different angles during flight. The cameras operate at 3.3V, but the module includes a built-in voltage regulator that can handle up to 5V, making it easy to power directly from the drone’s battery without additional circuitry.

Because the camera has its own WiFi connection, it can stream live video independently of the drone’s flight controller. This means you get continuous video even while the LiteWing ESP32 handles stable flight. Its compact design also makes it simple to mount on the drone without affecting weight or balance, making it a perfect fit for hobby video flights and experimentation.
WiFi Camera Module vs ESP32-CAM
| Feature | Dedicated WiFi Camera Module | ESP32-CAM |
| Power requirement | Up to 5 V via built-in regulator | Stable 5 V, higher current draw |
| Integration complexity | Power only (VCC + GND) | Requires firmware configuration |
| Stability on 1S LiPo | Good with a high C-rating battery | Prone to resets under motor load |
| Onboard image processing | No | Yes |
| Best suited for | Simple live streaming builds | Projects requiring custom logic |
| Weight impact | Minimal – compact module | Slightly heavier with antenna |
Hardware Connections
For this project, the hardware setup is very simple. We used the LiteWing ESP32 drone as the flying platform and mounted a dual WiFi camera module taken from a toy drone onto the frame. The camera does not require any data connection to the flight controller. We only connected the VCC of the camera module to the VBUS line and the GND to the common ground of the drone.

The system runs on a 1S LiPo battery, which powers both the drone and the camera. Proper mounting and secure wiring are important to keep the setup balanced during flight, and using a higher C-rating battery helps maintain stable performance.
How to Connect a Drone Camera to a Mobile Phone: Step-by-Step
Once the camera is powered on, it automatically creates its own WiFi access point. To view the live feed:
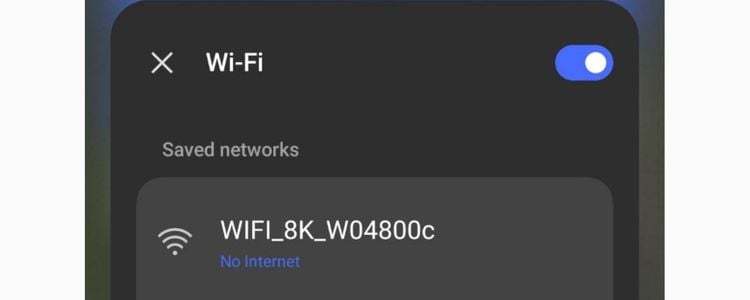
Step 1 ⇒ Connect your mobile phone to the camera’s WiFi network using the default password 12345678.
Step 2 ⇒ Download and open a compatible Web Cam app (many camera modules support apps like “IP Camera” or “WebCam” on Android/iOS).
Step 3 ⇒ In the app, click on the start button to start getting the live feed
Step 4 ⇒You should now see the live video feed streaming directly from the drone.
This setup keeps the camera completely independent of the LiteWing ESP32 flight controller, allowing smooth drone operation while continuously viewing live video. The key advantage of a dual-channel architecture for a drone with camera at hobby scale.
Working Demo
When the system is powered on, the LiteWing ESP32 manages the drone’s flight, which you can control through the LiteWing mobile app. At the same time, the WiFi camera powers up independently and creates its own network. To view the live video feed, you connect to the camera’s network using its dedicated viewing app. This setup lets the drone fly smoothly while streaming live video at the same time, showing how both systems work together.
Troubleshooting the LiteWing Drone Camera Setup
In some cases, noise or jitter may appear in the live video feed when the drone motors start operating. This issue can occur even if the camera footage looks clear while the drone is stationary. The disturbance is mainly caused by PWM switching noise from the motor control MOSFETs, which can introduce power fluctuations affecting the WiFi camera module.
To avoid this problem, it is recommended to use a battery with a higher C-rating, as it can supply stable current during rapid motor load changes. Using a higher C-rating battery significantly reduces power-related interference, resulting in smooth and jitter-free video streaming during flight.
Frequently Asked Questions
⇥ Can an ESP32-CAM be used instead of the WiFi camera module on the drone?
Yes, an ESP32-CAM can be used on the drone, but it requires more careful design compared to a standalone WiFi camera module. The ESP32-CAM needs a stable 5V supply and draws higher current, which can be difficult to maintain on a 1S LiPo battery when the motors are running, leading to possible resets, frame drops, or WiFi disconnections. It also adds extra processing load and power consumption to the system, increasing overall complexity. For simple live video streaming, a dedicated WiFi camera module is easier and more reliable, while the ESP32-CAM is better suited for projects that require onboard image processing or custom control logic.
⇥ Why does the drone’s video feed show noise or jitter during flight?
The video jitter or noise usually happens due to a voltage drop when the motors draw high current during flight. If the battery cannot supply enough current consistently, the voltage fluctuates, which can affect the WiFi camera module and cause instability in the video feed. Using a battery with a higher C-rating helps maintain stable voltage under load, reducing video noise and ensuring smoother transmission.
⇥ How to connect the drone camera to a mobile phone?
To connect the drone camera to a mobile phone, first power on the drone so that the WiFi camera module turns on. Once powered, the camera automatically creates its own WiFi access point. Open the WiFi settings on your mobile phone and connect to the camera’s WiFi network using the default password 12345678. After connecting, open the Web Cam app (available on the Play Store), and the live video feed will be displayed on your phone in real time.
LiteWing Drone Projects
Explore LiteWing drone tutorials covering programming, configuration, and experimental control methods using Python, Crazyflie tools, and ESP32-based hardware integrations.

DIY Gesture Control Drone using Python with LiteWing and ESP32
A gesture-controlled drone using ESP32 and MPU6050 that translates hand movements into real-time drone flight commands through Python and the LiteWing library.

How to use Crazyflie cfClient with Litewing
cfClient is a GUI tool used to connect, monitor, and control the LiteWing drone from a computer, allowing users to adjust flight settings, view real-time data, and configure input devices like game controllers.

How to Program the LiteWing Drone using Python with Crazyflie Cflib Python SDK
Program the LiteWing drone using Python with the Crazyflie cflib SDK to send flight commands and control roll, pitch, yaw, and thrust over Wi-Fi.
Excellent insights into earthing accessories and industrial safety products. High-quality earth pit covers ensure protection from moisture, corrosion, and physical damage.
Thanks for sharing valuable information about electrical grounding. SG Power provides excellent-quality earthing products with long service life.
Informative and SEO-friendly blog. The details about industrial applications and load-bearing capacity are highly useful.
Excellent explanation about the benefits of HDPE earth pit covers. Proper grounding protection is very important for industrial infrastructure.

Very useful blog for industries and commercial projects. We were searching for the best Lightning Protection System Manufacturer & Supplier in India and found SG Power solutions highly effective and durable. Thanks for sharing such valuable insights.