
Raspberry Pi is very popular for IoT projects because of its seamless ability of wireless communication over the internet. Raspberry Pi 3 has inbuilt Wi-Fi and Bluetooth, and Bluetooth is a very popular wireless communication Protocol. Today we going to build a Remote Controlled Car using Raspberry Pi 3 and Bluetooth, here we will use Smart Phone as a remote to control the car. We have previously built created this RC car using Arduino.
Here we are using Raspberry Pi 3 which have inbuilt Bluetooth, so we don't need to use any external USB Bluetooth dongle. Here we are using RFCOMM Bluetooth protocol for wireless communication.
Programming for Bluetooth in Python follows the socket programming model and communications between the Bluetooth devices is done through RFCOMM socket. RFCOMM (Radio Frequency Communication) is a Bluetooth Protocol which provided emulated RS-232 serial ports and also called as Serial Port Emulation. Bluetooth serial port profile is based on this protocol. RFCOMM is very popular in Bluetooth applications because of its wide support and publically available API. It is bound to L2CAP protocol.
If you have Raspberry Pi 2, then you either need to use external Bluetooth dongle or Bluetooth module HC-06. Check our previous projects for using these external Bluetooth devices: Controlling Raspberry Pi GPIO using Android App over Bluetooth and Raspberry Pi controlled Home Appliances.
Installing Required Packages for Bluetooth Communication:
Before starting, we need to install some software for setting up Bluetooth communication in Raspberry Pi. You should have a Raspbian Jessie installed memory card ready with Raspberry Pi. Check this article to install the Raspbian OS and getting started with Raspberry Pi. So now we first need to update the Raspbian using below commands:
sudo apt-get update
sudo apt-get upgrade
Then we need to install few Bluetooth related packages:
sudo apt-get install bluetooth blueman bluez
Then reboot the Raspberry Pi:
sudo reboot
BlueZ is a open source project and official Linux Bluetooth protocol stack. It supports all the core Bluetooth protocols and now become part of official Linux Kernel.
Blueman provides the Desktop interface to manage and control the Bluetooth devices.
Finally we need python Library for Bluetooth communication so that we can send and receive data through RFCOMM using Python language:
sudo apt-get install python-bluetooth
Also install the GPIO support libraries for Raspberry Pi:
sudo apt-get install python-rpi.gpio
Now we are done with installing required packages for Bluetooth communication in Raspberry Pi.
Pairing Devices with Raspberry Pi over Bluetooth:
Pairing Bluetooth Devices, like mobile phone, with Raspberry Pi is very easy. Here we have paired our Android Smart phone with Raspberry Pi. We have previously installed BlueZ in Pi, which provides a command line utility called “bluetoothctl” to manage our Bluetooth devices.
Now open the bluetoothctl utility by below command:
sudo bluetoothctl
You can check all the commands of bluetoothctl utility by typing ‘help’. For now we need to enter below commands in given order:
[bluetooth]# power on
[bluetooth]# agent on
[bluetooth]# discoverable on
[bluetooth]# pairable on
[bluetooth]# scan on
After the last command “scan on”, you will see your Bluetooth device (Mobile phone) in the list. Make sure that your mobile has Bluetooth turned on and visible by nearby devices. Then copy the MAC address of you device and pair it by using given command:
pair <address of your phone>
Then you will be prompted for Passcode or Pin in your Terminal console then type passcode there and press enter. Then type the same passcode in your mobile phone when prompted and you are now successfully paired with Raspberry Pi. We have also explained this whole process in the Video given in previous GPIO controlling Tutorial. Here is the direct YouTube link.
As told earlier, you can also use Desktop interface to pair the Mobile phone. After installing Blueman, you will see a Bluetooth icon in right side of your Raspberry Pi desktop as shown below, using which you can easily do the pairing.
Selecting the Toy Car:
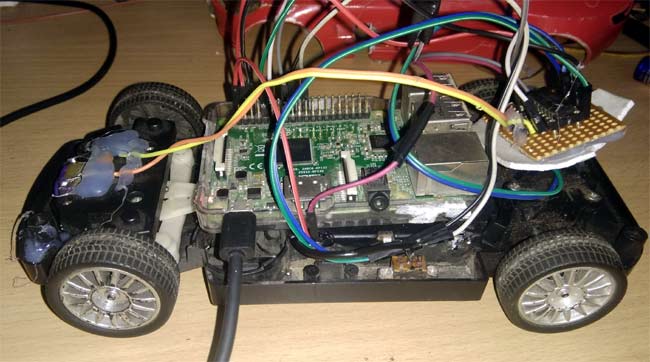
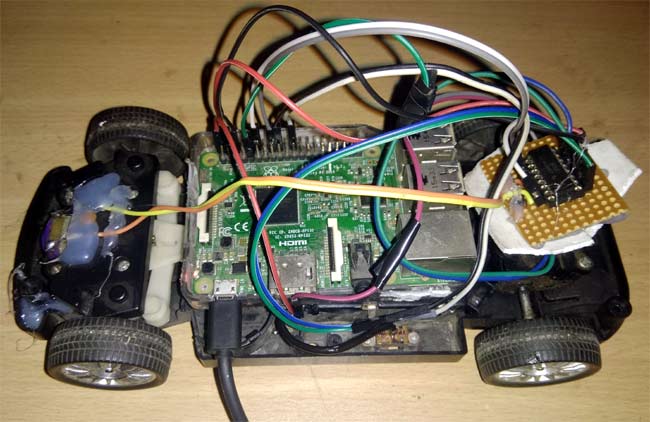
In this Raspberry Pi Controlled Car project we have used a toy car for demonstration. Here we have selected a RF toy car with moving left-right steering feature. After buying this car we have replaced its RF circuit with our Raspberry circuit. This car has two DC motors, one to rotate two front wheel and other one is to rotate two rear wheels. Front side motor is used for giving direction to car means turning left or right side (like real car steering feature). And rear side motor is used for driving the car in forward and backward direction. A Bluetooth of Raspberry is used to receive command wirelessly from android phone to control the car.

You can use any toy car which has two DC Motors to rotate front and Rear Wheels.
Circuit Diagram and Explanation:
In this Remote Controlled Car, we only need to connect Raspberry Pi with two motors using L293D module. For powering the Raspberry Pi and car we have used a mobile power bank. The mobile power bank is enough to power the Raspberry Pi and car’s motors but when we put power bank over car then due to the heavy weight of mobile power bank car would not be able to move properly. So we recommend to use the low weight power supply or Lithium batteries for powering the system. All the connections are shown in circuit diagram below. Also check our Robotics section to learn more about controlling Motors with different technologies.
Note: do not put more than 5v to the raspberry pi.

This circuit has been made on Perf Board for this project, so that there is less weight on the car.
Controlling Car Remotely with Android App BlueTerm:
Now after setting up all the things and successfully try paring the Smart Phone over bluetooth, we need to install an Android App for communicating with Raspberry Pi using a Bluetooth Serial Adapter, so that we can control the GPIO pins of Raspberry Pi. As told earlier RFCOMM/SPP protocol emulates serial communication over Bluetooth, so we installed here BlueTerm App which supports this protocol.
You can also use any other Bluetooth Terminal App which supports communication via RFCOMM socket.
Now after downloading and installing the BlueTerm App, run the below given Python Program from the terminal and connect the paired raspberrypi device from the BlueTerm App at the same time.
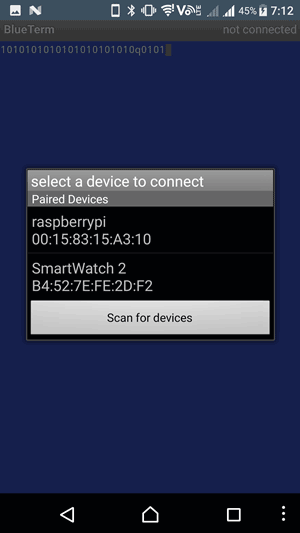
After successful connection you will see connected:raspberrypi at the top right corner of the App as shown below:
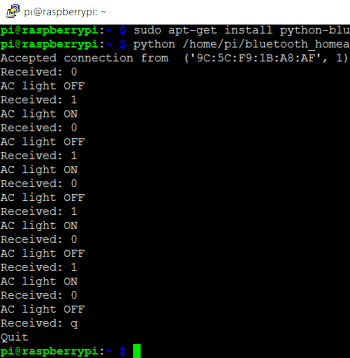

Now you can just enter the following commands from the BlueTerm app to make the car moving in the desired direction. Press ‘q’ to exit the program. You can use Google Voice Typing Keyboard to control this car using your Voice. Check the complete demo in the Video given at the end.
Commands:
F – Forward Move
B – Backward Move
S – Stop
L – Forward Left Move
R – Forward Right Move
A – Backward Left Move
P – Backward Right Move
Q – Quit
Python Programming:
Python Program for Controlling Raspberry Pi GPIO with Android App is very simple and self-explanatory. Only we need to learn a little bit about the code related to Bluetooth RFCOMM communication. Otherwise its same like controlling any robot or car by making motor’s pin high or low. The complete program is given below in the Code section.
First, we need to import the Bluetooth socket library which enables us to control Bluetooth with Python language; we have installed the library for the same in the previous section.
import Bluetooth
Then we included some more header files and define pins for motors put them default low.
import bluetooth
import time
import RPi.GPIO as GPIO
m11=18
m12=23
m21=24
m22=25
GPIO.setwarnings(False)
GPIO.setmode(GPIO.BCM)
GPIO.setup(m11, GPIO.OUT)
GPIO.setup(m12, GPIO.OUT)
GPIO.setup(m21, GPIO.OUT)
GPIO.setup(m22, GPIO.OUT)
GPIO.output(m11 , 0)
GPIO.output(m12 , 0)
GPIO.output(m21, 0)
GPIO.output(m22, 0)
Below is the code responsible for Bluetooth communication:
server_socket=bluetooth.BluetoothSocket( bluetooth.RFCOMM )
port = 1
server_socket.bind(("",port))
server_socket.listen(1)
client_socket,address = server_socket.accept()
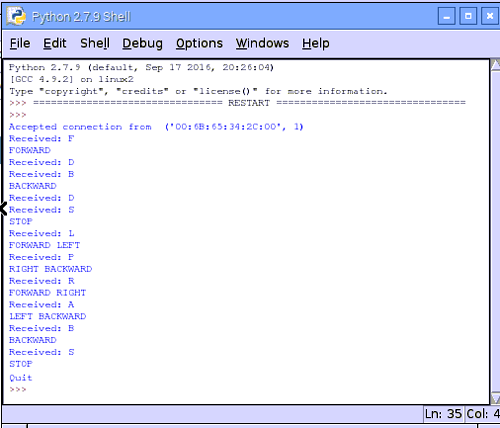
print "Accepted connection from ",address
Here we can understand them line by line:
server_socket=bluetooth.BluetoothSocket( bluetooth.RFCOMM ): Creating socket for Bluetooth RFCOMM communication.
server_socket.bind(("", port):- Server binds the script on host '' to port.
server_socket.listen(1): Server listens to accept one connection at a time.
client_socket, address = server_socket.accept(): Server accepts client’s connection request and assign the mac address to the variable address, client_socket is the client’s socket
After this we have created some functions that are responsible for moving car in the desired direction: def left_side_forward(), def right_side_forward(), def forward(), def left_side_reverse(), def right_side_reverse(), def reverse()def stop(). These functions will be called respectively when we press L, R, F, A, P, B, S from the Mobile blueTerm app and the car will move accordingly.
data=""
while 1:
         data= client_socket.recv(1024)
         print "Received: %s" % data
         if (data == "F"):
            forward()
         elif (data == "L"):
            left_side_forward()
         elif (data == "R"):
            right_side_forward()
         elif (data == "B"):
            reverse()
         elif (data == "A"):
            left_side_reverse()
         elif (data == "P"):
            right_side_reverse()
         elif data == "S":
            stop()
         elif (data == "Q"):
            print ("Quit")
            break
client_socket.close()
server_socket.close()
data = client_socket.recv(1024): Receive data through the client socket client_socket and assign it to the variable data. Maximum 1024 characters can be received at a time.
Finally, after all the programming, close the client and server connection using below code:
client_socket.close()
server_socket.close()
Complete Project Code
import bluetooth
import time
import RPi.GPIO as GPIO
m11=18
m12=23
m21=24
m22=25
GPIO.setwarnings(False)
GPIO.setmode(GPIO.BCM)
GPIO.setup(m11, GPIO.OUT)
GPIO.setup(m12, GPIO.OUT)
GPIO.setup(m21, GPIO.OUT)
GPIO.setup(m22, GPIO.OUT)
GPIO.output(m11 , 0)
GPIO.output(m12 , 0)
GPIO.output(m21, 0)
GPIO.output(m22, 0)
server_socket=bluetooth.BluetoothSocket( bluetooth.RFCOMM )
port = 1
server_socket.bind(("",port))
server_socket.listen(1)

client_socket,address = server_socket.accept()
print "Accepted connection from ",address
def left_side_forward():
    print "FORWARD LEFT"
    GPIO.output(m21 , 1)
    GPIO.output(m22 , 0)
    time.sleep(.5)
    GPIO.output(m11 , 1)
    GPIO.output(m12 , 0)
def right_side_forward():
   print "FORWARD RIGHT"
   GPIO.output(m21 , 1)
   GPIO.output(m22 , 0)
   time.sleep(.5)
   GPIO.output(m11 , 0)
   GPIO.output(m12 , 1)
def forward():
   print "FORWARD"
   GPIO.output(m11 , 0)
   GPIO.output(m12 , 0)
   GPIO.output(m21 , 1)
   GPIO.output(m22 , 0)
def left_side_reverse():
   print "BACKWARD LEFT"
   GPIO.output(m21 , 0)
   GPIO.output(m22 , 1)
   time.sleep(.5)
   GPIO.output(m11 , 1)
   GPIO.output(m12 , 0)
def right_side_reverse():
   print "BACKWARD RIGHT"
   GPIO.output(m21 , 0)
   GPIO.output(m22 , 1)
   time.sleep(.5)
   GPIO.output(m11 , 0)
   GPIO.output(m12 , 1)
def reverse():
   print "BACKWARD"
   GPIO.output(m11 , 0)
   GPIO.output(m12 , 0)
   GPIO.output(m21 , 0)
   GPIO.output(m22 , 1)
def stop():
   print "STOP"
   GPIO.output(m11 , 0)
   GPIO.output(m12 , 0)
   GPIO.output(m21 , 0)
   GPIO.output(m22 , 0)

data=""
while 1:
         data= client_socket.recv(1024)
         print "Received: %s" % data
         if (data == "F"):
            forward()
         elif (data == "L"):
            left_side_forward()
         elif (data == "R"):
            right_side_forward()
         elif (data == "B"):
            reverse()
         elif (data == "A"):
            left_side_reverse()
         elif (data == "P"):
            right_side_reverse()
         elif data == "S":
            stop()
         elif (data == "Q"):
            print ("Quit")
            break
client_socket.close()
server_socket.close()
Comments
can the project be wireless

Circuits with codes and protues simulation