

Ever wanted to receive real-time SMS alerts for your Raspberry Pi projects without dealing with bulky GSM modules or complicated SIM card setups, Imagine getting a text the moment your server room overheats or your smart greenhouse crosses a critical temperature limit. No apps to open, no dashboards to log into, just a simple SMS, instantly delivered to your phone.
In this project, I’ll show you how I built a temperature alert system using a Raspberry Pi and a DHT11 sensor. The best part is it uses only Wi-Fi and a free SMS API from Circuit Digest Cloud, no SIM cards, no GSM shields. All communication is done over Wi-Fi using the Circuit Digest Cloud API, making it a simple, smart, and modern way to stay informed anytime, anywhere. So let's dive in!
Table of Contents
Components Required
Raspberry Pi Setup
To get started with this project, make sure your Raspberry Pi is up and running with the latest version of Raspberry Pi OS. If you're setting it up from scratch, use the official Raspberry Pi Imager to download and flash the OS onto an SD card. Once flashed, insert the SD card into your Raspberry Pi, power it up, and complete the initial setup steps.
After booting into the OS, connect your Raspberry Pi to the internet, either via Wi-Fi or Ethernet, depending on your setup. Internet access is crucial since you'll be installing software packages and using a cloud-based API later.
Once connected, it's good practice to update your system to ensure all packages are current. Open a terminal and run:
|
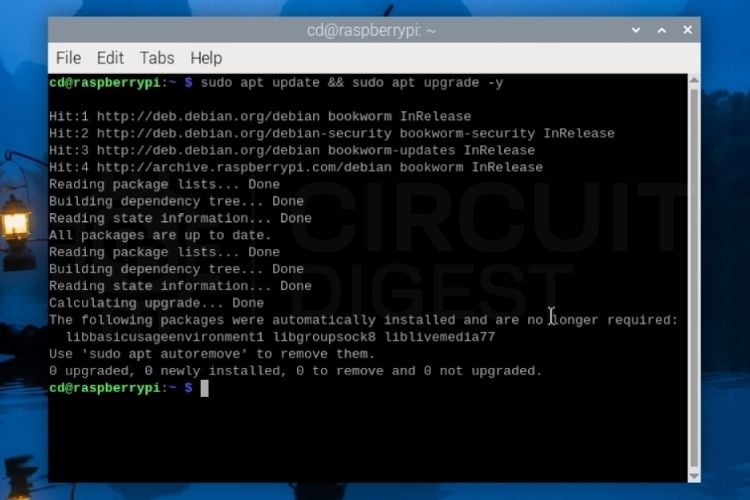
This will fetch the latest package lists and upgrade all installed software to the newest available versions, a step that helps avoid compatibility issues during the setup.
Installing Python Libraries & Handling Common Setup Issues
Now that your Raspberry Pi is updated, it’s time to install the required Python libraries. For this project, you'll need Adafruit_DHT (to read from the DHT11 temperature sensor) and requests (to interact with the SMS API). However, during this step, you might encounter a common issue when using pip to install packages system-wide.
For example, if you try:
|
You might see an error that says: "This environment is externally managed"
This error comes from PEP 668, a Python enhancement that restricts changes to the system-managed Python environment to prevent breaking critical components. It's common on newer versions of Raspberry Pi OS.
To work around this, you have two options:
Option 1: Install with Override
You can bypass the restriction by using the following command:
|
This tells pip to ignore the environment protection and force the installation. It often works, but use it with caution it can potentially conflict with system packages.
Option 2: Use a Virtual Environment
A safer and cleaner solution is to use a Python virtual environment, which creates a dedicated space for your project’s dependencies without affecting the system Python.
Here’s how to set it up:
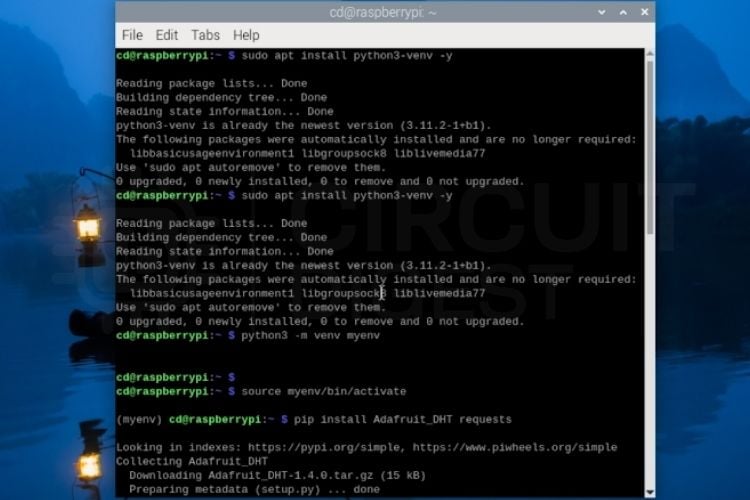
Once the virtual environment is active, you’ll see the environment name (e.g., (myenv)) in your terminal prompt. This means all Python packages you install will be isolated to this environment, ideal for development and testing.
Circuit Diagram of Raspberry Pi Based SMS Alert System

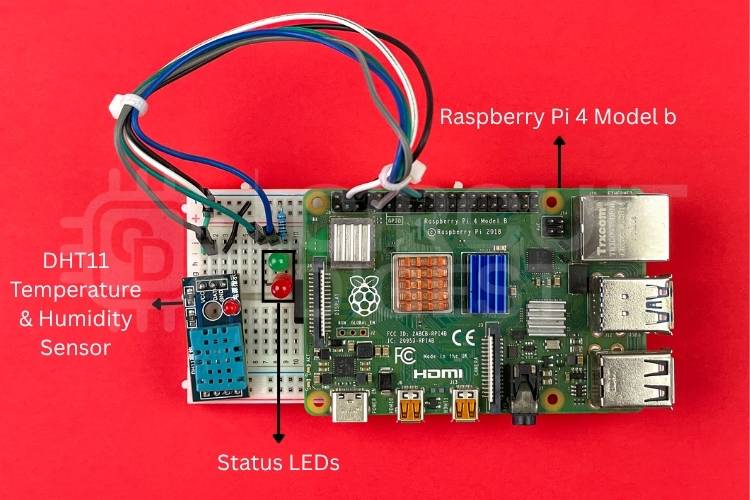
Pin Connections
Setting Up Cloud API

What is Circuit Digest Cloud?
Circuit Digest Cloud is a handy online platform that helps makers like me integrate internet-based services such as SMS alerts, License Plate Recognition, and QR recognition into embedded projects also offers APIs for GPS tracking (GeoLinker) making it a useful all-in-one solution for smart IoT and automation systems.
Generating API Key
Before moving on to the coding part, we first want to generate a valid SMS API from the Circuit Digest Cloud SMS service provider, so that we can make our ESP32 send SMS by utilizing the power of the internet.
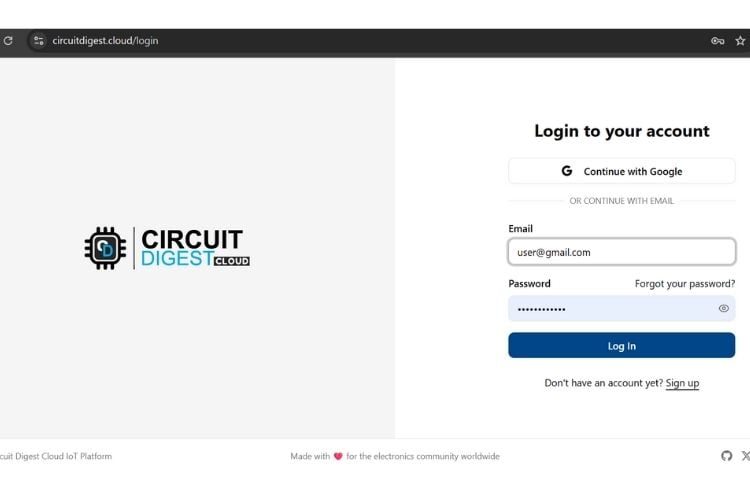
STEP 1: Visit our Circuit Digest Cloud website “https://www.circuitdigest.cloud/”. Then click on the login button. It will redirect you to the login page, there you just enter your login credentials. If you don’t have an account, create a new one using the Register Page.
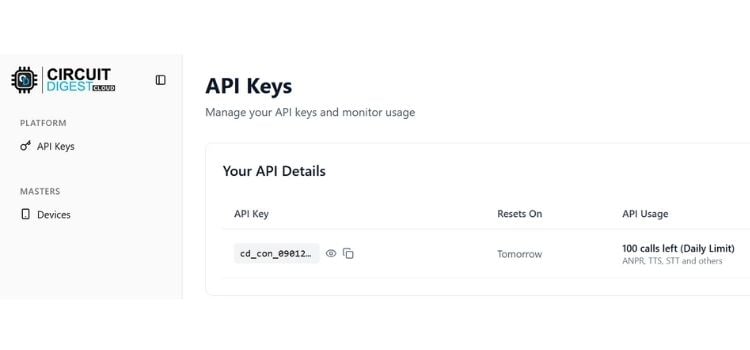
STEP 2: After logging in, you will find the “Account” button in the top-right corner. Click on it to view a dropdown menu with options such as Profile, API Key, and Logout. Select API Key, and you will be redirected to the API key generation page.

STEP 3: On the API Key generating page, a new API key will be generated with a limit of 100 SMS per month. Even after Expiry, you can renew it for free of cost.
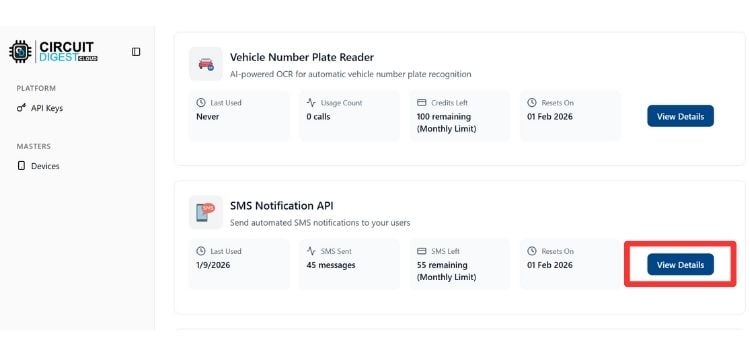
STEP 4: After that, scroll down the webpage until you find the SMS Notification API section. Click on "View Details" to proceed.
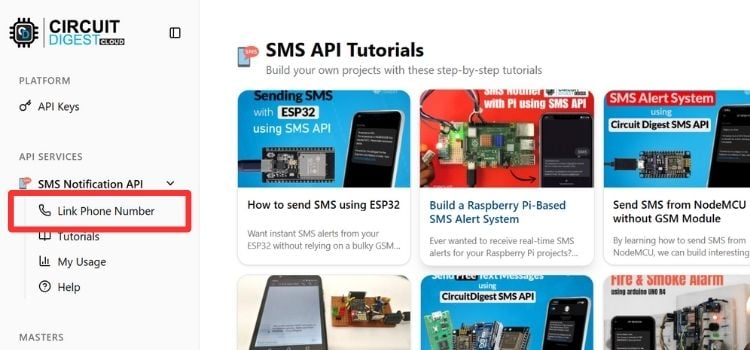
Step 5: In the SMS Notification API tab, you will find the "Link Phone Number" option. Click on it to link a phone number for sending SMS notifications.
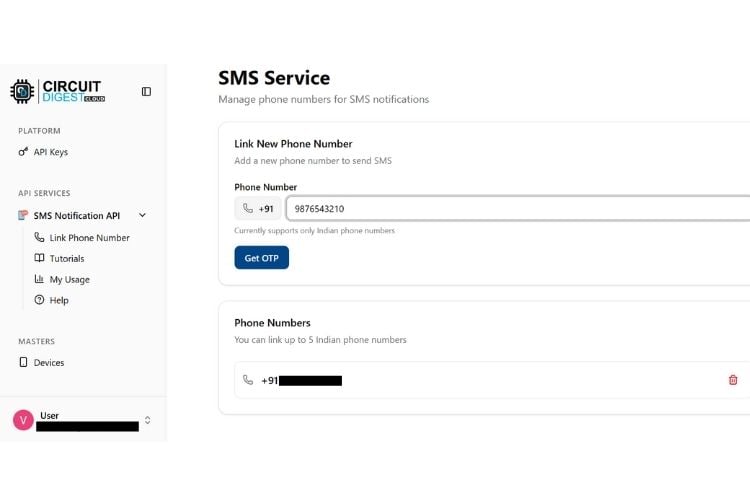
STEP 6: Enter the phone number you want to link and click the "Get OTP" button. You will receive an OTP on the entered number enter the OTP to verify the phone number. Once verified, you can also view the list of linked phone numbers here.
API Key Usage Limits and Fair Use Policy
CircuitDigest Cloud enforces usage limits to maintain server performance and ensure fair access across users. As of now:
GeoLinker (GPS Tracking) API Keys: allow up to 10,000 GPS data points per key.
SMS and ANPR API Keys : are limited to 100 requests per month.
Note: Once you exhaust the allowed quota, you may return to the API management page to generate a new API Key, which refreshes your usage count. These quotas are subject to change as the platform evolves and user demand scales.
SMS Template Table CircuitDigest SMS API
The table above lists the 15 most commonly used SMS templates, each identified by a unique Template ID. Every template includes two placeholders, marked as {#var#}, which can be dynamically filled with real-time data from your development board.
To send an SMS using the Circuit Digest Cloud API, you’ll need to provide the following four parameters:
API Endpoint Details
Python Code
import time
import requests
import adafruit_dht
import board
import RPi.GPIO as GPIO
from datetime import datetime
These are the essential libraries used in the script. time is for delays, requests handle HTTP API calls, adafruit_dht and board are used to interface with the DHT11 sensor, RPi.GPIO controls the GPIO pins, and datetime is used to fetch the current time for SMS content.
User Configuration
API_KEY = 'xxxxxxxxxx' # Your API Key
TEMPLATE_ID = '102'
MOBILE_NUMBER = '91xxxxxxxxxx' # Target Mobile Number
LOCATION = 'Home'
TEMP_THRESHOLD = 33             # °C: Trigger SMS if temp exceeds this
READ_INTERVAL = 10              # Seconds between sensor reads
COOLDOWN_TIME = 60              # Seconds to wait after sending SMS
API_URL = f'https://www.circuitdigest.cloud/api/v1/send_sms?ID={TEMPLATE_ID}'
This section defines the user-specific variables. It includes the API key, the SMS template ID, and the mobile number where alerts will be sent. You can also set the location label (used in the SMS), the temperature threshold for triggering the alert, and timing intervals like how often the sensor should read (READ_INTERVAL) and how long to wait before sending another SMS (COOLDOWN_TIME). The API_URL is dynamically constructed using the selected template ID.
GPIO Pin Setup
DHT_PIN = board.D4              # GPIO4 = Pin 7
GREEN_LED = 23                  # GPIO23 = Pin 16 (Success)
RED_LED = 24                    # GPIO24 = Pin 18 (Failure)
Here, you define the GPIO pins used. The DHT11 sensor is connected to GPIO4 (Pin 7). Two LEDs are used for feedback: green (GPIO23) signals successful SMS sending, and red (GPIO24) indicates failure.
GPIO.setmode(GPIO.BCM)
GPIO.setup(GREEN_LED, GPIO.OUT)
GPIO.setup(RED_LED, GPIO.OUT)
This initializes the GPIO system in BCM mode, which means you're referring to the GPIO numbers, not physical pin numbers. It also sets the LED pins as output.
DHT11 Sensor Initialization
dht = adafruit_dht.DHT11(DHT_PIN)This creates an instance of the DHT11 sensor using the defined GPIO pin. It’s now ready to read temperature and humidity data.
LED Feedback Function
def led_feedback(success):
   if success:
       GPIO.output(GREEN_LED, GPIO.HIGH)
       time.sleep(1)
       GPIO.output(GREEN_LED, GPIO.LOW)
   else:
       GPIO.output(RED_LED, GPIO.HIGH)
       time.sleep(1)
       GPIO.output(RED_LED, GPIO.LOW)
This function handles visual feedback using LEDs. If the success flag is True, the green LED blinks; if False, the red LED blinks. It's a simple way to show whether the SMS was sent successfully or failed, without needing to look at logs.
SMS Sending Function
def send_sms(temp):
   current_time = datetime.now().strftime("%I:%M %p")
   var1 = f"{LOCATION} at {current_time}"
   var2 = f"{temp}"
   payload = {
       "mobiles": MOBILE_NUMBER,
       "var1": var1,
       "var2": var2
   }
   headers = {
       "Authorization": API_KEY,
       "Content-Type": "application/json"
   }
   try:
       response = requests.post(API_URL, headers=headers, json=payload)
       if response.status_code == 200:
           print(f"[OK] SMS sent: {var1}, Temp = {var2}")
           print("Response:", response.json())
           led_feedback(True)
       else:
           print(f"[ERROR] SMS failed. Status: {response.status_code}")
           print("Response:", response.text)
           led_feedback(False)
   except requests.exceptions.RequestException as e:
       print("Connection error:", e)
       led_feedback(False)
This function handles sending SMS alerts using the CircuitDigest Cloud API. It builds two variables:
var1: Includes the location and current time (e.g., “Home at 02:45 PM”)
var2: The temperature value without the °C symbol (e.g., “34”)
These are sent as JSON payload to the SMS API, with appropriate headers including the API key. It checks the HTTP response status:
If successful (status_code == 200), it logs the response and blinks the green LED.
If it fails or there's a connection issue, it prints an error and triggers the red LED.
Main Monitoring Loop
print("Monitoring temperature... (Press Ctrl+C to stop)")
try:
   while True:
       try:
           temperature = dht.temperature
           humidity = dht.humidity
           if temperature is not None:
               print(f"Temperature: {temperature}C | Humidity: {humidity}%")
               if temperature > TEMP_THRESHOLD:
                   send_sms(temperature)
                   time.sleep(COOLDOWN_TIME)  # Prevent repeated alerts
           else:
               print("Sensor read failed.")
       except Exception as sensor_error:
           print("Sensor error:", sensor_error)
       time.sleep(READ_INTERVAL)
This is the main loop that keeps the script running. It continuously reads temperature and humidity from the DHT11 sensor at intervals defined by READ_INTERVAL
If the temperature is valid and exceeds the threshold, it calls send_sms() to trigger an alert and waits for COOLDOWN_TIME seconds before checking again. This prevents spamming your phone with messages every few seconds.
If the sensor fails or returns None, it logs an error and tries again after the interval. Sensor read errors are common with DHT11, so exception handling is important here.
Exit()
except KeyboardInterrupt:
   print("Script terminated by user.")
finally:
   GPIO.cleanup()
If you stop the script manually (e.g., with Ctrl+C), it prints a termination message. The finally block ensures that all GPIO pins are reset to their default state using GPIO.cleanup(), which is essential to avoid leaving pins active or LEDs stuck on.
Troubleshooting
Raspberry Pi SMS Alert System Demonstration
After wiring and running the script, test by heating the sensor with warm air. When the temperature goes beyond 33°C, an SMS like this should arrive:
| The temperature in Home at 02:45 PM has reached 34°C. Please take necessary action. |

The green LED lights up for 1 second to show success. If the SMS fails to send, the red LED turns on.
This project is just one example of what you can build using CircuitDigest Cloud and I am excited to see how the community will use this API in creative and practical ways. If you build something using this platform, share your project with us, we'd love to feature it or even collaborate on improvements. You can also suggest new features or templates you'd like to see added to CircuitDigest Cloud.
If you run into any issues, have feedback, or just want to show off what you've built, drop a comment below or reach out to us directly. Let's keep building and learning together!
GitHub Repository with Code and Circuit


Related Projects using Cloud SMS API
If you enjoyed this project or are exploring more ways to use the Circuit Digest Cloud SMS API, here are some related builds and resources you might find useful. Whether you're working with Arduino, ESP32, or just want to test the API quickly, these projects will help you get started faster
")
Learn how to send SMS for free using a simple HTTP-based API with Arduino, ESP32, ESP8266, NodeMCU, or Raspberry Pi—no GSM module or SIM card needed.

Learn how to send SMS from ESP32 using a free SMS API without a SIM card or GSM module. A simple HTTP-based method ideal for IoT notifications.

How to Send SMS with Arduino UNO R4 via Internet?
Send SMS using Arduino via the Internet without a GSM module. Learn how to use free SMS APIs with HTTP requests for IoT alerts and remote messaging.

How to Send SMS from NodeMCU without Using GSM Module?
Learn how to send SMS alerts from NodeMCU without a GSM module using a free SMS API. Ideal for IoT projects needing wireless text notifications.
Complete Project Code
import time
import requests
import adafruit_dht
import board
import RPi.GPIO as GPIO
from datetime import datetime

# === USER CONFIGURATION ===
API_KEY = 'xxxxxxxxxx'        # Your API Key
TEMPLATE_ID = '102'
MOBILE_NUMBER = '91xxxxxxxxxx' # Target Mobile Number
LOCATION = 'Home'
TEMP_THRESHOLD = 33             # °C: Trigger SMS if temp exceeds this
READ_INTERVAL = 10              # Seconds between sensor reads
COOLDOWN_TIME = 60              # Seconds to wait after sending SMS
API_URL = f'https://www.circuitdigest.cloud/send_sms?ID={TEMPLATE_ID}'

# === GPIO PINS ===
DHT_PIN = board.D4              # GPIO4 = Pin 7
GREEN_LED = 23                  # GPIO23 = Pin 16 (Success)
RED_LED = 24                    # GPIO24 = Pin 18 (Failure)

# === GPIO SETUP ===
GPIO.setmode(GPIO.BCM)
GPIO.setup(GREEN_LED, GPIO.OUT)
GPIO.setup(RED_LED, GPIO.OUT)

# === DHT11 SENSOR SETUP ===
dht = adafruit_dht.DHT11(DHT_PIN)

# === LED FEEDBACK FUNCTION ===
def led_feedback(success):
   if success:
       GPIO.output(GREEN_LED, GPIO.HIGH)
       time.sleep(1)
       GPIO.output(GREEN_LED, GPIO.LOW)
   else:
       GPIO.output(RED_LED, GPIO.HIGH)
       time.sleep(1)
       GPIO.output(RED_LED, GPIO.LOW)

# === SMS SEND FUNCTION ===
def send_sms(temp):
   current_time = datetime.now().strftime("%I:%M %p")
   var1 = f"{LOCATION} at {current_time}"
   var2 = f"{temp}C"

   payload = {
       "mobiles": MOBILE_NUMBER,
       "var1": var1,
       "var2": var2
   }

   headers = {
       "Authorization": API_KEY,
       "Content-Type": "application/json"
   }

   try:
       response = requests.post(API_URL, headers=headers, json=payload)
       if response.status_code == 200:
           print(f"[OK] SMS sent: {var1}, Temp = {var2}")
           print("Response:", response.json())
           led_feedback(True)
       else:
           print(f"[ERROR] SMS failed. Status: {response.status_code}")
           print("Response:", response.text)
           led_feedback(False)
   except requests.exceptions.RequestException as e:
       print("Connection error:", e)
       led_feedback(False)

# === MAIN LOOP ===
print("Monitoring temperature... (Press Ctrl+C to stop)")
try:
   while True:
       try:
           temperature = dht.temperature
           humidity = dht.humidity

           if temperature is not None:
               print(f"Temperature: {temperature}C | Humidity: {humidity}%")
               if temperature > TEMP_THRESHOLD:
                   send_sms(temperature)
                   time.sleep(COOLDOWN_TIME)  # Prevent repeated alerts
           else:
               print("Sensor read failed.")

       except Exception as sensor_error:
           print("Sensor error:", sensor_error)

       time.sleep(READ_INTERVAL)

except KeyboardInterrupt:
   print("Script terminated by user.")

finally:
   GPIO.cleanup()
