
The Raspberry Pi Pico SD card module is a simple yet very handy add-on that lets you store and access a lot of data using a standard microSD card. When interfacing the SD card module with Raspberry Pi Pico, you gain access to gigabytes of storage for sensor logging, configuration files, and time-stamped data. This comprehensive guide will show you how to build a fully functional Raspberry Pi Pico SD card reader using the SPI communication protocol, which means you can connect it to almost any microcontroller and start recording sensor data, saving config uration files, or storing time-stamped information with minimal effort. Most Raspberry Pi Pico SD card modules include a built-in 3.3V voltage regulator and basic level shifting, making them safe and stable to use with common development boards. If you're new to external storage, this is a great starting point, before moving on to other setups like SD card module interfacing with Arduino, where the same ideas are applied with slightly different hardware.
In this project, I'm utilising the same concept with the Raspberry Pi Pico SD card Arduino integration and enhancing the experience to make it more interactive. Since this is about interfacing the SD card module with the Raspberry Pi Pico, I’ve set up the Pico to respond directly to whatever the user types in the Serial Monitor. Want to create a file? Press a key. Want to enter your own text? Just type it in. Need to read from or delete a file? Simply give a command, and the Raspberry Pi Pico SD card module setup handles it immediately. This gives you a clear, real-time view of what's happening behind the scenes as the Pico communicates over SPI, initialises the SD card, and performs FAT32 file operations. By the time you try all the menu options, you’ll fully understand how to interface an SD card to Pico and how embedded systems handle external storage. And once you master these fundamentals of how to interface an SD card to Pico, you'll be well-prepared for more advanced projects, such as the non-contact wall-mount infrared thermometer with SD card logging, where long-term, reliable data storage is the foundation of the entire system.
Table of Contents
Understanding the Raspberry Pi Pico SD Card Module
The SD card module is a simple and reliable way to add external storage to your projects. When you interface an SD card to the pico, the Raspberry Pi Pico SD card module handles voltage regulation and level shifting automatically, protecting both the microcontroller and the microSD card. It uses the SPI interface, which makes it easy for microcontrollers like the Raspberry Pi Pico to send and receive data from a microSD card. Most modules come with a built-in 3.3V regulator and basic level shifting, so the SD card stays protected while you read and write files. For beginners, the Raspberry Pi Pico SD card reader is one of the easiest ways to start working with real data storage, like logging values, saving settings, or keeping simple text files, all with just a few wires. This makes the Raspberry Pi Pico SD card Arduino integration straightforward and beginner-friendly for data logging, configuration storage, and embedded file systems.
SD Card Module Pin Configuration for Raspberry Pi Pico
The image below explains the pins of the SD card module.
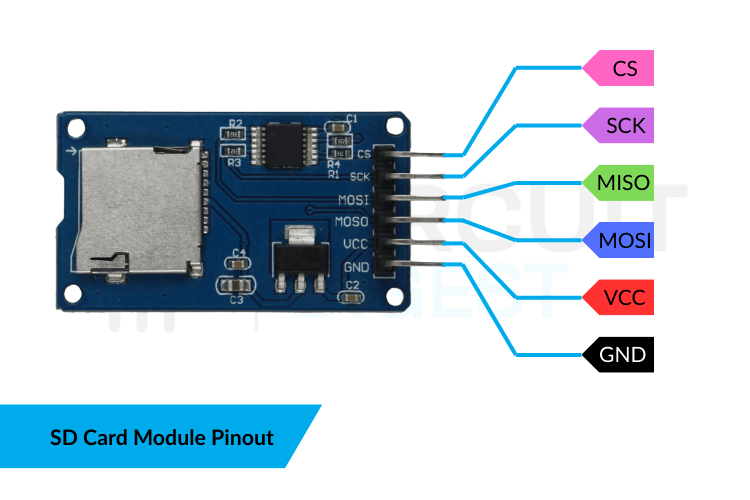
Usually, an SD card module includes the following pins:
| Pin | Function | Signal Description |
| VCC | Power | Connects to 3.3V on the Pico. |
| GND | Ground | Common reference ground. |
| MISO/DO | Master In Slave Out | SD → Pico data line. |
| MOSI/DI | Master Out Slave In | Pico → SD data line. |
| SCK | SPI Clock | Clock signal from Pico. |
| CS | Chip Select | Select the SD module on the SPI bus. |
Points to be Noted:
Some SD card modules label the data pins as DI (Data In) and DO (Data Out). DI actually stands for MOSI, while DO stands for MISO.
SD Card Module Hardware Components Explained
Understanding the internal components of your SD card module helps troubleshoot issues and ensures proper operation when interfacing the SD card module with Raspberry Pi Pico. The major components in the SD card module are explained below:
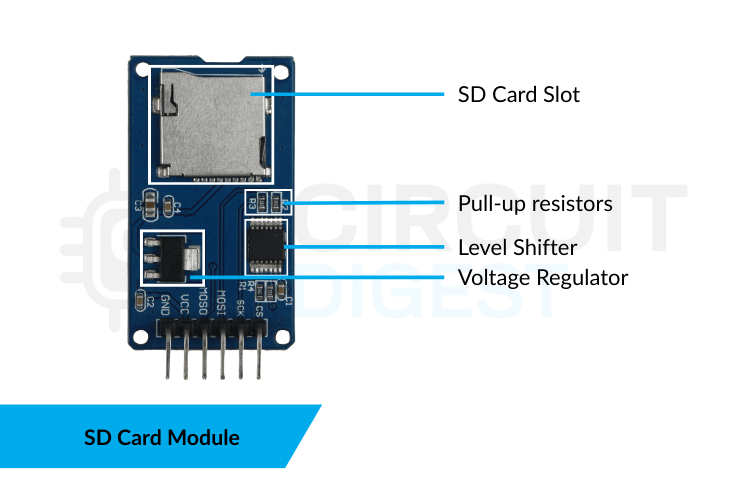
Key hardware elements on the SD card module include:
- AMS1117-3.3 Regulator
Steps down 5V to 3.3V, ensuring safe SD card operation. - Level Shifters (On some modules)
Transistor/resistor networks that convert 5V logic to 3.3V. - Pull-up Resistors
Maintain correct logic states on SPI lines. - MicroSD Socket
Accepts standard microSD cards.
Components Required for Raspberry Pi Pico SD Card Interface
The list of components required to interface the SD card module is listed in the table below.
Component | Quantity | Notes |
| Raspberry Pi Pico | 1 | RP2040-based microcontroller with SPI0 on pins GP16-GP19 |
| SD Card module | 1 | Must include 3.3V regulator and SPI interface |
| Breadboard | 1 | For prototyping connections |
| Jumper Wires | Several | Male-to-female or male-to-male depending on module |
| USB Cable | 1 | Micro-USB for power and programming |
Circuit Diagram: Interfacing SD Card Module with Raspberry Pi Pico Pin Configuration
The following wiring diagram shows the complete Raspberry Pi Pico SD card Arduino connection scheme using the Pico's default SPI0 interface. To interface the SD card with the Raspberry Pi Pico, refer to the following image,

Raspberry Pi Pico SD Card Module SPI0 Wiring Configuration
The pinout for connecting your Raspberry Pi Pico SD card module is explained below:
| Pico Pin | SD Pin | Description |
| 3V3 | VCC | Safe power for SD module |
| GND | GND | Common ground |
| GP19 | MOSI / DI | SPI0 MOSI |
| GP16 | MISO / DO | SPI0 MISO |
| GP18 | SCK | SPI0 Clock |
| GP17 | CS | Chip Select |
This wiring matches exactly with the Pico’s default SPI0 interface used by the Arduino-Pico core, so the SD library knows which pins to use for your Raspberry Pi Pico SD card reader. Once the Pico is properly connected, it communicates with the SD module through its SPI0 bus. The Arduino SD.h library takes care of the following things following operations for your Raspberry Pi Pico SD card reader:
- Sending and receiving data over the SPI bus
- Creating and deleting files
- Managing the memory used for reading and writing
- Handling folders and files on a FAT32-formatted SD card
This project includes a menu system that works with the Serial Monitor, letting users start SD card tasks on their Raspberry Pi Pico SD card reader interactively.
Preparing Your SD Card for Raspberry Pi Pico Interface
Proper SD card preparation is critical for successful interfacing of the SD card module with Raspberry Pi Pico. Follow these steps to ensure your Raspberry Pi Pico SD card reader works correctly:
Steps to Prepare the Card for Raspberry Pi Pico SD Card Module
- Remove all existing partitions using Disk Management.
- Create one primary partition, and make sure the card uses MBR, not GPT.
- Format the card to FAT32.
- If the SD card is larger than 8GB, create a partition of only 4GB or 8GB and leave the excess space unallocated.
- Windows won’t format cards larger than 32GB to FAT32 by default.
- For SDXC cards, use Rufus or GUIFormat to format them correctly.
- Insert the card into the SD module.
If the card isn’t formatted as FAT32 or if it uses a GPT partition table, your Raspberry Pi Pico SD card reader will not initialize it properly, and the serial monitor shows that “The SD card is not initialized”.
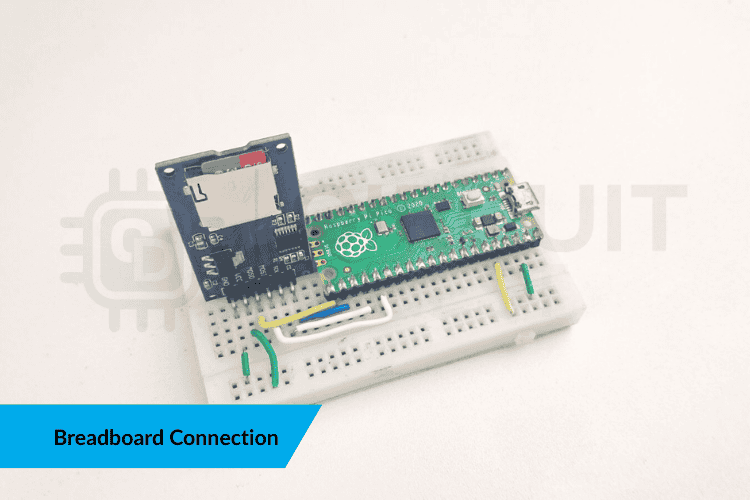
The following images show the breadboard interface of the SD card module with the Raspberry Pi Pico microcontroller.
Common Formatting Mistakes to Avoid with Raspberry Pi Pico SD Card Module
| Issue | Symptom | Solution |
| exFAT formatting | "SD init FAILED" error | Reformat to FAT32 using Rufus |
| GPT partition table | Card not detected | Convert to MBR partition table |
| Multiple partitions | Only first partition accessible | Use single primary partition |
| Improper insertion | No communication | Ensure card clicks into socket fully |
Raspberry Pi Pico Arduino Code for SD Card Module Interface
Proper SD card preparation is critical for successful interfacing of the SD card module with Raspberry Pi Pico. The following Raspberry Pi Pico SD card Arduino code creates an interactive menu system for file operations via the Serial Monitor. The firmware part consists of two libraries, one for SPI communication and another for SD card interfacing.
#include <SPI.h>
#include <SD.h>
const uint8_t CSPIN = 17;
const char *FILENAME = "demo.txt";
Here, SPI.h and SD.h give the Pico access to the SPI bus and SD card functions. The CSPIN value tells the library which GPIO pin is used as the Chip Select line, and demo.txt is the file we will create, write to, read from, and delete.
Next, the Pico begins Serial communication and tries to initialise the SD card:
Serial.begin(115200);
if (!SD.begin(CSPIN, SPI)) {
   Serial.println("SD init FAILED");
}
This sets the baud rate and mounts the SD card. If the card is not formatted correctly or the wiring is wrong, the SD initialisation will fail here.
The main loop waits for the user to enter a number in the Serial Monitor:
if (Serial.available()) {
   String s = Serial.readStringUntil('\n');
   char c = s.charAt(0);
   switch (c) { ... }
}
When the user types 1, 2, 3, or 4, the switch statement decides which SD-card action to perform.
Creating a file is simple:
File f = SD.open(FILENAME, FILE_WRITE);
f.println("Pico SD Demo initialized.");
f.close();
Opening a file in write mode automatically creates it if it doesn’t already exist. A default message is added, and the file is closed properly.
Writing custom text works in the same way, but this time the text comes from the user:
String text = Serial.readStringUntil('\n');
File f = SD.open(FILENAME, FILE_WRITE);
f.println(text);
f.close();
This appends whatever the user typed into the Serial Monitor.
Reading a file is just opening it in read mode and printing each character:
File f = SD.open(FILENAME, FILE_READ);
while (f.available()) {
   Serial.write(f.read());
}
This streams the file contents back to the Serial Monitor so the user can see exactly what was saved.
Finally, deleting the file is done with a single command:
SD.remove(FILENAME);
Serial.println("File deleted.");
This removes demo.txt from the SD card and resets the project back to the initial state.
Working Demonstration: Raspberry Pi Pico SD Card Module
When the system powers up with the Raspberry Pi Pico SD card properly connected:
- The Pico displays the SD menu options on the Serial Monitor.
- The user selects 1, 2, 3, or 4 to perform a specific file operation on the Raspberry Pi Pico SD card reader.
- The Pico carries out the action immediately on the SD card, and the Serial Monitor shows the result in real time.
This demo clearly walks through how the Pico handles file operations on a small storage module, a useful concept for IoT data logging, saving device settings, and storing information offline.
Troubleshooting Guide: Common Issues with Raspberry Pi Pico SD Card Module
Problem 1: "SD init FAILED" Error Message on Raspberry Pi Pico SD Card Reader.
If the SD card doesn’t start properly, the main reasons usually fall into one of these groups:
- The SD card is formatted as exFAT instead of FAT32 (very common with 32GB and larger SD cards).
- The wiring is incorrect; it happens often that MOSI and MISO are swapped.
- The level-shifter circuit on low-cost SD modules may not function reliably.
- The code might be using the wrong CS pin.
- The microSD card may not be fully inserted.
- The SD card itself could be faulty or picky, especially high-speed microSD cards.
This is the most common issue when interfacing SD card module with Raspberry Pi Pico pin configuration.
| Root Cause | How to Verify | Solution |
| Incorrect filesystem (exFAT/NTFS) | Check card properties on PC | Reformat to FAT32 using Rufus or GUIFormat |
| MOSI/MISO swapped | Double-check wiring diagram | Swap GP19 (MOSI) and GP16 (MISO) connections |
| Wrong CS pin in code | Verify CSPIN = 17 matches GP17 wiring | Update CSPIN constant or rewire to GP17 |
| Card not fully inserted | Listen for click when inserting | Remove and reinsert card firmly |
| Defective SD card | Test card on PC/camera | Try different known-good card |
| Poor breadboard connections | Check continuity with multimeter | Reseat wires, avoid damaged breadboard rows |
Problem 2: File Cannot Be Opened on Raspberry Pi Pico SD Card Reader
If the card initialises, but files won’t open:
- The SD card may not have a valid FAT32 primary partition.
- The filename or path may be incorrect, or the file wasn’t created beforehand.
- The SD card might be write-protected (rare but possible with some adapters).
Problem 3: Garbage Characters When Reading Files from Raspberry Pi Pico SD Card Module
- If the Serial Monitor shows unreadable characters:
- The Serial Monitor baud rate isn’t set to 115200; it must match the code.
The SD card might not be receiving stable power, causing corrupted or incomplete reads.
Frequently Asked Questions About Raspberry Pi Pico SD Card Module
⇥ 1. My 64GB card isn't working, but the wiring is perfect. Why?
It’s likely a formatting issue. SD cards larger than 32GB ship as exFAT, but the standard libraries used here only understand FAT32. Since Windows struggles to format large cards to FAT32, use a tool like Rufus or GUIFormat to force it. Once converted, the Pico should recognise it immediately.
⇥ 2. Can I connect a sensor and the SD card at the same time?
Yes, that’s the beauty of SPI. You can share the MOSI, MISO, and SCK pins with other sensors. You just need to give each device its own unique Chip Select (CS) pin. Think of the CS pin as a switch - pull it low for the device you want to talk to, and keep the others high.
⇥ 3. Can I use different pins? I need GP16-19 for something else.
Definitely. The Pico is very flexible. You can move connections to other SPI-capable pins (like using SPI1 on GP10–13). You just have to make sure you define the correct pins in your code setup before initialising the SD library.
⇥ 4. Should I power the module with 5V or 3.3V?
Stick to 3.3V. While some modules have regulators to handle 5V input, the Raspberry Pi Pico’s data pins are strictly 3.3V. If a 5V module leaks high voltage back into your Pico’s data lines, it could fry the board. Powering everything from the Pico’s 3V3 pin is the safest bet.
⇥ 5. What may be the reasons why the SD card may not work after being accessed several times?
Likely, your SD card is not being supplied with enough power to operate properly. The requirements for writing to an SD card are approximately 50-200 mA of current flow to the SD card. Make sure that you use a USB cable or power source that provides enough current to power the SD card and that it is not connected to the low-power rails on a breadboard. One way to enhance the decoupling capability of the SD card module is to place a 10µF-100µF decoupling capacitor at the VCC pin of the SD card module.
⇥ 6. What is the maximum size of SD card supported by the Raspberry Pi Pico?
The Arduino SD library currently supports FAT32 partitions with a maximum size of 32 GB; however, larger cards will work if formatted to FAT32 (no exFAT formatting). Other than the maximum FAT32 size limitation, there are no limitations related to the maximum size of SD cards for devices containing an RP2040 chip, such as the Raspberry Pi Pico.
⇥ 7. I get "SD Init Failed" errors with specific SD cards. Why?
Not all SD cards will read in the same way because manufacturers of SD Cards have different implementations of SPI timing. Newer generation SD Cards (UHS-I/II) can experience problems when interfaced to the basic implementation of SPI. To resolve this issue, select a Class 4 or Class 10 SD Card and avoid UHS-related markings on the card. Typically, microcontrollers will have better compatibility with SD cards from the manufacturers Samsung, SanDisk, and Kingston.
GitHub Repository
Access the complete interfacing SD card module with Raspberry Pi Pico project repository, including Arduino sketch, wiring diagrams, demonstration videos, and troubleshooting documentation:


Conclusion: Mastering SD Card Interfacing with Raspberry Pi Pico
The use of an interfacing SD card module with Raspberry Pi Pico allows for creating complex Embedded Applications that retain information through Non-Volatile Storage. The tutorial outlined everything about making the hardware connection, how to implement the Raspberry Pi Pico SD card Arduino code, how to format the SD card as FAT32, and how to perform Real-Time File Operations using the Serial Monitor, as well as different methods for troubleshooting problems. To ensure the reliability of the connection between interface sd card to pico, remember to format your SD Card as FAT32, use MBR partition tables, check that you have correctly connected the MOSI/MISO pins, only Power the card from the 3V3 pin on your Pico, and make sure that you properly close your files after using them or you risk corrupting the file and/or possibly damaging the card permanently.
This project was created by the CircuitDigest engineering team. Our experts focus on creating practical, hands-on tutorials that help makers and engineers master Raspberry Pi Pico projects, Arduino projects and IoT development projects.
I hope you liked this article and learned something new from it. If you have any doubts, you can ask in the comments below or use our CircuitDigest forum for a detailed discussion.
Related Data Logger Projects with Raspberry Pi and Arduino
These projects show how to record, save, and monitor different types of data using microcontrollers like Arduino and Raspberry Pi. Check out the list of projects below

Micro SD Card Module with Arduino: Understanding and Interfacing
Learn how to connect a micro SD card module to an Arduino step by step. This beginner-friendly guide covers wiring, SPI communication, code for reading and writing files, and practical data logging applications.

Non-Contact Wall Mount Digital Infrared Thermometer with SD Card Logging
This project builds a wall-mounted IR thermometer using Arduino. Once installed, anyone can walk up to the sensor, get their temperature scanned automatically, and view the reading on the LCD display.

Temperature Data Logger using Raspberry Pi Pico and DHT22 Temperature Sensor
In this project, we will make a temperature data logger using Raspberry Pi Pico. With this temperature monitoring system, you can easily monitor, track and generate graphs to understand daily temperature trends.

OBD-II Data Logger with IoT Dashboard and Dashcam
An all-in-one Car Accessory System that works as a dashcam, OBD-II logger, GNSS tracker, and IoT device - recording video, tracking location, monitoring vehicle health, and storing data on an SD card with remote access via an IoT dashboard.
Complete Project Code
#include <SPI.h>
#include <SD.h>
const int SD_CS = 17;            // GP17
const char *FNAME = "demo.txt";  // file on SD
void printMenu() {
 Serial.println();
 Serial.println(F("===== SD Menu ====="));
 Serial.println(F("1 - Create file"));
 Serial.println(F("2 - Write a line to file (append)"));
 Serial.println(F("3 - Read file"));
 Serial.println(F("4 - Delete file"));
 Serial.println(F("Enter choice and press Enter:"));
 Serial.print("> ");
}
void setup() {
 Serial.begin(115200);
 while (!Serial) ; // wait for Serial (on some cores)
 Serial.println();
 Serial.println(F("Pico SD Menu Demo"));
 if (!SD.begin(SD_CS)) {
   Serial.println(F("SD init FAILED. Check wiring & 3.3V power."));
   while (1) delay(500);
 }
 Serial.println(F("SD initialized OK."));
 printMenu();
}
String readSerialLine() {
 // Wait for a line from Serial, return trimmed string
 while (!Serial.available()) {
   delay(10);
 }
 String s = Serial.readStringUntil('\n');
 s.trim();
 return s;
}
void createFile() {
 if (SD.exists(FNAME)) {
   Serial.println(F("File already exists."));
   return;
 }
 File f = SD.open(FNAME, FILE_WRITE); // creates file
 if (!f) {
   Serial.println(F("Create FAILED."));
   return;
 }
 f.close();
 Serial.println(F("File created."));
}
void writeFile() {
 if (!SD.exists(FNAME)) {
   Serial.println(F("File does not exist. Create it first (press 1)."));
   return;
 }
 Serial.println(F("Type the text to append and press Enter:"));
 Serial.print("> ");
 String line = readSerialLine();
 File f = SD.open(FNAME, FILE_WRITE);
 if (!f) {
   Serial.println(F("Open for write FAILED."));
   return;
 }
 f.println(line);
 f.flush();
 f.close();
 Serial.println(F("Appended to file."));
}
void readFile() {
 if (!SD.exists(FNAME)) {
   Serial.println(F("File does not exist."));
   return;
 }
 File f = SD.open(FNAME, FILE_READ);
 if (!f) {
   Serial.println(F("Open for read FAILED."));
   return;
 }
 Serial.println(F("--- File content start ---"));
 while (f.available()) {
   Serial.write(f.read());
 }
 Serial.println();
 Serial.println(F("--- File content end ---"));
 f.close();
}
void deleteFile() {
 if (!SD.exists(FNAME)) {
   Serial.println(F("File does not exist."));
   return;
 }
 if (SD.remove(FNAME)) {
   Serial.println(F("File deleted."));
 } else {
   Serial.println(F("Delete FAILED."));
 }
}
void loop() {
 if (Serial.available()) {
   String cmd = Serial.readStringUntil('\n');
   cmd.trim();
   if (cmd.length() == 0) {
     printMenu();
     return;
   }
   char c = cmd.charAt(0);
   switch (c) {
     case '1':
       createFile();
       break;
     case '2':
       writeFile();
       break;
     case '3':
       readFile();
       break;
     case '4':
       deleteFile();
       break;
     default:
       Serial.println(F("Unknown choice."));
       break;
   }
   // show menu again
   printMenu();
 }
}
