

In our everyday lives, environmental conditions like temperature and humidity can have a big impact, whether it’s in your home, office, greenhouse, or server room. Imagine leaving your room for a few hours and suddenly discovering that the temperature had got too high or the air had become too humid. Keeping track of these changes in real time can be challenging, especially if you can’t constantly monitor a display or dashboard.
This is where IoT-based monitoring systems come to the rescue. They allow devices to automatically sense and report environmental changes, keeping you informed even when you’re away. Among the simplest and most effective ways to stay updated is through email notifications, which send detailed alerts directly to your inbox whenever something important happens. In this project, we will show you exactly how to send email alert using Arduino paired with a DHT11 temperature and humidity sensor. The DHT11 monitors the environment continuously, and when readings exceed your preset limits. The Arduino Uno R4 WiFi reads sensor data continuously and, whenever readings exceed your preset threshold, it triggers an Arduino email notification through the CircuitDigest Cloud Email API over a secure HTTPS connection, no SMTP configuration required. Once you are ready, the full Arduino email alert system tutorial below will walk you through every step. For newcomers, you can first check out tutorials on creating a CircuitDigest Cloud account and How to Send Email, so are you ready to set up your own alert system efficiently? Let's get started…
Quick Answer: How to Send Email Notification Using Arduino
- Connect a DHT11 sensor to Digital Pin 2 of an Arduino Uno R4 WiFi.
- Include the
WiFiS3andDHTlibraries in your Arduino sketch. - Enter your WiFi credentials and CircuitDigest Cloud API key.
- Define a temperature threshold (e.g., 30 °C).
- When the threshold is exceeded, the board sends a JSON payload via HTTPS to the cloud email API.
- The API dispatches the Arduino email alert to your inbox with live sensor readings.
Table of Contents
Components Required for the Arduino Email Alert System
The table below lists every component needed to build this Arduino-based email notification alert system. The Arduino Uno R4 WiFi's onboard ESP32-S3 co-processor handles all wireless communication; no external WiFi shield is needed.
| Components | Quantity |
| Arduino UNO R4 | 1 |
| DHT11 Sensor | 1 |
| Breadboard | 1 |
| Connecting Wires | Required Amount |
Circuit Diagram of the Arduino Email Alert System
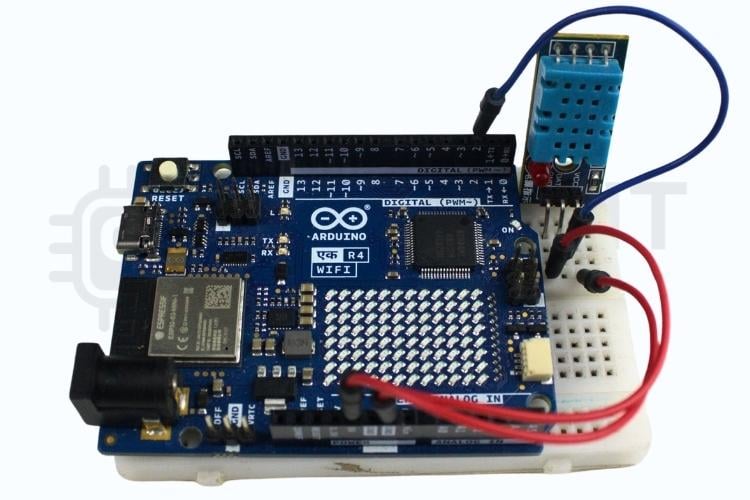
The wiring for this Arduino send email alert project is deliberately minimal. In the image, you can see that the DHT11 sensor is used to measure temperature and humidity. Its VCC pin is connected to 5V and GND to ground on the Arduino Uno R4. The data pin is connected to Digital Pin 2 with the internal pull-up resistor enabled, ensuring reliable communication. This setup allows the Arduino to continuously read the sensor values. The wiring for this Arduino send email alert project is deliberately minimal.

DHT11 to Arduino Uno R4 - Pin Connection Table
| DHT11 Pin | Arduino Uno R4 Pin | Notes |
| VCC (Pin 1) | 5V | Power supply |
| DATA (Pin 2) | Digital Pin 2 | Internal pull-up enabled in code |
| NC (Pin 3) | — (leave unconnected) | Not used |
| GND (Pin 4) | GND | Common ground |
Hardware Setup of the Arduino Uno R4 Email Alert System
The hardware setup shown below includes the Arduino Uno R4, a DHT11 sensor, and the built-in Wi-Fi for email alerts. The DHT11 is connected with VCC to 5V, GND to ground, and the data pin to Digital Pin 2 with the internal pull-up resistor. The Wi-Fi provides internet connectivity to send email notifications.
Setting Up CircuitDigest Cloud for Arduino Email Notifications
You will need to create a valid account with CircuitDigest Cloud that has an email template set up before you can upload any code. CircuitDigest Cloud is a cloud service that will act as a relay between the Arduino and the recipient's inbox: it handles SMTP, authentication and delivery, allowing the microcontroller to just perform one HTTPS POST request.
How to Set Up Email API
» Register for a free account at circuitdigest.cloud and log into your dashboard.
» Create an API key via the API Keys section of your profile page. Save this key for use in your Arduino sketch code - you will paste it into the Arduino sketch.
» Create an email template where you've defined variable names that are consistent with those in your Arduino sketch: subject, title, description, var1, and var2, and write down the corresponding Template ID for later use.
» You need to "verify" that the email address of the recipient is in your CircuitDigest dashboard per Anti-Spam policies.
» Put the CircuitDigest API Key, Template ID and Recipient Email into the Constants area of your Arduino code, upload the code and create an email message.
How the Arduino Uno R4 Based Email Alert System Works
The system starts by initialising the DHT11 temperature and humidity sensor and establishing a Wi-Fi connection using the onboard wireless capability of the Arduino Uno R4 controller. Once the network connection is successfully established, the system enters continuous monitoring mode. The DHT11 sensor periodically measures the surrounding temperature and humidity values at fixed time intervals and sends this data to the controller for further processing.
| Stage | Action | Outcome |
| Initialisation | DHT11 and WiFi libraries start; Arduino connects to 2.4 GHz network | Serial Monitor shows IP address and "WiFi connected" |
| Continuous monitoring | DHT11 polled every 2 seconds for temperature (°C) and humidity (%RH) | Values printed to the Serial Monitor in real time |
| Threshold check | Temperature compared to TEMP_THRESHOLD (default 30 °C) | Normal: monitoring continues; Exceeded: alert triggered |
| HTTPS API call | WiFiSSLClient sends a JSON payload to circuitdigest.cloud over port 443 | Cloud API receives temperature and humidity data |
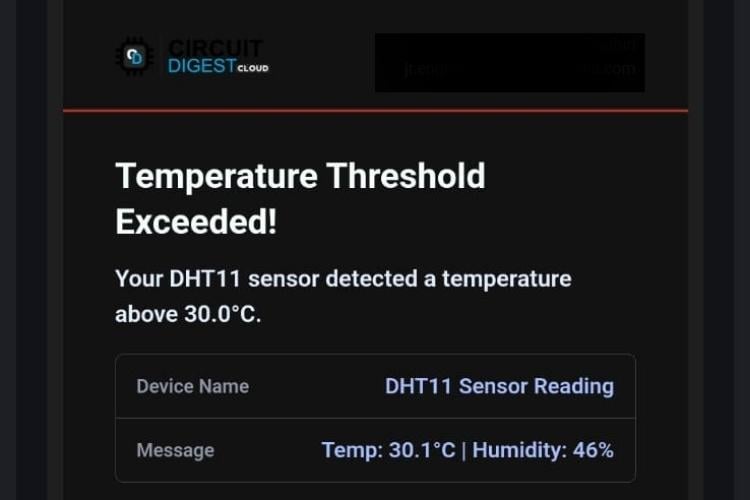
| Email dispatch | Cloud API renders the template and sends an email to the recipient address | An email with live DHT11 readings arrives in the inbox within seconds |
| Alert reset | emailSent flag prevents repeat alerts; resets when temp drops below threshold | The system is ready for the next abnormal event |
The measured temperature value is then compared with a predefined threshold limit set in the program. Under normal conditions, when the temperature remains below the threshold, the system continues monitoring without triggering any alert.
When the temperature exceeds the defined threshold value, the system treats this condition as an alert event. At this point, Arduino send email alert automatically through the cloud email API containing the current temperature, humidity level, and alert information. Using a secure HTTPS connection, this request is sent to the CircuitDigest Cloud Email Notification API, which processes the data and generates an alert email.
To avoid repeated alerts for the same event, the system uses internal flags and timing control. Once an alert email is successfully sent, further emails are temporarily blocked until the temperature returns to a normal range. When the temperature falls below the threshold again, the alert status is reset, and the system becomes ready to detect the next abnormal condition. Need more project ideas for the Arduino? Go through our Arduino Projects.
Arduino Email Alert Code Explanation
This code implements a WiFi-enabled temperature alert system using an Arduino board and a DHT11 sensor. When the temperature exceeds the limit, the Arduino connects securely to a cloud email API using HTTPS and sends an alert email containing real-time sensor data. The system automatically resets the alert when the temperature returns to normal, ensuring reliable and efficient monitoring. The full sketch for this Arduino send email alert project is structured in four logical blocks:
#include <WiFiS3.h>
#include <DHT.h>
#define DHTPIN 2
#define DHTTYPE DHT11
DHT dht(DHTPIN, DHTTYPE);
This section includes the required libraries for WiFi and DHT11 sensor operation. The sensor pin and type are defined to ensure correct communication. A DHT object is created to read temperature and humidity values from the sensor.
const char* ssid = "yourwifiname";
const char* password = "password";
const char* host = "www.circuitdigest.cloud";
const int port = 443;
This part stores WiFi credentials for internet connectivity. It also defines the cloud email server and secure HTTPS port. These details enable the Arduino to send alert emails over the internet.
const float TEMP_THRESHOLD = 30.0;
const unsigned long READ_INTERVAL = 2000;
const unsigned long RETRY_DELAY = 10000;
This section defines the temperature limit for triggering alerts. The read interval controls how often sensor data is read. The retry delay prevents repeated email attempts within a short time.
bool sendEmail(float temp, float hum) {
 WiFiSSLClient client;

 Serial.println("\n Connecting to server...");
 if (!client.connect(host, port)) {
   Serial.println(" HTTPS connection failed");
   return false;
 }
char payload[512];

 snprintf(payload, sizeof(payload),
   "{"
   "\"to_email\":\"%s\","
   "\"template_id\":%d,"
   "\"variables\":{"
     "\"subject\":\"Temperature Alert from DHT11 Sensor\","
     "\"title\":\"Temperature Threshold Exceeded!\","
     "\"description\":\"Your DHT11 sensor detected a temperature above %.1f°C.\","
     "\"var1\":\"DHT11 Sensor Reading\","
     "\"var2\":\"Temp: %.1f°C | Humidity: %.0f%%\""
   "}}",
   toEmail,
   templateID,
   TEMP_THRESHOLD,
   temp,
   hum
 );
This function establishes a secure HTTPS connection with the email server. Sensor values are formatted into a JSON payload. The payload is sent to the server to trigger the alert email.
if (temperature > TEMP_THRESHOLD) {
 sendEmail(temperature, humidity);
}
This logic continuously monitors the temperature value. When the temperature exceeds the defined threshold, an email alert is sent. The system avoids repeated alerts by controlling the email trigger condition. Explore the Arduino email alert GitHub repository (linked below) for the complete, ready-to-upload sketch, including all headers and setup() function.
Troubleshooting the Arduino Email Notification System
Issue 1: WiFi Not Connecting
If the Arduino fails to connect to WiFi, first verify that the SSID and password are entered correctly. Also, check the serial monitor for connection status messages to identify connection failures.
Issue 2: DHT11 Sensor Not Giving Readings
If temperature or humidity values appear as NaN, check the sensor wiring carefully, especially the data pin connection. Ensure the correct PIN and sensor type (DHT11) are defined in the code. Provide sufficient power and allow a startup delay for the sensor. Avoid long wires, as they may cause unstable readings.
Issue 3: Email Not Received
If the email alert is not received, verify that the API key, template ID, and recipient email address are correct. Check whether the Arduino is successfully connecting to the email server using HTTPS. Monitor the server response in the serial monitor for error messages. Also, confirm that the email has not been filtered into the spam folder.
Issue 4: Multiple Email Alerts Sent Repeatedly
If multiple alert emails are sent continuously, check the logic controlling the emailSent flag. Ensure that the flag resets only when the temperature returns to normal. Verify the retry delay setting to prevent frequent email attempts. Proper timing control helps avoid unnecessary alerts.
Issue 5: Wrong Data Appearing in Email Content
If incorrect or placeholder values appear in the email, verify that the JSON payload variables match the email template variables. Ensure that temperature and humidity values are correctly formatted before sending. Debug by printing the payload in the serial monitor. Correct variable mapping ensures accurate email content.
Real-World Applications of Arduino Email Alert Systems
Below are six proven use cases where an Arduino email notification system adds measurable value.
- Industrial Temperature Monitoring
Used in factories to monitor equipment temperature and send alerts before overheating causes damage or downtime. - Server Room Safety System
Provides early warning for abnormal temperature rise in server rooms, preventing hardware failure and data loss. - Home Automation and Safety
Can notify users through email when indoor temperature crosses safe limits, improving comfort and safety. - Cold Storage Monitoring
Ensures temperature-sensitive goods remain within safe limits by sending alerts during deviations. - Smart Agriculture
Helps farmers remotely monitor greenhouse or storage conditions for crops using automated alerts. - Educational and IoT Training Projects
Ideal for learning IoT concepts such as sensors, cloud integration, and real-time notifications.
This Arduino email alert system demonstrates how a low-cost DHT11 sensor combined with the Arduino Uno R4 WiFi's onboard wireless capability and a cloud REST API can deliver professional-grade remote monitoring in under an hour of build time. This Arduino email alert system shows how a simple sensor system can be made more useful by adding internet connectivity and real-time Arduino email notification features. It helps in monitoring conditions automatically without the need for constant checking. The alert feature makes the system more reliable by giving timely updates when attention is needed. The design is easy to understand and can be improved further by adding more features. It also helps learners understand how sensors, WiFi, and cloud services work together. Overall, it is a practical and user-friendly solution for basic monitoring applications. Also, go through our Automatic AC Temperature Controller using Arduino, DHT11 and IR Blaster to get more ideas in monitoring the parameters in the real world. If you want to implement this project using a different microcontroller board, you can also check out our detailed tutorial using the Raspberry Pi Pico W.
Frequently Asked Questions
1. How does the system send email alerts?
The Arduino connects to the internet using WiFi and communicates with a cloud email API. When the threshold is exceeded, it sends an alert email using a secure HTTPS connection.
2. Why is a temperature threshold required?
The threshold helps decide when an alert should be triggered. It avoids unnecessary alerts during normal temperature conditions.
3. Can the system send multiple emails continuously?
No, the code uses a control flag and timing logic to send only one alert per high-temperature event. This prevents repeated notifications.
4. Is this system limited to email alerts only?
No, the system can be extended to send SMS, mobile notifications, or cloud dashboard updates with minor code changes.
5. What happens if the payload format is incorrect?
If the payload structure or variable names are wrong, the server may reject the request. This can result in failed email delivery or missing data in the email content.
6. How is real-time sensor data added to the payload?
The Arduino reads the sensor values and inserts them into the payload using formatted strings. This ensures that each email contains the latest temperature and humidity readings.
Arduino Email Alert GitHub Repository
You can find the fully developed and tested Arduino sketch in the Arduino Email Alert GitHub repository. This repository contains the complete .ino file as well as all of the library files and setup code, along with the sendEmail() function, which means you can clone the entire project, configure it to your specific credentials, and upload the code to your Arduino Uno R4 WiFi board.


Projects Using Email Feature
If you need more projects related to the Email Feature, check out the links below

Real-Time Image Capture and Email Notification Using ESP32-CAM
ESP32-CAM real-time image capture with email notifications using Wi-Fi and API integration for instant smart surveillance alerts.

How to Send E-mail using PIC Microcontroller and ESP8266
Send emails using PIC16F877A and ESP8266 by interfacing over UART and using AT commands to trigger email alerts via SMTP on a Wi-Fi network

IOT-based Raspberry Pi Home Security System with Email Alert
Raspberry Pi IoT intruder alert system using PIR sensor to detect motion, capture visuals, and send instant email or mobile alerts for smart security.
Complete Project Code
#include <WiFiS3.h>
#include <DHT.h>
/* ================= DHT SENSOR ================= */
#define DHTPIN 2
#define DHTTYPE DHT11
DHT dht(DHTPIN, DHTTYPE);
/* ================= WIFI DETAILS ================= */
const char* ssid = "yourssid";
const char* password = "password";
/* ================= EMAIL API DETAILS ================= */
const char* host = "www.circuitdigest.cloud";
const int port = 443;
const char* apiKey = "yourapikey";
const char* toEmail = "your regis mailid";
const int templateID = 1001;
/* ================= SETTINGS ================= */
const float TEMP_THRESHOLD = 30.0;
const unsigned long READ_INTERVAL = 2000;  // 2 seconds
const unsigned long RETRY_DELAY = 10000;   // 10 seconds after failed email
/* ================= FLAGS ================= */
bool emailSent = false;
unsigned long lastReadTime = 0;
unsigned long lastEmailAttempt = 0;
/* ================= SEND EMAIL ================= */
bool sendEmail(float temp, float hum) {
 WiFiSSLClient client;

 Serial.println("\n Connecting to server...");

 // WiFiSSLClient on UNO R4 doesn't need setInsecure() - it handles SSL automatically

 if (!client.connect(host, port)) {
   Serial.println(" HTTPS connection failed");
   return false;
 }
 /* -------- BUILD COMPLETE JSON PAYLOAD -------- */
 char payload[512];

 snprintf(payload, sizeof(payload),
   "{"
   "\"to_email\":\"%s\","
   "\"template_id\":%d,"
   "\"variables\":{"
     "\"subject\":\"Temperature Alert from DHT11 Sensor\","
     "\"title\":\"Temperature Threshold Exceeded!\","
     "\"description\":\"Your DHT11 sensor detected a temperature above %.1f°C.\","
     "\"var1\":\"DHT11 Sensor Reading\","
     "\"var2\":\"Temp: %.1f°C | Humidity: %.0f%%\""
   "}}",
   toEmail,
   templateID,
   TEMP_THRESHOLD,
   temp,
   hum
 );
 /* -------- SEND HTTP REQUEST -------- */
 client.println("POST /api/v1/email/send HTTP/1.1");
 client.print("Host: "); client.println(host);
 client.print("Authorization: "); client.println(apiKey);
 client.println("Content-Type: application/json");
 client.print("Content-Length: "); client.println(strlen(payload));
 client.println("Connection: close");
 client.println();
 client.println(payload);
 /* -------- DEBUG: Print payload -------- */
 Serial.println(" Sending payload:");
 Serial.println(payload);
 /* -------- WAIT FOR RESPONSE -------- */
 unsigned long timeout = millis();
 while (!client.available()) {
   if (millis() - timeout > 10000) {
     Serial.println(" Server timeout");
     client.stop();
     return false;
   }
 }
 /* -------- READ AND PARSE RESPONSE -------- */
 bool success = false;
 Serial.println("\n Server response:");

 while (client.available()) {
   String line = client.readStringUntil('\n');
   Serial.println(line);

   // Check for success indicators
   if (line.indexOf("200 OK") >= 0 || line.indexOf("\"success\":true") >= 0) {
     success = true;
   }
 }
 client.stop();

 if (success) {
   Serial.println("\n Email sent successfully!");
 } else {
   Serial.println("\n Email may have failed - check response above");
 }

 return success;
}
/* ================= SETUP ================= */
void setup() {
 Serial.begin(9600);
 delay(1000);

 Serial.println("\n╔════════════════════════════════════════╗");
 Serial.println("║   DHT11 Temperature Alert System      ║");
 Serial.println("╚════════════════════════════════════════╝\n");

 // Initialize DHT sensor
 Serial.println("  Initializing DHT11 sensor...");
 dht.begin();
 delay(2000);  // DHT11 needs startup time
 Serial.println(" DHT11 ready\n");
 // Connect to WiFi
 Serial.println(" Connecting to WiFi...");
 Serial.print("SSID: ");
 Serial.println(ssid);

 WiFi.begin(ssid, password);

 int attempts = 0;
 while (WiFi.status() != WL_CONNECTED && attempts < 30) {
   delay(500);
   Serial.print(".");
   attempts++;
 }

 Serial.println();

 if (WiFi.status() == WL_CONNECTED) {
   Serial.println(" WiFi connected successfully!");
   Serial.print(" IP Address: ");
   Serial.println(WiFi.localIP());
   Serial.print(" Signal Strength: ");
   Serial.print(WiFi.RSSI());
   Serial.println(" dBm");
 } else {
   Serial.println(" WiFi connection failed!");
   Serial.println("  System will continue trying to reconnect...");
 }

 Serial.println("\n╔════════════════════════════════════════╗");
 Serial.println("║         Monitoring Started            ║");
 Serial.println("╚════════════════════════════════════════╝");
 Serial.print(" Alert Threshold: ");
 Serial.print(TEMP_THRESHOLD);
 Serial.println(" °C");
 Serial.print("  Reading Interval: ");
 Serial.print(READ_INTERVAL / 1000);
 Serial.println(" seconds\n");

 Serial.println("━━━━━━━━━━━━━━━━━━━━━━━━━━━━━━━━━━━━━━━━\n");
}
/* ================= LOOP ================= */
void loop() {
 unsigned long currentMillis = millis();

 // Non-blocking delay for sensor readings
 if (currentMillis - lastReadTime < READ_INTERVAL) {
   return;
 }
 lastReadTime = currentMillis;
 /* -------- CHECK WIFI CONNECTION -------- */
 if (WiFi.status() != WL_CONNECTED) {
   Serial.println("  WiFi disconnected - attempting reconnect...");
   WiFi.begin(ssid, password);
   delay(5000);
   return;
 }
 /* -------- READ SENSOR DATA -------- */
 float humidity = dht.readHumidity();
 float temperature = dht.readTemperature();
 if (isnan(humidity) || isnan(temperature)) {
   Serial.println(" Failed to read from DHT11 sensor");
   Serial.println("   Check wiring and connections\n");
   return;
 }
 /* -------- DISPLAY READINGS -------- */
 Serial.print("  Temperature: ");
 Serial.print(temperature, 1);
 Serial.print(" °C  |   Humidity: ");
 Serial.print(humidity, 0);
 Serial.print(" %  |  Status: ");
 /* -------- EMAIL ALERT LOGIC -------- */
 if (temperature > TEMP_THRESHOLD) {
   Serial.print(" HIGH ALERT");

   // Send email if not already sent and retry delay has passed
   if (!emailSent && (currentMillis - lastEmailAttempt > RETRY_DELAY)) {
     Serial.println("\n   └─> Temperature exceeded threshold!");
     Serial.print("   └─> Sending email alert...");

     lastEmailAttempt = currentMillis;

     if (sendEmail(temperature, humidity)) {
       emailSent = true;
       Serial.println("   └─>  Alert email delivered");
     } else {
       Serial.println("   └─>   Email delivery failed, will retry");
     }
   } else if (emailSent) {
     Serial.println(" (Email already sent)");
   } else {
     Serial.println(" (Waiting for retry delay)");
   }
 } else {
   Serial.println(" NORMAL");

   // Reset email flag when temperature returns to normal
   if (emailSent) {
     emailSent = false;
     Serial.println("   └─> Temperature normalized - alert reset");
   }
 }

 Serial.println();
}
