
In previous article, we covered various Music streaming softwares which can be installed on Raspberry Pi. Here we will pick one of them and install it on Raspberry Pi. Since we covered the installation of media servers like Kodi and Plex in our past tutorials, I feel this time, we should turn the spotlight towards the audiophiles and cover installing one of the music servers on the Raspberry Pi.
If you are like me, you probably use your Raspberry Pi(s) for more than one task as such the idea of installing an entire operating system for a music server only may not be too appealing, so for this tutorial we will be focussing on Mopidy since it allows us to install, without changing the distro. After installing Mopidy, we will install the Spotify extension on Raspberry pi to stream songs from Spotify. More details on Mopidy have been discussed in the previous article.
This guide is based on the Raspberry Pi 3 running the Raspbian Stretch OS. I would assume you are familiar with setting up the Raspberry Pi with the Raspbian stretch OS, and you know how to SSH into the Raspberry Pi using a terminal software like putty or connect the Pi to a Monitor via HDMI to boot the Raspbian Stretch desktop. If you have issues with any of this, there are tons of Raspberry Pi Tutorials on this website that can help.
Required Components
The only component we need for Raspberry Pi 3 Mopidy Server is the Raspberry Pi and everything necessary to get it up and running.
- Raspberry Pi 3 (The guide should also work for pi 2)
- SD card with Raspbian Stretch preloaded
- Ethernet cable/ Mouse and Keyboard, alongside HDMI cable to connect to a Monitor
With the SD card inserted, connect the pi to the Monitor via the HDMI cable and power the PI. This should boot the pi to the raspbian stretch desktop. If a desktop is not available, you can also choose to setup Raspberry pi in headless mode to do this over SSH or view the Pi’s desktop from a PC using the VNC Viewer.
Once the Pi’s desktop opens, follow the steps below to install and setup Mopidy on Rpi, and to connect Spotify with Raspberry Pi 3.
1. Install Mopidy in Raspberry Pi
The easiest way to install Mopidy on stretch is from the Mopidy APT Archive. Using this method, Mopidy is automatically updated whenever the pi is updated. To do this follow the steps below;
Step 1: Update the Pi
As usual, we start by updating and upgrading the pi to ensure everything is up to date and prevent compatibility issues. To do this, run;
Sudo apt-get update
Sudo apt-get upgrade
Step 2: Add the Archive’s GPG key
Do this by running;
wget -q -O - https://apt.mopidy.com/mopidy.gpg | sudo apt-key add -
The terminal should respond with “OK”
Step 3: Add the APT repo to your package sources
Next, we add the Mopidy Apt repo to the package sources list on the Raspberry Pi. Do this by running;
sudo wget -q -O /etc/apt/sources.list.d/mopidy.list https://apt.mopidy.com/stretch.list
Step 4: Run Mopidy Install Command
Finally update the Pi, so the new package list is registered and as soon as the update is complete, install Mopidy. Do note, a reboot might be necessary after updating the pi.
To do this run;
sudo apt-get update
Followed by:
sudo apt-get install mopidy
With this done, you should now have Mopidy installed on the Pi.
2. Configure Mopidy
Mopidy requires some basic configuration before it can be used. The extent to which the configuration goes technically depends on you but there are certain basic configurations that must be in place.
These configurations can either be created manually by running;
sudo nano .config/mopidy/mopidy.conf
Which will open a blank file for you to start typing configurations, or you go through an easier alternative by running the command;
mopidy
Immediately after installation, the command will automatically generate the config file and you can then proceed to edit using the previous command with the nano editor. More on Mopidy configuration can be found here.
A basic modification to be made to the config file after it has been generated is the setup of the http section of the config file. Changing the port through which the server can be accessed and setting it to accept connection from every hostname/ip.
To do this, run;
sudo nano .config/mopidy/mopidy.conf
This will open the config file. Scroll down to the http section and set its content to match the image below.
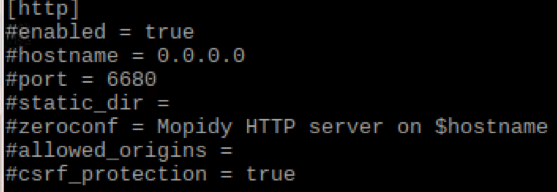
With that done, save and close the config file. Our Mopidy is now ready for use.
3. Run Mopidy
Mopidy can be run as a service using an init script or by setting it up as a systemd service. However, after installation and configuration, you can run mopidy using;
sudo service mopidy start
This kickstarts mopidy and opens it up to be accessed via any MPD client. A list of clients supported by Mopidy can be found here.
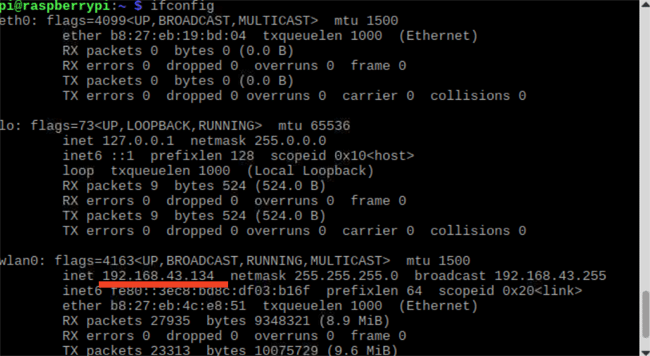
However MPD clients are only able to access Mopidy if on the same network and have access to the IP address of the server on which Mopidy is installed. As such you need to obtain the Ipaddress of the Pi. You can do this from the terminal by runing;
ifconfig
This should display a bunch of addresses and your IP address, if connected over Wi-Fi it should be the one in the location underlined in the image below.
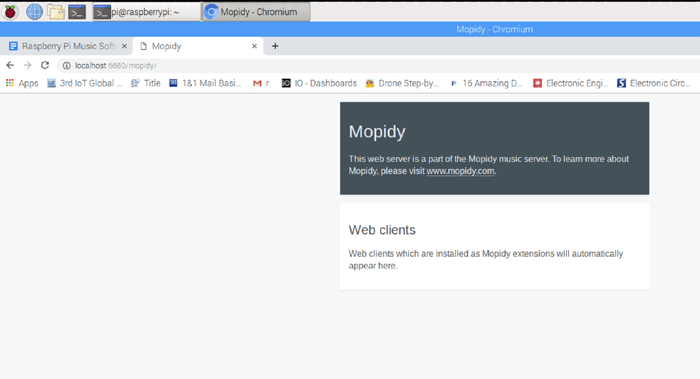
With the IP address obtained, and Mopidy running, open the browser on the pi and enter the IP address followed by the http port number. This will show you the Mopidy home page as shown in the image below.
That’s it! You can now proceed to install extensions, and MPD Clients to manage Mopidy.
4. Installing Spotify Extension on Mopidy Raspberry Pi 3
Mopidy has dozens of extensions to help users manage music from multiple platforms and use multiple MPD clients. As an example of how to setup an extension, I will be installing the Mopidy spotify extension. Spotify is very popular music streaming platform, and to install Spotify on raspberry pi follow the steps below.
Install the extension by running;
sudo apt-get install mopidy-spotify
This will install the Spotify on Pi. As mentioned earlier, for every extension installed, you have to add its configuration details in the mopidy config file. Open the mopidy config file by running;
sudo nano .config/mopidy/mopidy.conf
When it opens, scroll to the bottom of the page and add the following;
[spotify]
enabled = true
username = <your spotify username>
password = <your spotify password>
client_id = <your client id>
client_secret = <your client secret>
Such that it looks like the image below.

This, of course, assumes you already have a Spotify account and as such already have a username and password. The client id and secret is easily obtainable via this link. Click on login with Spotify and after you are logged in, the data appears in the text field.
Save the config file and exit the nano editor.
Next, we need to install spotify-tunigo. This is done by running;
sudo apt-get install mopidy-spotify-tunigo
Respond to any prompt during the installation.
With the installation complete, we have to add configurations for it in the mopidy config file. Open the config file, scroll to the bottom and add the lines below;
[spotify_tunigo]
enabled = true
Save and exit the editor.
Lastly, we need to install Mopify, A web client for Mopidy. Install mopify by running;
sudo pip install Mopidy-Mopify
Next, we add the configuration for mopify to the mopidy config file. Open the mopidy config file, add the lines below, save and close the editor.
[mopify]
enabled = true
debug = false
With this done, we are now ready to setup the web client.
Restart the Mopidy service to effect all the changes made by running;
sudo service mopidy restart
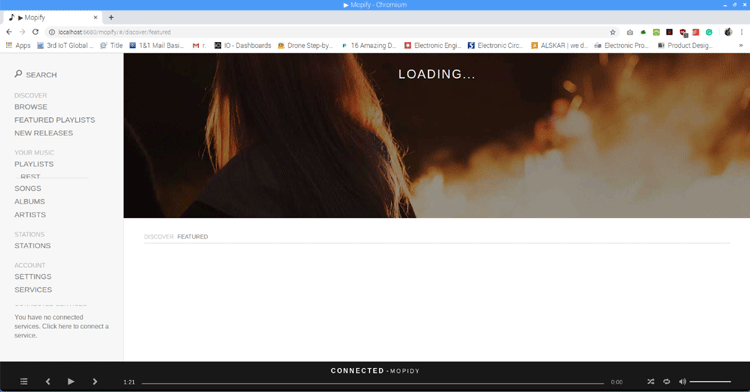
Refresh the Mopidy web page on localhost that we opened earlier. It should now look like the image below with the Mopify extension indicated.
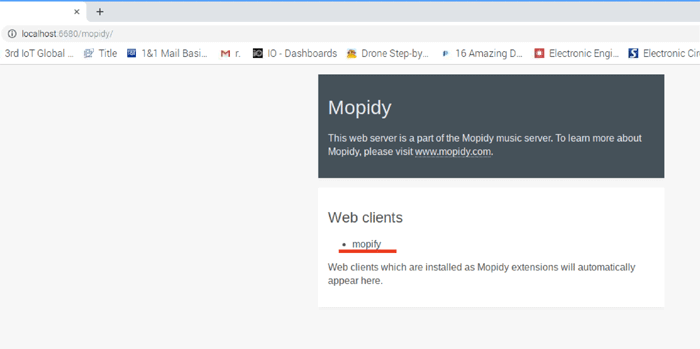
Click on the mopify text. It should open the mopify window similar to the image below.
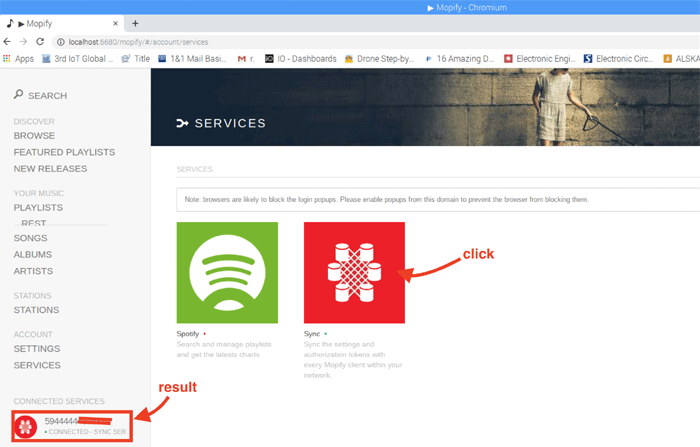
On the mopify window, click on “services”, it should open a window similar to the image below. Enable the sync service by simply clicking on it. When you hover over it you can go to settings and enable synchronization of your Spotify credentials as well. Also enable Spotify by simply clicking on it. It might require that you login to Spotify.
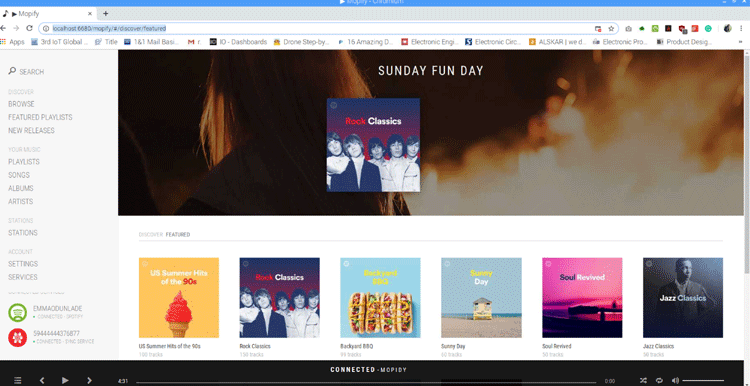
With that done, your Raspberry Pi Mopidy Music Server is now ready and you can listen to all the cool songs on your Raspotify (Raspberry Pi 3 Spotify server). Simply point the web browser to http://localhost:6680/mopify/ you should now see your songs listed as shown below.
Hit the play button and stream on!
Several other MPD clients exists that can be used with Mopidy along with several other clients to connect Mopidy to several music platforms.
Conclusion
As mentioned already, the choice of a media server on the Raspberry Pi starts from deciding if all you want to do with that particular Pi is a media server, or if you want it to be able to perform other tasks like home automation. You will also need to decide if you want a music-only media server (music Server) or you want to be able to handle all kinds of media. Aside from this, the rest is down to feeling and identifying which of them naturally resonates with you.
