

Arduino has been a boon for people who are not from the electronics background to build stuff easily. It has been a great prototyping tool or to try something cool, in this project we are going to build a small yet fun Piano using the Arduino. This piano is pretty much plain with just 8 push buttons and buzzer. It uses the tone() function of Arduino to create various types of piano notes on the speaker. To spice it up a bit we have added the recording feature in the project, this enables us to play a tune record it and play it again repeatedly when required. Sound interesting right!! So lets’ get building....
Materials Required:
- Arduino Uno
- 16*2 LCD Display
- Buzzer
- Trimmer 10k
- SPDT switch
- Push button (8 Nos)
- Resistors (10k, 560R, 1.5k, 2.6k, 3.9, 5.6k, 6.8k, 8.2k, 10k)
- Breadboard
- Connecting wires
Circuit Diagram:
The complete Arduino Piano Project can be built on top of a breadboard with some connecting wires. The circuit diagram made using fritzing that shows the breadboard view of the project is shown below

Just follow the circuit diagram and connect the wires accordingly, the push buttons and buzzer as used with a PCB module but in actual hardware we have used only the switch and buzzer, it should not confuse you much because they have the same type of pin out. You can also refer to the below image of the hardware to make your connections.
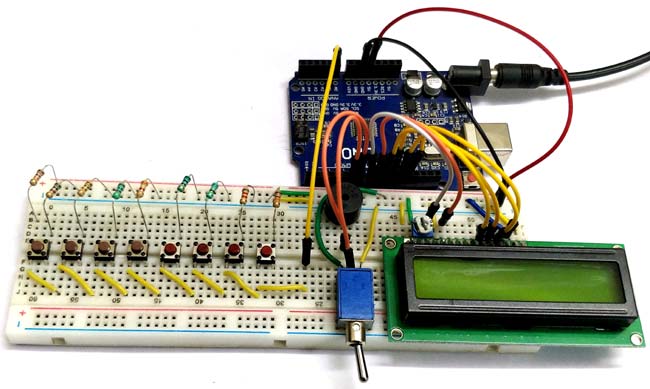
The value of the resistors from the left is in the following order, 10k, 560R, 1.5k, 2.6k, 3.9, 5.6k, 6.8k, 8.2k and 10k. If you do not have the same DPST switch you can use normal toggle switch like the one shown in the circuit diagram above. Now let’s look into the schematics of the project to understand why we have made the following connections.
Schematics and Explanation:
The schematics for the circuit diagram that is shown above is given below, it was also made using Fritzing.

One main connection that we have to understand is that how we have connected the 8 push buttons to the Arduino through the Analog A0 pin. Basically we need 8 input pins which can be connected to the 8 input push buttons, but for projects like this we cannot use 8 pins of the microcontroller just for push buttons since we might need them for later use. In our case we have the LCD display to be interfaced.
So we use the analog pin of the Arduino and form a potential divider with varying resistor values to complete the circuit. This way when each button is pressed a different analog voltage will be supplied to the Analog pin. A sample circuit with only two resistors and two push buttons are shown below.
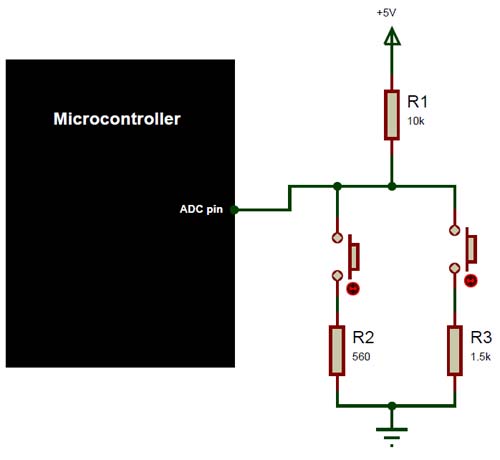
In this case the ADC pin will receive +5V when the push buttons are not pressed, if the first button is pressed then the potential divider gets completed through the 560R resistor and if the second button is pressed then the potential divider gets competed using the 1.5k resistor. This way the voltage received by the ADC pin will vary based on the formulae of potential divider. If you want to know more about how the potential divider works and how to calculate the value of voltage received by the ADC pin then you can use this potential divider calculator page.
Other than this all the connections are straight forward, the LCD is connected to pins 8, 9, 10, 11 and 12. The buzzer is connected to the pin 7 and the SPDT switch is connected to the pin 6 of Arduino. The complete project is powered through the USB port of the laptop. You can also connect the Arduino to a 9V or 12V supply through the DC jack and the project will still work the same.
Understanding the Tone() function of Arduino:
The Arduino has a handy tone() function which can be used to generate varying frequency signals that can be used to produce different sounds using a buzzer. So let’s understand how the function works and how it can be used with Arduino.
Before that we should know how a Piezo buzzer works. We might have learnt about Piezo crystals in our school, it is nothing but a crystal which converts mechanical vibrations into electricity or vice versa. Here we apply a variable current (frequency) for which the crystal vibrates thus producing sound. Hence in order to make the Piezo buzzer to make some noise we have to make the Piezo electric crystal to vibrate, the pitch and tone of noise depends on how fast the crystal vibrates. Hence the tone and pitch can be controlled by varying the frequency of the current.
Okay, so how do we get a variable frequency from Arduino? This is where the tone () function comes in. The tone () can generate a particular frequency on a specific pin. The time duration can also be mentioned if required. The syntax for tone () is
Syntax
tone(pin, frequency)
tone(pin, frequency, duration)

Parameters
pin: the pin on which to generate the tone
frequency: the frequency of the tone in hertz – unsigned int
duration: the duration of the tone in milliseconds (optional1) – unsigned long
The values of pin can be any of your digital pin. I have used pin number 8 here. The frequency that can be generated depends on the size of the timer in your Arduino board. For UNO and most other common boards the minimum frequency that can be produced is 31Hz and the maximum frequency that can be produced is 65535Hz. However we humans can hear only frequencies between 2000Hz and 5000 Hz.
Playing piano tones on Arduino:
Okay, before even I get started on this topic let me make it clear that I am a novice with musical notes or piano, so please forgive me if anything mentioned under this heading is gibberish.
We now know that we can use the tones function in Arduino to produce some sounds, but how can we play tones of a particular note using the same. Lucky for us there is a library called “pitches.h” written by Brett Hagman. This library contains all the information about which frequency is equivalent to which note on a piano. I was surprised by how well this library could actually work and play almost every note on a piano, I used the same to play the piano notes of Pirates of Caribbean, Crazy Frog, Mario and even titanic and they sounded awesome. Oops! We are getting a bit off topic here, so if you are interested in that check out playing melodies using Arduino project. You will also find more explanation about the pitches.h library in that project.
Our project has only 8 push buttons so each button can play only one particular musical note and thus totally we can play only 8 notes. I selected the most used notes on a piano, but can you can select any 8 or even expand the project with more push buttons and add more notes.
The notes selected in this project are the notes C4, D4, E4, F4, G4, A4, B4 and C5 which can be played using the buttons 1 to 8 respectively.
Programming the Arduino:
Enough of theory let us get to the fun part of programming the Arduino. The complete Arduino Program is given at the end of this page you can jump down if you eager or read further to understand how the code works.
In our Arduino program we have to read the analog voltage from pin A0, then predict which button was pressed and play the respective tone for that button. While doing this we should also record which button the user has pressed and how long he/she has pressed, so that we can recreate the tone that was played by the user later.
Before going to the logic part, we have to declare which 8 notes we will be playing. The respective frequency for the notes is then taken from the pitches.h library and then a array is formed as shown below. Here the frequency to play note C4 is 262 and so on.
int notes[] = {262, 294, 330, 349, 392, 440, 494, 523}; // Set frequency for C4, D4, E4, F4, G4, A4, B4,
Next we have to mentioned to which pins the LCD display is connected to. If you are following the exact same schematics given above then you don’t have to change anything here.
const int rs = 8, en = 9, d4 = 10, d5 = 11, d6 = 12, d7 = 13; //Pins to which LCD is connected
LiquidCrystal lcd(rs, en, d4, d5, d6, d7);
Next, inside our setup function we just initialize the LCD module and serial monitor for debugging. We also display a intro message just to make sure things are working as planned. Next, inside the main loop function we have two while loops.
One while loop will be executed as long as the SPDT switch is placed in recording more. In recording mode the user can pay the tones required and at the same time the tone that is being played will also be saved. So the while loop looks like this below
  while (digitalRead(6) == 0) //If the toggle switch is set in recording mode
  {
    lcd.setCursor(0, 0); lcd.print("Recording..");
    lcd.setCursor(0, 1);
    Detect_button();
    Play_tone();
  }
As you might have noticed we have two functions inside the while loop. The first function Detect_button() is used find which button the user has pressed and the second function Play_tone() is used to play the respective tone. Apart from this function the Detect_button() function also records which button is being pressed and the Play_tone() function records how long the button was pressed.
Inside the Detect_button() function we read the analog voltage from the pin A0 and compare it with some predefined values to find out which button has been pressed. The value can be determined by either using the voltage divider calculator above or by using the serial monitor to check what analog value is read for each button.
void Detect_button()
{
  analogVal = analogRead(A0); //read the analog voltag on pin A0
  pev_button = button; //remember the previous button pressed by the user

  if (analogVal < 550)
    button = 8;

  if (analogVal < 500)
    button = 7;

  if (analogVal < 450)
    button = 6;

  if (analogVal < 400)
    button = 5;

  if (analogVal < 300)
    button = 4;

  if (analogVal < 250)
    button = 3;

  if (analogVal < 150)
    button = 2;

  if (analogVal < 100)
    button = 1;

  if (analogVal > 1000)
    button = 0;

/****Rcord the pressed buttons in a array***/
  if (button != pev_button && pev_button != 0)
  {
    recorded_button[button_index] = pev_button;
    button_index++;
    recorded_button[button_index] = 0;
    button_index++;
  }
/**End of Recording program**/
}
As said, inside this function we also record the sequence in which the buttons are pressed. The recorded values are stored in a array named recorded_button[]. We first check if there is a new button pressed, if pressed then we also check if it is not the button 0. Where button 0 is nothing but no button is pressed. Inside the if loop we store the value on the index location given by the variable button_index and then we also increase this index value so that we don’t over write on the same location.
 /****Rcord the pressed buttons in a array***/
  if (button != pev_button && pev_button != 0)
  {
    recorded_button[button_index] = pev_button;
    button_index++;
    recorded_button[button_index] = 0;
    button_index++;
  }
/**End of Recording program**/
Inside the Play_tone() function we will play the respective tone for the button pressed by using multiple if conditions. Also we will use an array named recorded_time[] inside which we will save the time duration for which the button was pressed. The operation is similar to recording button sequence by we use the millis() function to determine how long each button was pressed, also for reducing the size of the variable we divide the value by 10. For button 0, which means the user is not pressing anything we play no tone for the same duration. The complete code inside the function is shown below.
void Play_tone()
{

 /****Rcord the time delay between each button press in a array***/

  if (button != pev_button)
  {
    lcd.clear(); //Then clean it
    note_time = (millis() - start_time) / 10;
    recorded_time[time_index] = note_time;
    time_index++;
    start_time = millis();
  }
  /**End of Recording program**/

  if (button == 0)
  {
    noTone(7);
    lcd.print("0 -> Pause..");
  }

  if (button == 1)
  {
    tone(7, notes[0]);
    lcd.print("1 -> NOTE_C4");
  }

  if (button == 2)
  {
    tone(7, notes[1]);
    lcd.print("2 -> NOTE_D4");
  }

  if (button == 3)
  {
    tone(7, notes[2]);
    lcd.print("3 -> NOTE_E4");
  }

  if (button == 4)
  {
    tone(7, notes[3]);
    lcd.print("4 -> NOTE_F4");
  }

  if (button == 5)
  {
    tone(7, notes[4]);
    lcd.print("5 -> NOTE_G4");
  }

  if (button == 6)
  {
    tone(7, notes[5]);
    lcd.print("6 -> NOTE_A4");
  }

  if (button == 7)
  {
    tone(7, notes[6]);
    lcd.print("7 -> NOTE_B4");
  }

  if (button == 8)
  {
    tone(7, notes[7]);
    lcd.print("8 -> NOTE_C5");
  }
}
Finally after recording the user has to toggle the DPST to the other direction to play the recorded tone. When this is done the program breaks out of the previous while loop and enters the second while loop where we play the notes in the sequence of the buttons pressed for a duration that was previously recorded. The code to do the same is shown below.
  while (digitalRead(6) == 1) //If the toggle switch is set in Playing mode
  {
  lcd.clear();
  lcd.setCursor(0, 0);  lcd.print("Now Playing..");

  for (int i = 0; i < sizeof(recorded_button) / 2; i++)
  {
    delay((recorded_time[i]) * 10); //Wait for before paying next tune

    if (recorded_button[i] == 0)
      noTone(7); //user dint touch any button
    else
      tone(7, notes[(recorded_button[i] - 1)]); //play the sound corresponding to the button touched by the user
  }
  }
}
Play, Record, Replay and Repeat! :
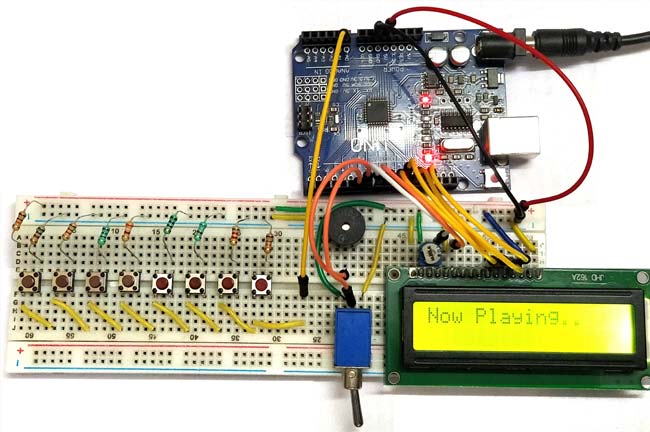
Make the hardware as per the circuit diagram shown, and upload the code to the Arduino board and its shown time. Position the SPDT in the recording mode and start playing the tones of your choice, pressing each button will produce a different tone. During this mode the LCD will display “Recording...” and on the second line you will see the name of the note that is currently being pressed as shown below
Once you have played your tone toggle the SPDT switch to the other side and the LCD should display “Now Playing..” and then start playing the tone that you just played. The same tone will be played again and again as long as the toggle switch is kept in the position as shown in the below picture.
The complete working of the project can be found in the video given below. Hope you understood the project and enjoyed building it. If you have any problems in building this post them in the comment section or use the forums for technical help on your project. Also don’t forget to check the demonstration video given below.
Complete Project Code
/*
   Arduino based Piano and Record and play option
   Code by: B. Aswinth Raj
   Website: www.circuitdigest.com
   Dated: 22-05-2017
*/
#include <LiquidCrystal.h>
int notes[] = {262, 294, 330, 349, 392, 440, 494, 523}; // Set frequency for C4, D4, E4, F4, G4, A4, B4, C5

const int rs = 8, en = 9, d4 = 10, d5 = 11, d6 = 12, d7 = 13; //Pins to which LCD is connected
LiquidCrystal lcd(rs, en, d4, d5, d6, d7);
char button = 0;
int analogVal;
char REC = 0;
int recorded_button[200];
int pev_button;
int recorded_time [200];
char time_index;
char button_index = 0;
unsigned long start_time;
int note_time;

void setup() {
  Serial.begin(9600);
  pinMode (6, INPUT);
  lcd.begin(16, 2); //We are using a 16*2 LCD display
  lcd.print("Arduino Piano"); //Display a intro message
  lcd.setCursor(0, 1);   // set the cursor to column 0, line 1
  lcd.print("-CircuitDigest"); //Display a intro message
  delay(2000); //Wait for display to show info
  lcd.clear(); //Then clean it
}

void loop()
{
  while (digitalRead(6) == 0) //If the toggle switch is set in recording mode
  {
    lcd.setCursor(0, 0); lcd.print("Recording..");
    lcd.setCursor(0, 1);
    Detect_button();
    Play_tone();
  }

  while (digitalRead(6) == 1) //If the toggle switch is set in Playing mode
  {
  lcd.clear();
  lcd.setCursor(0, 0);  lcd.print("Now Playing..");
  for (int i = 0; i < sizeof(recorded_button) / 2; i++)
  {
    delay((recorded_time[i]) * 10); //Wait for before paying next tune
    if (recorded_button[i] == 0)
      noTone(7); //user dint touch any button
    else
      tone(7, notes[(recorded_button[i] - 1)]); //play the sound corresponding to the button touched by the user
  }
  }
}

void Detect_button()
{
  analogVal = analogRead(A0); //read the analog voltag on pin A0
  pev_button = button; //remember the previous button pressed by the user
  if (analogVal < 550)
    button = 8;
  if (analogVal < 500)
    button = 7;
  if (analogVal < 450)
    button = 6;
  if (analogVal < 400)
    button = 5;
  if (analogVal < 300)
    button = 4;
  if (analogVal < 250)
    button = 3;
  if (analogVal < 150)
    button = 2;
  if (analogVal < 100)
    button = 1;
  if (analogVal > 1000)
    button = 0;

/****Rcord the pressed buttons in a array***/
  if (button != pev_button && pev_button != 0)
  {
    recorded_button[button_index] = pev_button;
    button_index++;
    recorded_button[button_index] = 0;
    button_index++;
  }
/**End of Recording program**/
}

void Play_tone()
{
 /****Rcord the time delay between each button press in a array***/
  if (button != pev_button)
  {
    lcd.clear(); //Then clean it
    note_time = (millis() - start_time) / 10;
    recorded_time[time_index] = note_time;
    time_index++;
    start_time = millis();
  }
  /**End of Recording program**/
  if (button == 0)
  {
    noTone(7);
    lcd.print("0 -> Pause..");
  }
  if (button == 1)
  {
    tone(7, notes[0]);
    lcd.print("1 -> NOTE_C4");
  }
  if (button == 2)
  {
    tone(7, notes[1]);
    lcd.print("2 -> NOTE_D4");
  }
  if (button == 3)
  {
    tone(7, notes[2]);
    lcd.print("3 -> NOTE_E4");
  }
  if (button == 4)
  {
    tone(7, notes[3]);
    lcd.print("4 -> NOTE_F4");
  }
  if (button == 5)
  {
    tone(7, notes[4]);
    lcd.print("5 -> NOTE_G4");
  }
  if (button == 6)
  {
    tone(7, notes[5]);
    lcd.print("6 -> NOTE_A4");
  }
  if (button == 7)
  {
    tone(7, notes[6]);
    lcd.print("7 -> NOTE_B4");
  }
  if (button == 8)
  {
    tone(7, notes[7]);
    lcd.print("8 -> NOTE_C5");
  }
}
Comments
I followed your steps exactly and made sure my connections are identical, I also copied your code and uploaded it to my arduino but nothing works. any ideas to help?
HELLO, great work, but absolutely nothing works. Pity. Does it work on arduino uno?

I want to download for read