
Security is main concern for various buildings, houses and offices. There are a variety of security alarms available in market which uses various types of technology for intruder detection like infrared sensors, motion sensors, ultrasonic sensors, laser sensors, etc. Previously we have also built some security alarm circuits like this PIR sensor based motion detector and burglar alarm circuit. In this circuit tutorial we are going to build a laser security alarm system which uses a laser light and a laser light detector circuit. It gets activated when someone crosses it.
Circuit Components
- IC LM358
- 555 Timer IC
- Laser light
- 150 Ohm, 10K Resistor
- 10 K POT
- 220uF capacitor
- LDR
- Breadboard
- 9 Volt Battery and Connector
- LED
Laser Security System Circuit Diagram and Explanation

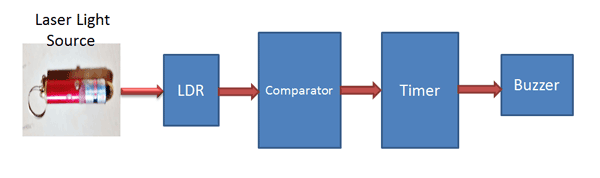
In this laser security alarm circuit we have used LM358 Dual Comparator IC for comparing voltages coming from LDR. Comparator is configured as Non-inverting mode and one 10K potentiometer is connected at its non-inverting terminal. An LDR is used for detecting light or laser light with respect to ground through a 10K resistor. And the midpoint of LDR and resistor is directly connected to inverting terminal of comparator. A red LED is connected at output pin of comparator for indicating intruder detection. A mono-stable multi-vibrator is also used for activating buzzer and LED for a time period. And a 9 volt battery is used for powering the circuit.
Working of Laser Security Alarm Circuit
In this circuit we have set reference voltages of comparators by using potentiometer, we can say this sensitivity of the circuit. Comparator is configured in non-inverting mode. In this system we have placed laser light and LDR facing each other, so laser light continuously falls on LDR. Due to this a potential difference generated across the non-inverting pin of comparator, then comparator compare this potential difference with reference voltage and generate a digital output as HIGH. Before this we have configured 555 timer in monostable mode so we it required a LOW trigger pulse at its trigger pin to activate buzzer and LED. So we applied output of comparator at trigger pin of 555 timer. Even comparator’s output is HIGH when laser lights falls on LDR so at this time buzzer and LED are deactivated. When someone crosses the laser light due to this LDR lost the laser light and generates a different potential difference across the same comparator terminal. Then comparator generates an output as LOW. Due to this LOW signal 555 timer gets a LOW trigger pulse and activates buzzer and LED for a time periods that is defined by R1 and C1 at 555 timer circuit.
Main component of this circuit is LDR which detects dark and light. LDR is a light dependent resistor which changes his resistance according to the light. When light falls on the LDR surface, it reduces its resistance and when no light resistance of LDR become Maximum. Understand more about working of LDR in this Dark Detector Circuit.
The 555 timer time calculation formula in mono-stable mode is:
Time period T is given by :
T = 1.1 R1 * C1
Where T is time in seconds, R1 is resistance in ohm and C1 is capacitor in farads
To demonstrate this project we have used a small toy laser light.
Comments
Thanks for your info and
Thanks for your info and circuit diagram. Can you make a diagram of laser alarm with timer and manual reset?
Y can't you ic741 instead of lm358
Y can't using. Ic741 it is also a comparator
You can use LM741, but LM358
You can use LM741, but LM358 is newer and advance than 741, compare the datasheets of both the ICs.
Sir,the circuit is not
Sir,the circuit is not working properly ,the led yellow led is constantly glowing without irrespective of the ldr resistance
Adjust the Variable Resistor
Adjust the Variable Resistor RV1 and check circuit connections.
can you let the buzzer run a
can you let the buzzer run a little longer that
yes, you can run the buzzer
yes, you can run the buzzer longer, by changing the R1 and C1, as 555 is running in Monostable mode. Check this article: Monostable multibrator
should i reduce R1 and C1 or
should i reduce R1 and C1 or increase their values to run the buzzer for longer time
how much time does LDR
how much time does LDR require to get adjusted to laser light beam??
In the circuit you have used
In the circuit you have used 5 resistors but in the demonstration video you have used four resistors...which resistor have you removed???
@Smitha and @priya: Follow
@Smitha and @priya: Follow the circuit diagram
It is a Voltage Regulator IC
It is a Voltage Regulator IC to provide the constant and smooth supply of 5v voltage.
sir, why my circuit is not
sir, why my circuit is not working? i've using proteus tu consruct the circuit
Learn about 555 timer IC here
Learn about 555 timer IC here: Understanding 555 Timer IC
what is the intensity of the
what is the intensity of the laser light source used??
Where did you get that laser
Where did you get that laser light from and how much did it cost.
Also your breadboarded circuit does not look similar to the schematic. So if i do this circuit using the schematic, will it work?
Also what is that component on the top in the schematic
Security timer system
Hi i made a laser security system with resistors 1k and 6.8k and fet transistor with buzzer and photocell and led
When the laser beam hit the photocell buzzer doesnt stop why is it so
Please use the components of
Please use the components of mentioned values, different resistor values change the High time of Monostable mode of 555.
Is the 7805 compulsory? What
Is the 7805 compulsory? What happens if I don't use it
7805 is used for 5v
7805 is used for 5v regulated power supply. For this particular circuit, you can omit 7805.
R2 and R3 are forming a
R2 and R3 are forming a Voltage Divider circuit.
what is RV1 and 10k written
what is RV1 and 10k written under it
Its polarized capacitor with
Its polarized capacitor with Voltage rating 16v, you can use any 220uF normal cap.
electronics
i need a simple school project on door and windows security alarms
We have numbers of projects
We have numbers of projects on Security system, check here: Projects on Security System
You can simply remove the
You can simply remove the 7805 and directly connect the battery in this project.
Irrespective of laser light
Irrespective of laser light the sound is coming from the buzzer...what to do?
Buzzer sounds as soon as battery connected.
The sound comes as soon as the battery is connected irrespective of the ldr. It goes off after some time but never sounds again until battery reconnected.
Adjust the RV1 properly.
Adjust the RV1 properly. Circuit is simple and should work easily.
I made it...all soldered
I made it...all soldered correctly...buzzer and all ligHTS r working simultaneously
There are so many softwares
There are so many softwares available for Schematic to PCB layout conversion like Easy EDA, Fritzing etc. We have made tutorial for using Easy EDA for PCB conversion Design Your Circuits Online for Free with EasyEDA
You can adjust the
You can adjust the sensitivity by rotating variable resistor RV1 and so that it wont trigger in normal daylight.
clarification
Sir,When i give the connection to the Pot...The LED does not glow
Circuit not working properly
Sir, my circuit is working in an opposite matter. when light falls on the ldr, led glows and in dark it does not glow. how to correct it??
Check the connection to LM358
Check the connection to LM358 IC's inverting and non inverting terminals.
Regarding IC7805
Sir, if I remove 7805 from the above circuit, do i need to replace the 9V power supply by a 5V power supply ??
You can use 9v battery
You can use 9v battery directly without 7805.
Sir plz tell me about how to
Sir plz tell me about how to connect the components in breadboard
Use Proteus for drawing
Use Proteus for drawing circuit and simulation.
Sir i done this project
Sir i done this project successfully. But i want to know the application and uses of this project
i am not being able to
i am not being able to success in this project sir buzzer and yellow led is continuously activate no matter light is in ldr or not
I like the circuit. I am
I like the circuit. I am planning to do it, but before that i need your help on some questions
1: i am planning to connect about 5 or 6 LDR s. How to connect( serail or parallel) it to get best result ? ( does it work)
2:how to change r1 and c1( imcrese or decrease) for long buzzering ?
3 how to add a manual switch for turning off buzzer instead of turning off itself?
pls give me a best answer instead of links. I read a lot of articles still i didnot understand it.
I made the circuit but its
I made the circuit but its not working properly when a put the laser on LDR light turns on and when I remove it it goes off tell me any solution
Adjust the RV1 (potentiometer
Adjust the RV1 (potentiometer) and check the connection with LM358.
Sir plzz tell me..here use
Sir plzz tell me..here use 10k potantiometer just like preset...can i use 10 k potentiometr..sir tell me
Doubt on 555 timer
Sir do we have to make the 555 timer in monostable mode before connectingit in the circuit
sir can I get an introduction
sir can I get an introduction,abstract,conclusion on the the project "laser security alarm using ic555 and lm358"
What is the value of voltage
What is the value of voltage of the capacitor? Is that ceramic or electrolytic?
can I get a perfect working
can I get a perfect working operation and methodology on "laser security alarm using ic 555 and lm358".
ldr sensor
sir how can this be connected together with an arduino and a keypad....
Its far easier to build it
Its far easier to build it using Arduino, you can connect alarm with any general purpose pin of Arduino and program it to trigger when LM358 is high. Search using search box above for these kind of project.
Microcontroller,,project
Sir,,I am new for Micro- controller project program.plz,,help me.I wanted made of micro- controller project
Can i increase the buzzer
Can i increase the buzzer time in the circuit.
great minds with great ideas
great minds with great ideas like the project
Sir, I am working on a
Sir, I am working on a project to sense the point of laser intrusion and send the alert message about the intrusion and location of intrusion.I am a beginner.Can u please tell how this can be implemented?
sense the point of laser
sense the point of laser intrusion?
I think that can be done by using multiple LDRs and read every one to know which LDR has been affected by the laser intensively. Since the position of each LDR is already known we can determine the positoin using the same. Just an idea hope it helped.
sir can you tell me what is
sir can you tell me what is the function of each components? thaaaanks
Great project , can you
Great project , can you provide Proteus file for this simulation ?
Thanks in advance.
Wer did you put the other one
Wer did you put the other one resistor? In diagram it has 5 resistor and when you do it on breadboard it just 4 resistor.. Pls answer
setting reference voltage
how to set the reference voltage in pot
A pot will have three pins.
A pot will have three pins. Connect both the exterme pins to +5V and ground. Now connect the center pin to place where you have to set reference voltage. You can measure the current voltage by placing your multimeter lead on the Ground and the center pin of your POT
Sir, what is the meaning of
Sir, what is the meaning of arrow from LM358IC to RV1.
Is it a connection to RV1 above or below?
Sir . In ur circuit above..
Sir . In ur circuit above.. how many seconds that the byzzer activate
sir plz can you explain how
sir plz can you explain how to connect it on breadboard by stepwise by today
Laser security
Am getting an error using proteus to do the simulation of the project. Errors include
Transient GMIN stepping at time =5.145e-005
Tran: timestep too small= 1.25e-019.
Please I need help am doing it as my final project
Sir, why did you use Variable
Sir, why did you use Variable Resistor RV1 instead of a Fixed Resistor?
can you give me the Pcb(
can you give me the Pcb( printed circuit broad) layout
when I do it on OrCad there
when I do it on OrCad there is error because pin 5 is unconnected . Any help to solve this problem?
You have to place a no
You have to place a no connection (NC) symbol to all unconnected pins in orcad, only then it will work
i want to know why this is a
i want to know why this is a dark sensor ,please ?

sir plz canu explain how to connect it on breadboard by stepwise by tomarrow