
Raspberry Pi is one of the most famous low cost computer and powerful tool for prototyping different types of IoT and embedded projects. With the popularity of Raspberry pi in the IoT domain, Particle cloud started support for this board on its platform.
Particle Cloud is a very popular IoT platform which can help you to start with everything that you want to do in your IoT device. Particle is a reliable, scalable, and secure IoT device platform. There are many IoT enabled Particle devices like Xenon, Photon, Electron, etc. which have different functionalities according to our need.
There are many IoT platforms like Blynk, ThingSpeak etc. that you can use to connect Raspberry Pi to IoT clouds, but particle cloud platform has some awesome features which makes it different from others. Like you can run your Arduino code in your Raspberry Pi using the particle cloud IDE and can program your Pi from anywhere in the world, now that’s something cool!! Also, you can easily integrate IFTTT, Google Cloud, or Microsoft Azure.
Let’s start exploring the Particle cloud platform by making as simple Raspberry Pi application to control Home AC appliances using Particle Mobile app and online Particle IDE from anywhere in the world.
Components Required
- Raspberry PI with Raspbian installed in it
- Relay Module
- 220v Bulb
- Jumper wires
It is assumed that your Raspberry Pi is already flashed with an operating system. If not, follow the Getting started with Raspberry Pi tutorial before proceeding. Here we are using Rasbian Jessie installed Raspberry Pi 3.
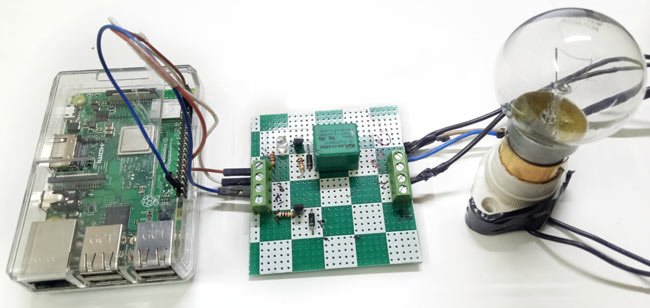
Circuit Diagram
Circuit diagram for this Raspberry Pi Home Automaton project is simple:

For connecting raspberry pi with your laptop, you can use Putty or VNC viewer, learn more about running a Raspberry Pi Heedlessly without a monitor here.
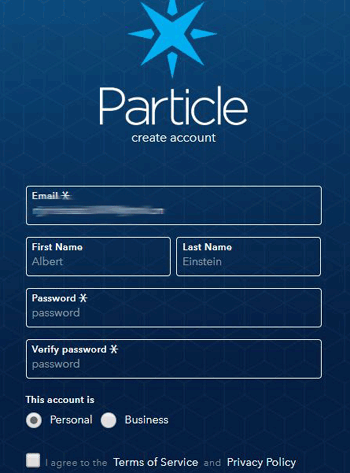
We have to install the Particle agent in our Raspberry Pi to connect it with the Particle Cloud. Particle Agent is a software service which runs in the background to interacts with the GPIO pins of the Raspberry pi. Before installing the agent, you have to make an account on the Particle.io.
We will start with creating an account on the particle cloud and knowing the interface of the particle platform.
Setup Particle Cloud account and Raspberry Pi
1. Go to Particle.io and click on Console in upper right corner. Now, click on Create Account. Fill all the information and click on Sign Up.
2. Now, run the below command in the raspberry pi terminal to install the Particle agent.
bash <( curl -sL https://particle.io/install-pi )
Enter your Particle cloud e-mail and password that you have created in first step.
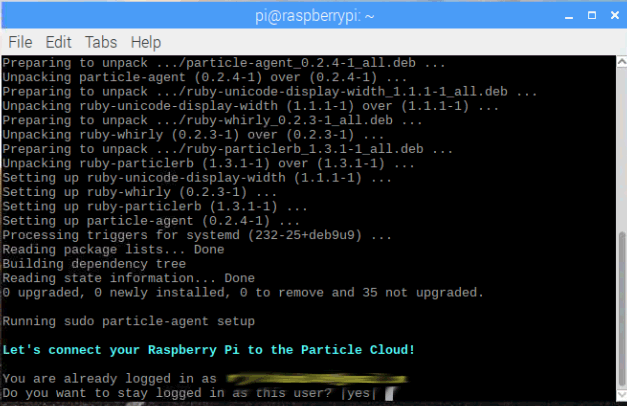
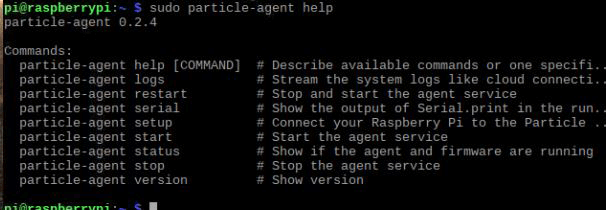
3. Particle agent is successfully installed in the Pi and running in background. It is also listening to the Particle cloud. You can get more information agent using below commands.
Now, let’s jump to coding part and explore the Particle platform.
Controlling AC Appliances using Raspberry Pi and Particle Cloud
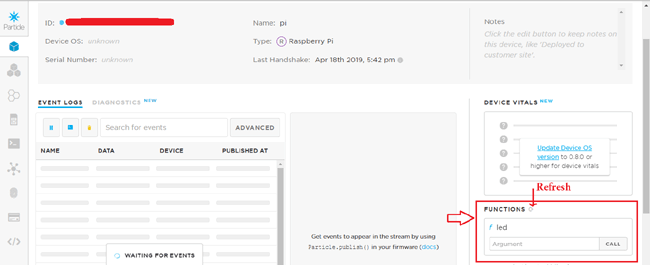
If you have successfully installed the Particle agent on your Pi then you can find your device on Particle console . As shown below
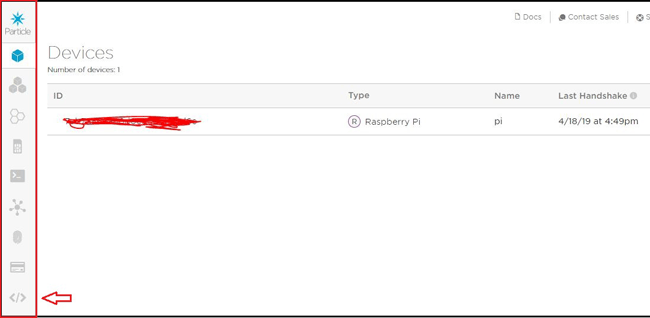
As you can see there are many options on left part of the screen which includes adding new devices, creating mesh networks, Integration with IFTTT, Microsoft Azure and Web IDE.
1. First, click on the Web IDE option. A new tab will open with online IDE as shown below.
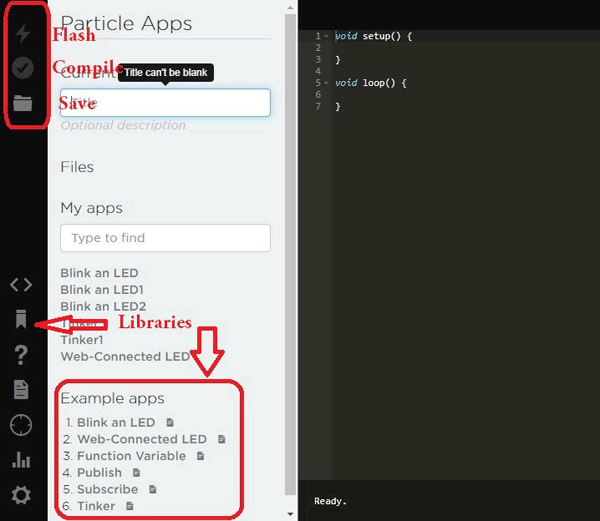
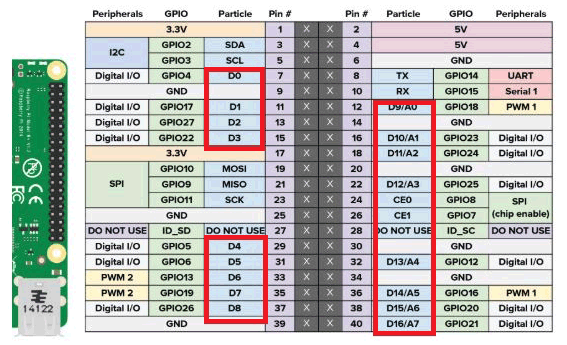
2. Now, you can use your Arduino code in Raspberry Pi. There are some example codes also given. We will control an AC bulb online so, click on Web-Connected LED example and connect your relay module as shown in circuit diagram. The pin used in the code is D7. Pin mapping is shown below.
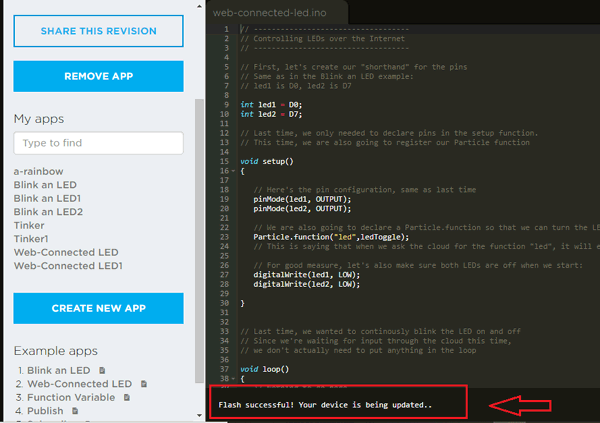
3. Now, compile the code and click on Flash. Make sure your Raspberry Pi is connected to internet. Also, you can change the code according to your need but you have to fork example code you want to use.
4. As you can see in the code that whenever you send “on” the bulb will glow and if whenever you send “off” the bulb will turn off. For giving the commands, go back to console tab and click on the device. Click on refresh button, you will see a led function which need an argument to perform function call. Here you have to write “on” and “off” to turn on and off the bulb. After writing argument click on call.
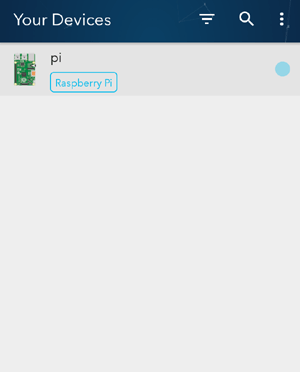
5. Now, control the bulb using mobile app. Download the Particle Cloud Android Application from the Playstore and login with the same credentials that you have signed in your browser.
In the app you will see your raspberry pi is listed, click on it.
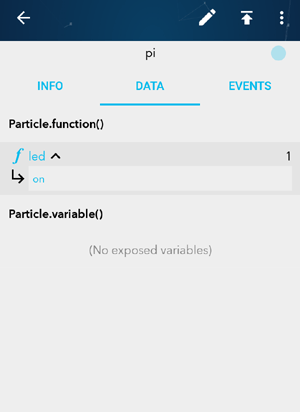
6. Click on Data. You will find the same led function here. Just type the argument and click on send. In this way you can control your appliances using smart phone also.
7. There is one special code example in the web IDE called Tinker. After uploading this code in the Raspberry Pi, you can control many pins at a time without hard coding it. Also, you can get sensor readings without specifying the pins in the code.
8. As soon as you Flash the Tinker example code, you will see Tinker option in front of your device in the App. Click on it.
9. Now, choose the pin on which you want to get output or input. On clicking you will be asked to click on digitalWrite, digitalRead, analogRead and analogWrite. In our case, click on digitalWrite on pin D7.
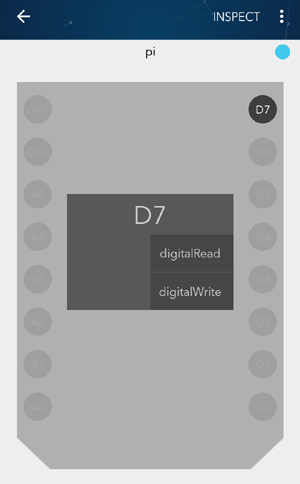
After assigning the function, just click on pin D7. You will see the bulb glowing. On pressing D7 again the bulb will turn off. Similarly, you can get the sensor data on different pins and can control the appliances at the same time.
Apart from using online IDE, you can download the Particle Desktop IDE and Workbench where you can write code and flash in the same way as online IDE. But these IDEs are also online development softwares. For more information about Particle cloud, you can check the official documentation here.
Complete code with a Demonstration Video is given below. Check out more home automation projects here.
Complete Project Code
// -----------------------------------

// Controlling LEDs over the Internet

// -----------------------------------
// First, let's create our "shorthand" for the pins

// Same as in the Blink an LED example:

// led1 is D0, led2 is D7
int led2 = D7;
// Last time, we only needed to declare pins in the setup function.

// This time, we are also going to register our Particle function
void setup()

{

   // Here's the pin configuration, same as last time

   pinMode(led1, OUTPUT);

   pinMode(led2, OUTPUT);
   // We are also going to declare a Particle.function so that we can turn the LED on and off from the cloud.

   Particle.function("led",ledToggle);

   // This is saying that when we ask the cloud for the function "led", it will employ the function ledToggle() from this app.
   // For good measure, let's also make sure both LEDs are off when we start:

   digitalWrite(led1, LOW);

   digitalWrite(led2, LOW);

}

// Last time, we wanted to continously blink the LED on and off

// Since we're waiting for input through the cloud this time,

// we don't actually need to put anything in the loop
void loop()

{

   // Nothing to do here

}
// We're going to have a super cool function now that gets called when a matching API request is sent

// This is the ledToggle function we registered to the "led" Particle.function earlier.
int ledToggle(String command) {

    /* Particle.functions always take a string as an argument and return an integer.

    Since we can pass a string, it means that we can give the program commands on how the function should be used.

    In this case, telling the function "on" will turn the LED on and telling it "off" will turn the LED off.

    Then, the function returns a value to us to let us know what happened.

    In this case, it will return 1 for the LEDs turning on, 0 for the LEDs turning off,

    and -1 if we received a totally bogus command that didn't do anything to the LEDs.

    */
    if (command=="on") {

        digitalWrite(led1,HIGH);

        digitalWrite(led2,HIGH);

        return 1;

    }

    else if (command=="off") {

        digitalWrite(led1,LOW);

        digitalWrite(led2,LOW);

        return 0;

    }

    else {

        return -1;

    }

}

undefined method `gunzip' for Gem:Module (NoMethodError)
I am getting this error while installing particle in pi. Kindly help in this regards