

OpenCV is a powerful tool and that combined with Raspberry Pi can open doors to many portable smart devices. In our previous Raspberry Pi CCTV monitoring article, we learned how to get live CCTV video from a DVR using RTSP and display on a Raspberry Pi, do check that out before proceeding. In this article, we will learn how to leverage the power of OpenCV and build a Raspberry Pi Motion Detection system on our live CCTV footages. If you do not have a CCTV installed, you can still build a Raspberry Pi Surveillance system by connecting USB cameras directly to your Pi. And if you are not a big fan of Pi and Python, you can build something similar with ESP32, refer to ESP32 Wi-Fi Door Bell for more details.
We will write a python script that can monitor all the four CCTV cameras simultaneously for any activities (motion). If an activity is detected on any camera, our Raspberry Pi will automatically change to that particular camera screen and highlight which activity took place, all this in real-time with just 1.5 seconds lag. I have also added an alarm feature, like a buzzer to which can alert the user by beeping if an activity is detected. But you can easily scale this up to send a message or E-mail or what not! Exciting right!! Let’s get started
Setting up Raspberry Pi with Buster and OpenCV
I am using the Raspberry Pi 3 B+ with Buster OS running on it and the version of OpenCV is 4.1. If you are completely new, follow the tutorials below before you can get started.
- Getting started with Raspberry Pi
- Installing OpenCV on Raspberry Pi
- RTSP CCTV Footage Monitoring on Raspberry Pi
The goal is to have your Pi up and ready for development. It is okay to have any version of Raspbian OS on your Pi but make sure the version of OpenCV is 4.1 or greater. You can either follow the above tutorial to compile your OpenCV which will take hours but is more reliable for heavy projects or just install it directly from pip using the following commands.
$ pip install opencv-contrib-python==4.1.0.25
If you are installing OpenCV with pip for the first time, you have to install the other dependencies as well. Use the below commands for that.
$ sudo apt-get install libavcodec-dev libavformat-dev libswscale-dev libv4l-dev
$ sudo apt-get install libxvidcore-dev libx264-dev
$sudo apt-get install libatlas-base-dev gfortran
$ sudo apt-get install libhdf5-dev libhdf5-serial-dev libhdf5-103
$ sudo apt-get install libqtgui4 libqtwebkit4 libqt4-test python3-pyqt5
We have already built many Raspberry Pi OpenCV projects, you can also check that out for more inspirations.
Adding Buzzer to Raspberry Pi 5Inch Display
On the hardware side, we do not have much other than a 5-Inch Display and a Buzzer. After Interfacing 5-Inch Display with Raspberry Pi, we can directly mount the buzzer to the backside of the Display which has extended some GPIO pins for us. I have connected my Buzzer as shown below-
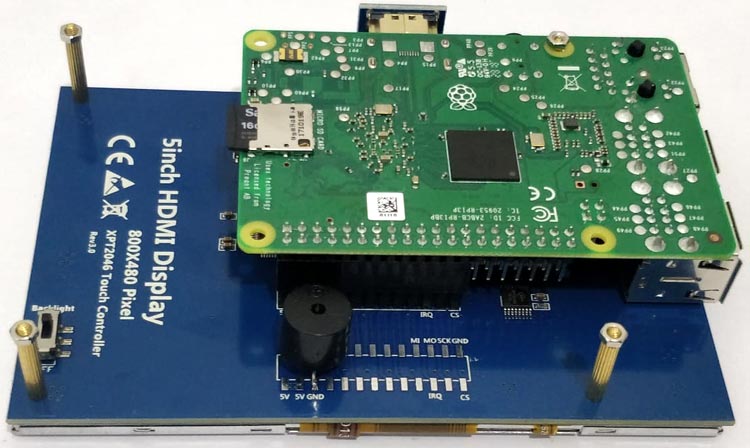
If you are interested in utilizing more I/O pins, then the below pin description will be useful. As you can see among the extended pins, most of the pins are utilized by the Display itself for a touchscreen interface. But still, we have pins 3,5,7,8,10,11,12,13,15,16, and 24 that have no connection and we can use it for our own application. In this tutorial, I have connected a buzzer to GPIO 3.

Programming Raspberry Pi for CCTV Motion Detection
The complete python script for this project can be found at the bottom of this page, but let’s discuss each segment of the code to understand how it works.
Monitoring Multiple Cameras without Lag on Raspberry Pi using RTSP
The challenging part in making this work was to reduce the load on Raspberry pi to avoid a lag in streaming. Initially, I tried switching between all four cameras to look for motion but it was very laggy (about 10 seconds). So I combined all four cameras to a single image and did all the motion detecting activities on that image. I wrote two functions, namely, create a camera and read camera.
The create camera function is used to open the cam with its respective channel number. Note that RTSP URL ends with “02”, which means I am using the sub-stream video feed which will be low in resolution and hence faster to read. Also, the type of video codec you use also contributes to speed, I experimented with different codes and found FFMPEG to be the fasted of all.
def create_camera (channel):
    rtsp = "rtsp://" + rtsp_username + ":" + rtsp_password + "@" + rtsp_IP + ":554/Streaming/channels/" + channel + "02" #change the IP to suit yours
    cap = cv2.VideoCapture(rtsp, cv2.CAP_FFMPEG)
    cap.set(3, cam_width)  # ID number for width is 3
    cap.set(4, cam_height)  # ID number for height is 480
    cap.set(10, 100)  # ID number for brightness is 10
    return cap
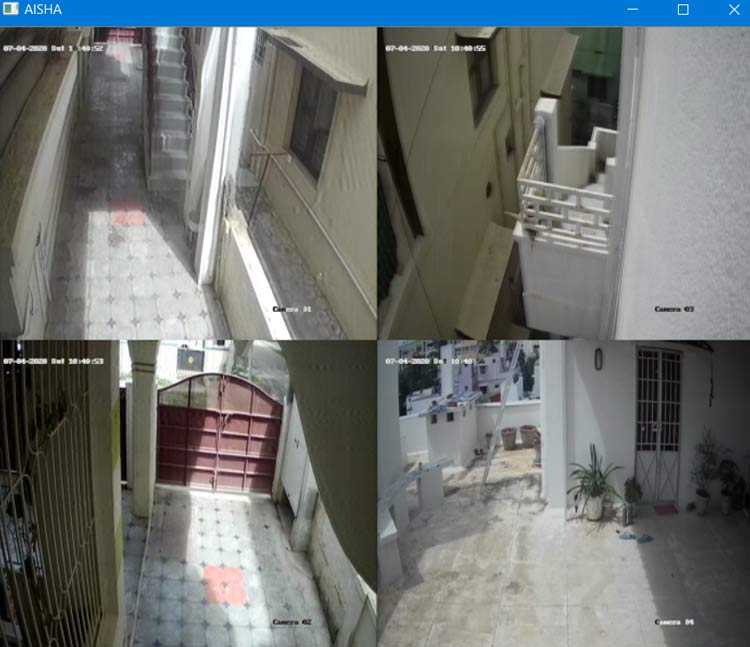
In the read camera function, we will read all four cams namely cam1, cam2, cam3, and cam4 to combine them all into a single image called Main_screen. Once this main screen is ready, we will do all our OpenCV work on this image.
def read_camera ():
    success, current_screen = cam1.read()
    Main_screen [:cam_height, :cam_width, :3] = current_screen
    success, current_screen = cam2.read()
    Main_screen[cam_height:cam_height*2, :cam_width, :3] = current_screen
    success, current_screen = cam3.read()
    Main_screen[:cam_height, cam_width:cam_width*2, :3] = current_screen
    success, current_screen = cam4.read()
    Main_screen[cam_height:cam_height*2, cam_width:cam_width*2, :3] = current_screen
    return (Main_screen)
The main screen image with all the four cams combined will look like the image shown below.
Motion Detection on OpenCV using Raspberry Pi
Now that we have the image ready, we can start with our motion detection. Inside the while loop, we start by reading two different frames namely, frame1 and frame2, then convert them to grayscale
frame1 = read_camera() #Read the first frame
grayImage_F1 = cv2.cvtColor(frame1, cv2.COLOR_BGR2GRAY)  # Convert to gray
frame2 = read_camera() #Read the 2nd frame
grayImage_F2 = cv2.cvtColor(frame2, cv2.COLOR_BGR2GRAY)
Then we take a difference between both these images to see what has changed and with a threshold, we group all the places that had a change, kind of like a blob. It is also common to blur and dilate the image to avoid sharp edges.
diffImage = cv2.absdiff(grayImage_F1,grayImage_F2) #get the differance --this is cool
blurImage = cv2.GaussianBlur(diffImage, (5,5), 0)
_, thresholdImage = cv2.threshold(blurImage, 20,255,cv2.THRESH_BINARY)
dilatedImage = cv2.dilate(thresholdImage,kernal,iterations=5)
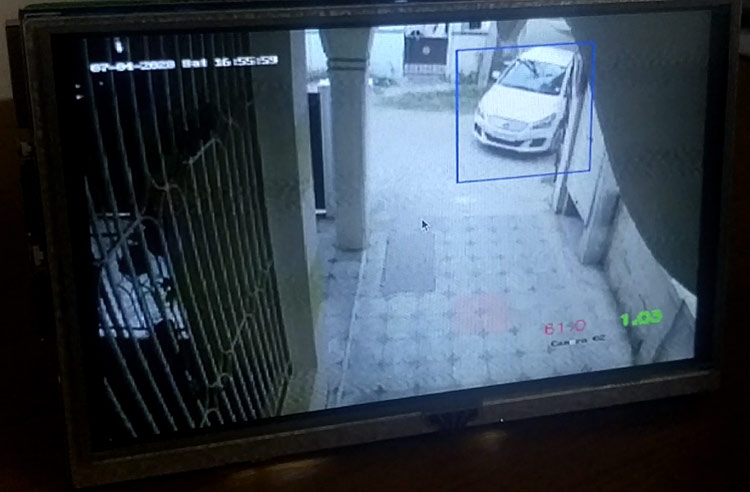
Next step is to find counters and check the area of each counter, by finding the area, we can figure out how big the motion. If the area is bigger than a specified value in the variable motion_detected, then we consider that as an activity and draw a box around the change to highlight it to the user.
contours, _ = cv2.findContours (dilatedImage, cv2.RETR_TREE, cv2.CHAIN_APPROX_SIMPLE) #find contour is a magic function
for contour in contours: #for every change that is detected
    (x,y,w,h) = cv2.boundingRect(contour) #get the location where change was found
    if cv2.contourArea(contour) > motion_threshold:
        cv2.rectangle(frame1, (x, y), (x + w, y + h), (255, 255, 0), 1)
        display_screen = find_screen()
The function find_screen() is used to find where the activity took place among the four cameras. We can find that since we know the x and y values of the motion. We compare these x and y values to the location of each screen to find which screen gave activity and we again crop that particular screen, so that we can display it on the pi touch screen.
def find_screen():
    if (x < cam_width):
        if (y < cam_height):
            screen = frame1[0:cam_height, 0:cam_width]
            print("Activity in cam screen 1")
        else:
            screen = frame1[cam_height:cam_height*2, :cam_width]
            print("Activity in cam screen 2")
    else:
        if (y < cam_height):
            screen = frame1[:cam_height, cam_width:cam_width*2]
            print("Activity in cam screen 3")
        else:
            screen = frame1[cam_height:cam_height*2, cam_width:cam_width*2]
            print("Activity in cam screen 4")
    return (screen)
Setting Alarm for Motion Detection
Once we know, in which screen, motion is detected, it is easy to add any type of alarm we need. Here we will beep a buzzer connected to GPIO 3. The if statement checks if the motion was detected in screen 3 and increments a variable called trig_alarm. You can detect any screen of your choice or even on multiple screens.
         if ((x>cam_width) and (y<cam_height)): #screen 3
                trig_alarm+=1
            else:
                trig_alarm =0
If the value of trig_alarm reaches more than 3, we will beep a buzzer once. The reason for this count is that sometimes I noticed shadows or birds created fake alarm. So this way only if there is a continuous activity for 3 frames, we will get an alarm.
    if (trig_alarm>=3):#wait for conts 3 motions
        #Beep the Buzzer
        GPIO.output(BUZZER,1)
        time.sleep(0.02)
        GPIO.output (BUZZER,0)
        trig_alarm =0

Monitoring CPU Temperature and Usage
The system is indented to work 24x7 and hence the Pi can get very hot, so I decide to monitor the temperature and CPU usage by displaying those values on the screen. We have obtained this information using the gpiozero library.
cpu = CPUTemperature()
    load = LoadAverage()
    cpu_temperature = str((cpu.temperature)//1)
    load_average = str(load.load_average)
    #print (cpu.temperature)
    #print(load.load_average)
    cv2.putText(display_screen, cpu_temperature, (250,250), cv2.FONT_HERSHEY_SIMPLEX, 0.4, (0,0,255), 1)
    cv2.putText(display_screen, load_average, (300,250), cv2.FONT_HERSHEY_SIMPLEX, 0.4, (0,255,0), 2)
Launching your Pi CCTV Motion Detector
I have tested this for days to gather and it works every single time and it was really a fun build until I damaged one camera, more on that along with detailed working in the video below. But the system was reliable and I was surprised to see pi handling all this butter smooth.
If you are planning to run it continuously, I would strongly recommend a proper casing with heatsink and cooling fans. Also, if you are in a place where frequent power failure is a thing, you might also want to consider some kind of Power path controller circuit to act as UPS for Pi and also auto launch the OpenCV code on Pi boot up. I hope you enjoyed the tutorial and learned something useful. If you have any questions, leave them in the comment section below or post them in our forums.
Complete Project Code
#!/usr/bin/env python3
import cv2
import numpy as np
import time
import RPi.GPIO as GPIO
from gpiozero import CPUTemperature, LoadAverage
#Enter credentials for CCTV
rtsp_username = "admin"
rtsp_password = "aswinth347653"
rtsp_IP = "192.168.29.100"
cam_width = 352 #set to resolution of incoming video from DVR
cam_height = 288 #set to resolution of incoming video from DVR
motion_threshold = 1000 #decrease this value to increase sensitivity
cam_no = 1
trig_alarm =0
GPIO.setmode(GPIO.BCM)
GPIO.setwarnings (False)
BUZZER = 3
GPIO.setup(BUZZER,GPIO.OUT)
def create_camera (channel):
    rtsp = "rtsp://" + rtsp_username + ":" + rtsp_password + "@" + rtsp_IP + ":554/Streaming/channels/" + channel + "02" #change the IP to suit yours
    cap = cv2.VideoCapture(rtsp, cv2.CAP_FFMPEG)
    cap.set(3, cam_width)  # ID number for width is 3
    cap.set(4, cam_height)  # ID number for height is 480
    cap.set(10, 100)  # ID number for brightness is 10
    return cap
def read_camera ():
    success, current_screen = cam1.read()
    Main_screen [:cam_height, :cam_width, :3] = current_screen
    success, current_screen = cam2.read()
    Main_screen[cam_height:cam_height*2, :cam_width, :3] = current_screen
    success, current_screen = cam3.read()
    Main_screen[:cam_height, cam_width:cam_width*2, :3] = current_screen
    success, current_screen = cam4.read()
    Main_screen[cam_height:cam_height*2, cam_width:cam_width*2, :3] = current_screen
    return (Main_screen)
def find_screen():
    if (x < cam_width):
        if (y < cam_height):
            screen = frame1[0:cam_height, 0:cam_width]
            print("Activity in cam screen 1")
        else:
            screen = frame1[cam_height:cam_height*2, :cam_width]
            print("Activity in cam screen 2")
    else:
        if (y < cam_height):
            screen = frame1[:cam_height, cam_width:cam_width*2]
            print("Activity in cam screen 3")
        else:
            screen = frame1[cam_height:cam_height*2, cam_width:cam_width*2]
            print("Activity in cam screen 4")
    return (screen)
#Open all four camera Framers
cam1 = create_camera(str(1))
cam2 = create_camera(str(2))
cam3 = create_camera(str(3))
cam4 = create_camera(str(4))
print ("Reading camera successfull")
Main_screen = np.zeros(( (cam_height*2), (cam_width*2), 3) , np.uint8) # create screen on which all four camera will be stiched
display_screen = np.zeros(( (cam_height*2), (cam_width*2), 3) , np.uint8) # create screen to be display on 5 inch TFT display
kernal = np.ones((5,5),np.uint8) #form a 5x5 matrix with all ones range is 8-bit
while True:
    frame1 = read_camera() #Read the first frame
    grayImage_F1 = cv2.cvtColor(frame1, cv2.COLOR_BGR2GRAY)  # Convert to gray
    frame2 = read_camera() #Read the 2nd frame
    grayImage_F2 = cv2.cvtColor(frame2, cv2.COLOR_BGR2GRAY)
    diffImage = cv2.absdiff(grayImage_F1,grayImage_F2) #get the differance --this is cool
    blurImage = cv2.GaussianBlur(diffImage, (5,5), 0)
    _, thresholdImage = cv2.threshold(blurImage, 20,255,cv2.THRESH_BINARY)
    dilatedImage = cv2.dilate(thresholdImage,kernal,iterations=5)
    contours, _ = cv2.findContours (dilatedImage, cv2.RETR_TREE, cv2.CHAIN_APPROX_SIMPLE) #find contour is a magic function
    for contour in contours: #for every change that is detected
        (x,y,w,h) = cv2.boundingRect(contour) #get the location where change was found
        if cv2.contourArea(contour) > motion_threshold:
            cv2.rectangle(frame1, (x, y), (x + w, y + h), (255, 0, 0), 1)
            display_screen = find_screen()
            if ((x>cam_width) and (y<cam_height)): #screen 3
                trig_alarm+=1
            else:
                trig_alarm =0
    if (trig_alarm>=3):#wait for conts 3 motions
        #Beep the Buzzer
        GPIO.output(BUZZER,1)
        time.sleep(0.02)
        GPIO.output (BUZZER,0)
        trig_alarm =0
    cpu = CPUTemperature()
    load = LoadAverage()
    cpu_temperature = str((cpu.temperature)//1)
    load_average = str(load.load_average)
    #print (cpu.temperature)
    #print(load.load_average)
    cv2.putText(display_screen, cpu_temperature, (250,250), cv2.FONT_HERSHEY_SIMPLEX, 0.4, (0,0,255), 1)
    cv2.putText(display_screen, load_average, (300,250), cv2.FONT_HERSHEY_SIMPLEX, 0.4, (0,255,0), 2)
    print(trig_alarm)
    dim = (800, 480)
    Full_frame = cv2.resize (display_screen,dim,interpolation=cv2.INTER_AREA)
    cv2.namedWindow("AISHA", cv2.WINDOW_NORMAL)
    cv2.setWindowProperty('AISHA', cv2.WND_PROP_FULLSCREEN, cv2.WINDOW_FULLSCREEN)
    cv2.imshow("AISHA",Full_frame)
    if cv2.waitKey(1) & 0xFF == ord('p'):
        cam1.release()
        cam2.release()
        cam3.release()
        cam4.release()
        cv2.destroyAllWindows()
        break
will this project work with just one camera ?