
Speech recognition technology is very useful in automation which not only gives you hands free control over devices but also adds security to the system. Apart from making voice controlled gadgets, speech recognition also provides significant help to people suffering from various disabilities.
In previous projects we built Arduino based Text to Speech (TTS) Converter and voice controlled lights. Now in this project, we are going to use machine learning to train a speech recognition model using Edge Impulse Studio with three commands i.e. ‘LIGHT ON’, ‘LIGHT OFF’, and ‘NOISE’. Edge Impulse is an online machine learning platform that enables developers to create the next generation of intelligent device solutions with embedded Machine Learning. We used Edge impulse studio previously to differentiate cough and noise sounds.
Components Required
Hardware
- Arduino 33 BLE Sense
- LED
- Jumper Wires
Software
- Edge Impulse Studio
- Arduino IDE
We have covered a detailed tutorial on Arduino 33 BLE Sense.
Circuit Diagram
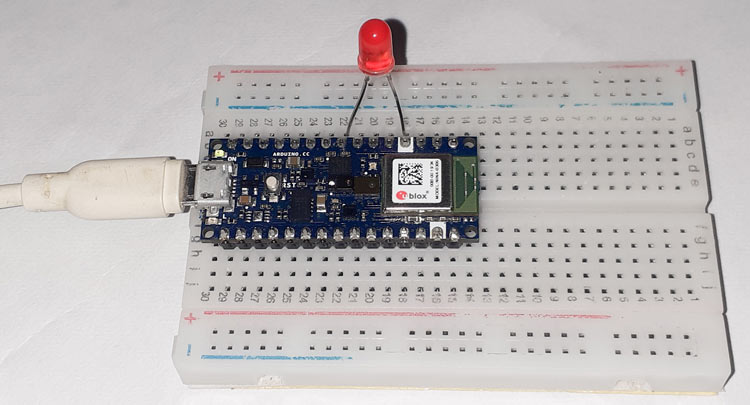
Circuit Diagram for this voice recognition using Arduino is given below. Fritzing part for Arduino 33 BLE was not available, so I used Arduino Nano as both have the same pinout.

The Positive lead of LED is connected to digital pin 5 of Arduino 33 BLE sense and Negative lead is connected to the GND pin of Arduino.
Creating the Dataset for Arduino Speech Recognition
Here Edge Impulse Studio is used to train our Speech Recognition model. Training a model on Edge Impulse Studio is similar to training machine learning models on other machine learning frameworks. For training, a machine learning model's first step is to collect a dataset that has the samples of data that we would like to be able to recognize.
As our goal is to control an LED with our voice command, we will need to collect voice samples for all the commands and noise so that it can distinguish between voice commands and other Noises.
We will create a dataset with three classes “LED ON”, “LED OFF” and “noise”. To create a dataset, create an Edge Impulse account, verify your account and then start a new project. You can load the samples by using your mobile, your Arduino board or you can import a dataset into your edge impulse account. The easiest way to load the samples into your account is by using your mobile phone. For that connect the mobile with Edge Impulse.
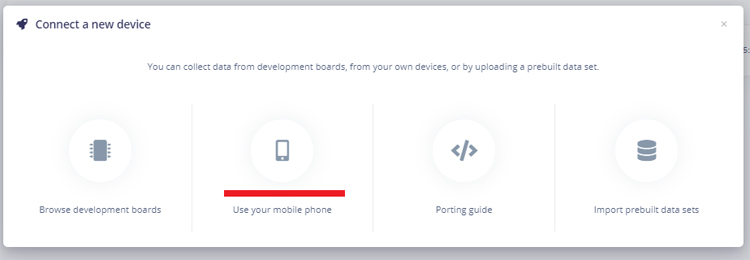
To connect Mobile phone click on ‘Devices’ and then click on ‘Connect a New Device’.

Now in the next window click on ‘Use your Mobile Phone’, and a QR code will appear. Scan the QR code with your Mobile Phone or enter the URL given on QR code.
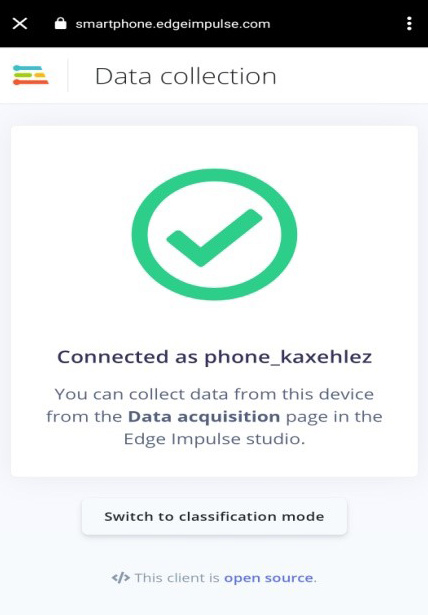
This will connect your phone with Edge Impulse studio.
With your phone connected with Edge Impulse Studio, you can now load your samples. To load the samples click on ‘Data acquisition’. Now on the Data acquisition page enter the label name, select the microphone as a sensor, and enter the sample length. Click on ‘Start sampling’, your device will capture a 2 Sec sample. Record a total of 10 to 12 voice samples in different conditions.
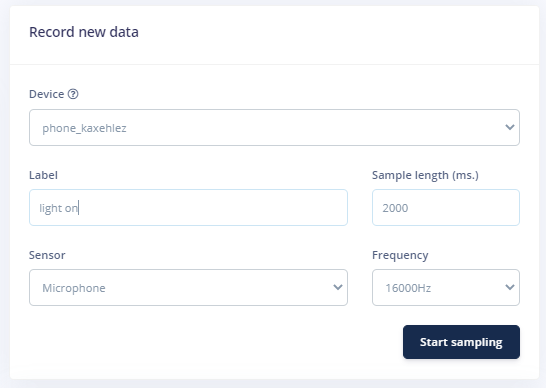
After uploading the samples for the first class now set the change the label and collect the samples for ‘light off’ and ‘noise’ class.
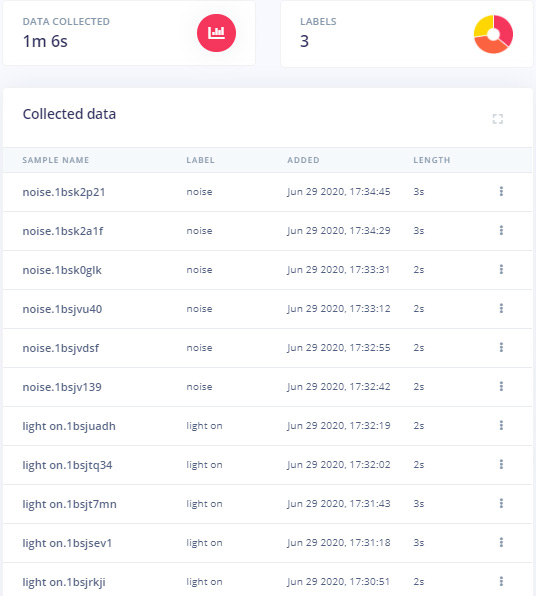
These samples are for Training the module, in the next steps, we will collect the Test Data. Test data should be at least 30% of training data, so collect the 4 samples of ‘noise’ and 4 to 5 samples for ‘light on’ and ‘light off’.
Training the Model
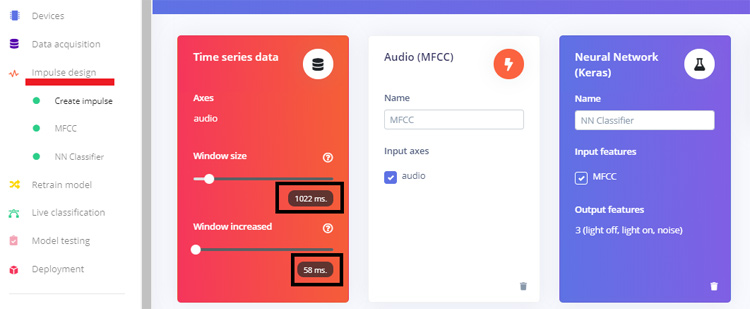
As our dataset is ready, now we can create an impulse for the data. For that go to ‘Create impulse’ page. Change the default settings of a 1000 ms Window size to 1200ms and 500 ms Window increase to 50ms. This means our data will be processed 1.2 s at a time, starting each 58ms.
Now on ‘Create impulse’ page click on ‘Add a processing block’. In the next window select the Audio (MFCC) block. After that click on ‘Add a learning block’ and select the Neural Network (Keras) block. Then click on ‘Save Impulse’.
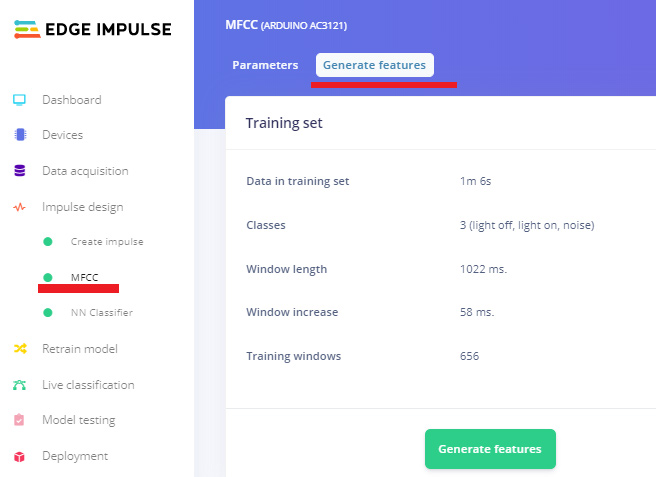
In the next step go to the MFCC page and then click on ‘Generate Features’. It will generate MFCC blocks for all of our windows of audio.
After that go to the ‘NN Classifier’ page and click on the three dots on the upper right corner of the ‘Neural Network settings’ and select ‘Switch to Keras (expert) mode’.
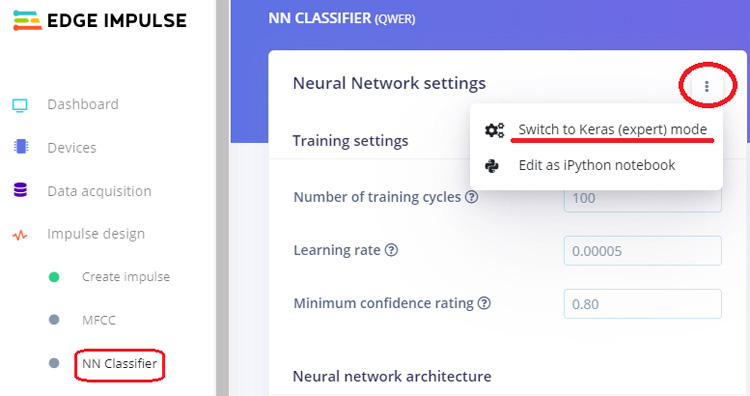
Replace the original with the following code and change the ‘Minimum confidence rating’ to ‘0.70’. Then click on the ‘Start training’ button. It will start training your model.
import tensorflow as tf
from tensorflow.keras.models import Sequential
from tensorflow.keras.layers import Dense, InputLayer, Dropout, Flatten, Reshape, BatchNormalization, Conv2D, MaxPooling2D, AveragePooling2D
from tensorflow.keras.optimizers import Adam
from tensorflow.keras.constraints import MaxNorm
# model architecture
model = Sequential()
model.add(InputLayer(input_shape=(X_train.shape[1], ), name='x_input'))
model.add(Reshape((int(X_train.shape[1] / 13), 13, 1), input_shape=(X_train.shape[1], )))
model.add(Conv2D(10, kernel_size=5, activation='relu', padding='same', kernel_constraint=MaxNorm(3)))
model.add(AveragePooling2D(pool_size=2, padding='same'))
model.add(Conv2D(5, kernel_size=5, activation='relu', padding='same', kernel_constraint=MaxNorm(3)))
model.add(AveragePooling2D(pool_size=2, padding='same'))
model.add(Flatten())
model.add(Dense(classes, activation='softmax', name='y_pred', kernel_constraint=MaxNorm(3)))
# this controls the learning rate
opt = Adam(lr=0.005, beta_1=0.9, beta_2=0.999)
# train the neural network
model.compile(loss='categorical_crossentropy', optimizer=opt, metrics=['accuracy'])
model.fit(X_train, Y_train, batch_size=32, epochs=9, validation_data=(X_test, Y_test), verbose=2)
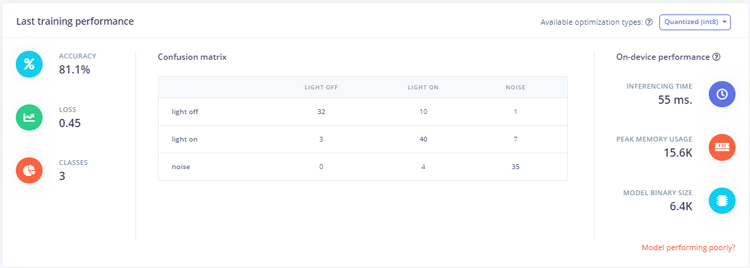
After training the model it will show the training performance. For me, the accuracy was 81.1% and loss was 0.45 that is not ideal performance but we can proceed with it. You can increase your model's performance by creating a vast dataset.
Now as our Speech Recognition model is ready, we will deploy this model as Arduino library. Before downloading the model as a library you can test the performance by going to the ‘Live Classification’ page. The Live classification feature allows you to test the model both with the existing testing data that came with the dataset or by streaming audio data from your mobile phone.
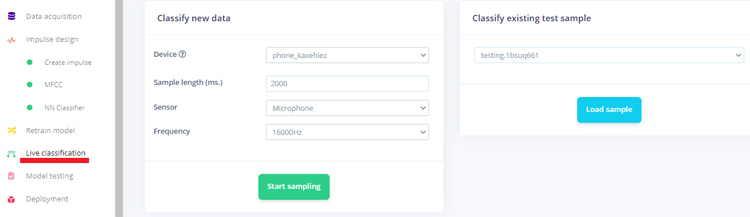
To test the data with your phone, choose ‘Switch to Classification Mode’ on your phone.

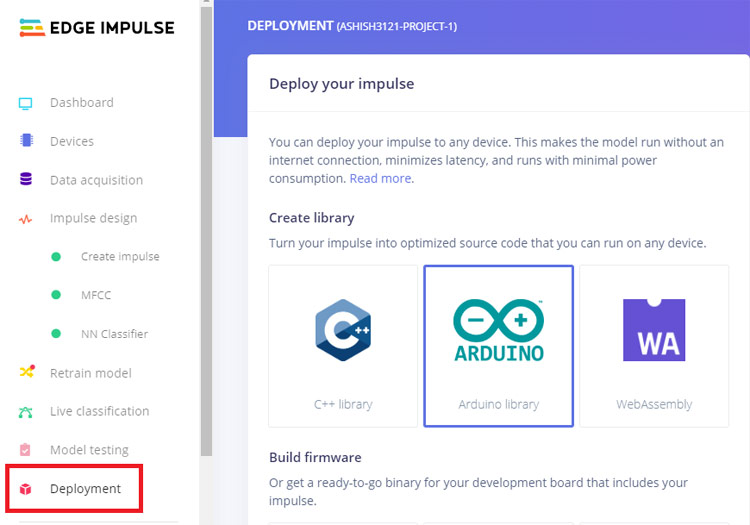
Now to download the model as Arduino Library, go to the ‘Deployment’ page and select ‘Arduino Library’. Now scroll down and click on ‘Build’ to start the process. This will build an Arduino library for your project.
Now add the library in your Arduino IDE. For that open the Arduino IDE and then click on Sketch > Include Library > Add.ZIP library
Then, load an example by going to File > Examples > Your project name - Edge Impulse > nano_ble33_sense_microphone
Arduino Code for Arduino Voice Recognition
Here some changes have been made to control LED with the voice commands.
We are making some changes in the void loop() where it is printing the probability of commands. In the original code, it is printing all the labels and their values together.
for (size_t ix = 0; ix < EI_CLASSIFIER_LABEL_COUNT; ix++) {
ei_printf("    %s: %.5f\n", result.classification[ix].label, result.classification[ix].value);
   }
To control the LED we have to save all the command probabilities in three different variables so that we can put conditional statements on them. So according to the new code if the probability of ‘light on’ command is more than 0.50 then it will turn on the LED and if the probability of ‘light off’ command is more than 0.50 than it will turn off the LED.
for (size_t ix = 2; ix < EI_CLASSIFIER_LABEL_COUNT; ix++) {
    noise = result.classification[ix].value;
    Serial.println("Noise: ");
    Serial.println(noise);
    }
    for (size_t ix = 0; ix < EI_CLASSIFIER_LABEL_COUNT; ix--) {
    lightoff = result.classification[ix].value;
    Serial.println("Light Off: ");
    Serial.print(lightoff);
    }
    lighton = 1- (noise +lightoff);
    Serial.println("Light ON: ");
    Serial.print(lighton);
    if (lighton > 0.50){
      digitalWrite(led, HIGH);
    }
    if (lightoff > 0.50){
      digitalWrite(led, LOW);
    }
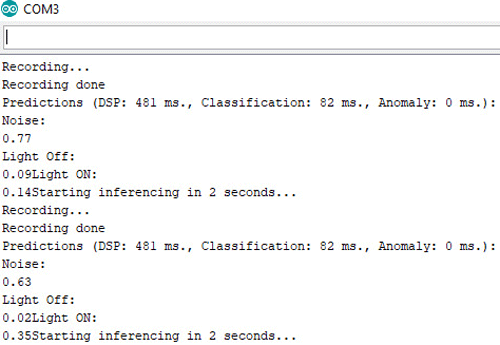
After making the changes, upload the code into your Arduino. Open the serial monitor at 115200 baud.
This is how you can build speech recognition using Arduino and give commands to operate the devices.
A complete working video with a library and code is given below.
Complete Project Code
#define EIDSP_QUANTIZE_FILTERBANK 0
/* Includes ---------------------------------------------------------------- */
#include <PDM.h>
#include <arduino_ac3121_inference.h>
/** Audio buffers, pointers and selectors */
typedef struct {
int16_t *buffer;
uint8_t buf_ready;
uint32_t buf_count;
uint32_t n_samples;
} inference_t;
static inference_t inference;
static bool record_ready = false;
static signed short sampleBuffer[2048];
static bool debug_nn = false; // Set this to true to see e.g. features generated from the raw signal
float lighton, lightoff, noise;
#define led 5
void setup()
{
// put your setup code here, to run once:
Serial.begin(115200);
Serial.println("Edge Impulse Inferencing Demo");
pinMode( led, OUTPUT );
// summary of inferencing settings (from model_metadata.h)
ei_printf("Inferencing settings:\n");
ei_printf("\tInterval: %.2f ms.\n", (float)EI_CLASSIFIER_INTERVAL_MS);
ei_printf("\tFrame size: %d\n", EI_CLASSIFIER_DSP_INPUT_FRAME_SIZE);
ei_printf("\tSample length: %d ms.\n", EI_CLASSIFIER_RAW_SAMPLE_COUNT / 16);
ei_printf("\tNo. of classes: %d\n", sizeof(ei_classifier_inferencing_categories) / sizeof(ei_classifier_inferencing_categories[0]));
if (microphone_inference_start(EI_CLASSIFIER_RAW_SAMPLE_COUNT) == false) {
ei_printf("ERR: Failed to setup audio sampling\r\n");
return;
}
}
/**
* @brief Arduino main function. Runs the inferencing loop.
*/
void loop()
{
ei_printf("Starting inferencing in 2 seconds...\n");
delay(2000);
ei_printf("Recording...\n");
bool m = microphone_inference_record();
if (!m) {
ei_printf("ERR: Failed to record audio...\n");
return;
}
ei_printf("Recording done\n");
signal_t signal;
signal.total_length = EI_CLASSIFIER_RAW_SAMPLE_COUNT;
signal.get_data = µphone_audio_signal_get_data;
ei_impulse_result_t result = { 0 };
EI_IMPULSE_ERROR r = run_classifier(&signal, &result, debug_nn);
if (r != EI_IMPULSE_OK) {
ei_printf("ERR: Failed to run classifier (%d)\n", r);
return;
}
// print the predictions
ei_printf("Predictions (DSP: %d ms., Classification: %d ms., Anomaly: %d ms.): \n",
result.timing.dsp, result.timing.classification, result.timing.anomaly);
// for (size_t ix = 0; ix < EI_CLASSIFIER_LABEL_COUNT; ix++) {
// ei_printf(" %s: %.5f\n", result.classification[ix].label, result.classification[ix].value);
// }
for (size_t ix = 2; ix < EI_CLASSIFIER_LABEL_COUNT; ix++) {
noise = result.classification[ix].value;
Serial.println("Noise: ");
Serial.println(noise);
}
for (size_t ix = 0; ix < EI_CLASSIFIER_LABEL_COUNT; ix--) {
lightoff = result.classification[ix].value;
Serial.println("Light Off: ");
Serial.print(lightoff);
}
lighton = 1- (noise +lightoff);
Serial.println("Light ON: ");
Serial.print(lighton);
if (lighton > 0.60){
digitalWrite(led, HIGH);
}
if (lightoff > 0.29){
digitalWrite(led, LOW);
}
#if EI_CLASSIFIER_HAS_ANOMALY == 1
ei_printf(" anomaly score: %.3f\n", result.anomaly);
#endif
}
/**
* @brief Printf function uses vsnprintf and output using Arduino Serial
*
* @param[in] format Variable argument list
*/
void ei_printf(const char *format, ...) {
static char print_buf[1024] = { 0 };
va_list args;
va_start(args, format);
int r = vsnprintf(print_buf, sizeof(print_buf), format, args);
va_end(args);
if (r > 0) {
Serial.write(print_buf);
}
}
/**
* @brief PDM buffer full callback
* Get data and call audio thread callback
*/
static void pdm_data_ready_inference_callback(void)
{
int bytesAvailable = PDM.available();
// read into the sample buffer
int bytesRead = PDM.read((char *)&sampleBuffer[0], bytesAvailable);
if (record_ready == true || inference.buf_ready == 1) {
for(int i = 0; i < bytesRead>>1; i++) {
inference.buffer[inference.buf_count++] = sampleBuffer[i];
if(inference.buf_count >= inference.n_samples) {
inference.buf_count = 0;
inference.buf_ready = 1;
}
}
}
}
/**
* @brief Init inferencing struct and setup/start PDM
*
* @param[in] n_samples The n samples
*
* @return { description_of_the_return_value }
*/
static bool microphone_inference_start(uint32_t n_samples)
{
inference.buffer = (int16_t *)malloc(n_samples * sizeof(int16_t));
if(inference.buffer == NULL) {
return false;
}
inference.buf_count = 0;
inference.n_samples = n_samples;
inference.buf_ready = 0;
// configure the data receive callback
PDM.onReceive(&pdm_data_ready_inference_callback);
// optionally set the gain, defaults to 20
PDM.setGain(80);
//ei_printf("Sector size: %d nblocks: %d\r\n", ei_nano_fs_get_block_size(), n_sample_blocks);
PDM.setBufferSize(4096);
// initialize PDM with:
// - one channel (mono mode)
// - a 16 kHz sample rate
if (!PDM.begin(1, EI_CLASSIFIER_FREQUENCY)) {
ei_printf("Failed to start PDM!");
}
record_ready = true;
return true;
}
/**
* @brief Wait on new data
*
* @return True when finished
*/
static bool microphone_inference_record(void)
{
inference.buf_ready = 0;
inference.buf_count = 0;
while(inference.buf_ready == 0) {
delay(10);
}
return true;
}
/**
* Get raw audio signal data
*/
static int microphone_audio_signal_get_data(size_t offset, size_t length, float *out_ptr)
{
arm_q15_to_float(&inference.buffer[offset], out_ptr, length);
return 0;
}
/**
* @brief Stop PDM and release buffers
*/
static void microphone_inference_end(void)
{
PDM.end();
free(inference.buffer);
}
#if !defined(EI_CLASSIFIER_SENSOR) || EI_CLASSIFIER_SENSOR != EI_CLASSIFIER_SENSOR_MICROPHONE
#error "Invalid model for current sensor."
#endifComments
Hi Stephane, Arduino Nano 33
Hi Stephane, Arduino Nano 33 BLE sense that i used in this project has a inbuilt microphone.
Nice Project and Briefing !
Nice Project and Briefing !
Is it possible to get this done without Mobile app & Bluetooth? With Hardwired mic and speech recognition?
I am in need of this solution. Can you please share your contact details to discuss more on this? or Can you please give me a call on 8380095023?
Regards,
Laxman Magar
8380095023
I am facing a issue with PDM
I am facing a issue with PDM.h
fatal error: PDM.h: No such file or directory
can Anyone please help
Sir You Said you are using I
Sir You Said you are using I used Arduino Nano as both have the same pinout.
I also tried with the same but it's not working.
It will be great if you can Help
No. For this project you need
No. For this project you need Arduino nano 33 ble SENSE.
Ok, Thank You for your reply.
Ok, Thank You for your reply.
Now I have the Arduino nano 33 BLE sense Program working fine but the led is not getting on or off
nothing is happening with Led.
Could you please help
Is it recognizing the speech?
Is it recognizing the speech? It only turns on the LED when it recognizes the key word 'LED ON'
Hello Sir,
Hello Sir,
First of all, I am really grateful that you are helping and replying to the comments.
I tried but still Led is not getting on off
below is the image
If I could get your email I can send you the image of the project and Code.
Sir, I am a student and I need to submit the project on 22nd after 2 days it will be great if you can help me with this project.
I have pinged you, my email address on Instagram
Thank You :)
I don't have your email
I don't have your email address. Can you please share your code and Serial monitor image.
My Email address is sashwi.77
My Email address is sashwi.77@gmail.com
I am waiting for your email as I am not able to attach the image here.
Code is below:
#define EIDSP_QUANTIZE_FILTERBANK 0
/* Includes ---------------------------------------------------------------- */
#include <PDM.h>
#include <voice_recognition_project_inference.h>
/** Audio buffers, pointers and selectors */
typedef struct {
int16_t *buffer;
uint8_t buf_ready;
uint32_t buf_count;
uint32_t n_samples;
} inference_t;
static inference_t inference;
static bool record_ready = false;
static signed short sampleBuffer[2048];
static bool debug_nn = false; // Set this to true to see e.g. features generated from the raw signal
float lighton, lightoff, noise;
#define led 5
void setup()
{
// put your setup code here, to run once:
Serial.begin(115200);
Serial.println("Edge Impulse Inferencing Demo");
pinMode( led, OUTPUT );
// summary of inferencing settings (from model_metadata.h)
ei_printf("Inferencing settings:\n");
ei_printf("\tInterval: %.2f ms.\n", (float)EI_CLASSIFIER_INTERVAL_MS);
ei_printf("\tFrame size: %d\n", EI_CLASSIFIER_DSP_INPUT_FRAME_SIZE);
ei_printf("\tSample length: %d ms.\n", EI_CLASSIFIER_RAW_SAMPLE_COUNT / 16);
ei_printf("\tNo. of classes: %d\n", sizeof(ei_classifier_inferencing_categories) / sizeof(ei_classifier_inferencing_categories[0]));
if (microphone_inference_start(EI_CLASSIFIER_RAW_SAMPLE_COUNT) == false) {
ei_printf("ERR: Failed to setup audio sampling\r\n");
return;
}
}
/**
* @brief Arduino main function. Runs the inferencing loop.
*/
void loop()
{
ei_printf("Starting inferencing in 2 seconds...\n");
delay(2000);
ei_printf("Recording...\n");
bool m = microphone_inference_record();
if (!m) {
ei_printf("ERR: Failed to record audio...\n");
return;
}
ei_printf("Recording done\n");
signal_t signal;
signal.total_length = EI_CLASSIFIER_RAW_SAMPLE_COUNT;
signal.get_data = µphone_audio_signal_get_data;
ei_impulse_result_t result = { 0 };
EI_IMPULSE_ERROR r = run_classifier(&signal, &result, debug_nn);
if (r != EI_IMPULSE_OK) {
ei_printf("ERR: Failed to run classifier (%d)\n", r);
return;
}
// print the predictions
ei_printf("Predictions (DSP: %d ms., Classification: %d ms., Anomaly: %d ms.): \n",
result.timing.dsp, result.timing.classification, result.timing.anomaly);
// for (size_t ix = 0; ix < EI_CLASSIFIER_LABEL_COUNT; ix++) {
// ei_printf(" %s: %.5f\n", result.classification[ix].label, result.classification[ix].value);
// }
for (size_t ix = 2; ix < EI_CLASSIFIER_LABEL_COUNT; ix++) {
noise = result.classification[ix].value;
Serial.println("Noise: ");
Serial.println(noise);
}
for (size_t ix = 0; ix < EI_CLASSIFIER_LABEL_COUNT; ix--) {
lightoff = result.classification[ix].value;
Serial.println("Light Off: ");
Serial.print(lightoff);
digitalWrite(led, LOW);
}
lighton = result.classification[ix].value;
Serial.println("Light ON: ");
Serial.print(lighton);
if (lighton > 0.50){
digitalWrite(led, HIGH);
}
if (lightoff > 0.50){
digitalWrite(led, LOW);
}
#if EI_CLASSIFIER_HAS_ANOMALY == 1
ei_printf(" anomaly score: %.3f\n", result.anomaly);
#endif
}
/**
* @brief Printf function uses vsnprintf and output using Arduino Serial
*
* @param[in] format Variable argument list
*/
void ei_printf(const char *format, ...) {
static char print_buf[1024] = { 0 };
va_list args;
va_start(args, format);
int r = vsnprintf(print_buf, sizeof(print_buf), format, args);
va_end(args);
if (r > 0) {
Serial.write(print_buf);
}
}
/**
* @brief PDM buffer full callback
* Get data and call audio thread callback
*/
static void pdm_data_ready_inference_callback(void)
{
int bytesAvailable = PDM.available();
// read into the sample buffer
int bytesRead = PDM.read((char *)&sampleBuffer[0], bytesAvailable);
if (record_ready == true || inference.buf_ready == 1) {
for(int i = 0; i < bytesRead>>1; i++) {
inference.buffer[inference.buf_count++] = sampleBuffer[i];
if(inference.buf_count >= inference.n_samples) {
inference.buf_count = 0;
inference.buf_ready = 1;
}
}
}
}
/**
* @brief Init inferencing struct and setup/start PDM
*
* @param[in] n_samples The n samples
*
* @return { description_of_the_return_value }
*/
static bool microphone_inference_start(uint32_t n_samples)
{
inference.buffer = (int16_t *)malloc(n_samples * sizeof(int16_t));
if(inference.buffer == NULL) {
return false;
}
inference.buf_count = 0;
inference.n_samples = n_samples;
inference.buf_ready = 0;
// configure the data receive callback
PDM.onReceive(&pdm_data_ready_inference_callback);
// optionally set the gain, defaults to 20
PDM.setGain(80);
//ei_printf("Sector size: %d nblocks: %d\r\n", ei_nano_fs_get_block_size(), n_sample_blocks);
PDM.setBufferSize(4096);
// initialize PDM with:
// - one channel (mono mode)
// - a 16 kHz sample rate
if (!PDM.begin(1, EI_CLASSIFIER_FREQUENCY)) {
ei_printf("Failed to start PDM!");
}
record_ready = true;
return true;
}
/**
* @brief Wait on new data
*
* @return True when finished
*/
static bool microphone_inference_record(void)
{
inference.buf_ready = 0;
inference.buf_count = 0;
while(inference.buf_ready == 0) {
delay(10);
}
return true;
}
/**
* Get raw audio signal data
*/
static int microphone_audio_signal_get_data(size_t offset, size_t length, float *out_ptr)
{
arm_q15_to_float(&inference.buffer[offset], out_ptr, length);
// numpy::int16_to_float(&inference.buffer[offset], out_ptr, length);
return 0;
}
/**
* @brief Stop PDM and release buffers
*/
static void microphone_inference_end(void)
{
PDM.end();
free(inference.buffer);
}
#if !defined(EI_CLASSIFIER_SENSOR) || EI_CLASSIFIER_SENSOR != EI_CLASSIFIER_SENSOR_MICROPHONE
#error "Invalid model for current sensor."
#endif
+919823661987 this is my
+919823661987 this is my whats app number .
Sir Please I need your help badly for this project.
Thank You So Much for all help
Hi can you help me to my
Hi can you help me to my thesis please Voice recognition with sensor.
Can i use the library with
Can i use the library with arduino nano?

Hi, interesting article thanks !
However, how do you manage the PCM library, since you don't have a microphone on your breadboard ?
I guess you use your computer microphone, but how do you deal with the PDM library ? Which one do you use ?
Regards