
GPS stands for Global Positioning System and used to detect the Latitude and Longitude of any location on the Earth, with exact UTC time (Universal Time Coordinated). This device receives the coordinates from the satellite for each and every second, with time and date. GPS offers great accuracy and also provides other data besides position coordinates.
We all know that GPS is a very useful device and very commonly used in mobile phones and other portable devices for tracking the location. It has very wide range of applications in every field from calling the taxi at your home to track the altitude of airplanes. Here are some useful GPS related projects, we built previously:
- Vehicle Tracking System
- GPS Clock
- Accident Detection Alert System
- Raspberry Pi GPS Module Interfacing Tutorial
- Interfacing GPS Module with PIC Microcontroller
Here in this tutorial, we will Interface a GPS module with STM32F103C8 microcontroller to find the location coordinates and display them on 16x2 LCD display.
Components Required
- STM32F103C8 Microcontroller
- GPS Module
- 16x2 LCD display
- Breadboard
- Connecting Wires
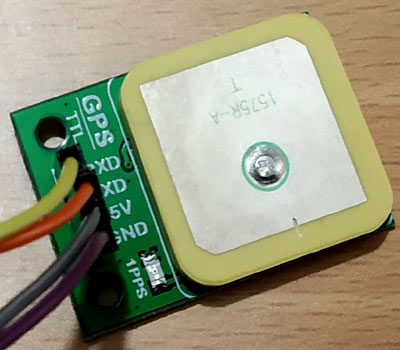
GPS Module
It’s a GY-NEO6MV2 XM37-1612 GPS Module. This GPS module has four pin +5V, GND, TXD and RXD. It communicates using the Serial pins and can be easily interfaced with the Serial port of the STM32F103C8.
GPS module sends the data in NMEA format (see the screenshot below). NMEA format consist several sentences, in which we only need one sentence. This sentence starts from $GPGGA and contains the coordinates, time and other useful information. This GPGGA is referred to Global Positioning System Fix Data. Know more about Reading GPS data and its strings here.
Below is one sample $GPGGA String, along with its description:
$GPGGA,104534.000,7791.0381,N,06727.4434,E,1,08,0.9,510.4,M,43.9,M,,*47
$GPGGA,HHMMSS.SSS,latitude,N,longitude,E,FQ,NOS,HDP,altitude,M,height,M,,checksum data
But here in this tutorial, we are using a TinyGPSPlus GPS library which extracts all the required information from the NMEA sentence, and we just need to write a simple line of code to get the latitude and longitude, which we will see later in the tutorial.
Pin out of STM32F103C8
STM32F103C8 (BLUE PILL) USART serial communication ports are shown in the pin out image below. These are blue coloured having (PA9-TX1, PA10- RX1, PA2-TX2, PA3- RX2, PB10-TX3, PB11- RX3). It has three such communication channels.

Circuit Diagram and Connections

Circuit Connections between GPS module & STM32F103C8
GPS Module | STM32F103C8 |
RXD | PA9 (TX1) |
TXD | PA10 (RX1) |
+5V | +5V |
GND | GND |
Connections between 16x2 LCD & STM32F103C8
LCD Pin No | LCD Pin Name | STM32 Pin Name |
1 | Ground (Gnd) | Ground (G) |
2 | VCC | 5V |
3 | VEE | Pin from Centre of Potentiometer |
4 | Register Select (RS) | PB11 |
5 | Read/Write (RW) | Ground (G) |
6 | Enable (EN) | PB10 |
7 | Data Bit 0 (DB0) | No Connection (NC) |
8 | Data Bit 1 (DB1) | No Connection (NC) |
9 | Data Bit 2 (DB2) | No Connection (NC) |
10 | Data Bit 3 (DB3) | No Connection (NC) |
11 | Data Bit 4 (DB4) | PB0 |
12 | Data Bit 5 (DB5) | PB1 |
13 | Data Bit 6 (DB6) | PC13 |
14 | Data Bit 7 (DB7) | PC14 |
15 | LED Positive | 5V |
16 | LED Negative | Ground (G) |
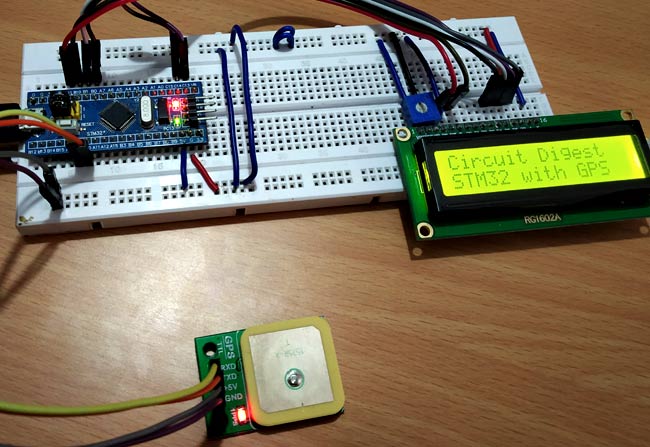
The whole setup will look like below:
Programming STM32F103C8 for GPS Module Interfacing
Complete program for finding location using GPS module using STM32 is given at the end of this project. STM32F103C8 can be programmed using Arduino IDE by simply connecting it to PC via USB port. Make sure to remove the pins TX and RX while uploading code and connect it after uploading.
To interface GPS with STM32, first we have to download a library from the GitHub link TinyGPSPlus. After downloading the library, it can be included in the Arduino IDE by to Sketch -> Include Library -> Add .zip Library. Same library can be used to interface GPS with Arduino.
So first include the necessary library files and define pins for 16x2 LCD:
#include <LiquidCrystal.h>
#include <TinyGPS++.h>
const int rs = PB11, en = PB10, d4 = PB0, d5 = PB1, d6 = PC13, d7 = PC14;
LiquidCrystal lcd(rs, en, d4, d5, d6, d7);
Then create an object named gps of the class TinyGPSPlus.
TinyGPSPlus gps;
Next in the void setup, begin the serial communication with the GPS module using Serial1.begin(9600). Serial1 is used as the Serial 1 port (Pins-PA9, PA10) of the STM32F103C8.
Serial1.begin(9600);
Then display welcome message for some time.
  lcd.begin(16,2);
  lcd.print("Circuit Digest");
  lcd.setCursor(0,1);
  lcd.print("STM32 with GPS");
  delay(4000);
  lcd.clear();
Next in the void loop (), we receive latitude and longitude from the GPS and check whether the data received is valid or not and display information in the serial monitor and LCD.
Checking if the location data available is valid or not
loc_valid = gps.location.isValid();
Receives the latitude data
lat_val = gps.location.lat();
Receives the longitude data
lng_val = gps.location.lng();
If invalid data is received it displays “*****” in serial monitor and display “waiting” in LCD.
  if (!loc_valid)
  {
    lcd.print("Waiting");
    Serial.print("Latitude : ");
    Serial.println("*****");
    Serial.print("Longitude : ");
    Serial.println("*****");
    delay(4000);
    lcd.clear();
  }
If valid data is received the latitude and longitude is displayed on serial monitor as well as on LCD display.
   lcd.clear();
    Serial.println("GPS READING: ");
    Serial.print("Latitude : ");
    Serial.println(lat_val, 6);
    lcd.setCursor(0,0);
    lcd.print("LAT:");
    lcd.print(lat_val,6);
    Serial.print("Longitude : ");
     Serial.println(lng_val, 6);
     lcd.setCursor(0,1);
     lcd.print("LONG:");
     lcd.print(lng_val,6);
     delay(4000);
Following function provides the delay to read the data. It keeps looking for the data on serial port.
static void GPSDelay(unsigned long ms)
{
  unsigned long start = millis();
  do
  {
    while (Serial1.available())
    gps.encode(Serial1.read());
  } while (millis() - start < ms);
}

Finding Latitude and Longitude with GPS and STM32
After building the setup and uploading the code, make sure to place the GPS module in open area to receive the signal fast. Sometimes it takes few minutes to receive signal so wait for some time. The LED will start blinking in the GPS module when it starts to receive signal and location coordinates will be displayed on the LCD display.
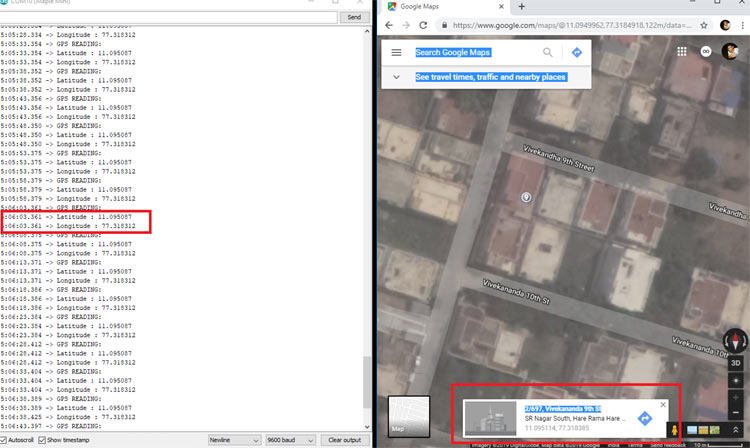
You can verify the latitude and longitude of location by using Google maps. Just Go to Google maps with GPS turned ON and click on the blue dot. It will show the address with the latitude and longitude as shown in the picture below
The complete code and demonstration video is given below.
Complete Project Code
#include <LiquidCrystal.h>     //Library for using LCD display functions
#include <TinyGPS++.h>         //Library for using GPS functions
const int rs = PB11, en = PB10, d4 = PB0, d5 = PB1, d6 = PC13, d7 = PC14;  //LCD pins connected with STM32
LiquidCrystal lcd(rs, en, d4, d5, d6, d7);
TinyGPSPlus gps;               //Object gps for class TinyGPSPlus
void setup()
{
  Serial1.begin(9600);         //Begins Serial comunication at Serial Port 1 at 9600 baudrate
  lcd.begin(16,2);             //Sets display in 16x2 Mode
  lcd.print("Circuit Digest");
  lcd.setCursor(0,1);
  lcd.print("STM32 with GPS");
  delay(4000);
  lcd.clear();
}
void loop()
{
  GPSDelay(1000);
  unsigned long start;
  double lat_val, lng_val;
  bool loc_valid;
  lat_val = gps.location.lat();        //Gets the latitude
  loc_valid = gps.location.isValid();
  lng_val = gps.location.lng();        //Gets the longitude
  if (!loc_valid)                     //Excecutes when invalid data is received from GPS
  {
    lcd.print("Waiting");
    Serial.print("Latitude : ");
    Serial.println("*****");
    Serial.print("Longitude : ");
    Serial.println("*****");
    delay(4000);
    lcd.clear();
  }
  else                              //Excutes when valid data is received from GPS
  {
    lcd.clear();
    Serial.println("GPS READING: ");
    Serial.print("Latitude : ");
    Serial.println(lat_val, 6);   //Prints latitude at Serial Monitor
    lcd.setCursor(0,0);
    lcd.print("LAT:");
    lcd.print(lat_val,6);         //Prints latitude at LCD display
    Serial.print("Longitude : ");
    Serial.println(lng_val, 6);   //Prints longitude at Serial monitor
    lcd.setCursor(0,1);
    lcd.print("LONG:");
    lcd.print(lng_val,6);          //Prints longitude at LCD display
    delay(4000);
  }
}
static void GPSDelay(unsigned long ms)          //Delay for receiving data from GPS
{
  unsigned long start = millis();
  do
  {
    while (Serial1.available())
    gps.encode(Serial1.read());
  } while (millis() - start < ms);
}
Comments
Works ok..doesn't change ..boud 9600.

when I tried to combine it with GSM module it doesn't work.. is there any particular setting to work with multiple serial pin in STM32?