
With Fitness Bands, Smartwatches and other wearable devices getting increasingly popular the use of Bluetooth 5 / Bluetooth Low Energy communication standards is widely being adopted. BLE helps us to exchange data over a short distance with very little power, which is very crucial for battery-operated devices like wearables. It also helps us to set up wireless BLE mesh networks, this feature comes in handy for home automation devices where multiple devices have to communicate with each other in a closed environment. We have already used BLE with Raspberry Pi and BLE with ESP32 to perform some basic BLE functions. Engineers are experimenting with BLE to design portable wireless devices that can run for a long time on small batteries and, there are multiple development kits available to work with BLE. In our recent review on Arduino Nano 33, we also noticed the board has nRF52840 with BLE capabilities.
In this tutorial, we will explore another exciting and popular development board called the nRF52 DK to measure Temperature and Humidity using BLE. By default, BLE Environment Sensing Profiles supports a wide range of environmental parameters but this tutorial is limited only to temperature and humidity values. This solution connects with a Smartphone over Bluetooth low energy and provides a frequent update regarding the environmental parameters i.e Temperature, Humidity. We will be using the DHT1 sensor and the Temperature measurement will be done with a resolution of 0.01 degrees Celsius and Humidity measurement will be done with a resolution of 0.01 percent.
nRF52 Development Kit:
nRF52DK is a complete prototyping platform for Bluetooth Low Energy and 2.4 GHz Wireless Internet of Things application. The development kit supports various standard Nordic Toolchains like open-source, GCC and commercial integrated development environments like Keil, IAR and Segger Embedded Studio, etc. Nordic also provides a full-fledged software development kit for nRF52, that includes complete support for nRF52DK.

nRF52DK is powered with nRF52832 ARM Cortex-M4F Microcontroller, which is integrated 512Kbytes of Flash Memor and 64 Kbytes of SRAM. nRF52DK has an integrated Segger J-Link On Board debugger, that provides an easier and faster debugging without an external/additional jtag debug devices. It also includes the Arduino Uno Rev3 compatible connector, which supports interfacing the analog and digital inputs with the microprocessor and it also includes standard communication protocols like, I2C (Inter-Integrated Circuit), SPI (Serial Peripheral Interface) and UART (Universal Asynchronous Receiver and Transmitter). This development kit is designed with an integrated in-built PCB antenna that provides short-range wireless communication using Bluetooth Low Energy for connecting with Smart Phone, Laptops and Tablets.
Segger Embedded Studio
To program the development board, we will use the Segger Embedded Studio with nRF52. Segger Embedded Studio is a powerful C/C++ integrated development environment (IDE) targeted specifically for embedded systems development. This provides a complete all-in-one solution containing everything needed for embedded C programming, development and debugging. This includes complete workflow for embedded systems programming and development, featured with project management, editor, debugger supporting ARM Cortex devices. This powerful and easy to use IDE is completely free for Nordic customers with full license without any code size restrictions. The IDE can be downloaded from the link given below,
Download Segger Embedded Studio
DHT11 with nRF52DK
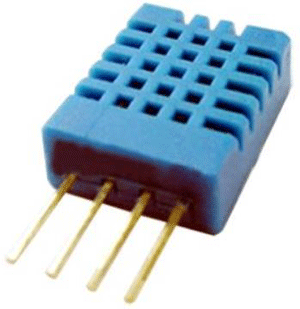
DHT11 is a full-featured Temperature and Humidity Sensor with a Resistive Type Humidity Measurement Component and an NTC type Temperature Measurement Component. It offers excellent quality, faster response, and cost-effectiveness. By default, all DHT11 sensors are calibrated in the lab which leads to extreme accuracy and reliability. It communicates using Single-Wire Serial Interface system and other specifications are given below
Specifications of DHT11:
- Humidity Range: 20 – 90 % RH
- Temperature Range: 0 – 50-degree celsius
- Humidity Accuracy: ±5%RH
- Temperature Accuracy: ±2℃
Timing Diagram of DHT11:
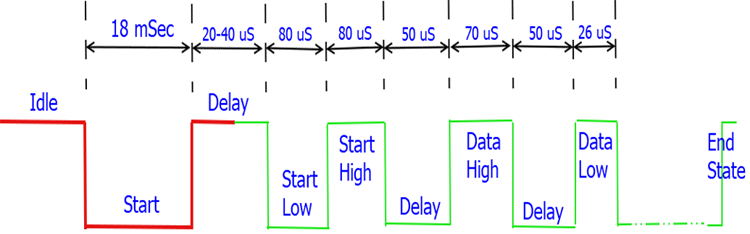
Reading the data from the DHT11 sensor is relatively simple using the timing diagram shown above. The procedure is similar to any controller and we have already used this sensor with other development platforms like
- DHT11 Sensor with Raspberry Pi
- DHT11 Sensor with PIC16F877A
- DHT11 Sensor with STM32F103C8
- DHT11 sensor with NodeMCU
To interface the DHT11 Temperature and Humidity sensor with nRF52 Development Kit, follow the connection diagram given below.

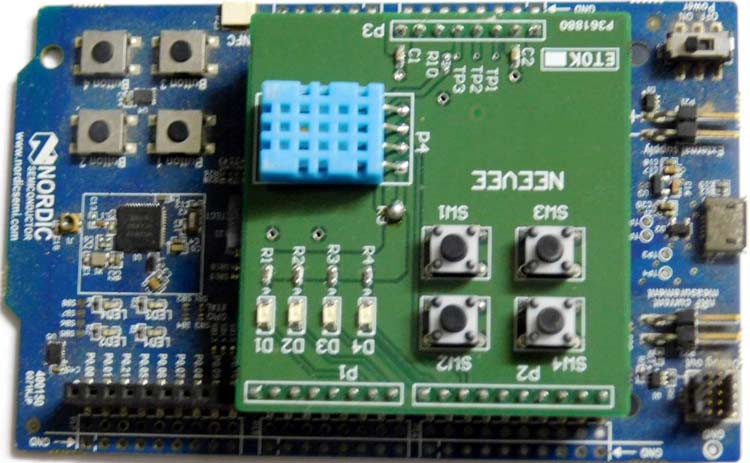
I am using a connector module to connect the sensor to my board, so my final set-up looks like this
Flow Chart for communicating with DHT11:
The below flow chart explains the program logical flow that we will be using to communicate between nRF52DK and DHT11

Data Format:


How to work with Bluetooth Low Energy (BLE)?
In order to understand how to use BLE feature, we have to understand a few basic terminologies that are explained below, you can also read the ESP32 BLE article to know more about BLE
Generic Access Profile (GAP)
Generic Access Profile holds the complete responsibility of establishing the connection for communication between BLE peripheral and Central Devices. GAP also provides various procedures including device scanning/discovery, link-layer connection establishment, link termination, handshaking of security features and full-fledged device configuration. GAP works in the following device states
|
GAP States |
Description |
|
Standby |
Device initial state upon reset |
|
Advertiser |
Device advertising with data that helps for initiator scanning |
|
Scanner |
Receives the advertisement and sends scan request to the advertiser |
|
Initiator |
Sends a connection request to establish a link |
|
Slave / Master |
On connection, device as a slave if advertiser, master if an initiator |
Generic Attribute Profile Layer (GATT)
GATT stands short for Generic Attribute Profile Layer, it is responsible for data communication between two BLE devices (Peripheral & Central). Data communication is characterized in the form of characteristics, which communicate and store the data. BLE device plays two different roles for device communication given below,
- GATT Server contains the characteristics information which will be used to read & write. In our tutorial, the DHT11 sensor, and the dev. the kit is our GATT Server.
- GATT Client reads and writes the data from/to the GATT Server. The smartphone is a GATT Client that reads & writes the data into our sensor board.
Bluetooth SIG
Bluetooth Special Interest Group (SIG) is the standards organization that monitors the development of Bluetooth standards and the licensing the Bluetooth technologies. The SIG group does not produce or sell any Bluetooth products. It defines the Bluetooth specification and standardization. They define the Unique Identifier for Bluetooth low energy profile and respective characteristics. The GATT Profile specifications can be found at the link below
Based on GATT Specification given in the above link, we have collected the unique identifiers required for our project which is tabulated below.
|
Profile / Characteristics |
UUID |
|
GAP (Generic Access) |
0x1800 |
|
GATT (Generic Attribute) |
0x1801 |
|
ESS (Environment Sensing) |
0x181A |
|
Temperature |
0x2A6E |
|
Humidity |
0x2A6F |
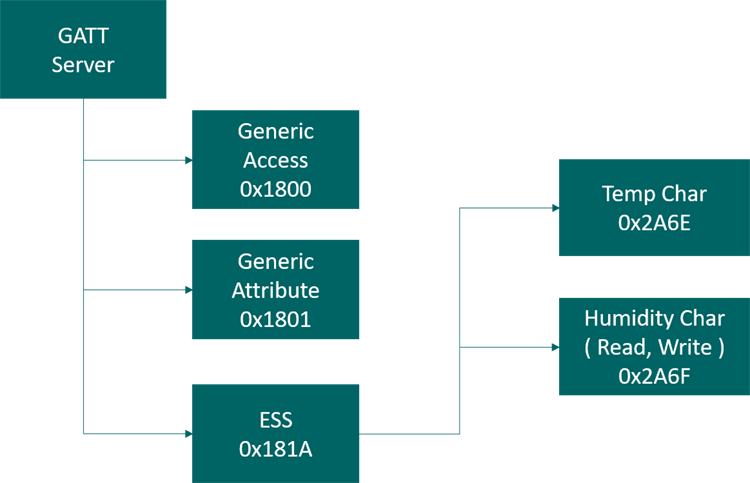
BLE Service / Characteristics Diagram
BLE UUIDs
|
UUID |
16 bit value |
128 bit UUID |
|
ESS Service |
0x181A |
0000181A-0000-0000-0000-00000000000 |
|
Temp Char |
0x2A6E |
00002A6E-0000-0000-0000-00000000000 |
|
Humidity Char |
0x2A6F |
00002A6F-0000-0000-0000-00000000000 |
Temperature Characteristics
|
Property |
Description |
|
Unit |
Degree Celsius with a resolution of 0.01 degree |
|
Format |
sint16 |
|
UUID |
0x2A6E |
|
Decimal Exponent |
2 |
|
Read |
Mandatory |
Humidity Characteristics
|
Property |
Description |
|
Unit |
Percentage with a resolution of 0.01 percent |
|
Format |
uint16 |
|
UUID |
0x2A6F |
|
Decimal Exponent |
2 |
|
Read |
Mandatory |
nRF52 BLE Program Explanation
We will be using the nRF5 SDK in order to program our nRF52 Development kit. nRF5 SDK is a complete software development kit integrated with numerous Bluetooth Low Energy profiles, GATT Serializer and driver support for all the peripherals on nRF5 series SoCs. This SDK helps developers to build full-featured, reliable and secure Bluetooth low energy applications with nRF52 and nRF51 series of microcontrollers. The complete program can be downloaded from here, the code explanation is as follows.
Configure the DHT11 DATA pin as input at nrf52 with pull up enable. Pin status should be high to confirm that nRF52 provides proper PULLUP for the DHT11 data pin
  /* set to input and check if the signal gets pulled up */
  Data_SetInput();
  DelayUSec(50);
  if(Data_GetVal()==0) {
    return DHT11_NO_PULLUP;
  }
Generate START signal from nRF52 Microcontroller and check for acknowledge signal.
  /* send start signal */
  Data_SetOutput();
  Data_ClrVal();
  DelayMSec(20); /* keep signal low for at least 18 ms */
  Data_SetInput();
  DelayUSec(50);
  /* check for acknowledge signal */
  if (Data_GetVal()!=0) { /* signal must be pulled low by the sensor */
    return DHT11_NO_ACK_0;
  }
  /* wait max 100 us for the ack signal from the sensor */
  cntr = 18;
  while(Data_GetVal()==0) { /* wait until signal goes up */
                DelayUSec(5);
    if (--cntr==0) {
      return DHT11_NO_ACK_1; /* signal should be up for the ACK here */
    }
  }
  /* wait until it goes down again, end of ack sequence */
  cntr = 18;
  while(Data_GetVal()!=0) { /* wait until signal goes down */
                DelayUSec(5);
    if (--cntr==0) {
      return DHT11_NO_ACK_0; /* signal should be down to zero again here */
    }
  }
Now read the 40 bits of data that contains 2 bytes of temperature, 2 bytes of humidity and 1 byte of a checksum.
  /* now read the 40 bit data */
  i = 0;
  data = 0;
  loopBits = 40;
  do {
    cntr = 11; /* wait max 55 us */
    while(Data_GetVal()==0) {
      DelayUSec(5);
      if (--cntr==0) {
        return DHT11_NO_DATA_0;
      }
    }
    cntr = 15; /* wait max 75 us */
    while(Data_GetVal()!=0) {
      DelayUSec(5);
      if (--cntr==0) {
        return DHT11_NO_DATA_1;
      }
    }
    data <<= 1; /* next data bit */
    if (cntr<10) { /* data signal high > 30 us ==> data bit 1 */
      data |= 1;
    }
    if ((loopBits&0x7)==1) { /* next byte */
      buffer[i] = data;
      i++;
      data = 0;
    }
  } while(--loopBits!=0);
Validate the data with the help of Checksum.
  /* test CRC */
  if ((uint8_t)(buffer[0]+buffer[1]+buffer[2]+buffer[3])!=buffer[4]) {
    return DHT11_BAD_CRC;
  }
Manipulate and store the temperature and humidity
  /* store data values for caller */
  humidity = ((int)buffer[0])*100+buffer[1];
  temperature = ((int)buffer[2])*100+buffer[3];
Initialize the nRF5 SDK Logger service. nRF52 SDK is featured with a logging control interface called nrf_log and uses the default backend for logging the information. The default backend will be a serial port. Here we initialize both nrf_log control interface and nrf_log default backends as well.
    ret_code_t err_code = NRF_LOG_INIT(NULL);
APP_ERROR_CHECK(err_code);
NRF_LOG_DEFAULT_BACKENDS_INIT();
nRF52 SDK has application timer functionality. The application timer module enables to create multiple timer instances based on RTC1 peripheral. Here we initialize the nRF5 application timer module. In this solution, two application timers are used for advertisement and data update interval.
ret_code_t err_code = app_timer_init();
APP_ERROR_CHECK(err_code);
nRF52 SDK has the full feature power management module since BLE devices need to work for multiple months on a Coin cell battery. Power management plays a vital role in BLE applications. nRF52 power management module completely handles the same. Here we initialize Power Management module of nRF5 SDK
ret_code_t err_code;
err_code = nrf_pwr_mgmt_init();
APP_ERROR_CHECK(err_code);
nRF52 SDK has an in-built Nordic Soft Device firmware hex file, which features Bluetooth low energy central and peripheral stack. This highly qualified protocol stack includes GATT, GAP, ATT, SM, L2CAP, and Link Layer. Here we follow the initialization sequence, that initialized nRF5 BLE Radio Stack ( Nordic Soft Device )
ret_code_t err_code;
err_code = nrf_sdh_enable_request();
APP_ERROR_CHECK(err_code);
// Configure the BLE stack using the default settings.
// Fetch the start address of the application RAM.
uint32_t ram_start = 0;
err_code = nrf_sdh_ble_default_cfg_set(APP_BLE_CONN_CFG_TAG, &ram_start);
APP_ERROR_CHECK(err_code);
// Enable BLE stack.
err_code = nrf_sdh_ble_enable(&ram_start);
APP_ERROR_CHECK(err_code);
// Register a handler for BLE events.
NRF_SDH_BLE_OBSERVER(m_ble_observer, APP_BLE_OBSERVER_PRIO, ble_evt_handler, NULL);
GAP is responsible for device scanning/discovery, link establishment, link termination, initiation of security features and configuration. GAP has featured with key connection parameters like connection interval, slave latency, supervision timeout, etc. Herewith initializing the Generic Access Profile connection parameters
ret_code_terr_code;
ble_gap_conn_params_tgap_conn_params;
ble_gap_conn_sec_mode_t sec_mode;
BLE_GAP_CONN_SEC_MODE_SET_OPEN(&sec_mode);
err_code = sd_ble_gap_device_name_set(&sec_mode,
(const uint8_t *)DEVICE_NAME,
strlen(DEVICE_NAME));
APP_ERROR_CHECK(err_code);
memset(&gap_conn_params, 0, sizeof(gap_conn_params));
gap_conn_params.min_conn_interval = MIN_CONN_INTERVAL;
gap_conn_params.max_conn_interval = MAX_CONN_INTERVAL;
gap_conn_params.slave_latency= SLAVE_LATENCY;
gap_conn_params.conn_sup_timeout= CONN_SUP_TIMEOUT;
err_code = sd_ble_gap_ppcp_set(&gap_conn_params);
APP_ERROR_CHECK(err_code);
GATT is responsible for data communication between BLE peripheral and central devices. nRF52 GATT module is helpful for negotiating and keeping track of the maximum ATT_MTU size. Here we initialize the nRF52 SDK Generic Attribute Module,
ret_code_t err_code = nrf_ble_gatt_init(&m_gatt, NULL);
APP_ERROR_CHECK(err_code);
GATT does data communication in the form of services and characteristics. Here we initialize the GATT environment sensing services, which includes the initialization of characteristics like temperature and humidity.
ret_code_terr_code;
nrf_ble_qwr_init_t qwr_init = {0};
// Initialize Queued Write Module.
qwr_init.error_handler = nrf_qwr_error_handler;
err_code = nrf_ble_qwr_init(&m_qwr, &qwr_init);
APP_ERROR_CHECK(err_code);
m_ess.notif_write_handler = ble_ess_notif_write_handler;
err_code = ble_ess_init(&m_ess);
APP_ERROR_CHECK(err_code);
Advertising plays a vital role in the BLE application environment. Advertisement packets include the information of address type, advertising type, advertising data, device manufacturer-specific data, and scan response data. nRF52 SDK featured with an advertising module. Here we do initialization of the advertising module with the parameters.
ret_code_terr_code;
ble_advdata_t advdata;
ble_advdata_t srdata;
ble_uuid_t adv_uuids[] = {{ESS_UUID_SERVICE, BLE_UUID_TYPE_BLE}};
// Build and set advertising data.
memset(&advdata, 0, sizeof(advdata));
advdata.name_type= BLE_ADVDATA_FULL_NAME;
advdata.include_appearance = true;
advdata.flags= BLE_GAP_ADV_FLAGS_LE_ONLY_GENERAL_DISC_MODE;
memset(&srdata, 0, sizeof(srdata));
srdata.uuids_complete.uuid_cnt = sizeof(adv_uuids) / sizeof(adv_uuids[0]);
srdata.uuids_complete.p_uuids= adv_uuids;
err_code = ble_advdata_encode(&advdata, m_adv_data.adv_data.p_data, &m_adv_data.adv_data.len);
APP_ERROR_CHECK(err_code);
err_code = ble_advdata_encode(&srdata, m_adv_data.scan_rsp_data.p_data, &m_adv_data.scan_rsp_data.len);
APP_ERROR_CHECK(err_code);
ble_gap_adv_params_t adv_params;
// Set advertising parameters.
memset(&adv_params, 0, sizeof(adv_params));
adv_params.primary_phy= BLE_GAP_PHY_1MBPS;
adv_params.duration= APP_ADV_DURATION;
adv_params.properties.type = BLE_GAP_ADV_TYPE_CONNECTABLE_SCANNABLE_UNDIRECTED;
adv_params.p_peer_addr= NULL;
adv_params.filter_policy= BLE_GAP_ADV_FP_ANY;
adv_params.interval= APP_ADV_INTERVAL;
err_code = sd_ble_gap_adv_set_configure(&m_adv_handle, &m_adv_data, &adv_params);
APP_ERROR_CHECK(err_code);
BLE Connection will be handled and monitored with various connection parameters like first connection params update delay, next consecutive delays, update count, connection event handler callback function and connection error callback event handler. Here we do initialization BLE Connection establishment parameters and a callback event handler for connection events and error events.
ret_code_terr_code;
ble_conn_params_init_t cp_init;
memset(&cp_init, 0, sizeof(cp_init));
cp_init.p_conn_params= NULL;
cp_init.first_conn_params_update_delay = FIRST_CONN_PARAMS_UPDATE_DELAY;
cp_init.next_conn_params_update_delay= NEXT_CONN_PARAMS_UPDATE_DELAY;
cp_init.max_conn_params_update_count= MAX_CONN_PARAMS_UPDATE_COUNT;
t_on_notify_cccd_handle= BLE_GATT_HANDLE_INVALID;
cp_init.disconnect_on_fail= false;
cp_init.evt_handler= on_conn_params_evt;
cp_init.error_handler= conn_params_error_handler;
err_code = ble_conn_params_init(&cp_init);
APP_ERROR_CHECK(err_code);
After the completion of the initialization of the system, here we start with advertising the BLE device name and capability information. From here, this peripheral can be seen over the smartphone Ble scan list.
ret_code_terr_code;
err_code = sd_ble_gap_adv_start(m_adv_handle, APP_BLE_CONN_CFG_TAG);
APP_ERROR_CHECK(err_code);
The main loop runs over the interval of 2 seconds, read the temperature & humidity and updates to a connected smart device using either read or notification
for (;;)
{
uint16_t temperature, humidity;
DHTxx_ErrorCode dhtErrCode;
idle_state_handle();
if(updtmrexp) {
dhtErrCode = DHTxx_Read(&temperature, &humidity);
if(dhtErrCode == DHT11_OK) {
NRF_LOG_INFO("Temperature: %d Humidity: %d\n", temperature, humidity);
if(temp_notif_enabled) {
ble_ess_notify_temp(m_conn_handle, &m_ess, temperature);
}else{
ble_ess_update_temp(&m_ess, temperature);
}
if(humid_notif_enabled) {
ble_ess_notify_humid(m_conn_handle, &m_ess, humidity);

}else{
ble_ess_update_humid(&m_ess, humidity);
}
}
updtmrexp=false;
}
}
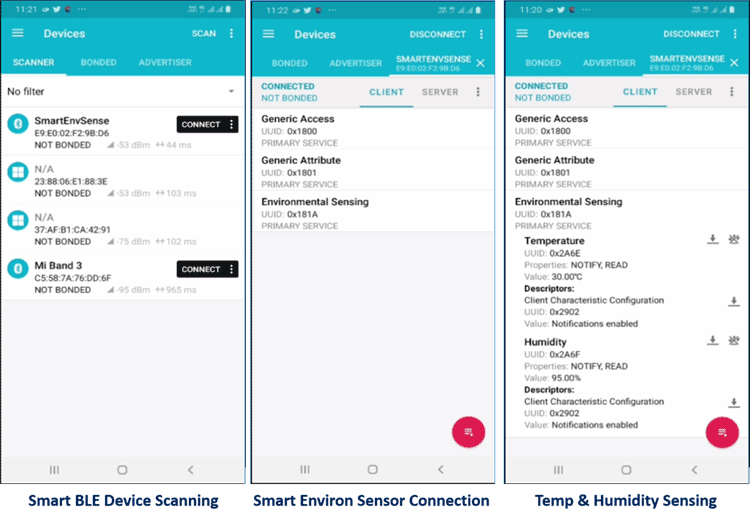
Testing our Program using nRF Connect
nRF Connect is a powerful Bluetooth low energy tool that allows to scan and explore the BLE enabled peripherals. nRF Connect for mobile supports a wide range of Bluetooth SIG adopted standard profiles. We can verify our program by using this, after installing the app we can pair the nRF52 board with our phone by scanning for BLE devices on the app. Inside the Environmental sensing attribute, we can notice the temperature and humidity values getting updated as shown in the below pictures.
Complete code for this project can be downloaded from here. Also, check the complete working of the project in the video linked at the bottom of this page. I hope you enjoyed the build and learned something useful. Let me know in the comment section about your experience with the nRF52 Development kit. If you have any other technical questions please use our forums.
Author Information
 Hariharan Veerappan is an independent consultant having more than 15 years of experience in embedded product development. He provides consulting services in embedded firmware / Linux development, he also provides corporate and online training. Hariharan holds a Bachelor of Engineering degree in the discipline of Electronics & Communication Engineering, through his articles and tutorials he shares his experience and thoughts with the readers of Circuit Digest.
Comments
Temperature and humidity measurement using Bluetooth Low Energy
Dear Sir,
Do you have an answer to the question above?
Best regards,
Adilson
Temperature and humidity measurement using Bluetooth Low Energy
Dear Sirs,
I'm having the same problem as Mr. "Lucasz", do you have an answer to this problem?
Best regards;
Adilson
Sir can you please upload…
Sir can you please upload your sdk folder . I am a student and have to complete this project and have been stuck for months . It will be very helpful sir if you give little help here. My email id is abhishekzanjare24@gmail.com .
thankyou

Hello
I tried to run project from article, becouse I need to find working example of ESS services program ( nordic SDK 16 has't support ess serwice). I downloaded your project and open it by SES IDE and when I tried to compile it, ther appear a problem, missing ble_ess.c and ble_ess.h files. This file is missing in SDK -> component-> ble services.
Could you add this two files to project on website? or you are using diferent SDK where this files are present.
if this possible, please help me with this issue.