

The ESP8266-01 has been a great module to quench all our thirsts for IOT projects. Since its release, it has developed a strong community and evolved into an easy to use, cheap and powerful Wi-Fi module. Another open-source platform which is much more popular is the Arduino, it already has tons of projects built around it. Combining these two platforms will open up doors for many innovative projects, so in this tutorial we will learn how to interface the ESP8266-01 module with Arduino. This way we will be able to send or receive data between the Arduino and Internet.
For the purpose of this tutorial we will read the time, date, temperature and humidity from the internet using an API with the ESP8266-01. Then send these values to an Arduino board and display them on the 16*2 LCD screen. Sounds cool right!! So let’s get started.
Materials Required:
- Arduino Board (Any version)
- ESP8266-01
- FTDI programmer board with 3.3V option
- 16x2 LCD
- Potentiometer
- Push button
- Connecting wires
- Breadboard
How things work?
Before we dive in, it is important to know how actually this thing is going to work. Basically, we have to start with the ESP8266-01 module. We will be using the Arduino IDE to program the ESP8266 and the code will be written to use an API to read a JSON file through http request. Then we will phrase this JSON file to extract only the required information from the complete JSON file.
Once the information is phrased we will print it out using the serial communication. These serial lines will then be connected to the Arduino, so that the Arduino could read the information sent from ESP8266. Once the information is read and processed we will display it on the LCD screen.
It’s okay, if you have not completely understood this, for we will be learning the same in the rest of this tutorial.
Programming the ESP8266-01:
This tutorial assumes that you have some experience with the ESP8266 module. If not then it is recommended to read through the following three tutorials to understand completely about it.
- Getting started with ESP8266-01
- Programming ESP8266-01 using AT commands
- Programming the ESP8266-01 using Arduino IDE and Flashing its memory
You can also check our all ESP8266 projects here.
Here we are going to program the ESP8266-01 module using the Arduino IDE. For hardware we are using the FTDI board with 3.3V to program ESP8266, since it will make the hardware much simple. The circuit diagram for connecting your ESP8266 with FTDI board is shown below.
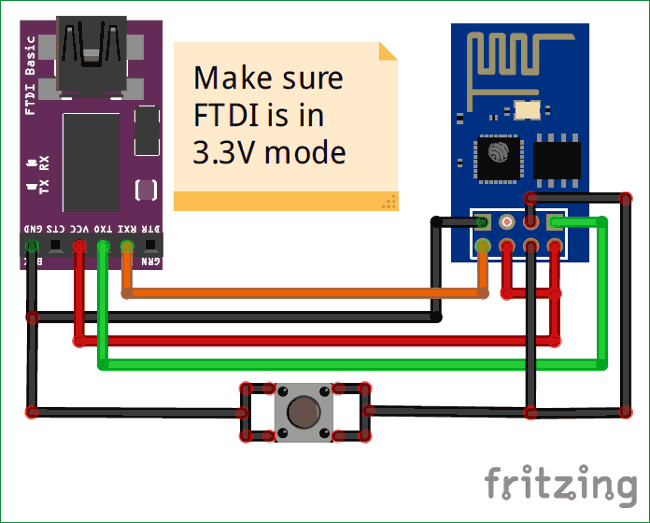


Make sure the following conditions are met
1. The ESP8266-01 is only 3.3V tolerant, do not use 5V. So set FTDI only in 3.3V mode.
2. GPIO_0 must be grounded for programming mode
3. The reset pin should be connected through a button to the ground pin. This button should be pressed just before uploading the code. Each time the button is pressed the blue LED on the ESP8266-01 module will go high to indicate that the module is reset.
Once the connections are done open the Arduino IDE and check if you are able to upload a sample program successfully. If you are not sure how to use the Arduino IDE to upload program to ESP8266 then follow the Programming ESP8266 with Arduino to learn it. At this point I assume that you have successfully uploaded the blink program.
Now let’s get into the actual program where we will get data from the internet and send it to the Arduino. The complete program is given at the end of this page further below I am explaining them as small snippets. The program also requires the Arduino JSON library to compile, so if you have not added the library to your Arduino IDE already, then add it by downloading from the Arduino JSON library from Github.
The ESP8266 has to connect with the internet to get the data about date, time, temperature and humidity. So you have to allow it to connect to your Wi-Fi by proving the SSID and Password in the below lines
const char* ssid = "JIO-Fi"; //Enter your Wi-Fi SSID
const char* password = "Pas123"; //Enter you Wi-Fi Password
Inside the setup() function we check if the ESP is able to connect with the Wi-Fi, if not it will wait there forever just by printing “Connecting..” on the serial monitor.
  while (WiFi.status() != WL_CONNECTED) { //Wait till Wi-Fi is connected
    delay(1000);
    Serial.print("Connecting.."); //Print Connecting.. till connection is established
  }
The next step is the very important step. If the Wi-Fi connection is successful we have to invoke an http get request to read the JSON file from the internet. In this tutorial I am using the API provided by wunderground.com. So if you are planning to use the same you can get into link and signup for the free API key or use any API of your choice. Once you are finalised with your API you will end up with a link something like this below
http://api.wunderground.com/api/abcd124578qwert/conditions/q/IN/Chennai.json
Note: I have changed the API key of this link so this will not work. Keep your API key secured and do not share.
My API here is used to get the weather data of Chennai. You can use any API. But when you load the API in any browser it should return a JSON file. For example my API returns the following JSON file
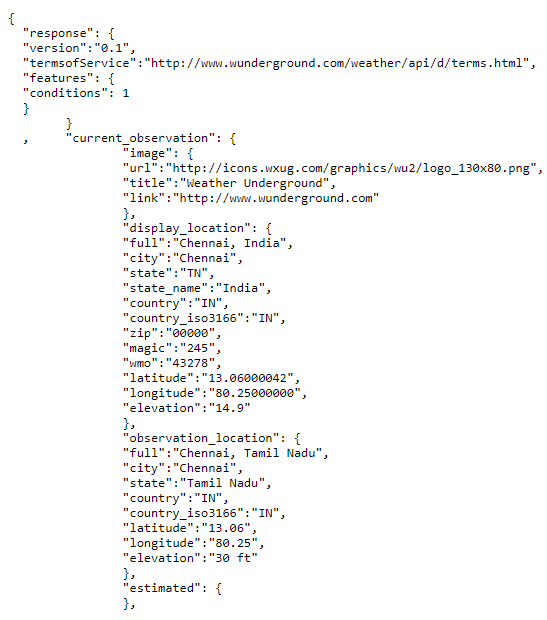
Yours might return a file with different data. We can check if this JSON file is also received by our ESP8266 by reading it and printing JSON on our serial monitor using the following lines
    int httpCode = http.GET(); //pass a get request
    if (httpCode > 0) { //Check the returning code
   //   payload = http.getString();   // Store the value on varibale Payload for debugging
   // Serial.println(payload);   //Print the payload for debugging otherwise comment both lines
I have commented these lines, as they are needed only for testing. Once you have ensured that ESP8266 is able to obtain the JSON data it’s time for phrasing the Data. As you can see this data is huge and most of the values are useless except for the ones that are required for us like date, time, temperature and humidity.
So we use the JSON Arduino library to separate the values required for us and store it in a variable. This is possible because the values in JSON file are assigned as name value pairs. So this name is a string which will hold the value required for us.
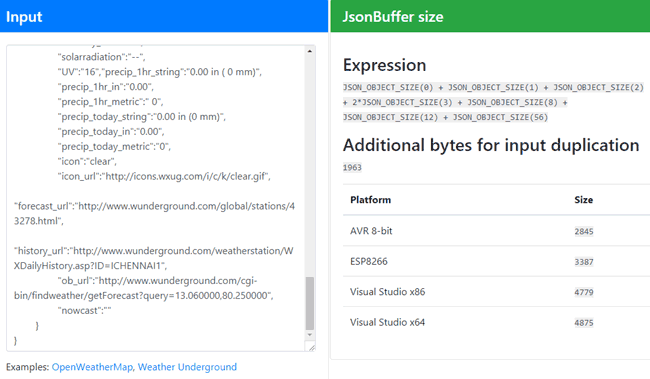
To do this we have to move to a website which will analyse the JSON file and give us the Arduino code. Yes it is as easy as that. Proceed to https://arduinojson.org/assistant/ and pastes the JSON file that we loaded in our browser and press enter. When done mine looked something like this below
Scroll down a bit to see the phrasing program that is created automatically
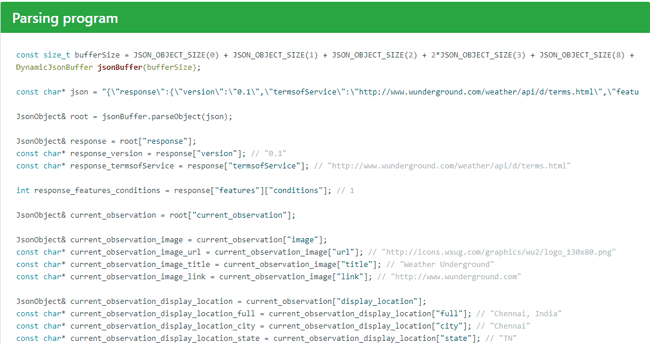
All you have to do is select the variable you want, copy them and paste it on your Arduino IDE, like I have done here
/*Phrasing Data using the JSON librarey */ //Use https://arduinojson.org/assistant/ to get the phrasing values for your JSON string
const size_t bufferSize = JSON_OBJECT_SIZE(0) + JSON_OBJECT_SIZE(1) + JSON_OBJECT_SIZE(2) + 2*JSON_OBJECT_SIZE(3) + JSON_OBJECT_SIZE(8) + JSON_OBJECT_SIZE(12) + JSON_OBJECT_SIZE(56) + 2160;
DynamicJsonBuffer jsonBuffer(bufferSize);
JsonObject& root = jsonBuffer.parseObject(http.getString());
/*End of Phrasing Data*/

//Address the value sin to desired variables
JsonObject& current_observation = root["current_observation"]; //under current_observation
JsonObject& current_observation_observation_location = current_observation["observation_location"]; //under observation_location
const char* current_observation_station_id = current_observation["station_id"]; // "ICHENNAI1" //get the location detials
const char* current_observation_local_time_rfc822 = current_observation["local_time_rfc822"]; //Local time //get the local time
const char* current_observation_temperature_string = current_observation["temperature_string"]; // "90.7 F (32.6 C)" //get the temperature value
const char* current_observation_relative_humidity = current_observation["relative_humidity"]; // "73%" //get the humidity value
I have just copied the variables current_observation_station_id, current_observation_local_time_rfc822, current_observation_temperature_string and current_observation_relative_humidity. Since we are planning to display only those four data on our LCD screen.
Finally, we have obtained the data that we need from the internet and have saved it into as a variable which we can comfortably use. To send these data to Arduino we just have write them serially though the Serial monitor. The following lines will do exactly the same
//Print the variables through serial monitor
Serial.print (current_observation_station_id); //send the location details to Arduino
delay(100); //stability delay
Serial.print (current_observation_local_time_rfc822); //send the local time details to Arduino
delay(100); //stability delay
Serial.print (current_observation_temperature_string); //send the temperature details to Arduino
delay(100); //stability delay
Serial.print (current_observation_relative_humidity); //send the humidity details to Arduino
delay(100); //stability delay
Note that I have used Serial.print() and not Serial.println() since the command Serial.println() will append a /n and /r along with the data which is not needed for us. We have also added a delay of 10 seconds so that the ESP will send these values only at an interval of 10seconds to Arduino.
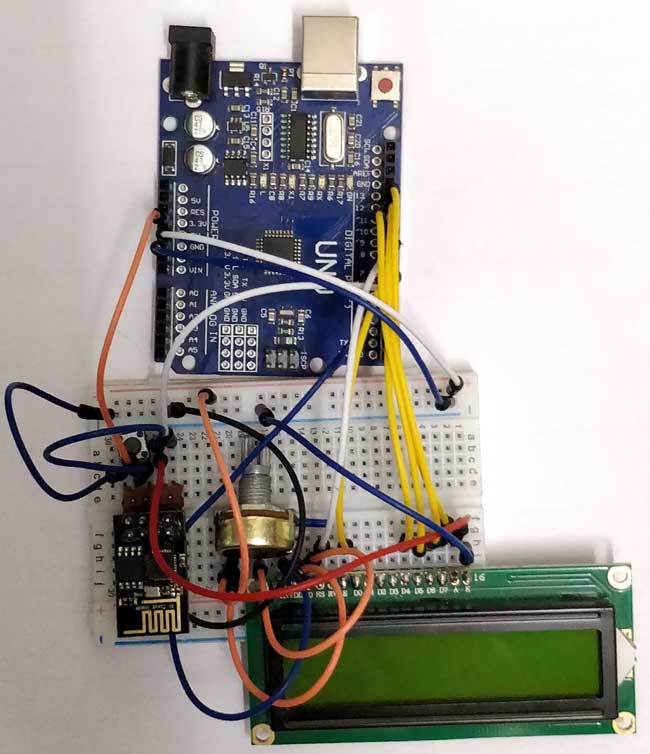
Connecting ESP8266-01 with Arduino:
So far we have programmed our ESP8266-01 to read the required data from the internet at an interval of 10 seconds and send it serially out. Now we have to interface the ESP with Arduino so that we can read this serial data. We also have to add a 16*2 LCD display to Arduino so that we can display the data received from the ESP8266 module. The circuit diagram to interface the ESP8266 module with Arduino is shown below

Make sure the GPIO_0 pin is left free, power the module only with the 3.3V pin of Arduino and press the push button to put the ESP module in operating module. Now the program that we uploaded to ESP should have started working and the module should be send the data via serial pin to Arduino. These serial pins are connected to pin number 6 and 7 on the Arduino. So we can use the software serial option on Arduino to read these serial data from the pins.
Arduino Program and Working:
The complete Arduino program is also given along with the ESP code at the end of this page. You can scroll down to view the program or read further if you want to understand the program.
The interfacing program is pretty simple, we just have to use the software serial library to read the data from the pin 6 and 7 and display them on the LCD screen. Since the data being received is in string format we have to use the substring option to break the payload to our requirement or even convert it to integer if required. So we start by defining the pins to which the LCD is connected.
const int rs = 8, en = 9, d4 = 10, d5 = 11, d6 = 12, d7 = 13; //Pins to which LCD is connected
LiquidCrystal lcd(rs, en, d4, d5, d6, d7);
Since we have connected the Rx and Tx pins of ESP8266 with the 6 and 7th pin of Arduino we have to initialise the Software serial for those pins so that we can receive the serial data from them .I have names this as ESP_Serial, you can name them anything you wish
SoftwareSerial ESP_Serial(6,7); //Tx,Rx
Inside the setup() function we initialise the serial communication for Serial monitor and also for the software serial. If you could recollect we made the ESP program to communicate at 9600 baud rate so we have to use the same baud rate for the software serial port. We also display a small intro message on the LCD for 2 seconds.
 void setup() {
  lcd.begin(16, 2); //We are using a 16*2 LCD display
  lcd.print(" Arduino & ESP"); //Display a intro message
  Serial.begin(115200);
  ESP_Serial.begin(9600);
  delay(2000);
  lcd.clear();
}
Inside the main loop() function we have to check if the ESP8266 is sending anything. If it is, then we read the string from ESP8266 and save it to a variable called payload. The variable payload is of type String and it will hold the complete information sent form the ESP8266 module.
  while (ESP_Serial.available() > 0)
  {
    payload = ESP_Serial.readString();
Now we have to split this string into small chunks so that we can use them for our own purpose, in this case we have to split them to display them on the LCD screen. This can be done easily by using the substring function in Arduino. You have to know the position of each character to use this substring function. You can print the payload on serial monitor to know the position of characters and use them to categorise the substrings as shown below
    local_date = payload.substring(14, 20);
    local_time = payload.substring(26, 31);
    temperature = payload.substring(48, 54);
    Humidity = payload.substring(55, 60);
Now I can go ahead and use these variables to either print them on serial monitor or just print them on the LCD. However printing them on the Serial monitor will help us o check if the substrings are split correctly. Next we just print them on the LCD display using the following lines
    lcd.clear();
    lcd.setCursor(1, 0);
    lcd.print(local_date);
    lcd.setCursor(8, 0);
    lcd.print(local_time);
    lcd.setCursor(1, 1);
    lcd.print(temperature);
    lcd.setCursor(10, 1);
    lcd.print(Humidity);
Upload the program to Arduino, and make sure the connections are as shown in the above circuit diagram. Adjust the contrast of the LCD display till you view the things clearly. You should see the Intro message on the LCD and then after few seconds the details such as date, time, temperature and Humidity should be displayed in the LCD screen as shown below.
You can also notice the blue led on the ESP8266 blinking every time the Data comes in. If you cannot see this it means the ESP is not in programming mode try pressing the Reset button also check the connections.
Similar to this you can use any API to get any required data from the internet and feed it to the Arduino and the process your work with Arduino. There is tons of API available on the internet and with all those you can make a limitless number of projects. Hope you understood the project and enjoyed building it. If you had faced any problem, post them on the comment section below or on our forums.
You can find our all ESP8266 related projects here.
Complete Project Code
Code for ESP8266:
#include <ESP8266WiFi.h> //ESP8266 Library

#include <ESP8266HTTPClient.h> //ESP8266 Library

#include <ArduinoJson.h> //For phrasing JSON file download from https://github.com/bblanchon/ArduinoJson


const char* ssid = "Jio-Fi"; //Enter your Wi-Fi SSID

const char* password = "pas123"; //Enter you Wi-Fi Password
String payload; //To store the JSON object as string
void setup () {


  Serial.begin(9600); //initialise serial monitor to send data to Arduino

  WiFi.begin(ssid, password); //connect to the network specified above


  while (WiFi.status() != WL_CONNECTED) { //Wait till Wi-Fi is connected

    delay(1000);

    Serial.print("Connecting.."); //Print Connecting.. till connection is established

  }

}


void loop() {

  if (WiFi.status() == WL_CONNECTED) { //If Wi-Fi connected successfully

    HTTPClient http;  //start a HTTPClinet as http

    //####DO NOT USE THE SAME API as below

    http.begin("http://api.wunderground.com/api/abcd123qwert456/conditions/q/IN/Chennai…");  //Enter your API


    int httpCode = http.GET(); //pass a get request


    if (httpCode > 0) { //Check the returning code


   //   payload = http.getString();   // Store the value on varibale Payload for debugging

   // Serial.println(payload);   //Print the payload for debugging otherwise comment both lines

/*Phrasing Data using the JSON librarey */ //Use https://arduinojson.org/assistant/ to get the phrasing values for your JSON string

const size_t bufferSize = JSON_OBJECT_SIZE(0) + JSON_OBJECT_SIZE(1) + JSON_OBJECT_SIZE(2) + 2*JSON_OBJECT_SIZE(3) + JSON_OBJECT_SIZE(8) + JSON_OBJECT_SIZE(12) + JSON_OBJECT_SIZE(56) + 2160;

DynamicJsonBuffer jsonBuffer(bufferSize);

JsonObject& root = jsonBuffer.parseObject(http.getString());

/*End of Phrasing Data*/
//Address the value sin to desired variables

JsonObject& current_observation = root["current_observation"]; //under current_observation

JsonObject& current_observation_observation_location = current_observation["observation_location"]; //under observation_location

const char* current_observation_station_id = current_observation["station_id"]; // "ICHENNAI1" //get the location detials

const char* current_observation_local_time_rfc822 = current_observation["local_time_rfc822"]; //Local time //get the local time

const char* current_observation_temperature_string = current_observation["temperature_string"]; // "90.7 F (32.6 C)" //get the temperature value

const char* current_observation_relative_humidity = current_observation["relative_humidity"]; // "73%" //get the humidity value
//Print the variables thorugh serial monitor

Serial.print (current_observation_station_id); //send the location details to Arduino

delay(100); //stability delay

Serial.print (current_observation_local_time_rfc822); //send the local time details to Arduino

delay(100); //stability delay

Serial.print (current_observation_temperature_string); //send the temperature details to Arduino

delay(100); //stability delay

Serial.print (current_observation_relative_humidity); //send the humidity details to Arduino

delay(100); //stability delay
    }


    http.end();   //Close http connection

  }

  delay(10000);    //send values to Arduino every 30 sec.

}

Code for Arduino:
#include <SoftwareSerial.h>

#include <LiquidCrystal.h> //Header file for LCD from https://www.arduino.cc/en/Reference/LiquidCrystal
const int rs = 8, en = 9, d4 = 10, d5 = 11, d6 = 12, d7 = 13; //Pins to which LCD is connected

LiquidCrystal lcd(rs, en, d4, d5, d6, d7);
String local_time;

String local_date;

String temperature;

String Humidity;

String payload;
SoftwareSerial ESP_Serial(6, 7); //Tx,Rx
void setup() {

  lcd.begin(16, 2); //We are using a 16*2 LCD display

  lcd.print(" Arduino & ESP"); //Display a intro message

  Serial.begin(115200);

  ESP_Serial.begin(9600);
  delay(2000);

  lcd.clear();

}
void loop() {

  while (ESP_Serial.available() > 0)

  {

    payload = ESP_Serial.readString();
    local_date = payload.substring(14, 20);

    local_time = payload.substring(26, 31);

    temperature = payload.substring(48, 54);

    Humidity = payload.substring(55, 60);
    delay(10);

    Serial.println(payload);

    Serial.println(local_time);

    Serial.println(local_date);

    Serial.println(temperature);

    Serial.println(Humidity);
    lcd.clear();

    lcd.setCursor(1, 0);

    lcd.print(local_date);

    lcd.setCursor(8, 0);

    lcd.print(local_time);

    lcd.setCursor(1, 1);

    lcd.print(temperature);

    lcd.setCursor(10, 1);

    lcd.print(Humidity);
  }

}
Comments
Hi
i cant get an API key from wunderground,
i did get one from openweathermap and is wondering if someone change the code for this to work with openweatermap?
Thanks
how to get the esp 8266 library for protous

hi,
I'm a newbie.
Is it possible to connect nodemcu to uno port 6,7 without damaging nodemcu?
Thanks