

Controlling LEDs with voice command seems to be a difficult task, but it’s easy and you can quickly build it. We just need an Arduino UNO to serially communicate with HC-06 Bluetooth module and a smartphone to send voice command to Bluetooth module HC-06. For receiving voice command we are using “Arduino Bluetooth Voice Controller” android app which you can download from play store (link is given below).
Material Required
- Arduino UNO
- HC-06 Bluetooth Module
- LEDs (Red, and Green)
- Resistor 220 ohm (2 nos.)
- Arduino Bluetooth Voice Controller (Download from play store)
- Breadboard
- Connecting wires
HC-06 Bluetooth Module:
Bluetooth can operate in the following two modes:
- Command Mode
- Operating Mode
In Command Mode we will be able to configure the Bluetooth properties like the name of the Bluetooth signal, its password, the operating baud rate etc. The Operating Mode is the one in which we will be able to send and receive data between the PIC Microcontroller and the Bluetooth module. Hence in this tutorial we will be toying only with the Operating Mode. The Command mode will be left to the default settings. The Device name will be HC-05 (I am using HC-06) and the password will be 0000 or 1234 and most importantly the default baud rate for all Bluetooth modules will be 9600.
The module works on 5V supply and the signal pins operate on 3.3V, hence a 3.3V regulator is present in the module itself. Hence we need not worry about it. Out of the six pins only four will be used in the Operating mode. The pin connection table is shown below
| S.No | Pin on HC-05/HC-06 | Pin name on MCU | Pin number in PIC |
| 1 | Vcc | Vdd | 31st pin |
| 2 | Vcc | Gnd | 32nd pin |
| 3 | Tx | RC6/Tx/CK | 25th pin |
| 4 | Rx | RC7/Rx/DT | 26th pin |
| 5 | State | NC | NC |
|
6 |
EN (Enable) |
NC |
NC |
Check our other projects to learn more about Bluetooth module HC-05 with other microcontrollers:
- Bluetooth Controlled Toy Car using Arduino
- Bluetooth Controlled Home Automation System using 8051
- Voice Controlled Lights using Raspberry Pi
- Smart Phone Controlled FM Radio using Arduino and Processing
- Interfacing Bluetooth Module HC-06 with PIC Microcontroller
- Bluetooth Controlled Servo Motor using Arduino
Circuit Diagram
Circuit diagram for this Voice Controlled Lights is given below, while uploading the code in the Arduino UNO disconnect the Rx and Tx pins and connect again after the code is uploaded.

Code and Explanation
The complete Arduino code for Voice controlled LEDs is given at the end. Here we are explaining few parts of code.
Here, in the below code we are defining the pins for Rx and Tx.
int TxD = 11;
int RxD = 10;
Now, set pin 2nd and 3rd of the Arduino as output.
pinMode(2, OUTPUT);
pinMode(3, OUTPUT);
In void loop function, Arduino will be checking the incoming values all the time and controls the LEDs as per the voice command. Arduino will turn on or off the LED according to the given Voice command. We are saving all the received command in variable “Value”
If the value is "all LED turn on" then both the LEDs turns ON, like this we have coded other voice commands for turning on or off the individual LED. Check the complete working and demonstration video later in this article.
if (bluetooth.available())
   {
    value = bluetooth.readString();

    if (value == "all LED turn on"){
    digitalWrite(2, HIGH);
    digitalWrite(3, HIGH);
      }

    if (value == "all LED turn off"){
      digitalWrite(2, LOW);
      digitalWrite(3, LOW);
      }

    if (value == "turn on Red LED"){
    digitalWrite(2, HIGH);
      }

    if (value == "turn on green LED"){
      digitalWrite(3, HIGH);
      }

    if (value == "turn off red LED"){
    digitalWrite(2, LOW);
      }

    if (value == "turn off green LED"){
      digitalWrite(3, LOW);
      }
 }
Working Procedure:
Step 1:- Connect all components as per the circuit diagram; disconnect Rx and Tx pins while uploading the code.
Step 2:- Download the app called “Arduino Bluetooth Voice Controller” which is free on play store.
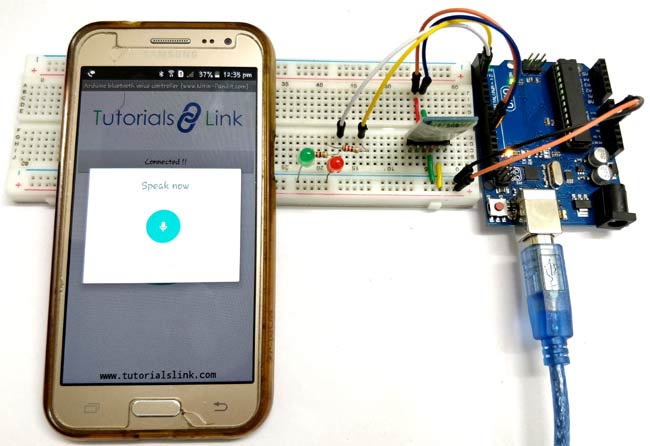
Step 3:- Open the app and follow the image below, like first click on “connect to Bluetooth device” and select your Bluetooth module and check if it is connected or not. Then click on the mic icon to speak and send the voice command to the HC-06 module.

Note: when you are connecting your Bluetooth module for the first time with your smartphone it will ask for the passcode, use 0000 or 1234.
Step 4:- After setting up all the things, you just have to send the voice command by using the app which is further sent to Bluetooth module HC-06 and the HC-06 serially communicate with the Arduino UNO and then the task is performed as per the command. The below shows the command and the action to be performed by the command:
|
S. No. |
Command |
Action |
|
1. |
all LED turn on |
Both Red and Green LED turns ON |
|
2. |
all LED turn off |
Both Red and Green LED turns OFF |
|
3. |
turn on Red LED |
Red LED turns ON |
|
4. |
turn on green LED |
Green LED turns ON |
|
5. |
turn off red LED |
Red LED turns OFF |
|
6. |
turn off green LED |
Green LED turns OFF |
Also, check Voice Controlled LED with Raspberry and Bluetooth.
Complete Project Code
#include <SoftwareSerial.h>

String value;

int TxD = 11;

int RxD = 10;

int servoposition;

SoftwareSerial bluetooth(TxD, RxD);
void setup() {

  pinMode(2, OUTPUT);

  pinMode(3, OUTPUT);

  Serial.begin(9600);       // start serial communication at 9600bps

  bluetooth.begin(9600);

}
void loop() {

  Serial.println(value);

 if (bluetooth.available())

   {

    value = bluetooth.readString();
    if (value == "all LED turn on"){

    digitalWrite(2, HIGH);

    digitalWrite(3, HIGH);

      }
    if (value == "all LED turn off"){

      digitalWrite(2, LOW);

      digitalWrite(3, LOW);

      }
    if (value == "turn on Red LED"){

    digitalWrite(2, HIGH);

      }
    if (value == "turn on green LED"){

      digitalWrite(3, HIGH);

      }


    if (value == "turn off red LED"){

    digitalWrite(2, LOW);

      }
    if (value == "turn off green LED"){

      digitalWrite(3, LOW);

      }
 }
}
Comments
Voice Controlled LEDs using Arduino and Bluetooth
Using an HC05 and no, the LEDs do not respond. Serial monitor show nothing. Why is voice control so hard to get working?
Voice Controlled LEDs using Arduino and Bluetooth
Well, really confused. Rese everything, reloaded sketch and not all works except "turn on red LED"
It will come on with all LED and will go off with "turn off red LED" and now the seral monitor shows
what the cmd was and it is correct EXCEPT the code called for "Red LED" and was getting "red LED".
changed the code to red and now all works???
LEDs didn't work
Hello I just wanna ask, what's the secret behind this. I have already followed all the instructions here but it doesn't work, can you give me some idea how to fix it.
The bluetooth module is
The bluetooth module is already connected to my device and whenever i speak the command no corresponding action at all.
Hello what's the use of "int
Hello what's the use of "int servoposition;" to the code, thank you!
IT is a variableused to save
The variable is not used in the program, it should have been deleted. May be the author forgot to remove it
Help, Please.
HI, I am a teacher and using this code with my students. Everything is set up correctly. I know the lights are working as I put in code to test to just turn them on. The Android app shows that the bluetooth is connected, but when I try the commands nothing happens.
Is there something incorrect with the loop code? Is there anyway to see what is happening with the Arduino to see if it is actually receiving the voice commands or not?
Thank you for any help.
-Mike :-)
Worked perfectly, just by
Worked perfectly, just by following the instructions and using same components as mentioned. Make sure the UNO port is selected correctly.
Worked nicely
Make sure to pair your HC-06 (or HC-05) with the smartphone before using the Arduino bluetooth voice controller application.
Wonder, if we can use text as well, in place of speech. That would require another application cos this app might not support that function. Can anyone suggest Arduino based voice and text control?
Thanks in advance

LED did not work