

Using a Servo motor is common in Robotics for precise control. Here, in this tutorial we are going to show you how to use a Servo motor wirelessly with an Arduino UNO and an Android device via Bluetooth connection. We already controlled servo with Arduino, this time we are Controlling Servo Motor using Arduino and Bluetooth.
Material Required
- Arduino UNO
- HC-05 or HC-06 Bluetooth module
- Servo Motor
- Roboremo App from Playstore
- Breadboard
- Connecting wire
HC-06 Bluetooth Module
Bluetooth can operate in the following two modes:
- Command Mode
- Operating Mode
In Command Mode we will be able to configure the Bluetooth properties like the name of the Bluetooth signal, its password, the operating baud rate etc. The Operating Mode is the one in which we will be able to send and receive data between the PIC Microcontroller and the Bluetooth module. Hence in this tutorial we will be toying only with the Operating Mode. The Command mode will be left to the default settings. The Device name will be HC-05 (I am using HC-06) and the password will be 0000 or 1234 and most importantly the default baud rate for all Bluetooth modules will be 9600.
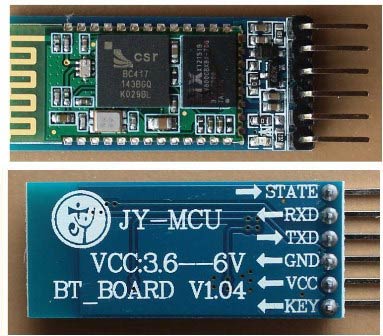
The module works on 5V supply and the signal pins operate on 3.3V, hence a 3.3V regulator is present in the module itself. Hence we need not worry about it. Out of the six pins only four will be used in the Operating mode. The pin connection table is shown below
| S.No | Pin on HC-05/HC-06 | Pin name on MCU | Pin number in PIC |
| 1 | Vcc | Vdd | 31st pin |
| 2 | Vcc | Gnd | 32nd pin |
| 3 | Tx | RC6/Tx/CK | 25th pin |
| 4 | Rx | RC7/Rx/DT | 26th pin |
| 5 | State | NC | NC |
| 6 | EN (Enable) | NC | NC |
Check our other projects to learn more about Bluetooth module HC-05 with other microcontrollers:
- Bluetooth Controlled Toy Car using Arduino
- Bluetooth Controlled Home Automation System using 8051
- Voice Controlled Lights using Raspberry Pi
- Smart Phone Controlled FM Radio using Arduino and Processing
- Interfacing Bluetooth Module HC-06 with PIC Microcontroller
Also check all the bluetooth related projects here.
Circuit Diagram
Circuit diagram for this Arduino Bluetooth Servo Motor Control project is given below:


Configuring Roboremo App for Controlling Servo:
Step 1:- Download the Roboremo app from the Android Play Store and install it in your smartphone. After installing it you will see the app window as shown in the figure1 and by clicking on ‘Menu’ button you will see window shown in figure2 below:


Step 2:- Then click on connect button and you will see the window shown in figure3 below then you have to select ‘Bluetooth RFCOMM’ and then you will be able to connect your HC-06 bluetooth module with your android app ‘Roboremo’.

Step 3:- After connecting to the HC-06 bluetooth module come back to figure2 window and then click on ‘edit ui’ for creating the user interface according to your need.
When click on ‘edit ui’ you will again see the window shown in figure1 then click anywhere on the screen you will see the app window like figure4 and the select ‘Button’ to get the button structure.

Step 4:- After selecting the button you will get a button structure on the screen to edit. You can resize and move the structure anywhere on the screen. Now, for setting the value to be sent on click via Bluetooth you have ‘set press action’ (as shown in figure6) and type the value you want to send from that particular button. Like, we are sending ‘1’ for rotating the servo by pressing the ‘Start’ button in Roboremo android application.
You can check all the values, being sent on clicking on different buttons, in the table given later section.


Step 5:- Finally we have User Interface to control the servo motor using Smartphone.

Code and Explanation
The complete code for Arduino Control Servo Motor Via Bluetooth is given at the end.
Arduino has library for Servo Motors and it handles all the PWM related things to rotate the servo, you just need to enter the angle to which you want to rotate and there is function servo1.write(angle); which will rotate the servo to desired angle.
So here we are starting by defining the library for Servo motor and Software Serial library is used for defining the Rx and Tx pin.
#include <SoftwareSerial.h>
#include <Servo.h>
In the below code, we are initializing the Arduino pins for Rx and Tx, defining variables for servo and other things.
Servo myServo;
int TxD = 11;
int RxD = 10;
int servoposition;
int servopos;
int new1;
SoftwareSerial bluetooth(TxD, RxD);
Now, setup all the variable and components to initial stage. Here we have attached the servo at 9th pin of the Arduino and made the initial position of servo to 0 degree. Baud rate for serial and Bluetooth communication has also been set to 9600.
void setup() {
  int pos=0;
  myServo.attach(9);
  myServo.write(0);
  Serial.begin(9600);       // start serial communication at 9600bps
  bluetooth.begin(9600);
}
In void loop function, Arduino will be checking the incoming values all the time and rotate the servo according to received value from Smart phone. All the values will be received using Serial Communication.
If the value is 0 the servo will rotate to 0 degree. Similarly if we send 45, 90, 135 and 180 from the Bluetooth application, the servo will rotate to 45, 90, 135 and 180 degree angle respectively.
void loop() {
 if (bluetooth.available()){
    String value = bluetooth.readString();
    servoposition = value.toInt();

    if (value.toInt() == 0){
      Serial.println(servoposition);
    myServo.write(0);
      }

      if (value.toInt() == 45){
      Serial.println(servoposition);
    myServo.write(45);
      }

      if (value.toInt() == 90){
      Serial.println(servoposition);
    myServo.write(90);
      }

      if (value.toInt() == 135){
      Serial.println(servoposition);
    myServo.write(135);
      }

      if (value.toInt() == 180){
      Serial.println(servoposition);
    myServo.write(180);
      }
If we send the value ‘1’ by pressing Start button then servo will rotate continuously until stop button is pressed. Here we are sending ‘2’ on pressing stop button, which will be read by the Arduino and it will break the while loop and servo will be stopped.
   while(value.toInt()==1){
    if (bluetooth.available())
   {
    value = bluetooth.readString();
    Serial.println(value);

    if (value.toInt()==2)
    {Serial.println("YYY");  break; }
   }
    servopos++;
    delay(30);
    Serial.println(servopos);
    myServo.write(servopos);

    if (servopos ==180 )
    {servopos=0;break;}
  }
 }
}

Working of Servo motor Control using Bluetooth:
In this project, we are controlling the Servo Motor using an Android application “Roboremo”. In this application’s interface, we have created 5 buttons to control the Servo motor as explained earlier. The working of every button is given in the below table:
|
S.No. |
Button Name |
Sending Value |
Description |
|
1. |
Start |
1 |
This button is used to start rotating the servo from 0⁰ to 180⁰. |
|
2. |
Stop |
2 |
This button is used to stop the servo at any point. |
|
3. |
0⁰ |
0 |
This button is used to rotate the servo to 0⁰. |
|
4. |
90⁰ |
90 |
This button is used to rotate the servo to 90⁰. |
|
5. |
180⁰ |
180 |
This button is used to rotate the servo to 180⁰. |
So, by pressing these buttons on your Android app Roboremo, the data will be sent through the smartphone’s Bluetooth to HC-06 Bluetooth module. From that HC-06 module data is received by the Arduino and Arduino rotates the Servo at the angle defined in the code for the particular button. We have also coded for angle 45 and 135, but due to the limitation of Roboremo app, you can only create 5 buttons, so we skipped two buttons.
So this is how you can send the data from Smartphone to the Arduino using Bluetooth to control the servo wirelessly. This can be used in many applications like Toy cars, robots etc.
Complete Project Code
#include <SoftwareSerial.h>

#include <Servo.h>
Servo myServo;

int TxD = 11;

int RxD = 10;

int servoposition;

int servopos;

int new1;

SoftwareSerial bluetooth(TxD, RxD);
void setup() {

  int pos=0;

  myServo.attach(9);

  myServo.write(0);

  Serial.begin(9600);       // start serial communication at 9600bps

  bluetooth.begin(9600);

}
void loop() {

 if (bluetooth.available())

   {

    String value = bluetooth.readString();

    servoposition = value.toInt();
    if (value.toInt() == 0)

    {

      Serial.println(servoposition);

    myServo.write(0);

      }
      if (value.toInt() == 45)

    {

      Serial.println(servoposition);

    myServo.write(45);

      }
      if (value.toInt() == 90)

    {

      Serial.println(servoposition);

    myServo.write(90);

      }
      if (value.toInt() == 135)

    {

      Serial.println(servoposition);

    myServo.write(135);

      }
      if (value.toInt() == 180)

    {

      Serial.println(servoposition);

    myServo.write(180);

      }


   while(value.toInt()==1){

    if (bluetooth.available())

   {

    value = bluetooth.readString();

    Serial.println(value);

    if (value.toInt()==2)

    {Serial.println("YYY");  break; }


   }


    servopos++;

    delay(30);

    Serial.println(servopos);

    myServo.write(servopos);


    if (servopos ==180 )

    {servopos=0;break;}


  }
 }
}
Comments
sometimes this happens ..
sometimes this happens ...clear the full UI and make it again or clear app data... this will work for sure.
Hi, my servo motor won't stop
Hi, my servo motor won't stop rotating after pressing the stop button.
How to increase the speed when we push the start button
Could you please help me how can i increase the rotation speed when i press the start button?
Reduce the delay in for loop
Reduce the delay in for loop in Arduino Program
servo motor
their availability of servo motor .which servomotor I used ..I need servomotor specific that's
cant send data from app.
cleared the UI and the app data but still not working. any other method to try out?

my bluetooth hc-05 is not receiving any information through my phone