As we all know Raspberry Pi is a wonderful Developing platform based on ARM microprocessor. With its high computational power it can work out wonders in hands of electronics hobbyists or students. All this can be possible only if we know how to make it interact with the real world. There are many sensors which can detect certain parameters from the real time world and transfer it to a digital world. We have covered lot of Raspberry Pi Projects with many sensors. Raspberry Pi is also a boon for IoT projects, as it is a pocket sized computer with inbuilt Wi-Fi, having capabilities of a microcontroller.
In this tutorial we will learn how we can Interface an IR sensor with Raspberry pi. These sensors are most commonly use in small robots like line follower robot, Edge avoiding robot etc.. Simply putting, it can detect the presence of objects before it and also differentiate between white and black colour. Sounds cool right?
So lets learn how to interface this sensor with Raspberry Pi. In this project, when there is no object in front of IR sensor then the Red LED remains turned on and soon as we put something in front of IR sensor then red LED turns off and Green LED turn on. This circuit can also serve as Security Alarm Circuit.
Material Required:
- Raspberry Pi 3 (any model)
- IR sensor Module
- Green and Red LED lights
- Breadboard
- Connecting wires
IR Sensor Module:
IR sensors (Infrared sensor) are modules which detect the presence of objects before them. If the object is present it give 3.3V as output and if it is not present it gives 0 volt. This is made possible by using a pair of IR pair (transmitter and receiver), the transmitter (IR LED) will emit an IR ray which will get reflected if there is a object present before it. This IR ray will be received back by the receiver (Photodiode) and the output will be made high after amplified using an op-amp link LM358. You can learn more about IR Sensor Module Circuit here.
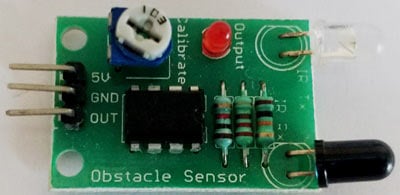
The IR Sensor used in this project is shown above. Like all IR sensor it has three pins which are 5V, Gnd and Out respectively. The module is powered by the 5V pin from Raspberry Pi and the out pin is connected to GPIO14 of Raspberry Pi. The potentiometer on top of the module can be used to adjust the range of the IR sensor.
Circuit Diagram and Explanation:
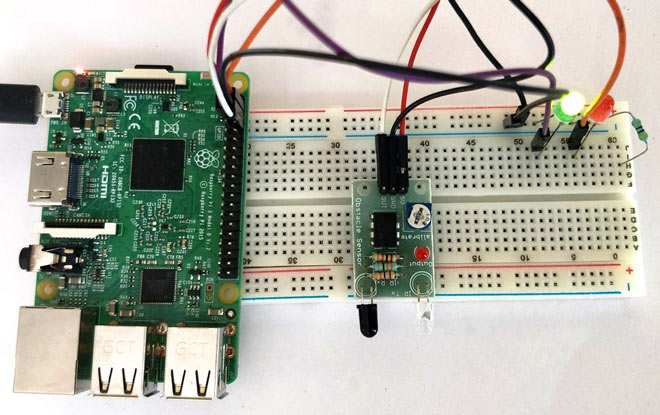
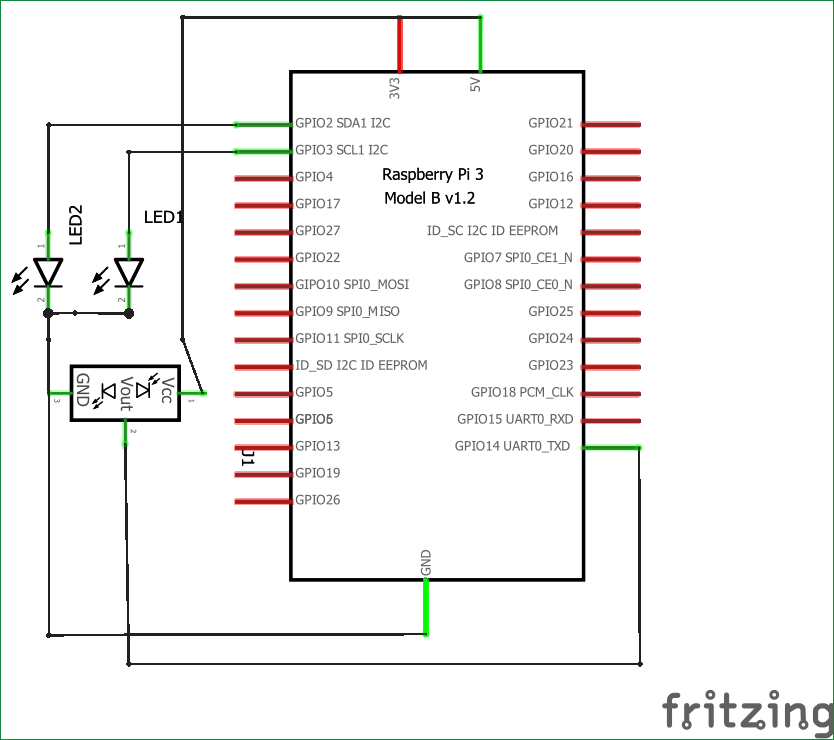
The circuit diagram for connecting Raspberry Pi with IR sensor is shown below. As you can see the circuit diagram is very simple. We have directly powered the IR module from the 5V and Ground Pin of Raspberry Pi. The output pin of the IR module is connected to the GPIO14. We have also used two LED (Green and Red) to indicate the status of the object. These two LEDs are connected to GPIO3 and GPIO2 respectively.
Since the GPIO pins of Raspberry Pi are 3.3V, a current limiting resistor is not mandatory. However if desired a resistor of value 470 ohms can be added between the ground pin of LEDs and Raspberry Pi. The whole circuit is powered by a 5V mobile charger through the micro USB port of the Raspberry pi.
Note: When connecting any sensor, make sure the ground of the sensor is connected to ground of the MCU or MPU (here Raspberry Pi). Only then they will be able to communicate.
Programming your Raspberry Pi:
Here we are using Python Programming language for programming RPi. There are many ways to program your Raspberry Pi. In this tutorial we are using the Python 3 IDE, since it is the most used one. The complete Python program is given at the end of this tutorial. Learn more about Program and run code in Raspberry Pi here.
We will talk about few commands which we are going to use in PYHTON program,
We are going to import GPIO file from library, below function enables us to program GPIO pins of PI. We are also renaming “GPIO” to “IO”, so in the program whenever we want to refer to GPIO pins we will use the word ‘IO’.
import RPi.GPIO as IO
Sometimes, when the GPIO pins, which we are trying to use, might be doing some other functions. In that case, we will receive warnings while executing the program. Below command tells the PI to ignore the warnings and proceed with the program.
IO.setwarnings(False)
We can refer the GPIO pins of PI, either by pin number on board or by their function number. Like ‘PIN 29’ on the board is ‘GPIO5’. So we tell here either we are going to represent the pin here by ‘29’ or ‘5’.
IO.setmode (IO.BCM)
We are setting 3 pins as input/output pins. The two output pins will control the LED and the input pin will read signal from the IR sensor.
IO.setup(2,IO.OUT) #GPIO 2 -> Red LED as output
IO.setup(3,IO.OUT) #GPIO 3 -> Green LED as output
IO.setup(14,IO.IN) #GPIO 14 -> IR sensor as input
Now we have to turn off the Green LED and turn on the Red LED when the object is far. This can be done by checking the GPIO14 pin.
    if(IO.input(14)==True): #object is far away
        IO.output(2,True) #Red led ON
        IO.output(3,False) # Green led OFF
Similarly we have to turn on the Green LED and turn off the Red LED when the object is near.
  if(IO.input(14)==False): #object is near
        IO.output(3,True) #Green led ON
        IO.output(2,False) # Red led OFF
Below command is used as forever loop, with this command the statements inside this loop will be executed continuously.
While 1:
Working:
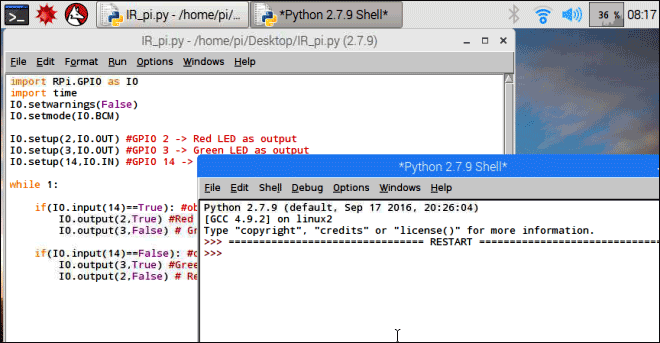
Once you have created your python code, execute it using the run command. If the program is executed without any errors you should get the following screen.
You should also see the red colour LED going high when there is no object in front of the sensor as shown below.
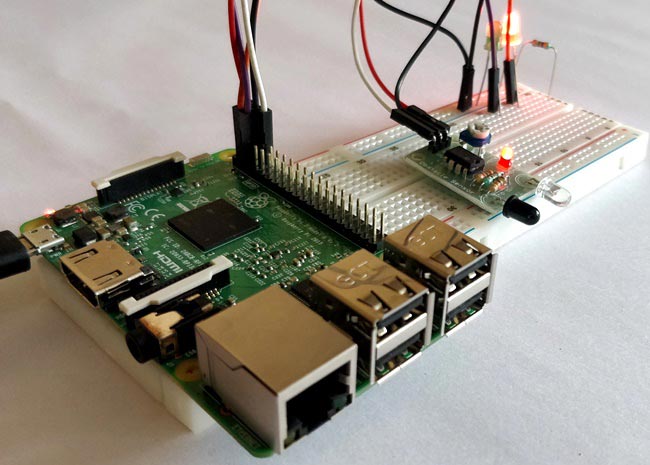
Now, bring something close to the IR led and you should notice the red LED turning off and the Green turning on. Complete working can be found on the Video given below.
Hope you understood the project and were able to build something useful with it. If any queries post those on the comment section below or on the forum.
Complete Project Code
import RPi.GPIO as IO

import time

IO.setwarnings(False)

IO.setmode(IO.BCM)
IO.setup(2,IO.OUT) #GPIO 2 -> Red LED as output

IO.setup(3,IO.OUT) #GPIO 3 -> Green LED as output

IO.setup(14,IO.IN) #GPIO 14 -> IR sensor as input
while 1:
    if(IO.input(14)==True): #object is far away

        IO.output(2,True) #Red led ON

        IO.output(3,False) # Green led OFF


    if(IO.input(14)==False): #object is near

        IO.output(3,True) #Green led ON

        IO.output(2,False) # Red led OFF



man your led is switches.red for green and green for red