
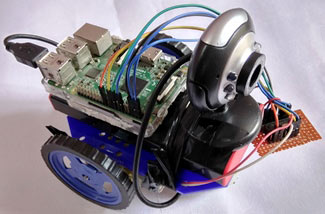
In this DIY session we are building a web controlled surveillance robotic car using raspberry pi and a webcam. This could be a useful and inexpensive security and spy tool, which have many configurable options and can be built in few hours. In this IoT Project, we are mainly using Raspberry Pi, USB web camera and two DC motor with Robot chassis to build this Robotic car.
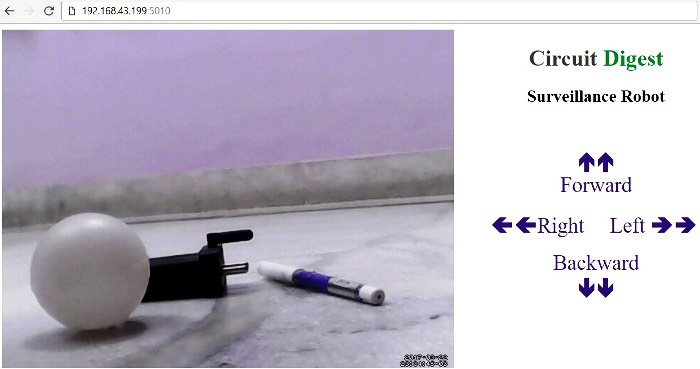
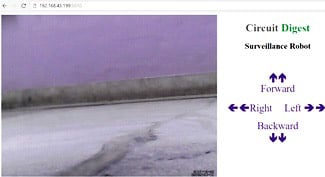
It has a web camera mounted over it, through which we will get live video feed and the interesting part here is that we can control and move this robot from a web browser over the internet. As it can be controlled using webpage, means it can also be controlled using webpage in Mobile. We built a webpage in HTML which has Left, Right, Forward, Backward links, clicking on which we can move the robot in any direction. Here we used “Motion” for getting live Video feed from USB camera and used “Flask” for sending commands from webpage to Raspberry Pi using python to move the Robot, which are explained in detail in subsequent part of this tutorial. We have Raspbian Jessie OS installed on our Raspberry Pi board. You can check this article to install the Raspbian OS and getting started with Raspberry Pi.
Installing and Configuring ‘Motion’ for getting Video feed:
Motion (Surveillance Software) is free, open source motion detector CCTV software, developed for Linux. It detects the motion and start recording video of it. With ‘Motion’ installed in your Raspberry Pi, you can magically turn your Raspberry Pi into a Security Camera. It is used for getting live video feed, making timelapse videos and taking snapshots at regular interval. It records and saves the Video whenever it detects Motion or any disturbance in the view area. Live Video feed can be watched on the web browser by entering the IP address of Pi along with the port.
We have created a detailed Tutorial on Using Motion with Raspberry Pi and USB Camera, here we are briefly explaining its installing on Raspberry pi for our Robot to send Live video streaming to webpage.
Here you need to run only few commands to start getting you first video feed over the network. Before that, properly check that your Raspberry Pi is connected to the internet, either using LAN or Wi-Fi and then follow below steps:
Step 1: First run the below command to update the Raspbian OS on Raspberry Pi:
sudo apt-get update
Step 2: Then install ‘Motion’ Library by using below command:
sudo apt-get install motion
Step 3: Now set Motion daemon to yes by editing the file: /etc/default/motion so that it will be always running. Edit this file using ‘nano’ editor with ‘sudo’ like given below:
sudo nano /etc/default/motion
Then save the file by pressing ‘CTRL+X’, then ‘Y’ and the Enter.
Step 4: Now we need to set the permission for the Target Directory (/var/lib/motion/), in which Motion saves all the Video recordings and picture files. We need to set ‘Motion’ as owner of this directory by issuing below command:
sudo chown motion:motion /var/lib/motion/
This permission is necessary otherwise you will get error, when you check Motion service Status.
You can check service status by using this command: sudo service motion status
Step 5: Now we are almost done, only we need to change one config option in Motion configuration file (/etc/motion/motion.conf) which is stream_localhost off. We have to turn off this local host streaming, otherwise we will not be able to access the Video feed on our network and it will be only accessible from the Raspberry Pi itself. To doing so, edit the Motion Configuration file with ‘nano’ editor and turn it off, like shown below:
sudo nano /etc/motion/motion.conf
Now we are done and ready to get our live feed from the USB web camera connected to Pi. Just start (or restart) the Motion service using below command and open your Raspberry Pi’s IP, with port 8081, in your browser (like 192.168.43.199:8081). In this project we have embed this IP in our HTML code in img src tag.
sudo /etc/init.d/motion restart
And you will see the live feed from your web camera. Here we have used a low cost USB web camera which worked smoothly with our Raspberry Pi, but you can further use a good quality camera for better resolution. As it will show in browser, you can use any device, to watch the feed, which supports web browser like Mobile, tablet etc.
Try rebooting the Raspberry Pi as a troubleshooting step when necessary:
sudo reboot
This is all about using Motion for our Surveillance Robot, apart from that, it has several configuration options which we have already discussed in our previous tutorial.
Note: If you are Raspberry Pi model below the version 3, then you may need a Wi-Fi dongle to wirelessly connect raspberry Pi to router.
Flask Setup in Raspberry Pi for Controlling Robot through Webpage:
Here, we have created a web server using Flask, which provides a way to send the commands from webpage to Raspberry Pi to control the Robot over the network. Flask allows us to run our python scripts through a webpage and we can send & receive data from Raspberry Pi to web browser and vice versa. Flask is a microframework for Python. This tool is Unicode based having built-in development server and debugger, integrated unit testing support, support for secure cookies and its easy to use, these things make it useful for the hobbyist.
Install a flask support package into the Raspberry Pi by using given command:
$ pip install Flask
Then we can use the Flask by just importing it in our program, like we have imported following packages of flask for this project:
from flask import Flask
from flask import Flask, render_template, request
You can learn more about the programming using Flask here, also check our previous projects where we have used Flask to send the message from Webpage to Raspberry Pi and send weight value to Raspberry Pi in Smart Container.
HTML code for webpage:
We have created a web page using HTML language for displaying control links (Left, Right, Forward, backward) to move the Robot from web browser. We have used jQuery script to call the functions in our Python Program. There are five functions in Python Code to move the Robot Left, Right, Forward, Backward and to stop it. Complete Python Code has been given at the end. These functions will be executed by clicking on the Control Links on webpage and motors will move depending on the link being clicked. Here we have written the code in such way that Robot will move in certain direction while clicking and holding the link, and as soon as we release the mouse button Robot will stop. Below is the HTML code for webpage including the jQuery:
<html>
<head>
<script src="https://ajax.googleapis.com/ajax/libs/jquery/3.1.1/jquery.min.js"></script>
</head>
<body>
<img src="http://192.168.43.199:8081" /> <!--Enter the IP Address of your Raspberry Pi-->
<div style="float:right">
</div>
<div style=" height:400px; width:300px; float:right;">
<center>
<h1><span style="color:#5C5C5C;">Circuit</span><span style="color:#139442"> Digest</span></h1>
<h2>Surveillance Robot</h2><br><br>
<a href="#" id="up" style="font-size:30px;text-decoration:none;"> 🢁🢁<br>Forward</a><br><br></center>
<a href="#" id="left" style="font-size:30px;text-decoration:none;"> 🢀🢀Left</a>
<a href="#" id="right" style="font-size:30px; text-decoration:none;"> Right 🢂🢂</a><br><br>
<center><a href="#" id="down" style="font-size:30px;text-decoration:none;"> Backward<br> 🢃🢃</a></center>
</div>
<script>
$( document ).ready(function(){
$("#down").on("mousedown", function() {
$.get('/down_side');
}).on('mouseup', function() {
$.get('/stop');
});
$("#up").on("mousedown", function() {
$.get('/up_side');
}).on('mouseup', function() {
$.get('/stop');
});
$("#left").on("mousedown", function() {
$.get('/left_side');
}).on('mouseup', function() {
$.get('/stop');
});
$("#right").on("mousedown", function() {
$.get('/right_side');
}).on('mouseup', function() {
$.get('/stop');
});
});
</script>
</body>
</html>Here you can see the we have embed the IP address, on which the Video is streaming, into the webpage by using img src tag. Change the IP address according to your Raspberry Pi but keep the port same.
<img src="http://192.168.43.199:8081" /> <!--Enter the IP Address of your Raspberry Pi-->
User needs to copy-paste the above given HTML code in some text editor (notepad) and save the file with .HTML extension (robot.html). Then put this HTML file in the /templates folder with respect to your python script location. Means you need to create a folder named templates, where you have put your Python Code file for this Raspberry Surveillance Robot, then put robot.html file in this templates folder. This step is important, otherwise our project won’t work. You can directly open the robot.html file by double clicking on it to see how your control links will look. Further check the whole process in Demonstration Video at the end. After we have done with the programming and all, we can just run the Python code in Raspberry Pi and open the IP_address_of_your_Pi:5010 in web Browser (like http://192.168.43.199:5010)
You can check the IP address of your Raspberry Pi by using ifconfig command:
ifconfig
Circuit Diagram and Setup:
After testing the Live Video feed and HTML code, we need to build a robot by using handmade or ready-made robot chassis, wheels, and nut-bolts. Then place Power bank over it for powering the Raspberry pi and then place the Raspberry Pi and web camera over the power bank and fix the setup using Cello tape or rubber strips, connect the USB camera with Raspberry Pi.

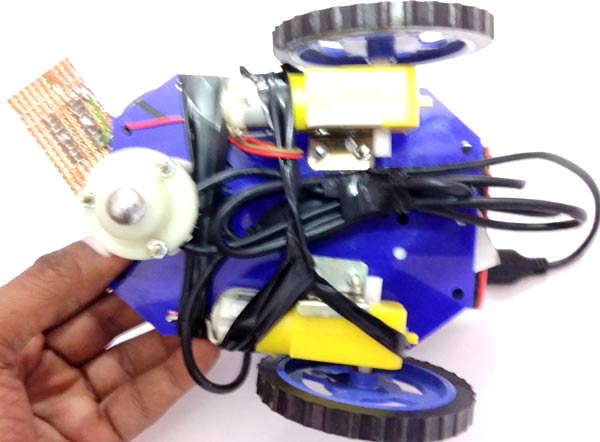
In this IoT project, we don’t need to do many connections, we only need to connect some wires for Motor Driver IC L293D and DC Motors. Connections are shown in circuit diagram below. Here we have used a General Purpose PCB for mounting L293D IC to reduce the space but you can also use small Breadboard for connecting DC motors with L293D.

How to operate:
Operation and Working this Surveillance Robot is very easy. Create a python file (.py extension) and copy the below code into it then save it on your Raspberry Pi. Then put the HTML file in the templates folder as explained above. Don’t forget to change the IP address in HTML file.
Then Run the Python code by entering below command:
python name_of_file.py
Then open your Raspberry Pi IP address with port 5010 like http://192.168.43.199:5010 (again replace IP address with your address). Now you will see the web page having four robot control links and live streaming video. User can control the robot by clicking and holding the links. If user will click and hold the links then robot will move according to clicked link and when will user release the link then robot automatically stop.
Complete Python code is given below, where we have written various functions to control the Robot on clicking the links on the webpage. You can understand them easily or if you are a beginner then check our previous Raspberry Pi Tutorials. Also visits our Robotics Section for more interesting and easy to build Robots.
Complete Project Code
from flask import Flask
from flask import render_template, request
import RPi.GPIO as GPIO
import time
app = Flask(__name__)
m11=18
m12=23
m21=24
m22=25
GPIO.setwarnings(False)
GPIO.setmode(GPIO.BCM)
GPIO.setup(m11, GPIO.OUT)
GPIO.setup(m12, GPIO.OUT)
GPIO.setup(m21, GPIO.OUT)
GPIO.setup(m22, GPIO.OUT)
GPIO.output(m11 , 0)
GPIO.output(m12 , 0)
GPIO.output(m21, 0)
GPIO.output(m22, 0)
print "DOne"
a=1
@app.route("/")
def index():
    return render_template('robot.html')
@app.route('/left_side')
def left_side():
    data1="LEFT"
    GPIO.output(m11 , 0)
    GPIO.output(m12 , 0)
    GPIO.output(m21 , 1)
    GPIO.output(m22 , 0)
    return 'true'
@app.route('/right_side')
def right_side():
   data1="RIGHT"
   GPIO.output(m11 , 1)
   GPIO.output(m12 , 0)
   GPIO.output(m21 , 0)
   GPIO.output(m22 , 0)
   return 'true'
@app.route('/up_side')
def up_side():
   data1="FORWARD"
   GPIO.output(m11 , 1)
   GPIO.output(m12 , 0)
   GPIO.output(m21 , 1)
   GPIO.output(m22 , 0)
   return 'true'
@app.route('/down_side')
def down_side():
   data1="BACK"
   GPIO.output(m11 , 0)
   GPIO.output(m12 , 1)
   GPIO.output(m21 , 0)
   GPIO.output(m22 , 1)
   return 'true'
@app.route('/stop')
def stop():
   data1="STOP"
   GPIO.output(m11 , 0)
   GPIO.output(m12 , 0)
   GPIO.output(m21 , 0)
   GPIO.output(m22 , 0)
   return  'true'
if __name__ == "__main__":
 print "Start"
 app.run(host='0.0.0.0',port=5010)
Comments
I'm using RPi official camera V2 i.e. the camera that uses CSI connector not USB cameras. Now I want to know where to change sothat I can get a live video feed from internet as you mentioned.
This "DIY" skips a few steps. I am not the author but will help as many people as I can with hopes someone can help me. To get the camera working you need to first make sure it is enabled by issuing the command "sudo raspi-config" and then go down to "interfacing option" and enable the camera, and then exit. Then test your camera from the command line with "raspistill -o cam.jpg" and it should display. After you do this then you need to enter
"sudo modprobe bcm2835-v4l2" (Careful, on the v4l2 it's an 'L', not the number 1) to make sure the RPi knows the camera is installed and available using the bcm driver. To complete the process, we also have to tell the Pi to activate the driver after any reboot so our camera will always be available. Then we want to make sure the driver and module starts every time with the Pi by entering "sudo nano /etc/modules" and at the end of the file, add this line : bcm2835-v4l2 and you should be good to go. Reboot to clean up and you can test again with the raspistill command from above.
hello, you moved the robot using commands left, right, forward, backward. in the similar way, can't you make the camera to move in different directions in its surroundings like up, left, right, down.
Hello Sir. Thanks For this Great Tutorial. I just want to Ask a simple question that do we need a wifi connection for this setup? or we can also use 3G ?
Thankyou very much Sir
Alex,
It will need to be on WiFi (but you can use NGROK or WEAVED to control it from 3G) or you will have to put a GSM/3G receiver on your Pi. If you do that you will be changing the IP address in the HTML file quite often.
I have a error while running the python code.
Pretty cool, I'm trying to re-adapt your code to work with my current robot...seeing how it works now, and it's very similar to another robot which used wiring pi and javascript in some ways...however the current robot is a motor/servo controller that rely on i2c to control them.
Anyways, I put jquery on locally since this bot also runs as an access point. I'm seeing these errors and not sure what they are?
192.168.0.12 - - [20/Feb/2018 15:43:23] "GET / HTTP/1.1" 200 -
192.168.0.12 - - [20/Feb/2018 15:43:24] "GET /favicon.ico HTTP/1.1" 404 -
Would appreciate any help!
Regards,
Matt
OK, minor brain fart, that's the icon in the url bar. Where would I put one to get rid of the error? Throwing a file in root didn't work.
* Running on http://169.254.201.51:5010/
169.254.201.51 - - [26/Feb/2018 12:05:41] "GET / HTTP/1.1" 500 -
169.254.201.51 - - [26/Feb/2018 12:05:42] "GET /favicon.ico HTTP/1.1" 404 -
while running the code i am getting this error if not this i am getting as "500 internal server error"
how to solve this
what is the range of this robot??
after this command "from flask import Flask"
'from: can't read /var/mail/flask"
is showing
@Ashish Agarwal....u do not have to run that command in terminal window....that commands are used in program
the python code is showing syntax error...please give the solution as fast as possible
I have a error while running sudo apt-get install motion. It shows a error called packages counldn"nt be found. Please tell me an an solution for this.Ihave tried many ways.
Had the same problem. Rebooted, ran "sudo apt-get update" then "sudo apt-get upgrade" and was able to install motion.
everything is perfectly running...just getting the small video window...how to enlarge it?
Did you change this line app.run(host="'0.0.0.0',port=5010)" for your ip ?
i am not getting both video and control simultaneously. i have used usb cam as u told and
plz help me if any procedure for tat
Hi! I have a doubt about the python code, in the end you write this line app.run(host="'0.0.0.0',port=5010)" the zeros also have to be replaced by my ip ?
Is because the port 5010 is suposely closed in my raspberry pi.
Hope your answer
upto what range the module can work,i mean upto what distance i can control my robo via webpage reply ASAP
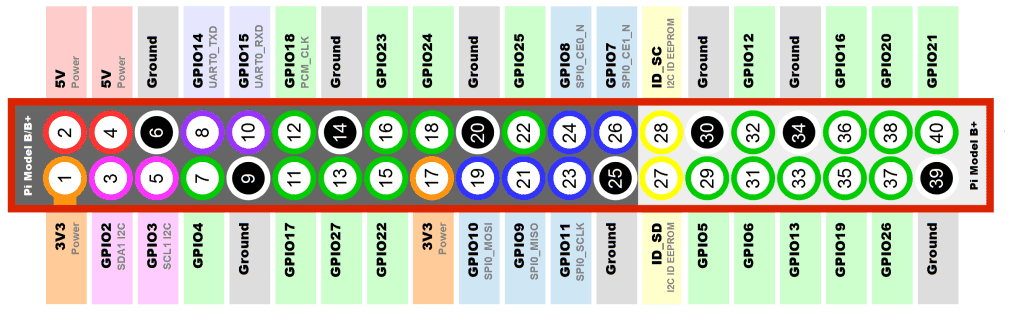
In the fritzing diagram pin 12,14,18 and 22 are used but in the code 18,23,24 and 25 are used .can somebody explain why there is such a blunder mistake?
i build this robot using the tutorial, everything is working fine except the backward button function where only one motor is rotating. help plss
It is not a mistake, in fritzing hardware pin numbers are mentioned and in program GPIO pin numbers are mentioned. Use the image in the below link to look at the GPIO pin numbers for each hardware pin
https://circuitdigest.com/sites/default/files/inlineimages/Raspberry-Pi…
The reason why backward button is not working seems to be a mistry. If only one motor is rotating then check if the hardware is proper
can you send me your contact so that i can contact you
Which raspberry pi we are using?
i got 500 internal server error plz help me to figure out this
Will it work with Raspberry pi 4?
hello i have this problem when i execute the program and opening the website, jinja2.exceptions.TemplateNotFound
anyone know how to fix this problem?

I want this car with complete package . i am a sri lankan. so will you send it as much as possible. total package cost how much?