
In this Arduino based automatic water level indicator and controller project we are going to measure the water level by using ultrasonic sensors. Basic principal of ultrasonic distance measurement is based on ECHO. When sound waves are transmitted in environment then they return back to the origin as ECHO after striking on any obstacle. So we have to only calculate its traveling time of both sounds means outgoing time and returning time to origin after striking on any obstacle. And after some calculation we can get a result that is the distance. This concept is used in our water controller project where the water motor pump is automatically turned on when water level in the tank becomes low. You can also check this simple water level indicator circuit for a simpler version of this project.
Components
- Arduino Uno
- Ultrasonic sensor Module
- 16x2 LCD
- Relay 6 Volt
- ULN2003
- 7806
- PVT
- Copper wire
- 9 volt battery or 12 Voltadaptor
- Connecting wires
Ultrasonic Sensor Module
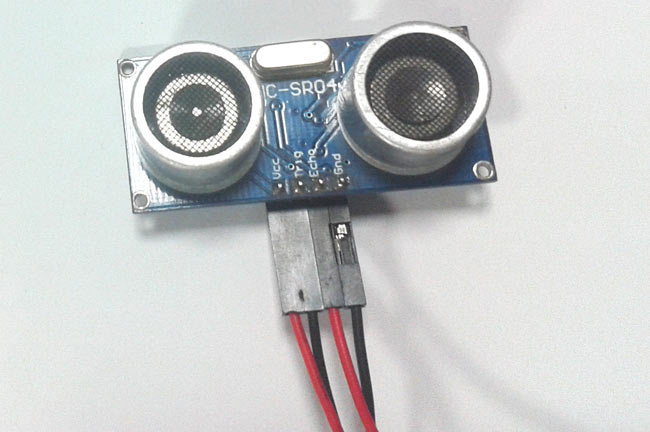
Ultrasonic sensor HC-SR04 is used to measure distance in range of 2cm-400cm with accuracy of 3mm. The sensor module consists of ultrasonic transmitter, receiver and the control circuit.
The ultrasonic sensor module works on the natural phenomenon of ECHO of sound. A pulse is sent for about 10us to trigger the module. After which the module automatically sends 8 cycles of 40 KHz ultrasound signal and checks its echo. The signal after striking with an obstacle returns back and is captured by the receiver. Thus the distance of the obstacle from the sensor is simply calculated by the formula given as
Distance= (time x speed)/2.
Here we have divided the product of speed and time by 2 because the time is the total time it took to reach the obstacle and return back. Thus the time to reach obstacle is just half the total time taken.
Working of Automatic Water Level Controller
Working of this project is very simple we have used Ultrasonic sensor module which sends the sound waves in the water tank and detects reflection of sound waves that is ECHO. First of all we needs to trigger the ultrasonic sensor module to transmit signal by using Arduino and then wait to receive ECHO. Arduino reads the time between triggering and received ECHO. We know that speed of sound is around 340 m/s. so we can calculate distance by using given formula:
Distance= (travel time/2) * speed of sound
Where speed of sound is approximately 340m per second.
By using this methods we gets distance from sensor to water surface. After it we need to calculate water level.
Now we need to calculate the total length of water tank. As we know the length of water tank then we can calculate the water level by subtracting resulting distance coming from ultrasonic from total length of tank. And we will get the water level distance. Now we can convert this water level in to the percent of water, and can display it on LCD. The working of the complete water level indicator project is shown in below block diagram.
Circuit Diagram and Explanation
As shown in the water level controller circuit given below, Ultrasonic sensor module’s “trigger” and “echo” pins are directly connected to pin 10 and 11 of arduino. A 16x2 LCD is connected with arduino in 4-bit mode. Control pin RS, RW and En are directly connected to arduino pin 7, GND and 6. And data pin D4-D7 is connected to 5, 4, 3 and 2 of arduino, and buzzer is connected at pin 12. 6 Volt relay is also connected at pin 8 of arduino through ULN2003 for turning on or turning off the water motor pump. A voltage regulator 7805 is also used for providing 5 volt to relay and to remaining circuit.

In this circuit Ultrasonic sensor module is placed at the top of bucket (water tank) for demonstration. This sensor module will read the distance between sensor module and water surface, and it will show the distance on LCD screen with message “Water Space in Tank is:”. It means we are here showing empty place of distance or volume for water instead of water level. Because of this functionality we can use this system in any water tank. When empty water level reaches at distance about 30 cm then Arduino turns ON the water pump by driving relay. And now LCD will show “LOW Water Level” “Motor turned ON”, and Relay status LED will start glowing
Now if the empty space reaches at distance about 12 cm arduino turns OFF the relay and LCD will show “Tank is full” “Motor Turned OFF”. Buzzer also beep for some time and relay status LED will turned OFF.
Programming
To program Arduino for water level controller, first we define all the pin that we are going to use in the project for interfacing external devices like relay, LCD, buzzer etc.
#define trigger 10
#define echo 11
#define motor 8
#define buzzer 12
Then we initialize all the devices used in project.
 lcd.begin(16,2);
 pinMode(trigger,OUTPUT);
 pinMode(echo,INPUT);
 pinMode(motor, OUTPUT);
 pinMode(buzzer, OUTPUT);
 lcd.print("  Water Level ");
 lcd.setCursor(0,1);
 lcd.print("   Indicator  ");
 delay(2000);
Now initialize the ultrasonic sensor module and read time of sending and receiving time of ultrasonic waves or sound by using pulseIn(pin). Then perform calculations and display the result on 16x2 LCD by using appropriate functions.
 digitalWrite(trigger,HIGH);
 delayMicroseconds(10);
 digitalWrite(trigger,LOW);
 delayMicroseconds(2);
 time=pulseIn(echo,HIGH);
 distance=time*340/20000;
 lcd.clear();
 lcd.print("Water Space In  ");
 lcd.setCursor(0,1);
 lcd.print("Tank is: ");
 lcd.print(distance);
 lcd.print("Cm");
After it we check conditions if water tank is full or water level is LOW, and take actions accordingly.
 if(distance<12 && temp==0)
 {
     digitalWrite(motor, LOW);
     digitalWrite(buzzer, HIGH);
     lcd.clear();
     lcd.print("Water Tank Full ");
     lcd.setCursor(0,1);
     lcd.print("Motor Turned OFF");
     delay(2000);
     digitalWrite(buzzer, LOW);
     delay(3000);
     temp=1;
 }

  else if(distance<12 && temp==1)
 {
     digitalWrite(motor, LOW);
     lcd.clear();
     lcd.print("Water Tank Full ");
     lcd.setCursor(0,1);
     lcd.print("Motor Turned OFF");
     delay(5000);
 }
Complete Project Code
#include <LiquidCrystal.h>


#define trigger 10

#define echo 11

#define motor 8

#define buzzer 12


LiquidCrystal lcd(7,6,5,4,3,2);


float time=0,distance=0;

int temp=0;

void setup()

{

 lcd.begin(16,2);

 pinMode(trigger,OUTPUT);

 pinMode(echo,INPUT);

 pinMode(motor, OUTPUT);

 pinMode(buzzer, OUTPUT);

 lcd.print("  Water Level ");

 lcd.setCursor(0,1);

 lcd.print("   Indicator  ");

 delay(2000);

}


void loop()

{

 lcd.clear();

 digitalWrite(trigger,LOW);

 delayMicroseconds(2);

 digitalWrite(trigger,HIGH);

 delayMicroseconds(10);

 digitalWrite(trigger,LOW);

 delayMicroseconds(2);

 time=pulseIn(echo,HIGH);

 distance=time*340/20000;

 lcd.clear();

 lcd.print("Water Space In  ");

 lcd.setCursor(0,1);

 lcd.print("Tank is: ");

 lcd.print(distance);

 lcd.print("Cm");

 delay(2000);

 if(distance<12 && temp==0)

 {

     digitalWrite(motor, LOW);

     digitalWrite(buzzer, HIGH);

     lcd.clear();

     lcd.print("Water Tank Full ");

     lcd.setCursor(0,1);

     lcd.print("Motor Turned OFF");

     delay(2000);

     digitalWrite(buzzer, LOW);

     delay(3000);

     temp=1;

 }


  else if(distance<12 && temp==1)

 {

     digitalWrite(motor, LOW);

     lcd.clear();

     lcd.print("Water Tank Full ");

     lcd.setCursor(0,1);

     lcd.print("Motor Turned OFF");

     delay(5000);

 }


 else if(distance>30)

 {

   digitalWrite(motor, HIGH);

   lcd.clear();

   lcd.print("LOW Water Level");

   lcd.setCursor(0,1);

   lcd.print("Motor Turned ON");

   delay(5000);

   temp=0;

 }

}
Comments
Can you tell me how to
Can you tell me how to connect arduino to water pump using relay modul 4 channel?
two tank monitoring
Hi sir,
I have two tank and I like to monitor one tank with ultrasonic sensor with this circuit , Is it possible ?
how can I make connection and how modify the codes
circuit WARNING !!!
WARNING !!
In the circuit diagram above,, arduino +V supply is connected to +12v unreg. source.
Should be fed by +5V regulator.
relay should have 12 V supply. .
So take care to swap those supply if you want it to work and not smoke..
As this circuit involves lethal voltages, don t try to reproduce it if you don t know anything about electricity / electronics, .
Ref Warning!!
F8EBL Radio..... The 'Vin' on the Aeduino Uno is between 7 to 12v and as per the schematic diagram it is being sent from a battery. All should be fine.
temp is used as a variable.
temp is used as a variable.
we can say temporary variable.
ur doubt clearence
temp is a temperory variable created to save the data for a temporarily use
On the component list I see
On the component list I see PVT, but on the schematic diagram I can't locate it, please help me with that one
how to do simulation using proteus?
i have insert this coding into the arduino uno r3 module in proteus to do the simulation of the program. but it only light up the lcd display without showing any information on the lcd..thank you for your guidance
How are you simulating
How are you simulating Ultrasonic sensor?
by using proteus 8, after
by using proteus 8, after entrepreting the data of ardunio software, then insert it to arduino uno in the proteus. the try do the simulation process. same as for me, it only light up the lcd but not showing any result. this is because the sensor not detecting any distance
I HAVE THE SAME PROBLEM..
I HAVE THE SAME PROBLEM...WHAT DID YOU DO TO OVERCOME THE PROBLEM....PLEASE RESPOND TO ME ...IM OUT OF TIME IN MY PROJECT
how to include library file of lcd
how to get library file of lcd
Its a core library of Arduino
Its a core library of Arduino, you don't need to install it, it is already there.
lcd library error
hi, I'm a little new with Arduino, I'm getting error: 'lcd' was not declared in this scope, can you please tell me what I'm doing wrong? I copied and pasted the whole code in the void setup section, tried to install adafruit libraries, but still getting this error.
Error on Code
Hi, I was pasting the code on a wrong way, I already fixed that, but still having problems when checking the code, I have this error:
ultrasonic_water_level_sensor.ino:7: error: 'lcd' does not name a type
lcd.begin(16,2);
ultrasonic_water_level_sensor.ino:8: error: expected constructor, destructor, or type conversion before '(' token
pinMode(trigger,OUTPUT);
ultrasonic_water_level_sensor.ino:9: error: expected constructor, destructor, or type conversion before '(' token
pinMode(echo,INPUT);
ultrasonic_water_level_sensor.ino:10: error: expected constructor, destructor, or type conversion before '(' token
pinMode(motor, OUTPUT);
ultrasonic_water_level_sensor.ino:11: error: expected constructor, destructor, or type conversion before '(' token
pinMode(buzzer, OUTPUT);
^
ultrasonic_water_level_sensor.ino:12: error: 'lcd' does not name a type
lcd.print(" Water Level ");
^
ultrasonic_water_level_sensor.ino:13: error: 'lcd' does not name a type
lcd.setCursor(0,1);
^
ultrasonic_water_level_sensor.ino:14: error: 'lcd' does not name a type
lcd.print(" Indicator ");
^
ultrasonic_water_level_sensor.ino:15: error: expected constructor, destructor, or type conversion before '(' token
delay(2000);
^
ultrasonic_water_level_sensor.ino:17: error: expected constructor, destructor, or type conversion before '(' token
digitalWrite(trigger,HIGH);
^
ultrasonic_water_level_sensor.ino:18: error: expected constructor, destructor, or type conversion before '(' token
delayMicroseconds(10);
^
ultrasonic_water_level_sensor.ino:19: error: expected constructor, destructor, or type conversion before '(' token
digitalWrite(trigger,LOW);
^
ultrasonic_water_level_sensor.ino:20: error: expected constructor, destructor, or type conversion before '(' token
delayMicroseconds(2);
^
ultrasonic_water_level_sensor.ino:21: error: 'time' does not name a type
time=pulseIn(echo,HIGH);
^
ultrasonic_water_level_sensor.ino:22: error: 'distance' does not name a type
distance=time*340/20000;
^
ultrasonic_water_level_sensor.ino:23: error: 'lcd' does not name a type
lcd.clear();
^
ultrasonic_water_level_sensor.ino:24: error: 'lcd' does not name a type
lcd.print("Water Space In ");
^
ultrasonic_water_level_sensor.ino:25: error: 'lcd' does not name a type
lcd.setCursor(0,1);
^
ultrasonic_water_level_sensor.ino:26: error: 'lcd' does not name a type
lcd.print("Tank is: ");
^
ultrasonic_water_level_sensor.ino:27: error: 'lcd' does not name a type
lcd.print(distance);
^
ultrasonic_water_level_sensor.ino:28: error: 'lcd' does not name a type
lcd.print("Cm");
^
ultrasonic_water_level_sensor.ino:30: error: expected unqualified-id before 'if'
if(distance<12 && temp==0)
^
ultrasonic_water_level_sensor.ino:44: error: expected unqualified-id before 'else'
else if(distance<12 && temp==1)
^
exit status 1
'lcd' does not name a type
Please help!
Intermediate water level
Dear Sir, I've decided to take up this project for my water tank. By please clear following doubts. Will this circuit switch on or off the pump and display the full or empty condition only? If I want intermediate status of water level, what code is required? Pl give that code for continuous monitoring of water level. Moreover the circuit is meant for display to be placed near the pump only? If I want to keep the controller i.e arduino with display at remote place with minimum no. of long cabling, what to do? Thank you.
Automatic Water Level Indicator and Controller using Arduino
i have insert this coding into the arduino uno r3 module in proteus to do the simulation of the program. but it only light up the lcd display without showing any information on the lcd..thank you for your guidance
DID YOU OVERCAME THE PROBLEM.
DID YOU OVERCAME THE PROBLEM...PLEASE RESPOND..
When the program runs and if
When the program runs and if the conditions are going to turn on the motor, the 8th pin continuously becomes ON until the condition for OFF executes.
ie, if we add
Serial.println("ON");
with digitalWrite(motor,HIGH);
the output in the serial monitor will be like this;
ON
ON
ON
ON
ON
ON
and so on.....until an OFF reaches.
Does this makes any problem to the relay driver or to the relay or to the motor? Does the program needs any modifications or not?
i try to make this project
i try to make this project through this way. but in simulation in proteus the lcd display did not showing any type of information . can you please help us. i never make any changes in programing too...
Try changing the code
Try changing the code LiquidCrystal lcd(7,6,5,4,3,2); to LiquidCrystal lcd(2,3,4,5,6,7);
tq for replay i have change
tq for replay i have change the code and its work
Please ans me.
On the component list I see 7806 and PVT, but on the schematic diagram I can't locate it, please help me..I want to do this project.
IC 7806 is clearly shown in
IC 7806 is clearly shown in circuit diagram and PVT is green color's terminal block on Relay board, you can see in image on the top.
error with the code
hello, the code is giving me some errors when i try to run it with turbo C.
Water level Controller with dispense mechanism
Is it also possible if I wan't to add a dispense in the water controller? Example, if I want to maintain this specific water level, any excess water added will be dispense automatically.
when i can past this code lcd
when i can past this code lcd cannot display any think plzz urgently tell me about it
Automatic Water Level Indicator and Controller using Arduino
Dear Sir, I've decided to take up this project for my water tank. By please clear following doubts. Will this circuit switch on or off the pump and display the full or empty condition only? If I want intermediate status of water level, what code is required? Pl give that code for continuous monitoring of water level. Moreover the circuit is meant for display to be placed near the pump only? If I want to keep the controller i.e arduino with display at remote place with minimum no. of long cabling, what to do? Thank you.
Query
Hey.
I am willing to make this for my water tank which is located at the 3rd floor of my house.
My question is that if i place Ultrasonic sensor inside the tank and place remaining assembly at ground floor then should i use any amplifier for the Ultrasonic sensor or the transmitted signal will be enough to travel to ground floor without any disturbance?
Confusion about U2
I didn't understand why you use U2 (ULN2003) for control a 6V or 12V relay? it's enough to control with BC547 and it will be more power saver.
mcu project
sir, what is the need of steeoer motor in these project. can i use simple motor instead of steeper motor
Automatic water level controller
How to add keypad in this circuit to selecm9t required water level please help
Help needed with respect to Automatic Water Level Indicator
Hello, Instead of displaying water level on LCD, can we send sms to predefine mobile numbers using GSM module but it should not flood the inbox with messages that tank is now emply. if yes then can someone help me with the software code as I am new to this and I have no software background. My objective is i need to automate underground water tank and tank notify me when the water level reached to certain low level so that i can call the water company and they come and fill up my underground tank.
wireless water level indicator
hello sir
I have
1 sound senseor
2 HC-05 Buletooth module
sir,how to interface soundsensor with HC-05 module when tank is fullHC-05 trans =mit signal to other HC-05 module and get output on Buzzer or LCd
Hi manpreet,
Hi manpreet,
You cannot use a HC-05 Bluetooth module without a Microcontroller because they work with USART
regarding this project
how to use arduino codes for this project????im really confused..
How to stop running dry pump
How to stop running dry pump if reservoir water get empty?
Water level sensor
Hi
Can we get the water level signal sent to a mobile by a Bluetooth or remote signal device connected to the board.
I've tried this project and
I've tried this project and connected everything as directed. But mu lcd is not showing any display in it. Plzz help me out sir as early as possible
I HAVE ALSO THE SAME PROBLEM.
I HAVE ALSO THE SAME PROBLEM...PLEASE TELL ME HOW DID YOU OVER CAME IT...
about this project
Can i use this automatic water level indicator and controller as fuel level indicator.If yes please provide the circuit diagram for the fuel level indicator also
Yes you can use nano, no
Yes you can use nano, no changes are needed in the code and hardware, just connect the pins on nano just as you connect to to a UNO
Hi sir... I wanted to know
Hi sir... I wanted to know what's the use of temp here and what kind of data it is holding.
Ultrasonic Water level controller
Dear Sir,
Very interesting project and it is working fine … i have request on this program.
As per this code motor turn ON water level less than “X” level, OK, the motor started pumping the water ;But in case lower tank was empty or some other reasons the TANK water level not increasing from the “X” level, we have to TURN OFF the motor for safety purpose.
For example: current water level is >60 CM and motor is ON,BUT after 3 MIN still water level not increasing or not reached a specific level( Eg: 50CM) we have to turn of the motor .
So this is my requirement how do I resolve this, could you please help me.
GSM AND IOT BASED AUTOMATIC WATER LEVEL CONTROLLER
SIR MY PROJECT USING SENSOR IS LEVEL SENSOR SIR . I NEED HELP FOR PROGRAM SIR AUTOMATIC WATER LEVEL PROGRAM I S DOUBT SIR SO PLEASE PROGRAMING SEND ME SIR
about the code
Code is executed and uploading to arduino but lcd did not showing any display.please what can i do tell as soon as possible.
code is not working
i have complied the code but nothing is being displayed on lcd ,what should i doo,
Check your connections, try
Check your connections, try some simple LCD program and see if it is working. Also make sure your contrast level for the LCD is set properly
lcd is nt working
By using this circuit and diagram everything is working instead of LCD. I checked my connection again and again but i cant find the problem then i search in google and i do it another connection then lcd glow but it cant show tank is full ya motor started.please suggest me wht am i do
what if buzzer is turned off
what if buzzer is turned off by switch. If water tank full or Low
Thanks for the circuit and
Thanks for the circuit and explanation. Good reference project.
Bula from Fiji
Hello Group,
Just a humble query. Is there a Ultrasonic Sensor Module that can go further than 400cm. Will like to use for a taller tank.
Please advise.
Thanks
Try MB1010 or MB1240, they
Try MB1010 or MB1240, they are the long range ones

I'm new with it. Tell me how to collect the code?