Building a DIY drone test rig is essential for safely testing mini-drones without the risk of crashes or component damage. This comprehensive guide shows you how to build a 3D printed drone testing stand that allows complete flight testing in a controlled tabletop environment. This drone test stand was originally built for our LiteWing Drones, but you can use it to test any mini drones.
Our homemade drone test stand design is inspired by the Open Gimbal project but modified for easier assembly and tabletop use. Unlike expensive commercial drone test equipment that costs thousands of dollars, this open-source drone testing rig can be built for under $50 using 3D printed parts and basic hardware.
What you'll learn in this tutorial:
- Complete parts list for your DIY drone testing setup
- Step-by-step assembly instructions with detailed images
- How to safely test drone flight characteristics without propeller damage
- Free downloadable 3D print files and assembly guide
Whether you're a drone enthusiast, engineering student, or maker looking to test quadcopter prototypes safely, this 3D printed drone gimbal provides a professional testing solution at a fraction of the cost.
Required Components for Your DIY Drone Testing Setup
3D Printed Parts List
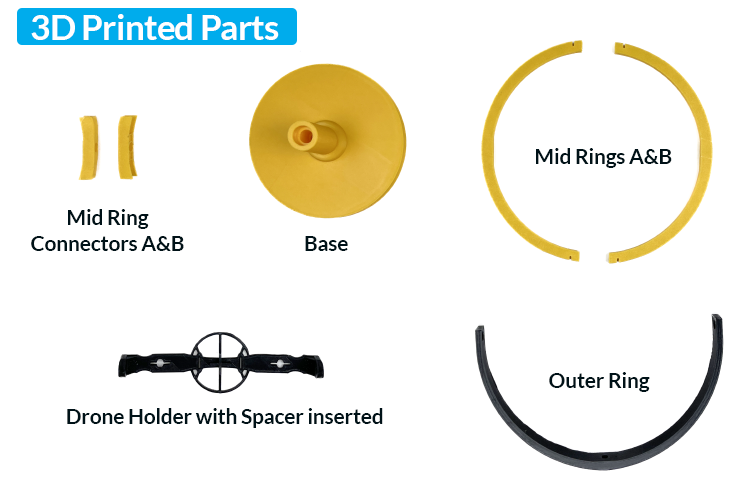
- Base
- Mid Rings A& B
- Outer Ring
- Mid Ring Connectors A & B
- Drone Holder with Spacers Inserted
Note: Design files for 3D Printing these parts are provided at the bottom of this page.
Mechanical Hardware Components
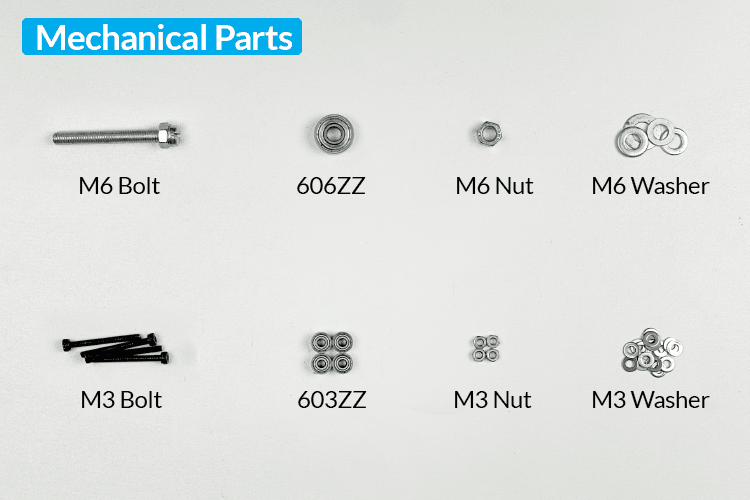
- 603zz (3x9x5 Shielded Miniature Ball Bearing) - 4
- 606zz (6x17x6 Shielded Miniature Ball Bearing) - 1
- M6 Bolt 50mm - 1
- M6 Nut - 2
- M6 Washer - As required
- M3 Bolt 30mm - 4
- M3 Nut - 4
- M3 Washer - As required
Essential Tools for Assembly
- Screwdriver
- Allen key for M3
- Mini pliers
Step-by-Step Drone Test Stand Assembly Guide
Start assembling after confirming the availability of all the components. To make this super simple, we use 3D renders. You can still view the full video available below to understand the assembly.
Step 1: Base and Outer Ring Connection
As shown in the image below, we will be using the M6 bolt to connect the outer ring and the base.
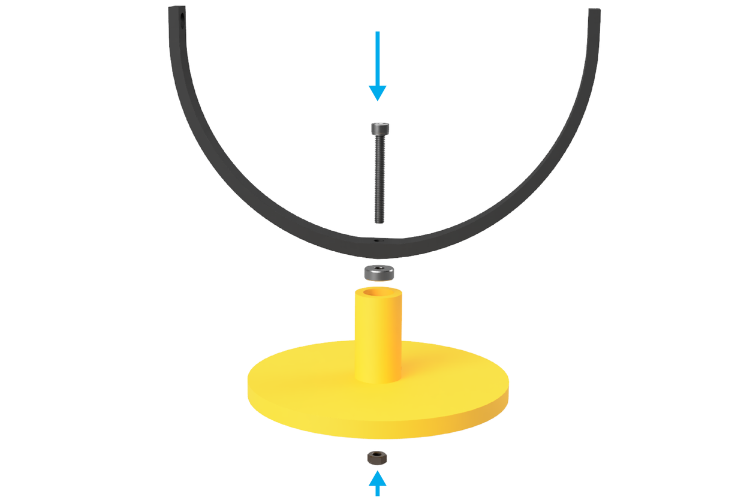
You can use the washers as per your requirement. The direction of the bolt is also up to you—there is no constraint on that.
Step 2: Mid Ring Assembly Process
As shown in the image below, the mid rings can be assembled. There is no need for screws or any other fasteners to make this attach firmly.
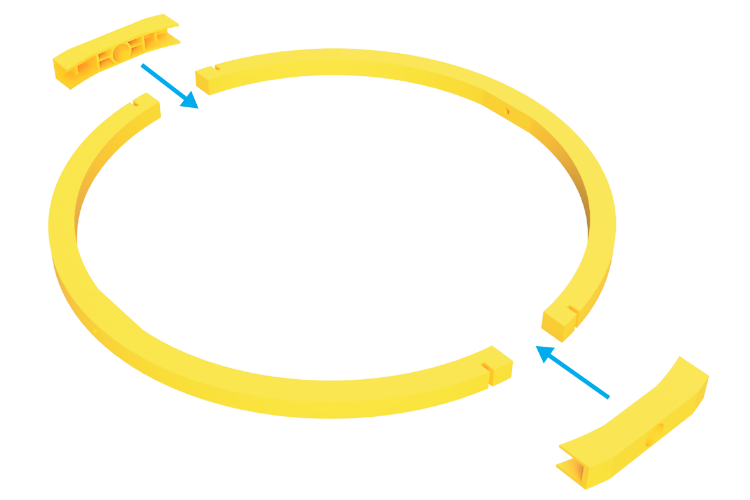
If the parts feel a little tight, light sanding can solve this issue. Applying force to tight parts may easily break them, especially in this connection.
Step 3: Mid Ring to Outer Ring Connection with Bearings
First, insert the 603ZZ bearing into the outer ring edges. Then, the mid ring can be connected to the mainframe using M3 screws and nuts, as shown in the reference image below.
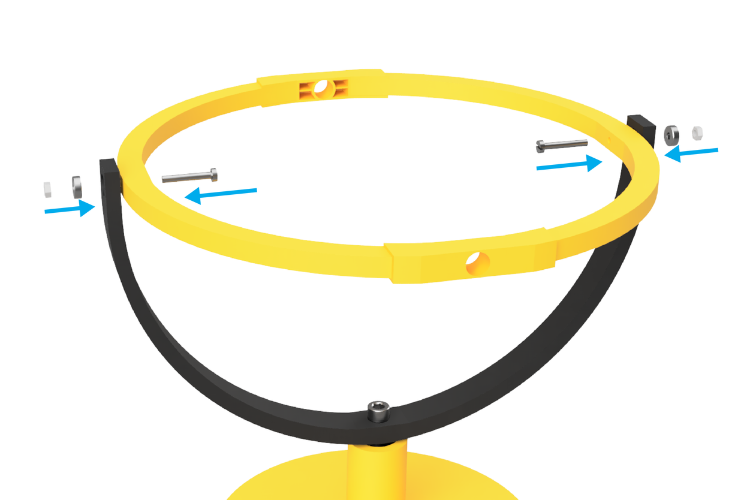
Use washers to create appropriate spacing between the frames. In my case, I used up to 3 on each side. Likewise, you might need a different number depending on the tolerance in your print quality.
Step 4: Drone Holder Frame Installation
Finally, we come to the drone frame. Here, just like the previous step, we need to insert the 603ZZ bearing to attach the drone holder frame to the mid ring.
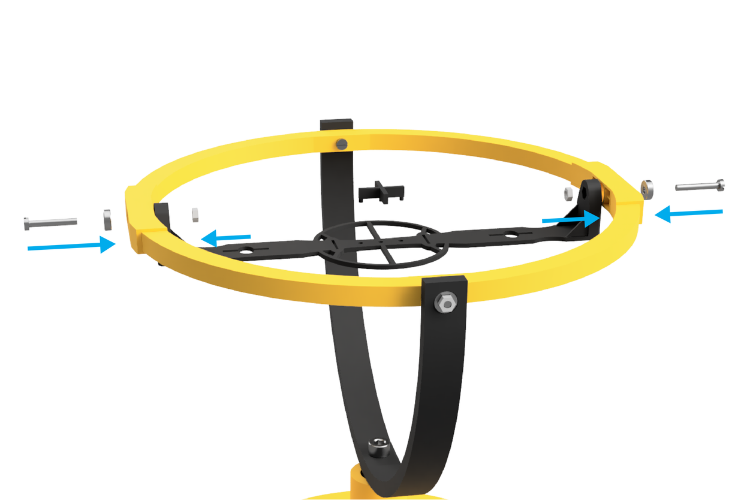
As shown in the image above, the screw can be inserted. But if it interferes with the drone's propeller, you may need to reduce the length of the bolt accordingly.
Here, spacers are also included, as they will be crucial if the drone has some sensors attached below.
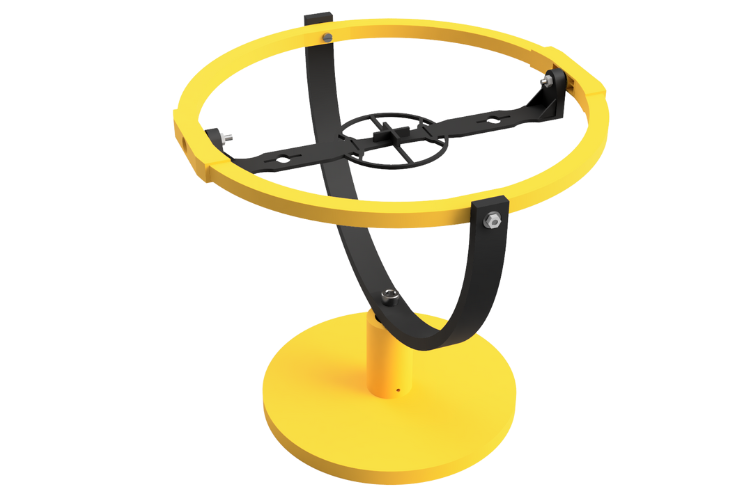
Step 5: Final Assembly and Testing Your DIY Drone Rig
Finally, testing this testing rig—I have used our LiteWing here. I attached the LiteWing using a Velcro strap. You can use anything, even a zip tie.

Also, the drone can be mounted diagonally using the available holes in the holder frame.
How to Use Your Homemade Drone Test Stand
Once your DIY drone test rig is fully assembled, testing your mini-drone safely becomes straightforward. This 3D printed drone testing stand allows you to evaluate flight characteristics, tune parameters, and identify issues without risk of crashes or propeller damage. You can also check out the video below, which shows the drone test stand in action.
Setting Up Your Drone for Testing
Mounting Your Drone: Secure your mini-drone to the holder frame using a Velcro strap or zip tie. The drone can be mounted either horizontally or diagonally using the available mounting holes. For drones with bottom-mounted sensors, use the included spacers to provide adequate clearance.
Safety Checks Before Testing:
- Ensure all bolts are properly tightened
- Verify the drone is securely fastened to the holder
- Check that propellers have adequate clearance from the rig components
- Confirm the test stand is stable on your work surface
Testing Procedures with Your Drone Test Rig
Basic Flight Control Testing: Start with low throttle settings to test basic motor response and flight controller functionality. The gimbal system allows your drone to rotate freely in all three axes, simulating actual flight conditions while keeping it safely contained.
Parameter Tuning and Calibration: Use your homemade drone test stand to safely adjust PID settings, calibrate gyroscopes, and test different flight modes. The stable platform eliminates variables like wind and pilot error, allowing precise evaluation of control algorithms.
Motor and Propeller Testing: Test different motor-propeller combinations to optimize performance. The rig allows you to safely run motors at various speeds while observing vibration patterns and listening for mechanical issues.
Troubleshooting Common Issues: If your drone exhibits erratic behavior during testing, check for binding in the gimbal joints or ensure the mounting is secure. The bearing system should allow smooth rotation without resistance.
Download 3D Print Files and Source Code
All design files for this open-source drone testing rig are freely available for download. This DIY drone test stand project includes complete 3D models, assembly instructions, and documentation to help you build your own testing setup. You can also check this Thingiverse page to view and download the 3d printing files.
Recommended 3D Print Settings:
- Layer height: 0.2mm for optimal balance of speed and quality
- Infill: 20-30% for structural components
- Support material: Required for overhanging features
- Print orientation: Specific orientation files included for best results