
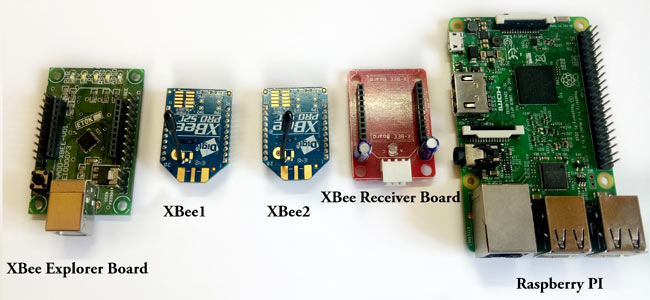
In previous tutorial we interfaced the XBee module with Arduino Uno and made them communicate wirelessly using XBee module. Now we will interface XBee module with Raspberry Pi which will act as a receiver and make it communicate wirelessly with another XBee module (XBee explorer board) which is serially connected with the laptop.
Hardware Requirements
- 1 x Raspberry Pi with Raspbian Installed in it
- 2 x XBee Pro S2C modules (any other model can be used)
- 1 x XBee explorer board (optional)
- 1 x Xbee Breakout board (optional)
- USB cables
- LEDs
It is assumed that your Raspberry Pi is already flashed with an operating system. If not, follow the Getting started with Raspberry Pi tutorial before proceeding. Here we are using Rasbian Jessie installed Raspberry Pi 3.
Here External Monitor using HDMI cable is used as display to connect with Raspberry Pi. If you don’t have monitor, you can use SSH client (Putty) or VNC server to connect to Raspberry pi using Laptop or computer. Learn more about setting up Raspberry Pi headlessly here.
Configuring XBee Modules using XCTU
As we have learnt in previous tutorial of ZigBee Introduction that the XBee module can act as a Coordinator, Router or an End device but it need to be configured to work in desired mode. So, before using the XBee modules with Raspberry Pi, we have to configure these modules using XCTU software.
To connect XBee module with the laptop, a USB to serial converter or specifically designed explorer board is used. Just hook up the XBee module to the Explorer board and plug it with the laptop using USB cable.
If you don’t have any converter or explorer board, then an Arduino board can be used as a USB to serial device which can easily communicate with the XBee and laptop. Just upload blank sketch in Arduino board and now it can behave like a USB to Serial converter.
Configuring XBee Modules:
Here in this tutorial, an Explorer board is used to configure the XBee modules.
Download the XCTU software from this link and install it. After downloading and installing the XCTU software, open it and make sure your XBee module is properly connected. Check the COM port of the Arduino board in device manager.
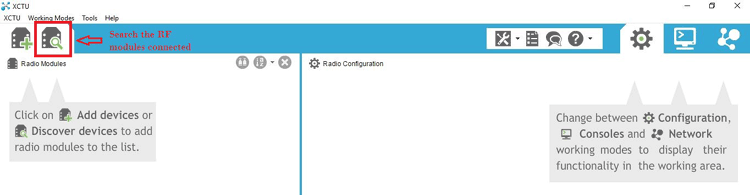
1. Now, click on the search button. This will show you all the RF devices connected with your laptop. In our case, it will show only one XBee module.
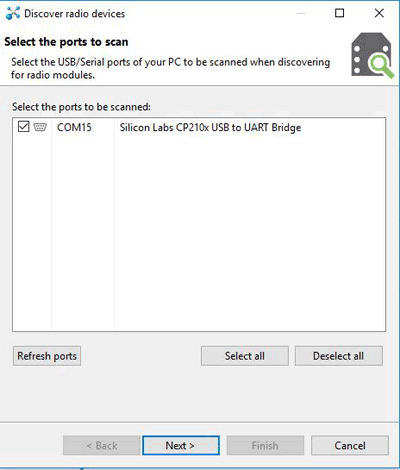
2. Select the Serial port of the Explorer board/Arduino board and click on Next.
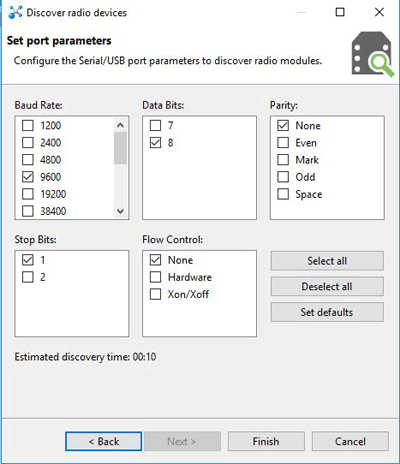
3. In the next window, set the USB port parameters as shown below and click on Finish.
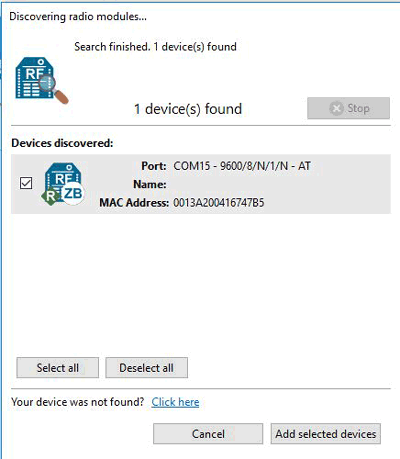
4. Select the Discovered device and click on Add selected device. This process will add your XBee module to XCTU dashboard.
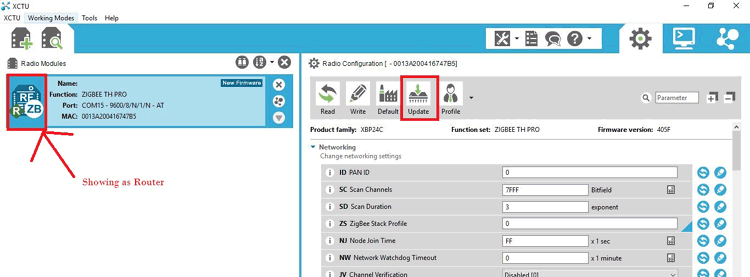
5. Now, you can configure your XBee module in this window. You can use either AT commands or put the data manually. As you can see, there is R showing on the left panel which means XBee is in router mode. We have to make it Coordinator for the transmitter part.
First, update the Firmware by clicking on the Update firmware.
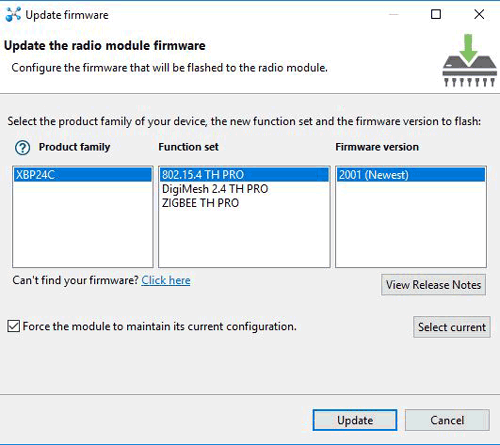
6. Choose the Product family of your device which is available on back of your XBee module. Select function set and firmware version as highlighted below and click on Update.
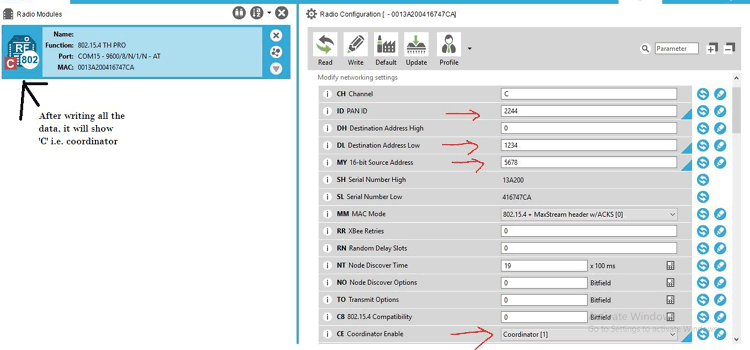
7. Now, you have to give ID, MY and DL data to make connection with other XBee. ID remains same for both the modules. Only MY and DL data interchange i.e. MY for the receiver XBee becomes DL of the transmitter XBee (coordinator) and DL for the receiver XBee becomes MY of the transmitter XBee. Make CE as Coordinator and then hit the Write button. As shown below.
|
|
ATDL |
ATMY |
ATID |
|
XBee 1 coordinator |
1234 |
5678 |
2244 |
|
XBee 2 end device |
5678 |
1234 |
2244 |
8. After writing the above data to the transmitter part, plug out it from the explorer board and plug in the second XBee module in it. Repeat the same process as above only changes are the DL, MY, and CE. As we will make the second XBee as End device so in CE drop down menu, select the End device and hit the Write button.
9. Now, our XBee modules are ready to interface with the Raspberry Pi. We will connect the transmitter XBee to the laptop and receiver XBee with the Raspberry Pi. Then give commands to the receiver part using laptop. laptop.
Circuit Diagram for Receiver Part
Connections for interfacing ZigBee module with Raspberry PI are shown in the circuit diagram.

Connections:
- Tx (pin2)of XBee -> Tx of pin Raspberry Pi
- Rx(pin3) of XBee -> Rx of pin Raspberry Pi
- Gnd (pin10) of XBee -> GND of pin Raspberry Pi
- Vcc (Pin1) of XBee -> 3.3v of pin Raspberry Pi
- Led is connected to GPIO 23
Setup Raspberry Pi for Serial communication
Now, we will setup the Raspberry Pi for the Serial communication. By default, the hardware serial port of Pi is disabled. So, we have to enable it before starting the connection.
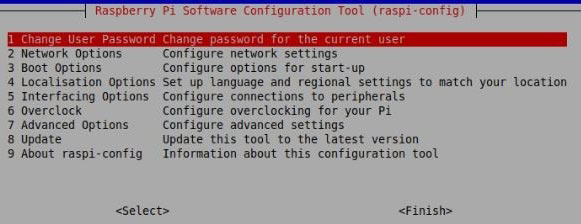
1. In the terminal, run the command raspi-config.
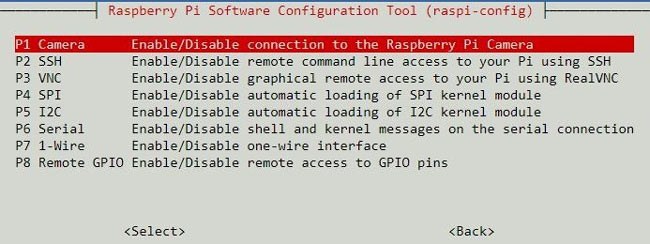
2. Go to option 5 Interfacing options and hit the enter. Now, select the P6 Serial option and Enable it and then save.
Exit the terminal and you are all set to make the connection between Raspberry Pi and XBee. GPIO14 and 15 will act as Tx and Rx respectively and these are available at /dev/ttyS0 port of raspberry pi.
Now, we will write a python script to ON the LED whenever we receive ‘a’ from the transmitter side XBee.
Programming Raspberry Pi for XBee communication
Complete python program for interfacing XBee with Raspberry Pi is given at the end.
First, we have to import the time, serial and RPi.GPIO libraries using import function.
import time
import serial
import RPi.GPIO as GPIO
…
Now, write the properties of serial connection, define port, baudrate and parities as below.
ser = serial.Serial(
    port='/dev/ttyS0',
    baudrate = 9600,
    parity=serial.PARITY_NONE,
    stopbits=serial.STOPBITS_ONE,
    bytesize=serial.EIGHTBITS,
    timeout=1
 )
Write all the send and receiving elements in the while loop.
while 1:
You can use ser.write function to send the messages to the transmitter side. Uncomment the below lines to send countings.
    #ser.write(str.encode('Write counter: %d \n'%(counter)))
    #time.sleep(1)
    #counter += 1
For receiving the messages we have to use ser.readline() function. Store the incoming message in a variable and check the condition. If incoming message is ‘a’ then turn ON the LED for 3 seconds and then turn OFF the LED.
    x=ser.readline().strip()
    print(x)
    if x == 'a':
        GPIO.output(23,GPIO.HIGH)
        time.sleep(3)
..
..
Complete Python code with a Demonstration Video is given at the end of the tutorial. Paste the code in any text editor of the Pi and save it. Run the script in the terminal using sudo python script_name.py OR you can use Python IDE and Shell to execute the script.
Testing the wireless XBee communication using Raspberry Pi
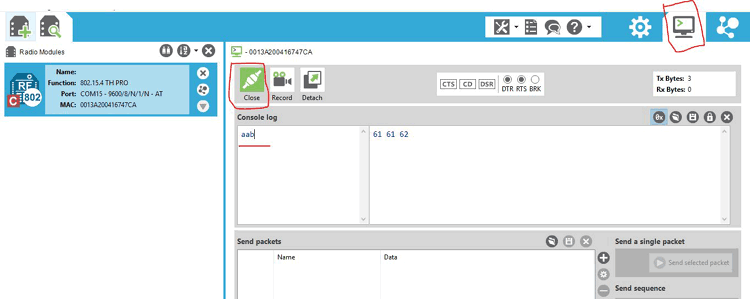
Now, we all set to test our XBee transmitter and receiver. To give command to the transmitter part, we will use XCTU’s console terminal. Click on the Console icon near the settings option. Then, click on Open button to connect the XBee to the laptop.
Enter ‘a’ in Console log. You will see that LED will turn ON for 3 seconds and then it turn OFF.
In this way you can also connect the transmitter XBee to the Arduino board as described in the previous tutorial, and make the Raspberry Pi and Arduino to communicate with each other.
Complete Project Code
#!/usr/bin/env python

import time

import serial

import RPi.GPIO as GPIO

GPIO.setmode(GPIO.BCM)

GPIO.setwarnings(False)

GPIO.setup(23,GPIO.OUT)

ser = serial.Serial(

    port='/dev/ttyS0',

    baudrate = 9600,

    parity=serial.PARITY_NONE,

    stopbits=serial.STOPBITS_ONE,

    bytesize=serial.EIGHTBITS,

    timeout=1

 )

counter=0


while 1:

    #ser.write(str.encode('Write counter: %d \n'%(counter)))

    #time.sleep(1)

    #counter += 1

    x=ser.readline().strip()

    print(x)

    if x == 'a':

        GPIO.output(23,GPIO.HIGH)

        time.sleep(3)

    else:

        GPIO.output(23,GPIO.LOW)
Comments
If you aren't getting serial data from Python:
the ser.readline() function is expecting a newline character, \n. You can add \n to your transmitted message, or just use ser.read(x) where x specifies the number of bytes you want.

hello
I followed all the tutorial about xbee translation but I can't send the information or print the x