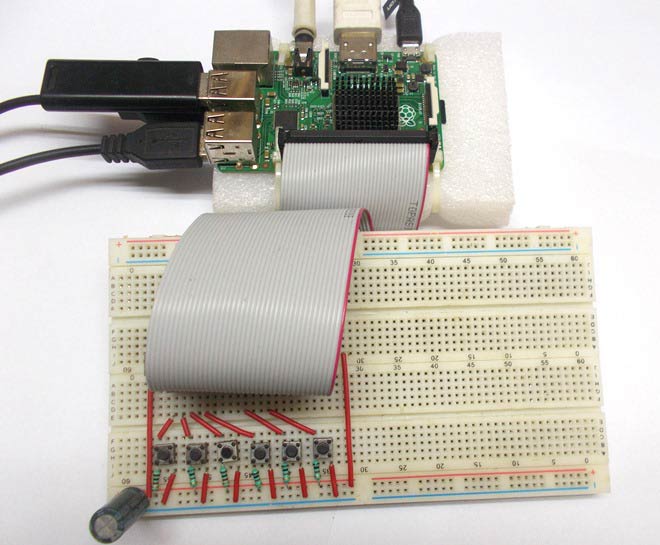
In this session we are going to use Raspberry Pi and the PYGAME functions to make a sound board. In simple terms, we are going to connect few buttons to the Raspberry Pi GPIO pins and when these buttons are pressed Raspberry Pi plays audio files stored in its memory. These audio files can be played one by one or they can all be played together. In other words you can press one or multiple buttons at the same time, Raspberry Pi will play one or multiple audio files accordingly at the same time. Check the Demo Video at the end of this article. Also check our Raspberry Pi Tutorial Series along with some good IoT Projects.
We have 26 GPIO pins in Raspberry Pi which can be programmed, out of which some are used to perform some special functions and then we have 17 GPIO remaining. Each GPIO pin can deliver or draw a maximum of 15mA. And the sum of currents from all GPIO cannot exceed 50mA. So we can draw a maximum of 3mA in average from each of these GPIO pins. We will use resistors to limit the current flow. Learn more about GPIO Pins and interfacing button with Raspberry Pi here.
Components Required:
Here we are using Raspberry Pi 2 Model B with Raspbian Jessie OS. All the basic Hardware and Software requirements are previously discussed, you can look it up in the Raspberry Pi Introduction and Raspberry PI LED Blinking for getting started, other than that we need:
- Raspberry Pi with pre-installed OS
- Power supply
- Speaker
- 1KΩ resistor (6 pieces)
- Push Buttons (6 pieces)
- 1000uF capacitor
Working Explanation:
Here we are Playing Sound using Buttons with Raspberry Pi. We have used 6 push buttons to play 6 audio files. We can add more buttons and audio files to extend this board to create more beautiful pattern by pressing these buttons. Before explaining any further, complete the steps below.
1. First of all download the 6 Audio files from the link given below or you can use your audio files, but then you need to change the file names in Code.
Download Audio files from here
2. Create a new folder on Raspberry Pi desktop screen and name it as “PI SOUND BOARD”.
3. Unzip the downloaded audio files into the folder which we have created on DESKTOP in previous step.
4. Open the terminal window in Raspberry Pi and enter below command:
sudo amixer cset numid=3 1 <press enter>
This command tells PI to provide audio output through 3.5mm audio jack on board.
If you want audio output from HDMI Port then you can use below command:
$ sudo amixer cset numid=3 2 <press enter>
5. Connect speakers to the 3.5mm audio output jack on the Raspberry Pi board.
6. Create a PYTHON file (*.py extension) and save it in the same folder. Check this tutorial for creating and running the Python Program in Raspberry Pi.
7. Pygame mixer will be installed by default in the OS. If the program, after execution, does not recall PYMIXER, then update the OS of Raspberry Pi by entering below command in the terminal window. Make sure that Pi is connected to internet.
sudo apt-get update <press enter>
Wait for few minutes for the OS to update.
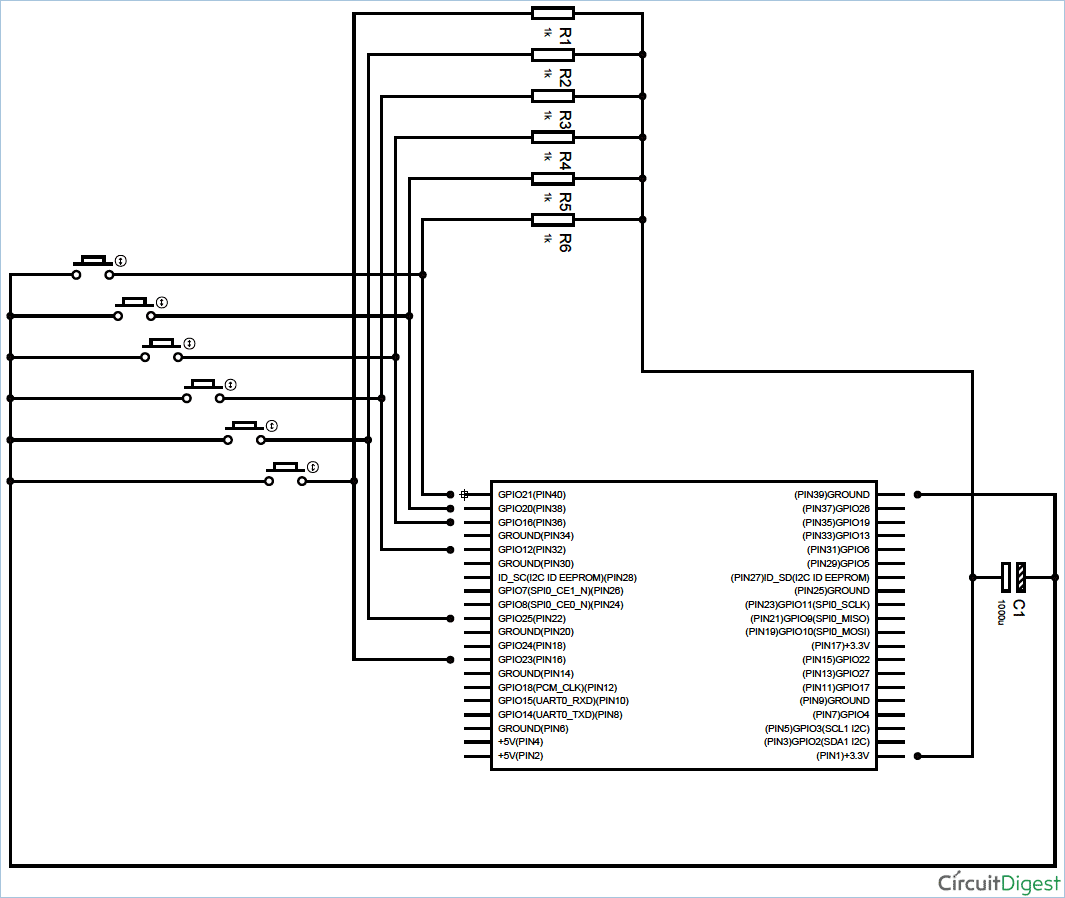
Now connect every component as per the circuit diagram given below, Copy the PYHTON program into the PYHTON file created on the desktop and finally hit run to play the audio files through the buttons. Python Program is given at the end with the Demo Video.
Circuit Diagram:
Programming Explanation:
Here we have created Python Program to play the Audio Files according to button press. Here we need to understand few commands, which we have used in the program.
import RPi.GPIO as IO
We are going to import GPIO file from library, above command enables us to program GPIO pins of PI. We are also renaming “GPIO” to “IO”, so in the program whenever we want to refer to GPIO pins we will use the word ’IO’.
IO.setwarnings(False)
Sometimes, when the GPIO pins which we are trying to use might be doing some other functions. Then you will receiver warnings whenever you execute a program. This command tells Raspberry Pi to ignore the warnings and proceed with the program.
IO.setmode (IO.BCM)
Here we are going to refer i/o pins of PI by their function name. So we are programming the GPIO by BCM pin numbers, which enables us to call PINs with their GPIO pin no. Like we can call PIN39 as GPIO19 in the program.
import pygame.mixer
We are calling pygame mixer to play the audio files.
audio1 = pygame.mixer.Sound("buzzer.wav")We are calling for ‘buzzer.wav’ audio file stored in desktop folder. If you want to play any other file, just change the audio file name in the function given above. You can name any files present in the desktop folder.
channel1 = pygame.mixer.Channel(1)
Here we are setting up a channel for each button so we can play all audio files simultaneously.
    if (IO.input(21) == 0):
        channel1.play(audio1)
In case, the condition in if statement is true, the statement below it will be executed once. So if the GPIO pin 21 goes low or grounded, then it will play the audio file assigned to audio1 variable. As per Circuit Diagram, we can see that GPIO pin 21 goes low when we press first button. So we can play any audio file by pressing the corresponding button.
while 1: is used as forever loop, with this command the statements inside this loop will be executed continuously.
You can make changes to the python program to make the most satisfying Sound Board with Raspberry Pi. You can even add more buttons to make things more interesting and play more audio files.
Complete Project Code
#working
import pygame.mixer #calling for pygame mixer to play audio files
import time         #calling for time to provide delays in program
import RPi.GPIO as IO  #calling for header file which helps in using GPIO’s of PI
IO.setwarnings(False)  #do not show any warnings
IO.setmode(IO.BCM)     #programming the GPIO by BCM pin numbers. (like PIN29 as'GPIO5')
IO.setup(21, IO.IN)  #initialize GPIO21 as an input
IO.setup(20, IO.IN)  #initialize GPIO20 as an input
IO.setup(16, IO.IN)  #initialize GPIO16 as an input
IO.setup(12, IO.IN)  #initialize GPIO12 as an input
IO.setup(25, IO.IN)  #initialize GPIO25 as an input
IO.setup(23, IO.IN)  #initialize GPIO23 as an input
pygame.mixer.init(48000, -16, 1, 1024)  #initializing audio mixer
audio1 = pygame.mixer.Sound("buzzer.wav")      #calling for audio file
audio2 = pygame.mixer.Sound("cartoon002.wav")  #calling for audio file
audio3 = pygame.mixer.Sound("baby_x.wav")      #calling for audio file
audio4 = pygame.mixer.Sound("ahem_x.wav")      #calling for audio file
audio5 = pygame.mixer.Sound("clap.wav")
audio6 = pygame.mixer.Sound("baseball_hit.wav")
channel1 = pygame.mixer.Channel(1)   #using channel one for first button
channel2 = pygame.mixer.Channel(2)   #using channel two for second button
channel3 = pygame.mixer.Channel(3)    #using channel three for second button
channel4 = pygame.mixer.Channel(4)   #using channel four for second button
channel5 = pygame.mixer.Channel(5)   #using channel five for second button
channel6 = pygame.mixer.Channel(6)   #using channel six for second button
while 1:  #execute loop forever
    if (IO.input(21) == 0):
        channel1.play(audio1)          #if button one is pressed(grounded) play audio file one
    if (IO.input(20) == 0):
        channel2.play(audio2)          #if button two is pressed(grounded) play second audio file
    if (IO.input(16) == 0):
        channel3.play(audio3)          #if button three is pressed(grounded) play third audio file
    if (IO.input(12) == 0):
        channel4.play(audio4)
    if (IO.input(25) == 0):
        channel5.play(audio5)
    if (IO.input(23) == 0):
        channel6.play(audio6)
    time.sleep(.01)  #sleep for 100ms


