
The MPU6050 sensor module consists of an accelerometer and gyro on a single chip. It contains analog-16 bits in the digital converter for each channel. So it can capture the x, y, and z channels at the same time. The sensor uses I2C-bus to interact with Arduino or any other microcontroller. The MPU-6050 sensor module used in many applications like drones, robots, motion sensors. This sensor is also called the Gyroscope or Triple axis accelerometer. We previously used this module to build many MPU6050 based projects.
In today’s article, we are going to interface the MPU6050 Accelerometer and Gyroscope with ESP32 and showing the values over the Webserver. Throughout this article, I will give you a basic introduction to the MPU6050 and demonstrate how it can be interfaced with an ESP32 Development Board and how its values can be displayed on the Webpage.
Components Required
- ESP32 NodeMCU
- MPU6050 Accelerometer and Gyroscope Module
- Jumper Wires
Circuit Diagram
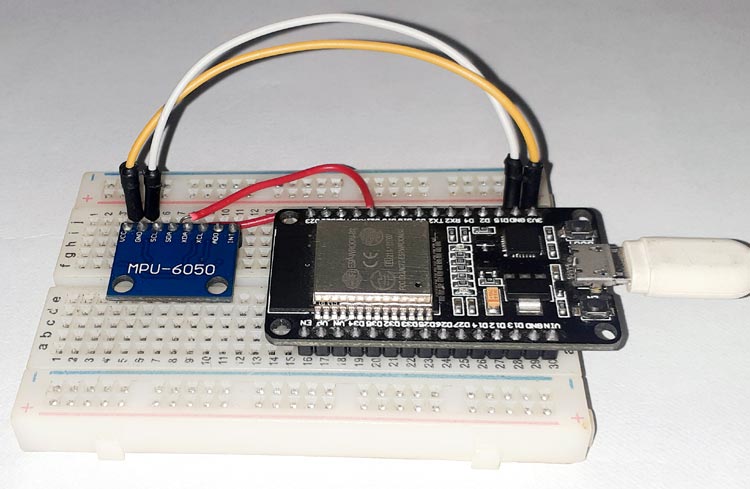
Circuit Diagram for interfacing MPU6050 Accelerometer and Gyroscope Module with ESP32 is given below.

The MPU6050 communicates with the ESP32 through the I2C protocol, so we only need two wires to interface ESP32 and MPU6050. The SCL and SDA pins of MPU6050 are connected to D22 and D21 pins of ESP32, while VCC and GND pins of MPU6050 are connected to 3.3V and GND of ESP32.
MPU6050 Sensor Module
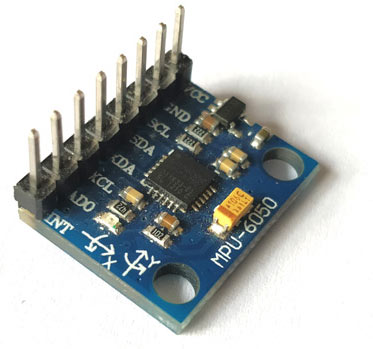
MPU6050 is based on Micro-Mechanical Systems (MEMS) technology. This sensor has a 3-axis accelerometer, a 3-axis gyroscope, and an in-built temperature sensor. It can be used to measure parameters like Acceleration, Velocity, Orientation, Displacement, etc. We have previously interfaced MPU6050 with Arduino and Raspberry pi and also built a few projects using it like- Self Balancing robot, Arduino Digital Protractor, and Arduino Inclinometer.
The MPU6050 module is small in size and has low power consumption, high repetition, high shock tolerance, and low user price points. The MPU6050 comes with an I2C bus and Auxiliary I2C bus interface and can easily interfere with other sensors such as magnetometers and microcontrollers.
Code Explanation
The programming part for MPU6050 ESP32 is simple. The complete code is given at the end of the page. Here we are explaining some important parts.
As usual, start the code by including all the required libraries. The Wire.h library allows you to communicate with I2C / TWI devices while WiFi.h library provides ESP32 specific Wi-Fi routines that we are calling to connect to the network.
#include <Wire.h>
#include <WiFi.h>
After including the libraries, define some variables to store the Accelerometer and Gyroscope values.
int16_t AcX,AcY,AcZ,Tmp,GyX,GyY,GyZ;
In the next lines, enter your Wi-Fi Name and password.
const char *ssid =  "Galaxy-M20";     // Enter your Wi-Fi Name
const char *pass =  "ac312124"; // Enter your Wi-Fi Password
Inside the void setup() loop, initialize the baud rate, the wire library, Webserver, and the data transmission through the power management register.
Serial.begin(115200);
Wire.begin();
Wire.beginTransmission(MPU_addr);
Wire.write(0x6B);
Wire.write(0);
server.begin();
In loop Function, we have called the mpu_read function to get the accelerometer and gyroscope readings. These readings will be sent to the Webpage using the client.println() function.
mpu_read();
Now in the next lines, check whether any client has sent an HTTP request or not. If ESP32 gets any client request, then it will be stored in character and shown on the serial monitor.
WiFiClient client = server.available();
 if (client)
  {
    Serial.println("new client");
    String currentLine = "";
    while (client.connected())
    {
      if (client.available())
      {
        char c = client.read();
        if (c == '\n')
Next, design the web page using html and send each line to the Webpage using the client.println() function. The <style> tag is used to change the text and background color. You can change the properties in the below lines.
client.print("<html><title> ESP32 WebServer</title></html>");
client.print("<body bgcolor=\"#E6E6FA\"><h1 style=\"text-align: center; color: blue\"> ESP32 WebServer </h1>");
client.print("<p style=\"text-align: left; color: red; font-size:150% \">Accelerometer Values: ");
 client.print("<p style=\"text-align: left; font-size:150% \">AcX: ");
 client.print(AcX);
 client.print("<br/>AcY: ");
 client.print(AcY);
 client.print("<br/>AcZ: ");
 client.print(AcZ);
 client.print("<p style=\"text-align: left; color: red; font-size:150% \">Gyroscope Values: ");
 client.print("<p style=\"text-align: left; font-size:150% \">GyX: ");
 client.print(GyX);
 client.print("<br/>GyY: ");
 client.print(GyY);
 client.print("<br/>GyZ: ");
 client.print(GyZ);
 client.print("</p></body>");
Inside the mpu_read loop(), read all the six registers for the X, Y, and Z axes of Accelerometer and Gyroscope.
AcX=Wire.read()<<8|Wire.read();  // 0x3B (ACCEL_XOUT_H) & 0x3C (ACCEL_XOUT_L)     AcY=Wire.read()<<8|Wire.read();  // 0x3D (ACCEL_YOUT_H) & 0x3E (ACCEL_YOUT_L)
AcZ=Wire.read()<<8|Wire.read();  // 0x3F (ACCEL_ZOUT_H) & 0x40 (ACCEL_ZOUT_L)
GyX=Wire.read()<<8|Wire.read();  // 0x43 (GYRO_XOUT_H) & 0x44 (GYRO_XOUT_L)
GyY=Wire.read()<<8|Wire.read();  // 0x45 (GYRO_YOUT_H) & 0x46 (GYRO_YOUT_L)
GyZ=Wire.read()<<8|Wire.read();  // 0x47 (GYRO_ZOUT_H) & 0x48 (GYRO_ZOUT_L)
Testing the MPU6050 ESP32
Connect the ESP32 with the laptop and upload the code. Don’t forget to select the board and port correctly.
Make sure your laptop shares the same Wi-Fi network as the ESP32. After uploading the code, open the serial monitor. Change the baud rate of the serial monitor to 115200. You will see the IP address and the Accelerometer and Gyroscope values on the serial monitor, copy this IP and paste it in the browser. Now you will see the MPU6050 Gyro and accelerometer values on the webpage as shown below:
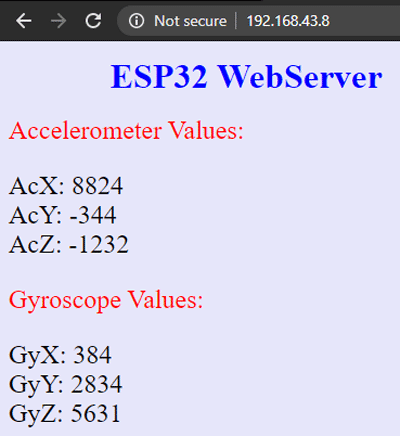
Now you can use these values to build anything cool like a self-balancing robot, Hand Gesture Controlled Robotic Arm, etc.
Complete Project Code
#include <Wire.h>
#include <WiFi.h>
const int MPU_addr=0x68;  // I2C address of the MPU-6050
int16_t AcX,AcY,AcZ,Tmp,GyX,GyY,GyZ;
// WiFi network info.
const char *ssid =  "Galaxy-M20";     // Enter your WiFi Name
const char *pass =  "ac312124"; // Enter your WiFi Password
WiFiServer server(80);
void setup(){
 Serial.begin(115200);
 Wire.begin();
 Wire.beginTransmission(MPU_addr);
 Wire.write(0x6B);  // PWR_MGMT_1 register
 Wire.write(0);     // set to zero (wakes up the MPU-6050)
 Wire.endTransmission(true);
 Serial.println("Wrote to IMU");
  Serial.println("Connecting to ");
  Serial.println(ssid);
  WiFi.begin(ssid, pass);
  while (WiFi.status() != WL_CONNECTED)
  {
    delay(500);
    Serial.print(".");              // print ... till not connected
  }
  Serial.println("");
  Serial.println("WiFi connected");
  Serial.println("IP address is : ");
  Serial.println(WiFi.localIP());
  server.begin();
  Serial.println("Server started");
}
void loop(){
mpu_read();
WiFiClient client = server.available();
 if (client)
  {
    Serial.println("new client");
    String currentLine = "";                   //Storing the incoming data in the string
    while (client.connected())
    {
      if (client.available())                  //if there is some client data available
      {
        char c = client.read();                // read a byte
          if (c == '\n')                       // check for newline character,
          {
          if (currentLine.length() == 0)      //if line is blank it means its the end of the client HTTP request
          {
            client.print("<html><title> ESP32 WebServer</title></html>");
            client.print("<body bgcolor=\"#E6E6FA\"><h1 style=\"text-align: center; color: blue\"> ESP32 WebServer </h1>");
            client.print("<p style=\"text-align: left; color: red; font-size:150% \">Accelerometer Values: ");
            client.print("<p style=\"text-align: left; font-size:150% \">AcX: ");
            client.print(AcX);
            client.print("<br/>AcY: ");
            client.print(AcY);
            client.print("<br/>AcZ: ");
            client.print(AcZ);
            client.print("<p style=\"text-align: left; color: red; font-size:150% \">Gyroscope Values: ");
            client.print("<p style=\"text-align: left; font-size:150% \">GyX: ");
            client.print(GyX);
            client.print("<br/>GyY: ");
            client.print(GyY);
            client.print("<br/>GyZ: ");
            client.print(GyZ);
            client.print("</p></body>");
            break;  // break out of the while loop:
          }
           else
          {    // if you got a newline, then clear currentLine:
            currentLine = "";
          }
         }
         else if (c != '\r')
         {  // if you got anything else but a carriage return character,
          currentLine += c;       // add it to the end of the currentLine
         }
        }
      }
  }
}
void mpu_read(){
 Wire.beginTransmission(MPU_addr);
 Wire.write(0x3B);  // starting with register 0x3B (ACCEL_XOUT_H)
 Wire.endTransmission(false);
 Wire.requestFrom(MPU_addr,14,true);  // request a total of 14 registers
 AcX=Wire.read()<<8|Wire.read();  // 0x3B (ACCEL_XOUT_H) & 0x3C (ACCEL_XOUT_L)
 AcY=Wire.read()<<8|Wire.read();  // 0x3D (ACCEL_YOUT_H) & 0x3E (ACCEL_YOUT_L)
 AcZ=Wire.read()<<8|Wire.read();  // 0x3F (ACCEL_ZOUT_H) & 0x40 (ACCEL_ZOUT_L)
 //Tmp=Wire.read()<<8|Wire.read();  // 0x41 (TEMP_OUT_H) & 0x42 (TEMP_OUT_L)
 GyX=Wire.read()<<8|Wire.read();  // 0x43 (GYRO_XOUT_H) & 0x44 (GYRO_XOUT_L)
 GyY=Wire.read()<<8|Wire.read();  // 0x45 (GYRO_YOUT_H) & 0x46 (GYRO_YOUT_L)
 GyZ=Wire.read()<<8|Wire.read();  // 0x47 (GYRO_ZOUT_H) & 0x48 (GYRO_ZOUT_L)
 Serial.print("Accelerometer Values: \n");
 Serial.print("AcX: "); Serial.print(AcX); Serial.print("\nAcY: "); Serial.print(AcY); Serial.print("\nAcZ: "); Serial.print(AcZ);
 //Serial.print("\nTemperature: " );  Serial.print(Tmp);
 Serial.print("\nGyroscope Values: \n");
 Serial.print("GyX: "); Serial.print(GyX); Serial.print("\nGyY: "); Serial.print(GyY); Serial.print("\nGyZ: "); Serial.print(GyZ);
 Serial.print("\n");
 delay(3000);
}Comments
Hi , I had read the complete article and check my code so many times but there is no error or syntax problem but still I am getting -1 reading for my accelerometer and gyroscope all the axis and 0 for temperature , even I had tried to change the temperature , but it's still not working . And I am using ESP8266 nodemcu and with that I had used ESP8266WiFi.h library. I had also check my circuit connections .
And can you suggest me one more thing how to tightly attach nodemcu with breadboard like it is easily getting out ?
So can you suggest me what could be the problem ?
Thank you!

I was porting a project from the Mega 2650 to the ESP32 and the MPU stopped being functional. Unlike you, I have a endWireTransmission() module that calls Wire.endTransmission and looks at the results returned and reports any NACK or other errors. It kept telling me that I get a NACK when transmitting address and data requests. It took me a while to figure out why your routine works and mine failed. It has to do with bus timing.
I had always started Wire.begin() via:
#if I2CDEV_IMPLEMENTATION == I2C_ARDUINO_WIRE
Wire.begin();
Wire.setClock(400000);
#elif I2CDEV_IMPLEMENTATION == I2CDEV_BUILTIN_FASTWIRE
Fastwire::setup(400, true);
#endif
Apparently, Wire.setClock is setting the bus speed inappropiately. I suspect it's too low, given how fast the ESP32 is. I commented out the setClock call (in fact the whole macro), and all is well.
Just thought I'd pass that along. -ear