
If one is familiar with using firebase to fetch and update data to real-time databases, then it’s known that it’s an annoying problem that the data will be destroyed when the NodeMCU resets. So, here, let’s learn how to overcome the problem with the help of LittleFS. This problem persists in Arduino as well, but to solve this in Arduino, we use EEPROM. It is a non-volatile memory where data is written. Here, non-volatile means that the data won’t be lost as soon as the power supply is cut. Hence, data is written permanently and it won’t change unless the user decides to. This data can be erased and rewritten electrically hence the name “Electrically Erasable Programmable Read-only memory”. To understand EEPROM (or E2PROM), consider it as something similar to the hard drive on a computer or you can refer to our previous projects and articles on EEPROM.
But boards like NodeMCU have a flash memory that is more advanced than EEPROMs. In EEPROM, data is stored as bytes, and hence, storing large amounts of data will be complex and the number of reads and writes is limited. Whereas in flash memory, it is like a thumb drive (pen drive) which has far more reads and writes cycles than EEPROM. Along with this, by using a file system, we can create files, folders and users have the control to rename or delete whatever they create. Even though the file system is stored on the same flash chip as the program, when a new sketch is programmed, it does not modify file system contents. There are two file systems for utilizing the onboard flash on the ESP8266. One is SPIFFS and the other one is LittleFS. SPIFFS is currently deprecated and may be removed in future releases of the ESP core, so let’s learn about LittleFS. In this tutorial, we will clarify your understanding of LittleFS and how it works. In our previous articles, we have used ESP8266 and firebase to make many cool projects like IoT Based AC Fan Speed Control using Smart Phone with NodeMCU and Google Firebase and ESP8266 and Neopixel LED Strips Based RGB Night Lamp Controlled By Blynk App, you can check those out if you are interested in these kinds of projects.
Understanding how to save data to the flash memory of the NodeMCU (Write to LittleFS)
In this section, we will discuss the process of reading and writing the data in the little FS file system. It will give you a basic idea about how the total system works.
Writing Data to the Flash Memory of NodeMCU (Writing data to LittleFS):
Writing data to the LittleFS file system is very easy, to write the data in the LittleFS file system we have our very simple code, which we will discuss later. The code is written in such a way that it allows the user to type the data on the serial monitor so the data can be stored easily. After writing the desired data, we need to press ‘enter’ (Make sure that the Baud rate = 115200 and no line ending is selected). Whatever is typed is taken as the data and it is saved to LittleFS file system. The LittleFS file system is mounted on Flash memory of ESP8266. Other than writing the data to the LittleFS file system, it can also be used to reading and deleting data. To do that, the code is written in such a way that it takes input from the user and does the function that the user requests. When the user enters “D” the file is deleted. (NOTE: it is case sensitive. And any error like “DD” or “dD” instead of “D” will be considered as input data and this will overwrite the existing data). To read the data, we need to press “R” to read the file. (NOTE: it is case sensitive. And any error like “RR” or “rR” instead of “R” will be considered as input data and this will be overwritten on the existing data).
Reading Data from Flash Memory of NodeMCU (Read from LittleFS):
When an attempt is made to read the data without writing anything first, the LCD will put out an error message by saying “No saved data”. Reading data from the flash memory of the NodeMCU is not complex at all. The “readData()” function is used to read the data and “lcd.write(file.read());” function is used to print the data on the LCD display. We will discuss all the major functions in the code section of the article.
Delete Data from Flash Memory of NodeMCU (Delete from LittleFS):
To delete data from LittleFS, a simple function called “LittleFS.remove();” is used. This function deletes the contents of the file whose path should be given by the user. We will discuss that later in the article.
Components Required to Build the LittleFS Test Circuit with ESP8266
- 16x2 LCD Display
- I2C module (PC8574T - Remote 8-bit I/O expander for I2C-bus)
- Breadboard
- Jumper wires (Male to Female)
The 16X2 LCD Display Module:
First, let’s start with 16x2 LCD Display basics and display a simple message on the LCD. It stands for Liquid Crystal Display which is a cost-effective way of displaying text output of microcontrollers/development boards. A 16x2 LCD can display 16 characters on each line and has 2 such lines. In case there are more lines of information that need to be displayed, messages can scroll through the LCD screen. Now, when it comes to displaying information that is more than “ON or OFF” there’s a limitation with LEDs and Seven Segment Displays since they can display “ON or OFF” state and alphanumeric characters, respectively. This limitation can be circumvented easily by using LCD but they take up most of the pins of the microcontroller or the NodeMCU. To avoid this, we use an I2C module; by using an I2C module, interfacing LCD can be achieved by only 4 pins.

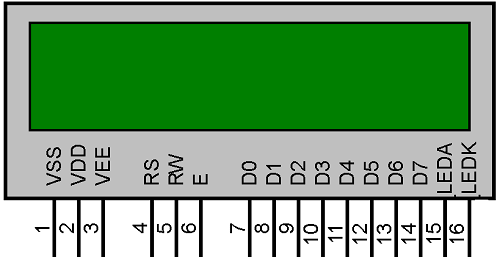
Interfacing the LCD with ESP8266. This is the basic project and using this we can read the data from LittleFS. As we can see in the Pinout diagram, we need to connect 8 data pins of LCD to NodeMCU, this will leave no pins of NodeMCU for other applications. Hence, we use the I2C module as shown in the figure below.
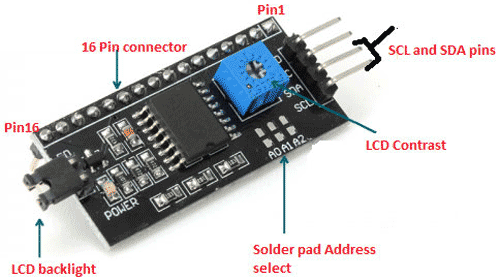
I2C LCD Driver module, which is attached to the back of the LCD is shown below in the photo. We have made a separate article on Interfacing 16X2 LCD with ESP32 using I2C, you can check that out if you want to know more about the topic.
LittleFS Test Circuit With ESP8288 and I2C LCD - Schematic Diagram
The complete schematic diagram for the ESP8266, I2C LCD and NodeMCU based LittleFS test Circuit is shown below.

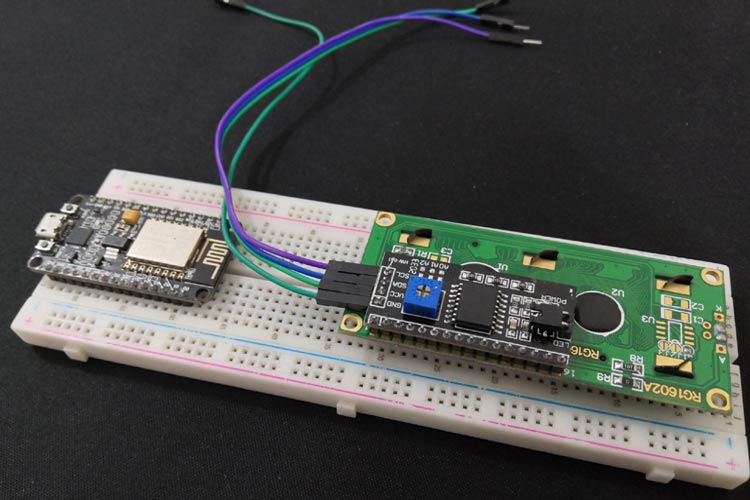
First, connect the I2C module to the LCD. Solder Female Header pins to the LCD and connects the I2C module in such a way that the four pins of the I2C (GND, VCC, SDA, SCL) point outwards. Now, to power the circuit, connect the GND pin of the I2Cmodule to the GND of ESP8266 and connect the VCC of the I2C module to the Vin pin of ESP8266. (These two pins supply the power to the LCD screen). Connect SDA of I2C module to D2 pin of ESP8266, and connect SCL of I2C module to D1 pin of ESP8266.
Arduino Code for Testing the LCD and Writing Data to LittleFS on ESP8266
The complete Arduino code to read and write data to the LittleFS database is shown below, but before we start our code, we need to include all the required libraries on the Arduino IDE. As we are using an I2C LCD and LittleFS, we need to download both the libraries and install them. The download links are given below.
Arduino-LiquidCrystal-I2C-library from GitHub
LittleFS library from GitHub
Now, as we have the downloaded files, we need to install the LiquidCrystal_I2C.h library and the LittleFS Library. For that, we need to go to Arduino IDE ---> Sketch ---> Include Library ---> Add. ZIP Library ---> and select this zip file and press open.
For simplicity, the code is divided into two portions the first portion of code is to check only the working of the I2C display and the second portion is where we implemented little FS,
Testing the 16X2 I2C LCD with Arduino:
We start our code by including all the required libraries. First, we include the LiquidCrystal_I2C.h library and then we need to include the Wire.h library as we are going to be using I2C
#include < LiquidCrystal_I2C.h >
#include <Wire.h>
Next, we declare all the required variables. As we are using a 16X2 display, we define the LCD height and width.
int lcdColumns = 16;
int lcdRows = 2;
The next line of the code configures the LCD with the above-defined configuration.
LiquidCrystal_I2C lcd(0x27, lcdColumns, lcdRows);
Next, we have our setup function in the setup function we initialize the LCD and we turn on the backlight of the LCD.
void setup()
{
    lcd.init();
    lcd.backlight();
}
In the void loop, “.setCursor” function is used to set the cursor to the required position. Since we want to display the message “Hello World!” in the first column, first row, we give the position “(0,0)”
void loop(){
    lcd.setCursor(0, 0);
    lcd.print("Hello World!");
    delay(1000);
lcd.print” function will print whatever the message is given. Here, let’s display “Hello World!”. delay(1000);” will create a delay of 1 second. This makes sure that the message displayed will stay long enough for us to see it properly.
lcd.clear();
This function will clear the display to print a new message.
lcd.setCursor(0,1);
Now, to create a little animation, let’s set the cursor to the first column, the second row. So after displaying the message on the first row for a second, it will shift to the second row.
    lcd.print("Hello World!");
    delay(1000);
After getting to the second row, print the same message to display and the delay will make sure that the message will stay for 1 second on the second row as well.
lcd.clear();
This will clear the screen so next time, it’s convenient to print messages. This is not required but it’s good practice to write a program this way.
This concludes the first portion of the code compile and upload the code, if everything is working fine, you will get a hello world message in the display. In the next portion, we implement LittleFS
Writing, Reading, and Deleting in LittleFs with 16x2 LCD display and ESP8266:
The circuit for using LittleFS to write, read and delete files from flash memory remains the same as the previous one to display “Hello World”
#include <LiquidCrystal_I2C.h>
#include <Wire.h>
#include "LittleFS.h"
The above libraries are required to work with LCD, I2C, and LittleFS.
int lcdColumns = 16;
int lcdRows = 2;
This is to set the LCD number of columns and rows. In our case, 16x2 which means 16 columns and 2 rows.
LiquidCrystal_I2C lcd(0x27, lcdColumns, lcdRows);
This function is used to set the LCD address, number of columns and rows.
void readData();
void writeData(String data);
void deleteData();
These are function prototypes. To read the data to the flash memory use the custom function “readData()”. Similarly, “writeData” and “deleteData” are custom functions to read, write and delete data from LittleFS respectively.
void setup() {
            Serial.begin(115200);
            lcd.init();
lcd.backlight();
Next, we have our setup function. In the setup function, we start the serial monitor and set the baud rate to 115200. The “lcd.init” function will initialise LCD and .backlight function will turn on the LCD backlight
lcd.setCursor(0, 0);
lcd.print("Little FS Demo");
            delay(1000);
Like before, this will set the cursor to the first column, first row and print the message “Little FS Demo” and wait for a second. The delay is used to stabilize the system
if(!LittleFS.begin()){
            Serial.println("An Error has occurred while mounting LittleFS");
This part of the program is used because in case Little Fs fails to start then an error message should be displayed to notify the user that Little FS failed to start.
            lcd.clear();
            lcd.print("Mounting Error");
            delay(1000);
            return;
}
readData();
}
If the LittleFS is mounted and initialized successfully, we use this snippet of code to read the saved data
void loop() {
    if(Serial.available())
    {
         String data = Serial.readString();
         Serial.println(data);
Next, we have our loop function. In the loop function, we declare an “if statement” which triggers when some data from the serial monitor window is received. Then the data is read and stored in a string of “data”, and to read the string we’ll use the “serial.readString function()”. The data which is printed in the display will be written to the flash of the nodeMCU. “Serial.available” function will take input from the user on the serial monitor and store it in the “data” string. Then it’ll check to see what command the user has entered.
         if(data == "D")
         {
            deleteData();
            Serial.println("File deleted!");
            return;
         }
If the user has entered “D” it will call “deleteData” function to delete the file and display the “File deleted!” message on the LCD.
         else if(data == "R")
         {
            readData();
            Return;
         }
Similarly, if the user has entered “R” it will call the function “readData” to read the file from flash memory.
         Serial.println("Writing Data...");
         writeData(data);
         Serial.println("done Writing Data!");
    }
}
void readData()
{
   File file = LittleFS.open("/SavedFile.txt", "r");
Create another function called “readData()”. Create a file object and pass in the path for the file and the letter ‘r’ to indicate that the file is being read. To read the data, first, the file must be accessed, that’s why this is used. This will open the LittleFS file and inside that saved text file.
   if(!file){
    Serial.println("No Saved Data!");
    lcd.clear();
    lcd.print("No Saved Data!");
    return;
   }
Now, we need to check if the file opens. If so, we check for the data from the file by using a “while loop” and “file.available()” because “file.read()” function outputs one character at a time. So, use the “serial.write” function to print one character at a time. The “if” condition will check if the file exists. If not, it’ll print a message saying “No Saved Data!” on the serial monitor and it’ll clear the LCD and display the same message.
lcd.clear();
lcd.print("Saved Data :");
lcd.setCursor(0,1);
while(file.available()){
lcd.write(file.read());
}
lcd.setCursor(0,0);
file.close();
}
If the file is found, then the “lcd.clear” function will clear the LCD and display the message “Saved Data:”. To indicate that it is about to read the data from flash memory and the second row, it'll start displaying the message. Hence the cursor is set to the first column, second-row position, and the file is read from flash memory and the same is written on the LCD screen. After displaying, it’ll reset the cursor position, and “file.close function” will close the file.
void writeData(String data)
{
  //Open the file
  File file = LittleFS.open("/SavedFile.txt", "w");
  //Write to the file
  file.print(data);
 delay(1);
  //Close the file
  file.close();
Inside “writeData” function we first create a file where you want to save the data. For that, use “File file = LittleFS.open()” inside this put the path where it should be saved. I will just say ”/SavedFile.txt.” If the file already exists, it will rewrite the data in the file or if it doesn’t exist, it will create a new file called SavedFile.txt. The second parameter for this function is ‘w’ which indicates that it is writing to a file. “writeFunction” function is called to write to the Flash memory using LittleFs. “LittleFs” is open to access the saved text file. Then “file.print” is used to write the data. Delay of one second is used to give time, which helps to save data properly, and “file.close” is used to close the file after writing.
  Serial.println("Write successful");
  lcd.clear();
  lcd.print("Data Saved :");
  // set cursor to first column, second row
  lcd.setCursor(0,1);
  // print the data on the LCD
  lcd.print(data);
  // reset cursor position
  lcd.setCursor(0,0);
}
On the serial monitor, “Write successful” message is displayed. LCD is then cleared to print “Data Save:” then the cursor is set to (0,1) position to print the written data on the LCD. Then the cursor position is set back to (0,0).
void deleteData()
{
   //Remove the file
   LittleFS.remove("/SavedFile.txt");
   lcd.clear();
   lcd.print("Data Deleted");
}
Create another custom function called “deleteData()” Here, use the snippet “LittleFS.remove("/SavedFile.txt");” where the “/SavedFile.txt” is the path of the file which has to be deleted. “deleteData” function is to remove the file. So, first, the saved text file is accessed and then deleted. Then a message “Data Deleted” is printed on the LCD.
Expected output of LittleFS: For the first time, since there is no data to be displayed, the LCD screen will display the message “No data Saved”
Once the data is entered through Serial Monitor, the data can be read by typing “R” or deleted by typing “D” in the Serial Monitor.
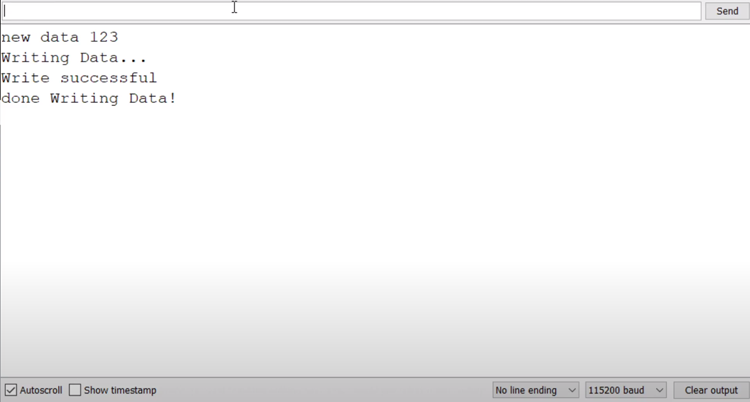
The above figure shows writing new data to the Little Fs from Serial Monitor. The new data that we have entered here is “new data 123” but you can use any data of your choice. It can be a combination of alphanumeric characters.
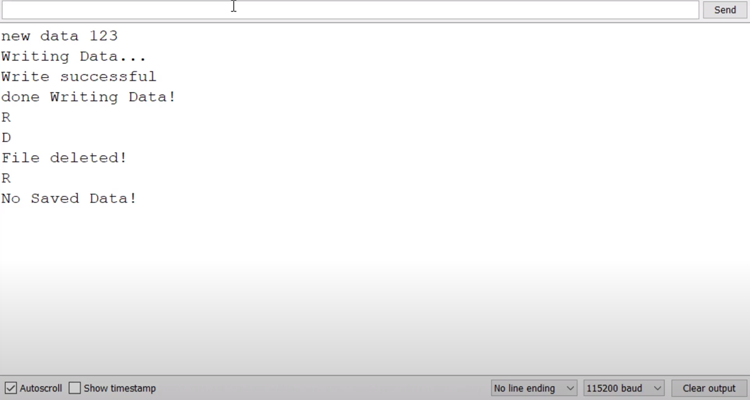
Similarly, we can Read and Delete data using “R” and “D”. In the figure above we have deleted the data using D and then when we try to read the data again, it says No saved Data.
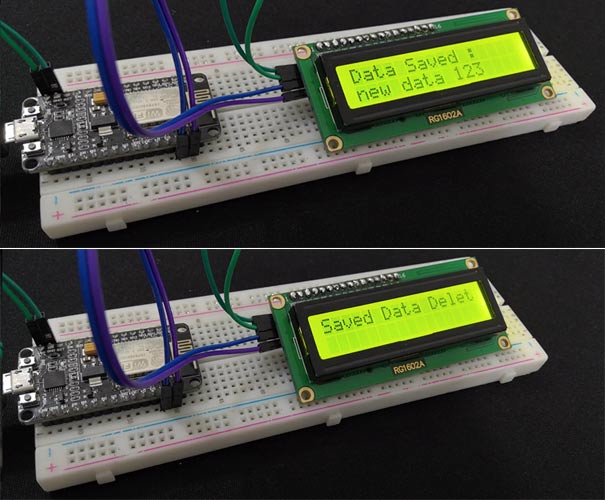
We have also interfaced an LCD to nodemcu to display the saved data, as you see in the above images, the LCD displays the status of the data stored in the flash memory of nodemcu.
When the NodeMCU is disconnected from power and reconnected, it will read from the flash memory of NodeMCU. Now, disconnect the NodeMCU from the PC and reconnect again. This should directly call the read function and display the data stored in the flash memory. As you can see, we can observe the “No saved data” message on the display.
Storing the input from Sensor to Little Fs
After being familiar with the basics of storing and retrieving the data from LittleFS, we can try to take input from sensor and try to save in Little Fs. Since this is the introduction to Little Fs, let’s take an overlook at saving data to Little Fs from Sensor. Appropriate circuit connection must be made (connect the sensor of your choice to the NodeMCU according to the requirements of the sensor).
Explanation for code to get input from sensor and store using Little Fs
The code is written in such a way that any basic sensor’s input can be stored (like DHT11 sensor or LDR). The code doesn’t change much from the previous one where we write, read and delete through Serial monitor. The code will take input from the sensor every 5 seconds and stores it through Little Fs. The data is read/displayed on LCD only when read command is given through the serial monitor.
#include <LiquidCrystal_I2C.h>
#include <Wire.h>
#include "LittleFS.h"
The previous libraries are necessary to interface LCD with NodeMCU along with the I2C module and Little Fs.
int lcdColumns = 16;
int lcdRows = 2;
These two lines set the LCD number of columns and rows.
int sensorReading;
Here, use appropriate data type like float/double/long/int/short depending on the type of sensor.
unsigned long lastSensorWriteTime = 0;
To track Little's access time by sensor this is used. This snippet basically keeps checking the input from the sensor.
LiquidCrystal_I2C lcd(0x27, lcdColumns, lcdRows);
This is to set LCD address, number of columns, and rows to display messages.
void readData();
void writeData(String data);
void deleteData();
These are function prototypes. These functions are used to read, write and delete data like in the previous code.
void setup() {
            Serial.begin(115200);
Start the serial monitor and set the baud rate to 115200.
  lcd.init();
  lcd.backlight();
  lcd.setCursor(0, 0);
  lcd.print("Little FS Demo");
  delay(1000);
The lcd.int function will initialize the LCD display. lcd.backlight function will turn on the backlight, and lcd.setCursor function will set it to the first column, first row.
  if(!LittleFS.begin()){
               Serial.println("An Error has occurred while mounting LittleFS");
    lcd.clear();
               lcd.print("Mounting Error");
               delay(1000);
              return;
  }
  readData();
}
Like in the previous code, if Little Fs fails to start, the same is notified to the user by printing messages on Serial Monitor and on the LCD display. If not, the data is read by calling readData function.
void loop() {
               readSensorValue();
    if(Serial.available())
    {
              String data = Serial.readString();
                Serial.println(data);
This takes input from the user on the serial monitor and stores it in a string.
                  if(data == "D")
                {
                    deleteData();
                   Serial.println("File deleted!");
                   return;
                   }
                   else if(data == "R")
  {
                      readData();
                      return;
                    }
“D” deletes the file and “R” reads the data
Serial.println("Writing Data...");
writeData(data);
`           Serial.println("done Writing Data!");
               }
This writes data and prints the same on serial monitor.
               if((millis() - lastSensorWriteTime) > 5000)
    {
                  writeData(String(sensorReading));
       lastSensorWriteTime = millis();
    }
}
This part of the code is to write the sensor data to Little Fs every five seconds. First, the condition whether 5 seconds have elapsed is checked. If the condition is true, the sensor reading is stored in a string and the SensorWriteTime is updated.
void readData()
{
             File file = LittleFS.open("/SavedFile.txt", "r");
             if(!file){
              Serial.println("No Saved Data!");
               lcd.clear();
    lcd.print("No Saved Data!");
               return;
   }
readData function, like in the previous code, will open the file and check if the file exists, and print “No Saved Data!” if there is no data saved.
                lcd.clear();
                lcd.print("Saved Data :");
                lcd.setCursor(0,1);
                while(file.available()){
                lcd.write(file.read());
                }
   lcd.setCursor(0,0);
   file.close();
   }
The cursor is set to the first column, second row. Saved data is fetched and displayed on the LCD and then the cursor position is reset. And the file is closed.
void writeData(String data)
{
  File file = LittleFS.open("/SavedFile.txt", "w");
  file.print(data);
  delay(1);
  file.close();
This void function is used to open the file, write the fetched data to Little Fs, cause delay for a second and close the file.
  Serial.println("Write successful");
  lcd.clear();
  lcd.print("Data Saved :");
  lcd.setCursor(0,1);
  lcd.print(data);
  lcd.setCursor(0,0);
}
Message to concur successful writing is displayed, the LCD screen is cleared, and the saved data is fetched and displayed, and then the cursor position is set to the beginning.
void deleteData()
{
              LittleFS.remove("/SavedFile.txt");
              lcd.clear();
              lcd.print("Data Deleted");
}
This snippet is to delete the data, the data is deleted using the .remove function and a message is displayed after clearing the LCD display.
void readSensorValue()
{
  /*
      Read your sensor value here!
  */
}
Based on the sensor used, put appropriate code here to read the sensor value and store it in the sensorReading variable.
This concludes our projects on LittleFS. If you have any questions regarding the project, do not hesitate to comment down below, or you can use our forum for a speedy response.
Complete Project Code
#include <LiquidCrystal_I2C.h>

#include <Wire.h>

#include "LittleFS.h"

// set the LCD number of columns and rows

int lcdColumns = 16;

int lcdRows = 2;

// set LCD address, number of columns and rows

LiquidCrystal_I2C lcd(0x27, lcdColumns, lcdRows);

//function prototypes

void readData();

void writeData(String data);

void deleteData();

void setup() {

  //Start the serial monitor

  Serial.begin(115200);

  // initialize LCD

  lcd.init();

  // turn on LCD backlight

  lcd.backlight();

   // set cursor to first column, first row

  lcd.setCursor(0, 0);

  lcd.print("Little FS Demo");

  delay(1000);

  //Start LittleFS

  if(!LittleFS.begin()){

    Serial.println("An Error has occurred while mounting LittleFS");

    //Print the error on display

    lcd.clear();

    lcd.print("Mounting Error");

    delay(1000);

    return;

  }

  //Read the saved data

  readData();

}

void loop() {

    //Take input from user on serial monitor

    if(Serial.available())

    {

         String data = Serial.readString();

         Serial.println(data);

         if(data == "D") // To delete the file

         {

            deleteData();

            Serial.println("File deleted!");

            return;

         }

         else if(data == "R") // To read the file

         {

            readData();

            return;

         }

         Serial.println("Writing Data...");

         writeData(data);

         Serial.println("done Writing Data!");

    }

}

void readData()

{

   //Open the file

   File file = LittleFS.open("/SavedFile.txt", "r");

  //Check if the file exists

   if(!file){

   //Read the file data and display it on LCD

    Serial.println("No Saved Data!");

    lcd.clear();

    lcd.print("No Saved Data!");

    return;

   }

      lcd.clear();

      lcd.print("Saved Data :");

      // set cursor to first column, second row

      lcd.setCursor(0,1);

      //Display on the LCD

      while(file.available()){

      lcd.write(file.read());

      }

      //reset cursor poisition

      lcd.setCursor(0,0);

   //Close the file

    file.close();

}

void writeData(String data)

{

  //Open the file

  File file = LittleFS.open("/SavedFile.txt", "w");

  //Write to the file

  file.print(data);

  //Close the file

  file.close();

  delay(1);

  Serial.println("Write successful");

  lcd.clear();

  lcd.print("Data Saved :");

  // set cursor to first column, second row

  lcd.setCursor(0,1);

  // print the data on the LCD

  lcd.print(data);

  // reset cursor position

  lcd.setCursor(0,0);

}

void deleteData()

{

   //Remove the file

   LittleFS.remove("/SavedFile.txt");

   lcd.clear();

   lcd.print("Data Deleted");

}

#include <LiquidCrystal_I2C.h>

#include <Wire.h>

  // set the LCD number of columns and rows

int lcdColumns = 16;

int lcdRows = 2;

// set LCD address, number of columns and rows

// if you don't know your display address, run an I2C scanner sketch

LiquidCrystal_I2C lcd(0x27, lcdColumns, lcdRows);

void setup()

{

    // initialize LCD

    lcd.init();

    // turn on LCD backlight

    lcd.backlight();

}

void loop(){

    // set cursor to first column, first row

    lcd.setCursor(0, 0);

    // print message

    lcd.print("Hello World!");

    delay(1000);

    // clears the display to print new message

    lcd.clear();

    // set cursor to first column, second row

    lcd.setCursor(0,1);

    lcd.print("Hello World!");

    delay(1000);

    lcd.clear();

}

Thanks for Wonderful Detailed tutorial.
Now once data is written to text file, is it possible to download the text file using browser and wifi ?
how ? Please elaborate