
IR (Infrared) communication is simple, low-cost, and widely used wireless communication technology. IR light is somewhat similar to the visible light, except that the wavelength is slightly longer. This property of IR makes it undetectable to the human eye and perfect for wireless communication.
There are lot of applications where you need to decode the IR signals to operate some devices with IR remote. So in this tutorial, we are going to use the TSOP1838 IR receiver to build an IR Remote Decoder using Arduino. The hex code for every button will be logged to Microsoft Excel Sheet. This simple IR Remote Control Decoder can be used in projects like IR Remote control Robot, Home automation, and other IR controlled projects.
Previously we used IR remote and TSOP receiver to build many useful applications like:
- IR Remote Controlled TRIAC Dimmer Circuit
- IR Remote Controlled Home Automation using Arduino
- IR Remote Controlled Home Automation using PIC Microcontroller
- Cell Phone Controlled AC using Arduino and Bluetooth
Components Required
- Arduino Uno / Arduino Nano
- IR Receiver (TSOP1838)
- Jumper Wires
- Breadboard
How does IR Communication Works?
Like other communications systems, Infrared communication also has a transmitter and receiver. The transmitter looks just like an LED, but it produces light in the IR spectrum instead of the visible spectrum. While IR receiver is a photodiode embedded with a pre-amplifier that changes the IR light into an electrical signal. For IR communication both transmitter and receiver should be pointed to each other. To learn more about the IR transmitter and receiver circuit, follow the link.
When a remote button is pressed, the IR LED (Transmitter) emits infrared light. This light is received by the Receiver that is typically a photodiode or phototransistor. But the IR light is also emitted by the sun, light bulbs, and anything else that produces heat. This can interfere the transmitter signal, so to prevent, the transmitter signal is modulated using a carrier frequency between 36 kHz to 46 kHz. Upon receiving the signal, the IR receiver demodulates the signal and converts it to binary before sending it to the microcontroller.
Here we are using a TV remote for sending IR signal and TSOP1838 with Arduino for receiving them.

Also, check various IR based applications here including TV Remote Control Jammer Circuit and IR tester circuit.
Circuit Diagram
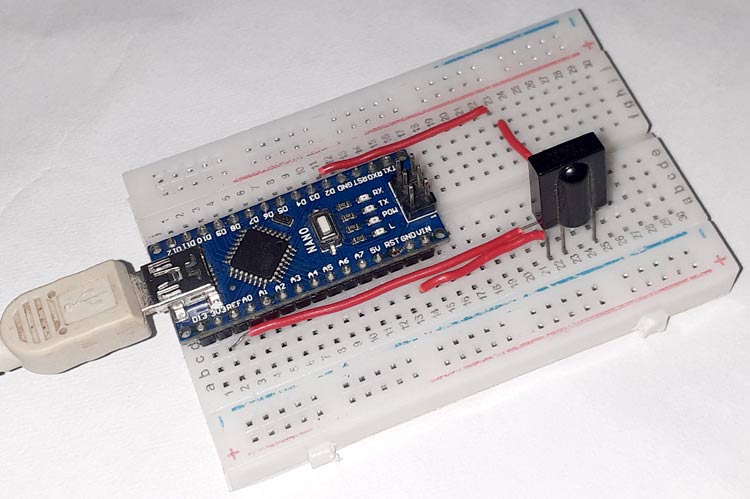
The Circuit diagram for IR Remote Decoder using Arduino is given below:

The connections are very simple as the IR Receiver sensor only has three pins, Vs, GND, and Data. Connect Vs and GND pin of IR Receiver to 3.3V GND pin of Arduino and Data pin to Digital pin 2 of Arduino.
Programming for Arduino IR Remote Decoder
The complete code for the Arduino IR Decoder is given at the end of the page.
For decoding the IR Remote, first, we need to download and add an IR library to Arduino IDE. You can download the IR Remote library from here. After downloading the file, open your Arduino IDE and Go to Sketch > Include library > Add.Zip library. Select the library file and click on ‘Open’.
Start your code by including the IR Remote library file.
#include <IRremote.h>
After that define the Arduino pin where you connected the Data pin of IR Receiver. In my case, it is connected to the D2 pin of Arduino.
int IRPIN = 2;
After that create an instance for IR Receiver pin.
IRrecv irrecv(IRPIN);
In the next line, define an object for the decode_results class, it will be used by the IR receiver to send the decoded information.
decode_results result;
Inside the setup() function, initiate the serial communication, and start the IR receiver by calling the IRrecv function enableIRIn().
void setup()
{
  Serial.begin(9600);
  Serial.println("Enabling IRin");
  irrecv.enableIRIn();
  Serial.println("Enabled IRin");
  Initialize_streamer();
}
In the loop() function, irrecv.decode constantly checks for new signal and if a new signal is received, the received signal code will be stored in a result.value function.
void loop()
{
  if (irrecv.decode(&result))
  {
    Serial.print("Value: ");
    Serial.println(result.value, HEX);
    Write_streamer();
    irrecv.resume();
  }
  delay(500);
}
For sending data to an Excel sheet from Arduino, we are using PLX-DAQ. Using Write_streamer() function, we are sending the data serially in a specific pattern just like displaying the value on serial monitor. The key lines are explained below:
void Write_streamer()
  {
    Serial.print("DATA"); //always write "DATA" to Indicate the following as Data
    Serial.print(","); //Move to next column using a ","
    Serial.print(result.value, HEX); //Store date on Excel
    Serial.print(","); //Move to next column using a ","
    Serial.println(); //End of Row move to next row
  }
Once the hardware and the program are ready, it is time to upload the program into your Arduino Nano Board. After uploading the code, point the remote towards the IR receiver and press the remote buttons. The hex code for every button will be printed on the serial monitor.
Saving the IR Remote Decoder Data into Excel Sheet
Now to send data to an Excel sheet, we are going to use PLX-DAQ. It is an Excel Plug-in software that helps you to write values from Arduino to directly into an Excel sheet on your Laptop or PC. Use the link to download the file. After downloading, extract the file and click on the .exe file to install it. It will create a folder named PLX-DAQ on your desktop.
Now open the ‘PLX-DAQ spreadsheet’ file from the desktop folder. If macros are disabled on your Excel, then you will see a security block as shown in the below image:
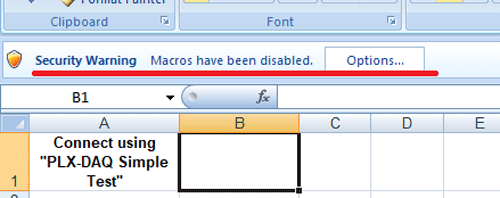
Click on Options->Enable the content -> Finish -> OK to Enable the Macros. After this, you will get the following screen:
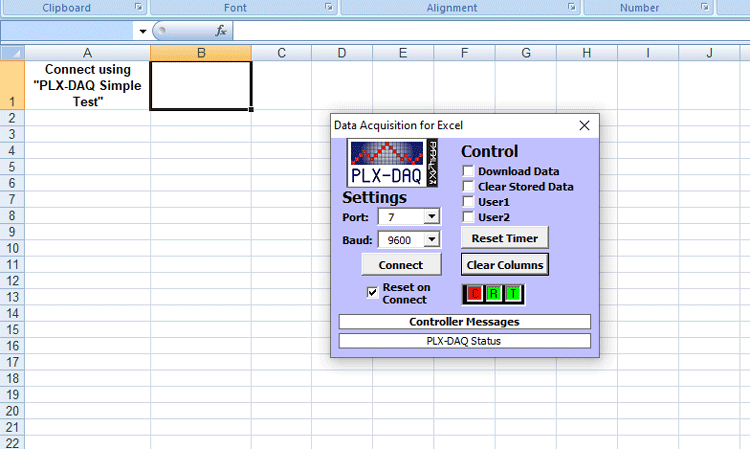
Now select the baud rate as “9600” and the port to which your Arduino is connected and then click on Connect to start the data streaming. Your values should start to get logged like shown in the picture below.
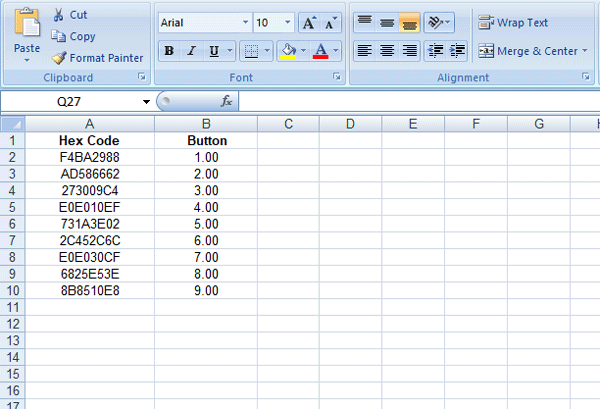
This is how an Arduino IR Remote Decoder can be built easily to convert the IR remote signals into equivalent HEX code.
Complete Arduino code with a demo video is given below.
Complete Project Code
#include <IRremote.h>
int IRPIN = 2;
IRrecv irrecv(IRPIN);
decode_results result;
int button = 0;
void setup()
{
  Serial.begin(9600);
  Serial.println("Enabling IRin");
  irrecv.enableIRIn();
  Serial.println("Enabled IRin");
  Initialize_streamer();
}
void loop()
{
  if (irrecv.decode(&result))
  {
    button = button+1;
    Serial.print("Value: ");
    Serial.println(result.value, HEX);
    Write_streamer();
    irrecv.resume();
  }
  delay(500);
}
void Initialize_streamer()
{
Serial.println("CLEARDATA"); //clears up any data left from previous projects
Serial.println("LABEL,Hex Code, Button"); //always write LABEL, to indicate it as first line
}
void Write_streamer()
  {
    Serial.print("DATA"); //always write "DATA" to Indicate the following as Data
    Serial.print(","); //Move to next column using a ","
    Serial.print(result.value, HEX); //Store date on Excel
    Serial.print(","); //Move to next column using a ","
    Serial.print(button); //Store date on Excel
    Serial.print(","); //Move to next column using a ","
    Serial.println(); //End of Row move to next row
  }
The IRremote.h library has been changed and this code no longer works. Adafruit has an IR library that works great.