

In our previous tutorial we learnt how to install python on our windows machine and how to interface Arduino with python using a simple LED control project. If you are new, I would strongly recommend you to fall back to the previous tutorial since this tutorial is a continuation of the same.
You might have already started to wonder why we would need python with Arduino if all that it could do is simply communicate over serial port. But, Python is very strong development platform on which a lot of cool applications in which machine learning, computer vision and much more can be integrated. In this tutorial we will learn How we can Create a Small Graphical Interface Using Python. To do this we will need a module called Vpython. The following tutorial is applicable only for windows user since for Mac or Linux user, the procedure is different.
At the end of this tutorial we will learn how we can create simple GUI using Python. We will make a small animation which responds to the value of Ultrasonic sensor that is attached to the Arduino. This application tracks the object using Ultrasonic sensor and displays it in Graphical form on computer using VPython. As we move the object, Ultrasonic sensor senses the distance and sends this information to Python program using Arduino and it will move the object in the computer too. Sounds interesting right! So let get started...
Pre-requisites:
- Arduino (Any version)
- Ultrasonic Sensor HC-SR04
- Connecting Wires
- Computer with Python
- Knowledge on previous tutorial
Installing VPython on your Computer:
In our previous tutorial we have already learnt how to install python on your machine and how to move around it and create a simple program with Arduino. Now we have install Visual Python (VPython) on top of this so that we can create cool Graphics using Python for Arduino. For the simple steps below to get started with VPython
Step 1. Make sure Python is already installed as per previous tutorial guidelines.
Step 2. Click on VPython to download the exe file for Visual Python. Do not opt to install a 64–bit version even if your machine runs on 64-bit. Just follow the link given.
Step 3. Launch the exe file and follow the setup. Do not change the default directory path and make sure you have selected “full installation”.
Step 4. Once installed, you should find a new application named “VIDLE(VPython)” on your desktop or application panel as shown below.
Note: VIDLE for VPython is different from IDLE for python
Step 5. Launch the application and you should get a window as shown below.
Step 6. This is the window where we will be typing in the program for VPython. But, for now let us check if Vpython is working by opening an example program. To do this select File->Open->Bounce
Step 7. You should get an example program opened. Try launching the program using Run -> Run Module. If everything is working as expected you should get the following screen.

You should see the Shell window (left) with two >>> indicating successful compilation and the actual window (front) which shows a ball bouncing.
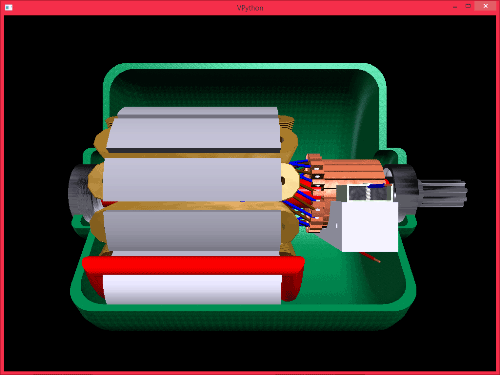
Step 8. You can also try other example programs to discover the power of VPython, for instance the example program called “electric-motor” will astonish you by the following screen.
Step 9. This means that your VPython is ready for use and you can fall down to the “Programming your Vpython” topic.
Step 10. Else if you are like one among the many who get a “numpy Error” don’t lose hope for we will be sorting out that issue in the further steps
Step 11. Open My computer -> C drive -> Python 27 -> Scripts -> local.bat. This will launch a command prompt as shown below
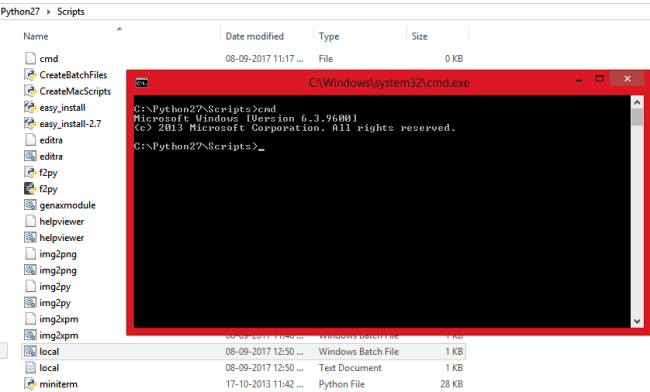
Step 12. Now type “pip install --upgrade numpy” and press enter. The new version of Numpy should get installed on your machine. You might have to wait for some time if your internet connection is slow.
Step 13. Once done you can fall back to step number 4 and try an example program and you should be able to get it working.
Programming VPython:
Next we start programming into our VPython window. In this program we will create two 3D rectangular objects one will be placed in the centre of the screen reference to the stationary Ultrasonic sensor and the other will be at a dynamic location based on the distance between the US sensor and the object (paper).
The complete Python code can be found at the end of this page. Further down, I have explained this python code by splitting them into small meaningful junks.
The first line would be to import the visual Library so that we can create 3D objects. The below line does the same.
from visual import *
You should be familiar with the next four lines, since we have used them already in our previous tutorial. They are used to import Serial and time library and also establish a serial connection with Arduino at COM18 with 9600 as baudrate
import serial #Serial imported for Serial communication
import time #Required to use delay functions

ArduinoSerial = serial.Serial('com18',9600) #Create Serial port object called arduinoSerialData
time.sleep(2) #wait for 2 secounds for the communication to get established
Now, it is time to create objects. I have created two 3d rectangles named as obj and wall. The wallL is a stationary wall in cyan colour placed at the centre of the screen and the obj is the movable object in white colour. I have also placed a text “US sensor” near the wall object.
obj = box(pos=(-5,0,0), size=(0.1,4,4), color=color.white)
wallL = box(pos=(-1,0,0), size=(0.2,12,12), color=color.cyan)
text(text='US sensor', axis=(0,1,0) , pos=(-2,-6,0), depth=-0.3, color=color.cyan)
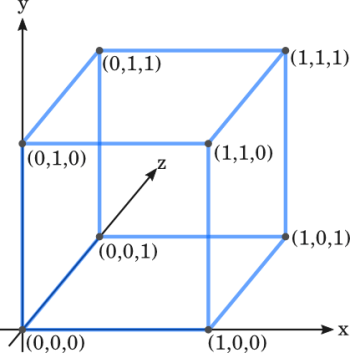
I am sure that the above three lines would have appeared as Greek and Latin for most of the first time readers, but with time you would be able to understand it. Everything that is mentioned inside brackets is (x,y,z) co-ordinates. And these co-ordinates are very similar to the ones that we find in our high school geometry class as shown below.
Now, the graphics and serial port is ready all that we have to do is read the data and place the “obj” (white rectangle) in a place according to the data coming from the Arduino. This can be done by the following lines, where obj.pos.x controls the X co-ordinate position of the object (White rectangle).
    t = int (ArduinoSerial.readline()) #read the serial data and print it as line
    t= t* 0.05
    obj.pos.x = t
Getting your Arduino Ready:
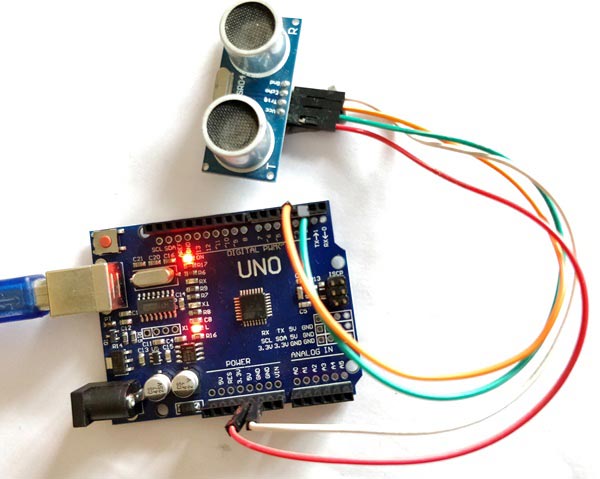
The Python script is ready to listen for values from COM port and animate the graphics accordingly, but our Arduino is not ready yet. First we have to connect the Ultrasonic sensor to the Arduino according to the following Circuit Diagram. If you are completely new to US sensor and Arduino, then you have to fall back to Arduino & Ultrasonic Sensor Based Distance Measurement tutorial.

Then upload the Arduino Program given at the end of this page. The program is self explained using comment lines. We know that ultrasonic sensor works by calculating the time taken for the pulse to hit an object and return back. This value is calculated by using the PulseIn function in Arduino. Later the time taken is converted into distance using the below line.
dist = (timetaken/2) / 2.91;
Here the distance is calculated in terms of millimetres (mm).
Working:
The working of the project is simple. Launch the Python program and place an object before the US sensor as shown below:
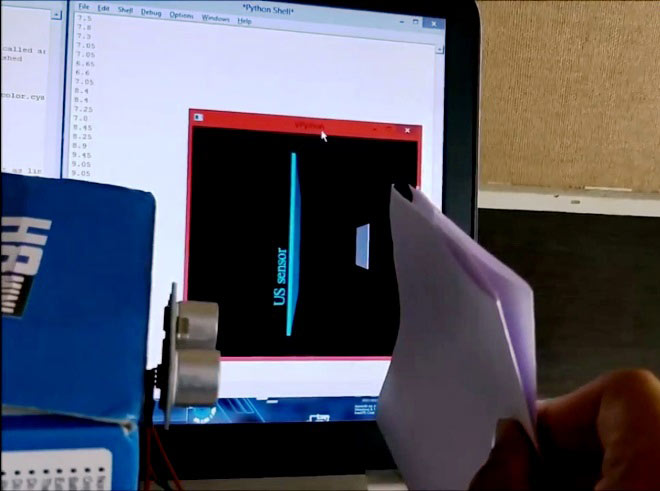
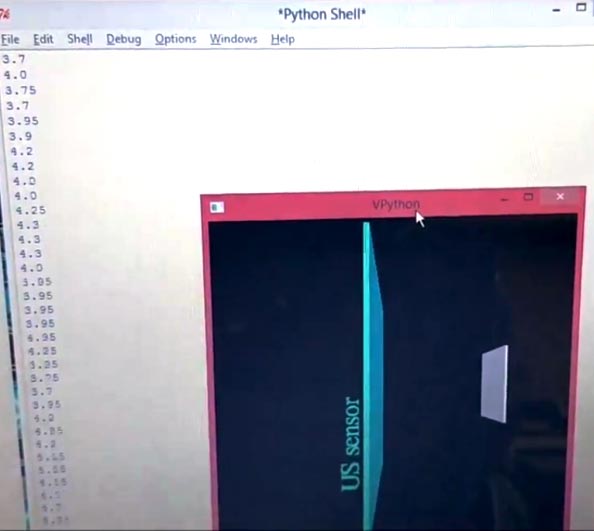
Now launch the python program and you should be able to notice the white rectangle move along with your paper, the distance between your paper and sensor will also be displayed in the shell window as show in the image below.
This is how we can track the motion of object using Ultrasonic sensor and Python with Arduino.
Hope you understood the project and enjoyed building one. This is just one subtle step towards python but you can build a lot more creative things using this. If you have any idea of what to build with this post them on the comment section and use the forums for technical help. See you with another interesting python project.
Complete Project Code
Python Code:
from visual import *

import serial #Serial imported for Serial communication

import time #Required to use delay functions
ArduinoSerial = serial.Serial('com18',9600) #Create Serial port object called arduinoSerialData

time.sleep(2) #wait for 2 secounds for the communication to get established
obj = box(pos=(-5,0,0), size=(0.1,4,4), color=color.white)

wallL = box(pos=(-1,0,0), size=(0.2,12,12), color=color.cyan)

text(text='US sensor', axis=(0,1,0) , pos=(-2,-6,0), depth=-0.3, color=color.cyan)
t = 0

while 1:

    rate(100)
    t = int (ArduinoSerial.readline()) #read the serial data and print it as line

    t= t* 0.05

    obj.pos.x = t

    print(t)

Arduino Code:
#define Trigger 2

#define Echo 3
int timetaken, dist;
int sendv;
void setup() {

  Serial.begin (9600);

  pinMode(Trigger, OUTPUT);

  pinMode(Echo, INPUT);

}
void loop() {

  timetaken=dist=0; //initialize the variable to zero before calculation
  //request the US to send a wave

  digitalWrite(Trigger, HIGH);

  digitalWrite(Trigger, LOW);


  timetaken = pulseIn(Echo, HIGH); //calculate the time taken for the wave to return

  dist = (timetaken/2) / 2.91; //formulae to calculate the distance using time taken


  if (dist <= 200 && dist > 0)//send the value to python only if it ranhes from 0-20 cm

   sendv = dist;
   Serial.println(sendv);


  delay(200);


}
