

Bluetooth is the simplest and most popular protocol for short range wireless communication in embedded systems. Bluetooth is not only used for transferring the data from one device to another but also used to control the devices wirelessly. Almost every electronic gadget has Bluetooth support now days so it is wise choice to have Bluetooth control option in your embedded application.
Here in this tutorial, we will learn how to use Bluetooth in MATLAB to communicate wirelessly. We will use computer’s in-built Bluetooth with MATLAB at one side and HC-05 with Arduino at other side. There are two ways to setup communication between MATLAB and Arduino via Bluetooth, one is using command window and other is using MATLAB GUI. The Arduino code for both the methods will remain the same. If you are new to MATLAB then it is recommended to get started with simple LED blink program with MATLAB and learn the basic terminology used in MATLAB. You can further explore more MATLAB Projects:
- Serial Communication between MATLAB and Arduino
- DC Motor Control Using MATLAB and Arduino
- Stepper Motor Control using MATLAB and Arduino
- Getting Started with Image Processing using MATLAB
Components Required
- MATLAB installed Laptop (Preference: R2016a or above versions)
- Arduino UNO
- Bluetooth Module (HC-05)
- LED (any color)
- Resistor (330 ohm)
- Jumper Wires
To learn more about HC-05 and its interfacing with Arduino, check the following articles.
- Bluetooth Controlled Servo Motor using Arduino
- Voice Controlled LEDs using Arduino and Bluetooth
- Cell Phone Controlled AC using Arduino and Bluetooth
Circuit Diagram
Schematics for Bluetooth communication between MATLAB and Arduino is given below:

Bluetooth Communication using MATLAB Command Window
This is the simple method to setup Bluetooth communication between Arduino and MATLAB. Here, the MATLAB uses the laptop’s bluetooth to connect HC-05 connected with Arduino. First we have to code the Arduino to read the serial incoming data coming from the MATLAB (using Laptop’s Bluetooth).
Then this Bluetooth transmitted data from MATLAB can be used to control anything connected to the Arduino. Here we have connected an LED to Arduino that can be controlled from the LAPTOP using MATLAB.
First, upload the given Arduino code in the Arduino UNO and then start coding in MATLAB Command Window.
#include <SoftwareSerial.h>
int TxD;
int RxD;
int data;
SoftwareSerial bluetooth(TxD, RxD);

void setup() {
  Serial.begin(9600);
  bluetooth.begin(9600);
}

void loop()
{
if(bluetooth.available() > 0)
{
data = bluetooth.read();
Serial.print(data);
Serial.print("\n");

if(data == '1')
{
digitalWrite(11, HIGH);
}


else if(data == '0')
{
digitalWrite(11, LOW);
}
}
}
Then, copy and paste the below MATLAB code in the Command window for Bluetooth communication between MATLAB and Arduino.
instrhwinfo('Bluetooth','HC-05');
bt = Bluetooth('HC-05', 1);
fopen(bt);

In the below code, command fprintf(bt,‘0’) is used to turn OFF the LED by sending ‘0’ to the Arduino. Now, if you want to turn ON the LED just send ‘1’ instead of ‘0’ using the below command.
fprintf(bt,'1');

To check the information about the available hardware, use below command
instrhwinfo('type','Name of device');
To open the bluetooth port, below command in used
fopen(bt);
Check the video below to understand the complete process of Sending Data from MATLAB to Arduino using Bluetooth.
Bluetooth Communication using MATLAB GUI
For demonstrating Bluetooth Communication using MATLAB GUI, we will create three graphical buttons in MATLAB to turn on, turn off and blink the LED connected to the Arduino. Data will be sent via bluetooth from MATLAB to HC-05 on clicking on those graphical buttons. Arduino contains the code to receive the Bluetooth transmitted data from MATLAB to HC-05 and controlling the LED according to data received. Arduino code will remain same as previous one, only difference is that, previously we were sending data ‘1’ and ‘0’ through command window of MATLAB, and now the same data will be sent on clicking on three graphical buttons.
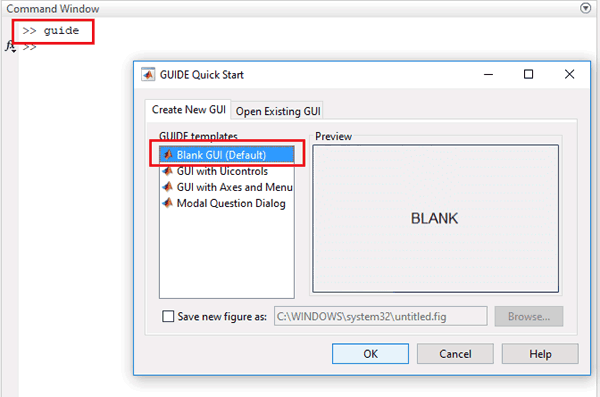
To launch the GUI, type the below command in the command window
guide
A popup window will open, then select new blank GUI as shown in below image,
Now choose three pushbuttons for turning ON, OFF and Blink the LED, as shown below,

To resize or to change the shape of the pushbuttons, just click on it and you will be able to drag the corners of the button. By double-clicking on pushbutton you can change the color, string and tag of that particular button. We have customized three pushbuttons as shown in below picture.


You can customize the buttons as per your choice. Now when you save this, a code will be generated in the Editor window of MATLAB. Edit this code according to the task you want to perform by your Arduino on receiving Bluetooth data using the MATLAB GUI. So below we have edited the MATLAB code. You can learn more about Command window, editor window etc in Getting started with MATLAB tutorial.
Complete MATLAB code, for controlling LED from MATLAB via Bluetooth, is given at the end of this project. Further we are including the GUI file (.fig) and code file(.m) here for download, using which you can customize the buttons as per your requirement. Below are some tweaks we did for controlling the LED connected with Arduino.
Copy and paste the below code on line no. 74 to setup or connect the MATLAB to the Laptop’s Bluetooth.
clear All;
global bt;
instrhwinfo('Bluetooth','HC-05');
bt = Bluetooth('HC-05', 1);
fopen(bt);

where, fopen(bt) is used to open the Bluetooth port for transmitting data.
Now, when you scroll down, you will see that there are three functions created for three pushbuttons in the GUI. Now write the code in the functions according to the task you want to perform on click.
In LED ON button’s function, copy and paste the below code just before the end of the function to turn ON the LED. In below code, fprintf(bt,‘1’) is used for sending ‘1’ from MATLAB to HC-05 using laptop’s Bluetooth. Arduino will receive this data ‘1’ through HC-05 and glow the LED by making its 11th pin HIGH.
global bt;
fprintf(bt,'1');

In LED OFF button’s function, copy and paste the below code just before the end of the function to turn OFF the LED. In below code, fprintf(bt,‘0’) is used for sending ‘0’ from MATLAB to HC-05 using laptop’s Bluetooth. Arduino will receive ‘0’ through HC-05 and turn off the LED by making its 11th pin LOW.
global bt;
fprintf(bt,'0');

In BLINK button’s function, use the below code to blink the LED. A for loop is used to blink the LED 10 times.
global bt;
for i = 1:10
    fprintf(bt,'1');
    pause(0.5);
    fprintf(bt,'0');
    pause(0.5);
end

After completing with MATLAB GUI coding and setup the hardware according to circuit diagram, just click on the run button to run the edited code in .m file.

MATLAB may take few seconds to respond, do not click on any GUI button until MATLAB shows BUSY indication, which you can see at the left bottom corner of the screen as shown below,

When everything is ready, click on LED-ON, LED OFF and BLINK button to turn ON, OFF and Blink the LED respectively. All the code files for this project can be downloaded from here or you can use the code given below.
Check the video below to understand the complete process of Sending Data from MATLAB to Arduino via Bluetooth using MATLAB GUI.
Complete Project Code
Arduino Code:
#include <SoftwareSerial.h>
int TxD;
int RxD;
int data;
SoftwareSerial bluetooth(TxD, RxD);
void setup() {
  Serial.begin(9600);
  bluetooth.begin(9600);

}
void loop()

{

if(bluetooth.available() > 0)

{

data = bluetooth.read();

if(data == '1')

digitalWrite(11, HIGH);

else if(data == '0')

digitalWrite(11, LOW);

}

}

Code for Bluetooth Communication using MATLAB Command Window
instrhwinfo('Bluetooth','HC-05');
bt = Bluetooth('HC-05', 1);
fopen(bt);
fprintf(bt,'1');
fprintf(bt,'0');

Code for Bluetooth Communication using MATLAB GUI
gui_Singleton = 1;
gui_State = struct('gui_Name',       mfilename, ...
                   'gui_Singleton',  gui_Singleton, ...
                   'gui_OpeningFcn', @bluetooth_with_MATLAB_OpeningFcn, ...
                   'gui_OutputFcn',  @bluetooth_with_MATLAB_OutputFcn, ...
                   'gui_LayoutFcn',  [] , ...
                   'gui_Callback',   []);
if nargin && ischar(varargin{1})
    gui_State.gui_Callback = str2func(varargin{1});
end

if nargout
    [varargout{1:nargout}] = gui_mainfcn(gui_State, varargin{:});
else
    gui_mainfcn(gui_State, varargin{:});
end

function bluetooth_with_MATLAB_OpeningFcn(hObject, eventdata, handles, varargin)
function varargout = bluetooth_with_MATLAB_OutputFcn(hObject, eventdata, handles)
varargout{1} = handles.output;
clear All;
global bt;
instrhwinfo('Bluetooth','HC-05');
bt = Bluetooth('HC-05', 1);
fopen(bt);

function led_on_Callback(hObject, eventdata, handles)

global bt;
fprintf(bt,'1');

function led_off_Callback(hObject, eventdata, handles)
global bt;
fprintf(bt,'0');

function blink_Callback(hObject, eventdata, handles)
global bt;
for i = 1:10
    fprintf(bt,'1');
    pause(0.5);
    fprintf(bt,'0');
    pause(0.5);
end

Communication from MATLAB on Laptop to Arrduino uno with HC05 bluetooth module was nicely presented.
I want to know how to do programming to capture sensor data in MATLAB from Arduino uno+HC-05 module? It is the reverse of above mentioned article.
Thanx