

Ever wondered if your everyday Arduino boards were just not enough for your tasks, and a Raspberry Pi (RPi) seemed to be overkill? Have you wished for something that was between the two, having more hardware resources and capabilities than your typical microcontroller, but being low power and efficient enough to last for days, unlike a micro-computer like RPi? Sony has a solution for these problems, and it comes in the form of Sony’s Spresense development kit, which according to me is by far one of the most lucrative, versatile, and easy-to-use development kits there is!
You can check out how to use Spresense Devkit:
What is Spresense Devkit and Ecosystem?
The Spresense devkit is a recent offering from the Sony Group, that is unlike its other products. It to my knowledge, is one of the very few embedded solutions developed by Sony, as a devkit for its CXD5602 microcontroller chip, which contains a whopping 6 (advertised, actually it has an extra M0 and M4 core along with these 6) Arm-Cortex-M4F core count and (would you believe it!) an inbuilt GPS! It also contains the CXD5247 coprocessor to handle audio and power management. These functions themselves make the devkit way more unique than any other microcontroller I can think of. Details of the chips can be found here. The Devkit priced at around 130$ on Adafruit is comprises of 3 components:
1. Sony Spresense Main Board
It is the Tiny board in an Arduino Nano equivalent form factor on the lower right corner of the image above. A closer view:
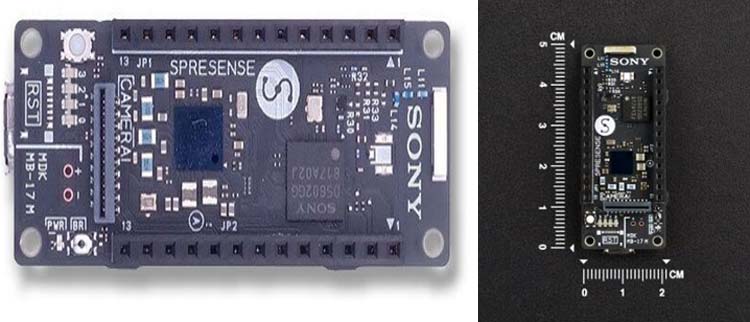
If you look closely, the CXD5602 chip is covered by a black shading seal, as Sony claims it might be affected by very strong light. It can go up to 156 MHz, 1.5MB RAM, and 8MB of Flash memory, all of which are huge for a microcontroller. The board is tiny, measuring just 50mm by 20.6mm, and contains an inbuilt GPS. The second chip CXD5247 is a coprocessor of sorts, handling audio and power management functions. It has a number of connectors too, one for the camera board and 2 breakout header strips on the top, and one for the connections with the Extension board. It has an integrated FTDI chip so you can directly upload the code using a micro USB cable. The board has a lot of pins available, even without the extension board –

The board itself works on 1.8V, making it extremely power efficient. There are a lot of features in this teeny-tiny board, but to make full use of its capabilities, you need -
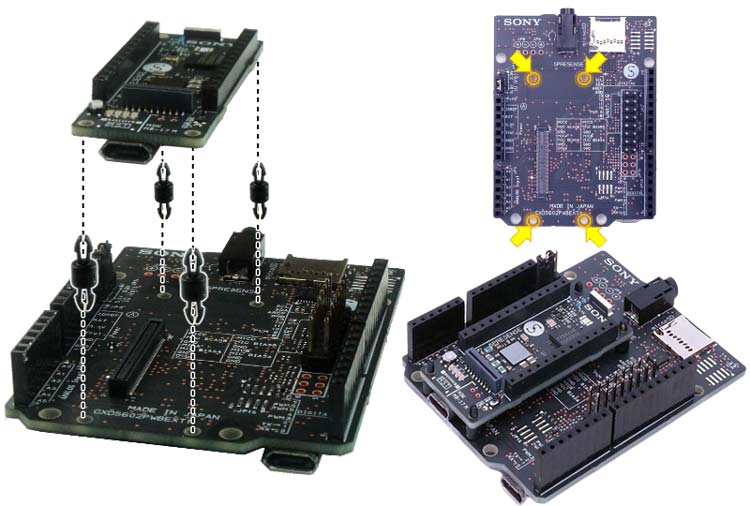
2. Sony Spresense Extension Board
It is a complementary board in Arduino Uno form factor that allows you to utilize the audio and SD card-related features of the main board. The kit comes with 4 standoffs/spacers to attach the main board correctly with the Extension Board:
It operates on 3v3 and 5V levels. A complete overview of the multiplexing of its pins is given below:

3. Sony Spresense Camera Board
It goes into the connector on the top of the mainboard.
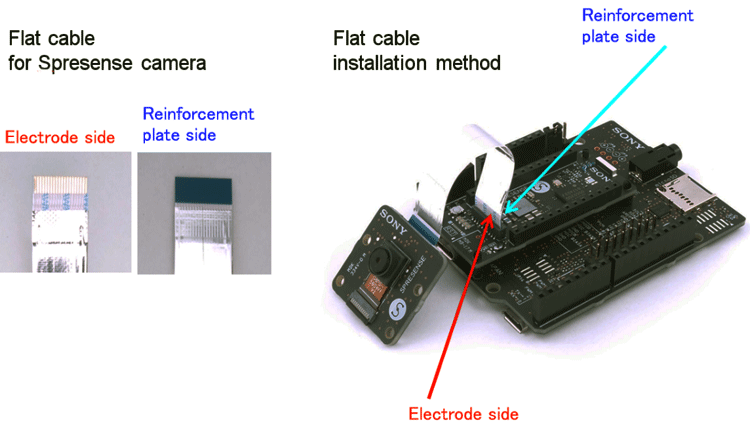
The camera board has a Sony (Obviously!) camera sensor with a 78 deg FOV and 5MP resolution. It can be inserted directly into the connector on the top of the main board as shown. This camera board is extremely useful for computer vision-based projects, especially since this board is officially supported by the Edge Impulse platform.
Detailed specs of all three components can be found here
As of February 2022, a fourth board is officially set to release separately from the devkit. It will enable LTE functionality for the Spresense main board and will contain a nano-SIM holder. It is currently available in EU and US versions as mentioned here
There also exist 3 add-on boards from 3rd part companies, which attach to the main board’s header pins to provide Wi-Fi, BLE, and sensor related functionalities.
What’s needed to try it out?
You will need at least the mainboard to start using the Spresense SDK on Arduino or other platforms. The official Extension board and add-ons allow other functionalities but you can choose to design your own carrier board with the functionalities you want. For any computer vision-related project, a camera board will also be needed.
As for the software side, Spresense is compatible with:
- Arduino, which will be a huge relief to a lot of beginners. It also means you will be able to test all basic functionalities of the board within a couple of mins, thanks to the vast number of reference examples available.
- VS Code or CMD using the official Sony Spresense SDK.
- CircuitPython also opens a lot of possibilities. All in all, it is an extremely solid and flexible software ecosystem.
For TinyML and computer vision models, you can use Edge Impulse or TensorflowLite.
How to start using Spresense?
Well, you can start by buying the kit from Adafruit or some local Indian website (this site seems to have it: https://www.mgsuperlabs.co.in/estore/. Once you have all the parts, you can assemble the parts and go through the official documentation here. Then, you can refer to its software ecosystem here and decide which platform/development approach you wish to pursue.
Arduino-based approach might be the best for beginners, while Circuitpython can be used by intermediate developers. The SDK can be used by seasoned developers who wish to create commercial products using the CXD chips. For Arduino, you can refer to this getting started guide which shows how to install the Spresense library and run examples. I have provided a demo video for the Camera example, to give you a basic idea.
Conclusion
The Spresense board is an excellent example of how a new devkit should be released –
- Its documentation covers each and every aspect of the devkit, and you don’t need to search the internet for every small thing.
- It has a lot of options and add-ons, allowing it all the functionalities you would expect on a board that claims to be a notch up than any generic microcontroller. You might argue that Teensy and other chips provide even better performance, but there are trade-offs in them, and the CDX chipset focuses on Audio and power management amongst other factors.
- An integrated GPS means much better performance and power saving. Thanks to this, I was able to easily receive a GPS lock in a minute, at my window.
- The audio quality on this board is insane, thanks to the 24bit, 192 KHz high resolution available. The ADC itself can output 10bits on Arduino and 16bits on the SDK according to this documentation here. According to the last slide on this presentation from Sony, “Xperia Ear Duo” is a commercial product that uses CXD5602, Spresense SDK, and NuttX.
- The camera board allows image classification apart from sensor-based TinyML, which is great.
However, there are a lot of limitations as well:
- The board’s pricing makes it a difficult choice over an RPi 4, except for low power or audio-based application. It has been priced at around 130-160$, and you can get it for below 13k INR in India. Meaning it is much more costly than an RPi, despite having less performance. So if the battery does not mean much to you, you are better off with an RPi.
- The Board does support computer Vision, but because of NuttX and overall limitations, it has a really bad performance even with image classification. I will be doing a separate project on that, which will show that even when you try to deploy models from Edge Impulse well within the RAM and flash constraints, the model still fails to run because of RAM issues.
- I would have preferred a better way of attaching the Main board to the extension board. Unless you absolutely lock the standoffs, there will be a lose connection, and when you do get a perfect connection, it seems permanent. To detach the board, you will most probably have to destroy the standoffs or something, which is a huge hassle and seems unnecessary. It also destroys the modularity of the kit. With the release of the LTE extension, this will become a bigger issue.
- I have always wished for USB cameras and peripherals support on a high-power microcontroller. This is because all of my good resolution plug-and-play thermal cameras are USB-based, meaning I cannot use them with this board. But this is more like an ease-of-use problem than a limitation, as you can always interface those camera sensors using SPI and I2C from scratch. You just won’t be able to interface them off the bat like with a RPi.
Frankly, it is an excellent developer board to have, especially if you want to switch from Arduino to commercial firmware development. I will soon be back with an edge impulse project on this board to show you guys its image classification capabilities. If you have any questions, please leave them in the comment section below or use our forum to start a discussion on this.
