
The primary objective is to develop a high-speed autonomous vehicle that utilizes a VL53L5CX multizone Lidar sensor to execute fluid, real-time swerving maneuvers instead of traditional "stop-and-turn" movements. By leveraging 8x8 spatial depth mapping, the system maintains continuous forward momentum while proactively navigating around obstacles via a timed S-curve algorithm.
Table of Contents
This project focuses on the development of an autonomous vehicular platform designed for high-speed navigation using advanced spatial perception. While traditional obstacle-avoidance robots rely on a "Stop-Detect-Turn" sequence, this platform implements a proactive "S-Curve Swerve" algorithm, allowing for fluid, continuous movement without losing forward momentum.
At its core, the system utilizes a Raspberry Pi 5 integrated with a VL53L5CX Multi-Zone Time-of-Flight (ToF) sensor. Unlike standard ultrasonic sensors, the VL53L5CX generates a real-time 8x8 depth map, providing 64 individual distance readings at 15Hz. This allows the car to perceive its environment as a spatial grid, identifying obstacles in its immediate path while simultaneously evaluating side clearance for a safe bypass.
The navigation logic is governed by a timed phased state machine. Upon detecting an object, the vehicle executes a two-part maneuver: an initial arc away from the obstruction (Phase 1), followed immediately by a counter-swerve to straighten its heading (Phase 2). This "lane-change" behavior mimics human driving and significantly increases efficiency in cluttered environments. Combined with emergency reverse protocols and "stuck recovery" logic, the project demonstrates a sophisticated, reactive approach to modern robotic navigation.
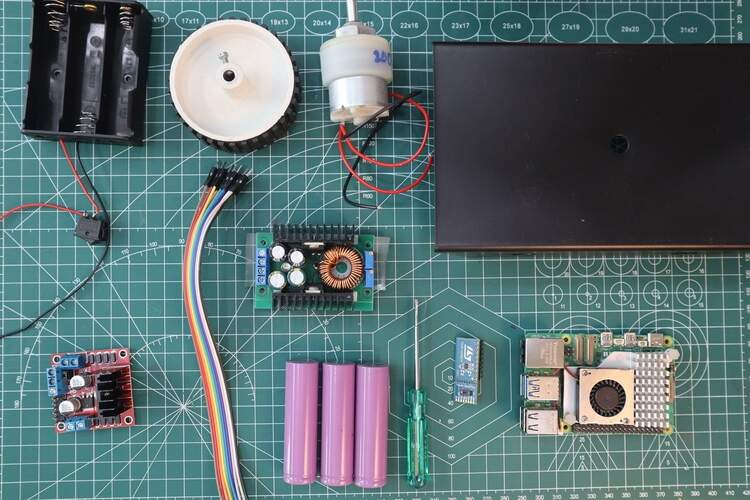
Components Used
- Raspberry Pi 5
- VL53L5CX-SATEL (8x8 Time-of-Flight Sensor)
- L298N Motor Driver
- 30W 10A DC-DC Buck Converter
- 12V Li-ion Battery Pack (3x 18650 cells)
- 200 RPM DC Motors (x4)
- DPDT Switch
- USB Type-C Cable (Modified for power)
- Jumper Wires (Connecting all modules)
Circuit Diagram with Explanation

This circuit is designed to handle the high-power demands of a Raspberry Pi 5 while maintaining precise control over your 4-motor drivetrain. It effectively separates the "High Power" (motors) from the "Logic Power" (Pi and sensor) to prevent interference and system crashes.
1. The Power Delivery Network (High vs. Low Voltage)
The system starts at the 12V Li-ion Battery Pack. Because different components need different voltages, the circuit splits here:
- The High-Voltage Rail (12V): The 12V goes directly to the L298N Motor Driver (12V input) and the Buck Converter. This provides the raw "muscle" needed to turn the 200 RPM motors.
- The Low-Voltage Rail (5V): The Buck Converter steps the 12V down to a stable 5V. With a 10A capacity, it provides the high current required by the Raspberry Pi 5. This 5V is delivered through the modified Type C cable.
- The DPDT Switch: This acts as the master "Kill Switch," cutting off the battery from both the motors and the converter simultaneously.
2. The Sensing Brain (I2C Communication)
The VL53L5CX-SATEL sensor is the "eyes" of the robot. It is connected to the Pi via the I2C protocol:
- Data Flow: The SDA and SCL lines allow the Pi to request depth maps from the sensor.
- Control (LPn): The specific red wire going to GPIO 23 is for the Low Power (LPn) pin. This allows your code to "wake up" or reset the sensor during initialization.
3. The Drive System (Motor Control)
The L298N Motor Driver acts as the bridge between the weak logic signals of the Pi and the heavy power requirements of the motors:
- Logic Signals: Six wires (rainbow colors in your diagram) connect the Pi's GPIOs to the L298N.
- Two pins (ENA/ENB) use PWM to control how fast the motors spin.
- Four pins (IN1-IN4) control the direction (Forward/Reverse).
Parallel Wiring: Notice that the two motors on the left are wired into the same terminal, and the two on the right are wired into another. This allows the car to use differential steering (turning like a tank) by varying the speed between the left and right sides.
4. Common Ground (The Most Important Part)
In your diagram, the black wires (Ground) from the battery, the buck converter, the Pi, and the motor driver all eventually link together. This Common Ground is essential; without it, the signals from the Pi wouldn't have a "return path," and the motor driver wouldn't understand the commands you're sending.
Working Principle: S-Curve Algorithm
The robot avoids obstacles using a two-phase motion strategy:
Phase 1 – Swerve Out
- Detect obstacle ahead
- Choose side with more space
- Slow inner wheels, maintain outer speed
- Robot curves around obstacle
Phase 2 – Swerve Back
- Reverse wheel speed logic
- Return to original path
This creates a smooth S-shaped trajectory without stopping.
Software Architecture
Key Modules
- Initialization
- GPIO setup
- Sensor configuration
- PWM setup
- Motor Control
- Forward, reverse, stop functions
- Speed control via PWM
- Decision Engine
- Processes depth data
- Determines movement
- Recovery System
- Detects stuck conditions
- Executes reverse + pivot
- Main Loop
- Reads sensor data
- Applies decision logic
- Controls motors
Sensor Zone Mapping
The 8×8 grid is divided into:
- Center Zone → Obstacle detection
- Left Zone → Left clearance
- Right Zone → Right clearance
- Ground Zone → Detect low obstacles
This allows the robot to understand where obstacles are, not just how far.
Decision Logic
Priority-based system:
- Emergency Mode
- Very close obstacle → Reverse + pivot
- Swerve Mode
- Medium distance → Execute S-curve
- Normal Mode
- No obstacle → Move forward
- Trap Detection
- No progress → Recovery action
System Code
Part 1: Setup
This section handles the environment configuration, hardware pin mapping, detection thresholds, and sensor initialization.
import os
import time
import numpy as np
import cv2
import lgpio
import signal
from vl53l5cx_ctypes import VL53L5CX
# ---------------- HARDWARE CONFIGURATION ----------------
LPN_PIN = 23
IN1, IN2, IN3, IN4 = 17, 27, 22, 24
ENA, ENB = 18, 19
# ---------------- NAVIGATION THRESHOLDS ----------------
THRESHOLD_CRITICAL = 120  # Distance to trigger emergency reverse
THRESHOLD_SWERVE   = 950  # Distance to initiate S-Curve swerve
THRESHOLD_GROUND   = 130  # Floor detection limit
MAX_DIST          = 2000
# ---------------- SPEED PROFILES ----------------
BASE_SPEED  = 85
SWERVE_LOW  = 25  # Speed of inner wheel during swerve
BACK_SPEED  = 70
# ---------------- INITIALIZATION ----------------
running = True
h = lgpio.gpiochip_open(0)
# Signal handler for safe exit
def signal_handler(sig, frame):
   global running
   print("\n[!] Ctrl+C Detected. Exiting...")
   running = False
signal.signal(signal.SIGINT, signal_handler)
# Claim GPIO pins
for pin in [IN1, IN2, IN3, IN4, ENA, ENB, LPN_PIN]:
   lgpio.gpio_claim_output(h, pin)
# Wake up and start the Lidar sensor
lgpio.gpio_write(h, LPN_PIN, 1)
time.sleep(0.1)
vl53 = VL53L5CX()
vl53.set_resolution(64)
vl53.set_ranging_frequency_hz(15)
vl53.start_ranging()
Part 2: Supporting Functions
These are the "muscle memory" commands of the robot. They define how the motors move and how the car recovers when it gets trapped.
# ---------------- MOTOR ACTUATION FUNCTIONS ----------------
def set_motors(l_speed, r_speed, d1, d2, d3, d4):
   """Core function to set PWM speed and direction for all motors."""
   l_speed = max(0, min(100, int(l_speed)))
   r_speed = max(0, min(100, int(r_speed)))

   lgpio.tx_pwm(h, ENA, 1000, l_speed)
   lgpio.tx_pwm(h, ENB, 1000, r_speed)
   lgpio.gpio_write(h, IN1, d1)
   lgpio.gpio_write(h, IN2, d2)
   lgpio.gpio_write(h, IN3, d3)
   lgpio.gpio_write(h, IN4, d4)
def drive_forward():
   set_motors(BASE_SPEED, BASE_SPEED, 1, 0, 1, 0)
def drive_back():
   set_motors(BACK_SPEED, BACK_SPEED, 0, 1, 0, 1)
def stop_car():
   set_motors(0, 0, 0, 0, 0, 0)
# ---------------- RECOVERY LOGIC ----------------
def pivot_recovery(left_clearance, right_clearance):
   """Stop, reverse, and turn away from the nearest obstacle."""
   stop_car()
   time.sleep(0.2)
   drive_back()
   time.sleep(0.5)
   if left_clearance > right_clearance:
       set_motors(80, 80, 0, 1, 1, 0) # Pivot Left
   else:
       set_motors(80, 80, 1, 0, 0, 1) # Pivot Right
   time.sleep(0.5)
   stop_car()
Part 3: Loop
This is the main "Autonomous Logic" section. It processes sensor data and runs the phased state machine to perform swerves.
# ---------------- LOGIC STATE VARIABLES ----------------
current_action = "INITIALIZING"
last_forward_time = time.time()
maneuver_phase = 0    # 0: Cruising, 1: Swerve Out, 2: Swerve Back
maneuver_end_time = 0
bypass_dir = ""
phase_duration = 0.5
try:
   while running:
       now = time.time()

       if vl53.data_ready():
           data = vl53.get_data()
           z = np.array(data.distance_mm).reshape((8, 8))
           z = np.rot90(z, k=1)
           z[z <= 0] = MAX_DIST
           # --- SENSOR REGION ANALYSIS ---
           min_center = np.min(z[0:5, 2:6])
           left_side_avg = np.mean(z[:, 0:3])
           right_side_avg = np.mean(z[:, 5:8])
           ground_near = np.min(z[6:8, 2:6])
           # --- DECISION TREE ---

           # 1. EMERGENCY STOP
           if ground_near < THRESHOLD_GROUND or min_center < THRESHOLD_CRITICAL:
               maneuver_phase = 0
               pivot_recovery(left_side_avg, right_side_avg)
               last_forward_time = now
               continue
           # 2. MANEUVER STATE MACHINE (S-CURVE)
           if maneuver_phase == 1:
               if now < maneuver_end_time:
                   if bypass_dir == "LEFT": set_motors(SWERVE_LOW, BASE_SPEED, 1, 0, 1, 0)
                   else: set_motors(BASE_SPEED, SWERVE_LOW, 1, 0, 1, 0)
                   continue
               else:
                   maneuver_phase = 2
                   maneuver_end_time = now + phase_duration

           if maneuver_phase == 2:
               if now < maneuver_end_time:
                   if bypass_dir == "LEFT": set_motors(BASE_SPEED, SWERVE_LOW, 1, 0, 1, 0)
                   else: set_motors(SWERVE_LOW, BASE_SPEED, 1, 0, 1, 0)
                   continue
               else:
                   maneuver_phase = 0
           # 3. DETECTION & TRIGGER
           if min_center < THRESHOLD_SWERVE and maneuver_phase == 0:
               bypass_dir = "LEFT" if left_side_avg > right_side_avg else "RIGHT"
               maneuver_phase = 1
               maneuver_end_time = now + phase_duration
               last_forward_time = now
           # 4. NORMAL DRIVE
           elif maneuver_phase == 0:
               drive_forward()
               last_forward_time = now
           # --- STUCK RECOVERY ---
           if (now - last_forward_time) > 4.0:
               pivot_recovery(left_side_avg, right_side_avg)
               last_forward_time = now
       time.sleep(0.01)
except Exception as e:
   print(f"\nERROR: {e}")
finally:
   # Cleanup hardware resources
   stop_car()
   vl53.stop_ranging()
   lgpio.gpiochip_close(h)
GitHub Repository


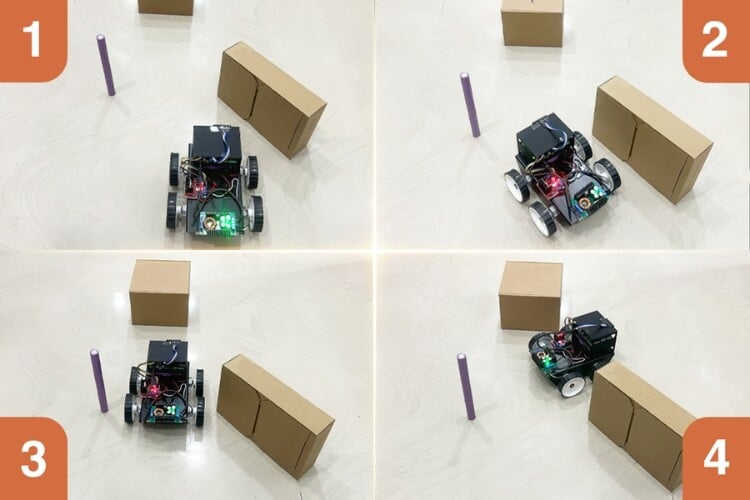
Working
Once placed in an environment with obstacles, it is able to smoothly glide through them like this:
Complete Project Code
"""
================================================================================
PROJECT: Autonomous High-Speed Swerving Vehicle
CORE LOGIC: Phased S-Curve Obstacle Avoidance
--------------------------------------------------------------------------------
CODE MAP:
[Lines 18 - 30]  I.   Setup & Configuration (GPIO Mapping & Logic Thresholds)
[Lines 32 - 50]  II.  Hardware Initialization (Lidar Sensor & Pin Claiming)
[Lines 52 - 76]  III. Motor Actuation Functions (Direct Hardware Control)
[Lines 78 - 98]  IV.  Recovery & Escape Logic (Emergency Pivot Maneuvers)
[Lines 100 - 173] V.   Main Control Loop (S-Curve State Machine & Perception)
[Lines 175 - 182] VI.  Teardown & Safety Cleanup
================================================================================
"""
import os
import time
import numpy as np
import lgpio
import signal
from vl53l5cx_ctypes import VL53L5CX
# Force X11 backend for OpenCV compatibility on Pi 5
os.environ["QT_QPA_PLATFORM"] = "xcb"
# ==============================================================================
# I. SETUP & CONFIGURATION
# ==============================================================================
LPN_PIN = 23               # Lidar Low-Power/Reset pin
IN1, IN2 = 17, 27          # Left Side Motor Direction
IN3, IN4 = 22, 24          # Right Side Motor Direction
ENA, ENB = 18, 19          # Motor Speed PWM Pins
# Navigation Logic Thresholds (measured in mm)
THRESHOLD_CRITICAL = 120   # Immediate panic stop/reverse distance
THRESHOLD_SWERVE   = 400   # Distance to trigger the S-Curve maneuver
THRESHOLD_GROUND   = 130   # Ground clutter/floor noise filter
MAX_DIST           = 1000  # Cap sensor readings to ignore distant objects
# Speed Duty Cycles (0 - 100)
BASE_SPEED  = 100          # Maximum cruising velocity
SWERVE_LOW  = 50           # Inner wheel speed during a swerving arc
BACK_SPEED  = 70           # Power for reversing maneuvers
# ==============================================================================
# II. HARDWARE INITIALIZATION
# ==============================================================================
running = True
h = lgpio.gpiochip_open(0) # Open GPIO chip 0 (standard for Pi 5)
def signal_handler(sig, frame):
   """Safely breaks the loop and stops motors on Ctrl+C."""
   global running
   running = False
signal.signal(signal.SIGINT, signal_handler)
# Claim GPIO pins for output
for pin in [IN1, IN2, IN3, IN4, ENA, ENB, LPN_PIN]:
   lgpio.gpio_claim_output(h, pin)
# Wake up and boot the VL53L5CX Lidar
lgpio.gpio_write(h, LPN_PIN, 1)
time.sleep(0.1)
vl53 = VL53L5CX()
vl53.set_resolution(64)          # Configure for 8x8 multizone matrix
vl53.set_ranging_frequency_hz(15) # Set sampling rate to 15 frames/sec
vl53.start_ranging()
# ==============================================================================
# III. MOTOR ACTUATION FUNCTIONS
# ==============================================================================
def set_motors(l_speed, r_speed, d1, d2, d3, d4):
   """Base function to translate logic into physical motor movement."""
   l_speed = max(0, min(100, int(l_speed)))
   r_speed = max(0, min(100, int(r_speed)))

   lgpio.tx_pwm(h, ENA, 1000, l_speed) # Frequency 1000Hz
   lgpio.tx_pwm(h, ENB, 1000, r_speed)
   lgpio.gpio_write(h, IN1, d1)
   lgpio.gpio_write(h, IN2, d2)
   lgpio.gpio_write(h, IN3, d3)
   lgpio.gpio_write(h, IN4, d4)
def drive_forward():
   set_motors(BASE_SPEED, BASE_SPEED, 1, 0, 1, 0)
def drive_back():
   set_motors(BACK_SPEED, BACK_SPEED, 0, 1, 0, 1)
def stop_car():
   set_motors(0, 0, 0, 0, 0, 0)
# ==============================================================================
# IV. RECOVERY & ESCAPE LOGIC
# ==============================================================================
def pivot_recovery(left_clr, right_clr):
   """Used when the car is trapped or an object is too close to swerve."""
   stop_car()
   time.sleep(0.2)
   drive_back() # Back up to gain clearance
   time.sleep(0.5)

   # Decide turn direction based on side-zone clearance
   if left_clr > right_clr:
       set_motors(80, 80, 0, 1, 1, 0) # Pivot Left
   else:
       set_motors(80, 80, 1, 0, 0, 1) # Pivot Right

   time.sleep(0.5)
   stop_car()
# ==============================================================================
# V. MAIN CONTROL LOOP
# ==============================================================================
current_action = "INITIALIZING"
last_forward_time = time.time()
# S-Curve State Variables
maneuver_phase = 0    # 0: Cruise, 1: Swerve Away, 2: Return to Heading
maneuver_end_time = 0
bypass_dir = ""
phase_duration = 1.7  # Duration of each half of the "S" maneuver
try:
   while running:
       now = time.time()

       if vl53.data_ready():
           data = vl53.get_data()
           # Reshape 1D sensor data into 8x8 matrix for spatial analysis
           z = np.array(data.distance_mm).reshape((8, 8))
           z[z <= 0] = MAX_DIST
           z = np.rot90(z, k=1)
           # Zone Analysis: Extract specific matrix regions
           min_center = np.min(z[0:5, 2:6])    # Obstacles directly in front
           left_side_avg = np.mean(z[:, 0:3])  # Average clearance on left
           right_side_avg = np.mean(z[:, 5:8]) # Average clearance on right
           ground_near = np.min(z[6:8, 2:6])   # Low obstacles/ground noise
           # 1. EMERGENCY STOP (Priority #1)
           if ground_near < THRESHOLD_GROUND or min_center < THRESHOLD_CRITICAL:
               current_action = "EMERGENCY RECOVERY"
               maneuver_phase = 0
               pivot_recovery(left_side_avg, right_side_avg)
               last_forward_time = now
               continue
           # 2. S-CURVE EXECUTION (Priority #2)
           if maneuver_phase == 1:
               # Phase 1: Arcing away toward the clear side
               if now < maneuver_end_time:
                   if bypass_dir == "LEFT": set_motors(SWERVE_LOW, BASE_SPEED, 1, 0, 1, 0)
                   else: set_motors(BASE_SPEED, SWERVE_LOW, 1, 0, 1, 0)
                   continue
               else:
                   # Timer expired, transition to Phase 2 (the return arc)
                   maneuver_phase = 2
                   maneuver_end_time = now + phase_duration
                   current_action = f"PHASE 2: RETURN {bypass_dir}"
           if maneuver_phase == 2:
               # Phase 2: Arcing back to original forward heading
               if now < maneuver_end_time:
                   if bypass_dir == "LEFT": set_motors(BASE_SPEED, SWERVE_LOW, 1, 0, 1, 0)
                   else: set_motors(SWERVE_LOW, BASE_SPEED, 1, 0, 1, 0)
                   continue
               else:
                   # Maneuver successfully completed
                   maneuver_phase = 0
                   current_action = "BYPASS COMPLETE"
           # 3. DETECTION & INITIATION (Priority #3)
           if min_center < THRESHOLD_SWERVE and maneuver_phase == 0:
               # Determine bypass direction based on side clearance
               bypass_dir = "LEFT" if left_side_avg > right_side_avg else "RIGHT"
               current_action = f"PHASE 1: SWERVE {bypass_dir}"
               maneuver_phase = 1
               maneuver_end_time = now + phase_duration
               last_forward_time = now
           # 4. NORMAL NAVIGATION (Priority #4)
           elif maneuver_phase == 0:
               current_action = "CRUISING"
               drive_forward()
               last_forward_time = now
           # 5. STUCK DETECTION
           if (now - last_forward_time) > 4.0:
               current_action = "TRAP ESCAPE"
               maneuver_phase = 0
               pivot_recovery(left_side_avg, right_side_avg)
               last_forward_time = now
           # Console Telemetry
           print("\033[H", end="") # Refresh terminal without scrolling
           print(f"--- ACTIVE MODE: {current_action} ---")
           print(f"Center Path: {int(min_center):4}mm | Phase: {maneuver_phase}")
       time.sleep(0.01)
except Exception as e:
   print(f"\nCRITICAL ERROR: {e}")
finally:
   # ==========================================================================
   # VI. TEARDOWN & SAFETY CLEANUP
   # ==========================================================================
   stop_car()
   vl53.stop_ranging()
   lgpio.gpiochip_close(h)
   print("\n[!] System Shutdown Cleanly.")
