

A Tilt Sensor switch is an electronic device that detects the orientation of an object and gives its output High or Low accordingly. Basically, it has a mercury ball inside it which moves and makes the circuit. So tilt sensor can turn on or off the circuit based on the orientation.
In this project, we are interfacing Mercury switch / Tilt sensor with Arduino UNO. We are controlling a LED and buzzer according to the output of the tilt sensor. Whenever we tilt the sensor the alarm will be turned on. You can also see the working of tilt sensor in this tilt sensor circuit.
Material Required
- Mercury Switch/ Tilt Sensor
- Arduino UNO
- Buzzer
- LED
- Resistor - 220 ohm
- Breadboard
- Connecting wires
Circuit Diagram

To connect a Tilt sensor with the Arduino, it requires 5v dc input to operate. That 5v is supplied using Arduino UNO and the output of Tilt sensor is taken at PIN 4 of the Arduino. LED is connected with the PIN 2 of the Arduino UNO with 220-ohm resistor to limit the current to a safe value. And, the buzzer is directly connected to the PIN 3 of the Arduino UNO.
Tilt Sensor

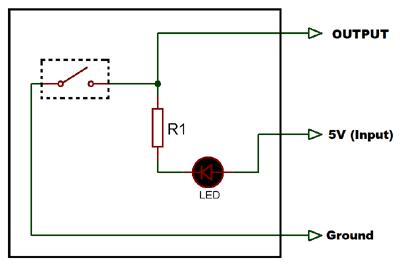
This is a Mercury switch based tilt sensor module that gives high at its output pin when tilted. It requires a 5V of DC input. It’s a three-terminal device consist of input, ground, and output. It has a glass tube consist of two electrode and liquid mercury ball. The liquid mercury ball closes and opens the circuit when inclined in a particular direction. The working and internal structure of the module is given below:
Internal Structure
Working of Tilt Sensor
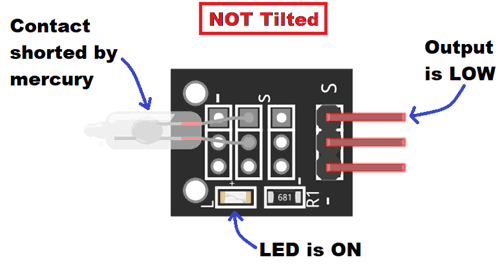
CASE 1: NOT TILTED
Initially, when it is in NOT tilted position as shown in the image below, it gives LOW output because of the liquid mercury complete the circuit by connecting the two electrodes. When the output is LOW on-board LED remain ON.
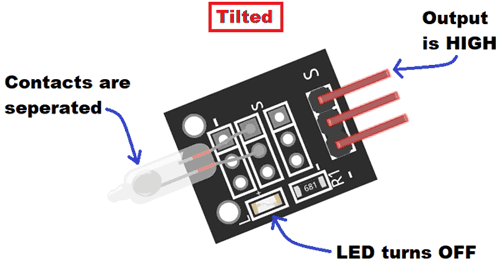
CASE 1: TILTED
When it is inclined in a particular direction or angle, the liquid mercury breaks the contact between the metal electrodes and the circuit gets open. Hence, we get HIGH output in this condition and the onboard LED turns off.
Code and Working Explanation
The complete Arduino code for Interfacing Tilt Sensor with Arduino is given at the end.
In the below code, we are defining the pins as Input and Output. Pin 2 and Pin 3 are set as output pins for LED and Buzzer respectively and Pin 4 is set as input to get input data from the Tilt sensor.
void setup() {
  pinMode(2, OUTPUT);
  pinMode(3, OUTPUT);
  pinMode(4, INPUT);
}
Now, whenever the Tilt sensor is inclined beyond a particular angle the Output of tilt sensor gets HIGH. This output is read through Pin 4. Therefore, whenever the Pin 4 is HIGH, it turns ON the LED and Buzzer.
void loop() {
  if (digitalRead(4) == 1)
  {
  digitalWrite(2, HIGH);
  digitalWrite(3, HIGH);
  delay(300);
  digitalWrite(2, LOW);
  digitalWrite(3, LOW);
  delay(300);
  }
}
This can be cool hobby projects like an antitheft box, alarm box or secret document box.

Complete Project Code
void setup() {

  pinMode(2, OUTPUT);

  pinMode(3, OUTPUT);

  pinMode(4, INPUT);
}
void loop() {

  if (digitalRead(4) == 1)

  {

  digitalWrite(2, HIGH);

  digitalWrite(3, HIGH);

  delay(300);

  digitalWrite(2, LOW);

  digitalWrite(3, LOW);

  delay(300);

  }
}

this project is great