
For one of our projects, we tried to Interface LM35 Temperature Sensor with Arduino but were unable to do so. Yes, what seemed like an easy task became a whole day's effort. We initially assumed the sensor was defective, but after testing about 15 sensors, we saw the same issue over and over again; all of these sensors came from the same lot of 85 sensors we had in the lab. We tried not only to test numerous sensors with Arduino but also to measure the sensor's output with a multimeter, however each sensor we tested gave weird results. After that, we were sure the problem was with the sensor. We tried a bunch of various things and looked through a lot of forum discussions, and discovered that we weren't the only ones who had this issue, and in the end, we weren't able to find a solution.
So today we are writing this article describing our failed attempts and observations in hopes of finding a solution to this problem once in for all.
Problem 1 - Output Voltage of the LM35 is Oscillating back to Zero
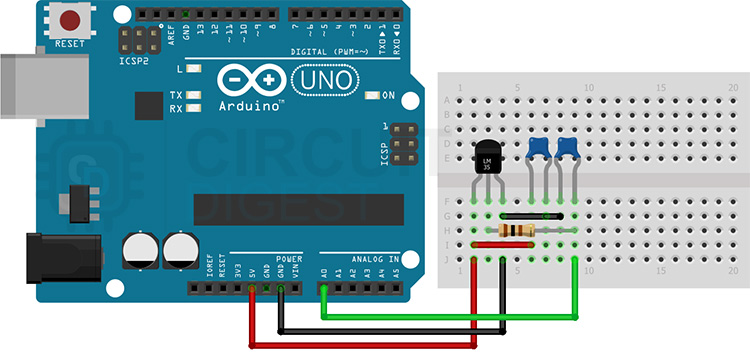
So, like any other project, we started off with an Arduino and an LM35 Temperature Sensor and we wired it up according to the schematic that is shown below.
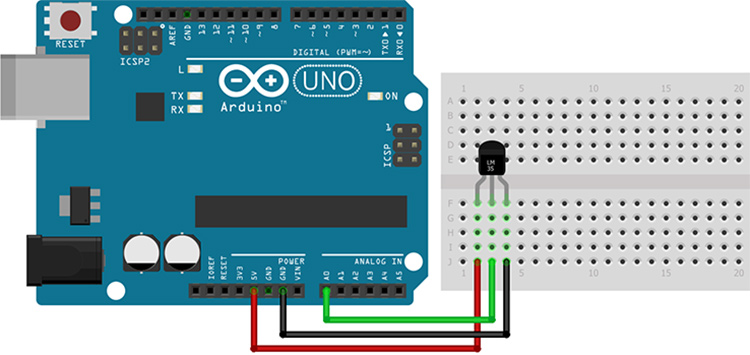
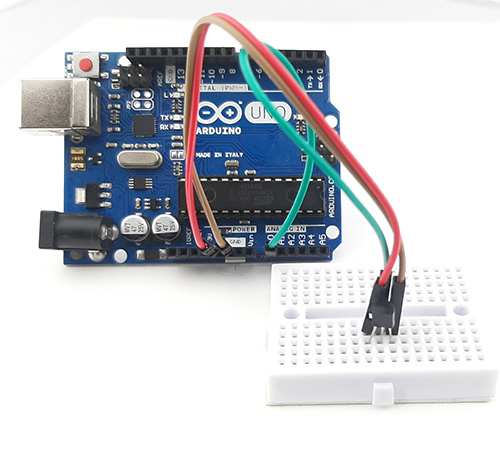
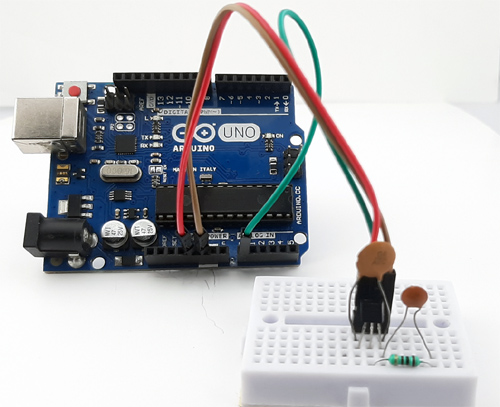
The above image is the schematic of LM35 with Arduino made with Fritzing and the actual Hardware Circuit looks something like what is shown below.
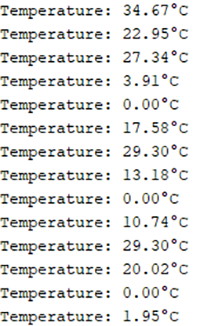
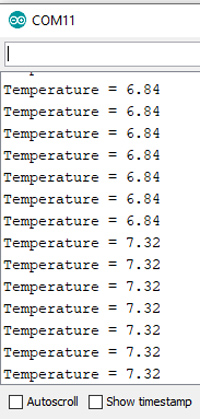
Once the hardware connections are done, we upload the basic sketch to the Arduino UNO (which we have discussed below) and observe the serial monitor window only to see the output is oscillating from 0*C to 35*C. This was the first unusual behavior that we have experienced.
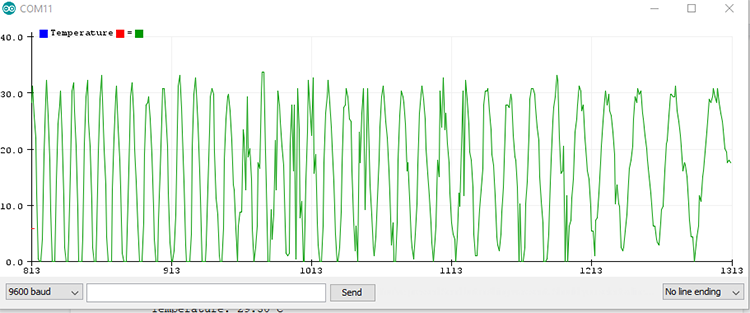
As the values were scrolling away rapidly in the serial monitor window, we decided to open the serial plotter window and we were shocked to observe the sine wave that is being outputted by the sensor.
As you can see in the above image, the screenshot of the serial plotter window where the LM35 sensor was connected with an Arduino. According to the schematic, the Arduino was powered with the 5V supply from the laptop.
Solution for LM35 Values Not Stable Problem
The output was very shocking to us so we did what every other engineer would do at this point in time, we started reading the datasheet. After reading the datasheet for a while, we found something interesting.
The datasheet of the LM35 Temperature sensor recommends an RC Damper Circuit and a Decoupling Capacitor. So, as you can see in the fritzing diagram above, we did exactly that.
The actual hardware image is shown above where we connected the RC Damper and the Decoupling capacitor according to the Schematic. For the Decoupling Capacitor, we have used a 104pF capacitor and for the RC Damper, we have used 100 Ohms with a 224 pF capacitor, once we did this, the output in the serial monitor window looked like something that is shown below.
As you can see it did not change anything since the output current coming out of the LM35 temperature sensor is very low and the output capacitor is charging very slowly, so we got a result like what is shown above.
Arduino Code used to Measure LM35 Temperature Sensor Data
Now as we have seen the problems regarding the sensor, let's look at the code that was used to measure the temperature data. To read the LM35 Temperature Sensor data, we have to use an analog pin of the Arduino because the output of the sensor is analog.
We start off by defining the analog pin for the Arduino.
#define sensorPin A0
Next, we have our setup function; in the setup function, we initialize the serial for debugging with 9600 baud.
void setup() {
  // Begin serial communication at 9600 baud rate
  Serial.begin(9600);
}
Next, we have our loop function; in the loop function, we read the raw data coming out of the sensor and store that into the variable raw_adc_data variable.
  // Get the raw Voltage Reading from LM35 Sensor
  int raw_adc_data = analogRead(sensorPin);
Next, we calculate the voltage from the read ADC data variable.
// Convert the ADC data to Voltage
  float voltage = raw_adc_data * (5.0 / 1024.0);
Next, we convert the voltage data to temperature data and print the output on the serial monitor window.
// Convert the ADC data to Voltage
  float voltage = raw_adc_data * (5.0 / 1024.0);
  // Print the temperature in Celsius
  Serial.print("Temperature = ");
  Serial.println(temC);
Finally, we add a little bit of delay to keep the values from flying away.
// wait half a second between readings
  delay(500);
That is all for the code portion of the article.
Testing LM35 Sensor Manually using a Multimeter
After all the failed attempts with the Arduino, we have tried a bunch of different ideas. In this section of the article, we will discuss those ideas.
For our first try, we have just connected 5V and GND to the sensor pins and connected the output of the sensor to the output of the UNI-T multimeter. We have also added a multimeter from HTC instruments to show the temperature.
As you can see we are getting a Negative Voltage out from the LM35 Sensor. This holds true for all 15 different LM35 temperature sensors we have tested.
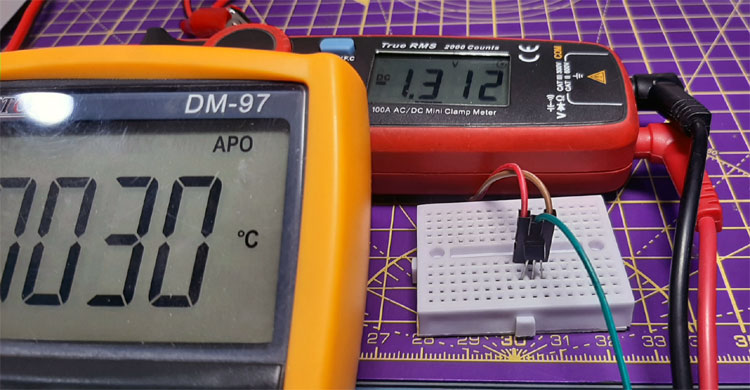
The next thing we did is add a bypass capacitor and an R-C Damper Circuit, according to the datasheet. We also tried to measure the output as shown in the above schematic.
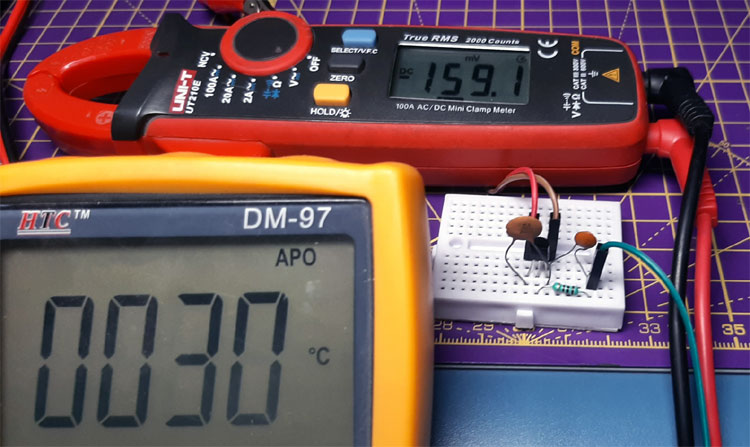
And as you can see from the above image, the output voltage from the sensor is -159.1mV but that is incorrect because the room temperature at the time of testing was 30°C. According to the datasheet, the output voltage from the sensor should be around 300mV.
LM35 Heating up Problems:
We have found extreme heating issues with the sensor, as the datasheet suggests that this sensor can run anywhere between 4V to 30V, and the current consumption should be less than 60uA during normal operation. But in our case, we have observed an extreme current draw of 220mA or even more; the image below shows you exactly that.
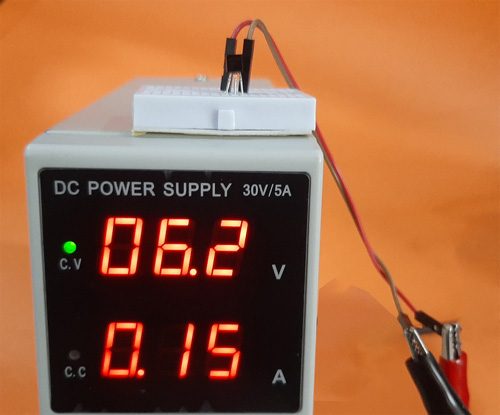
As you can probably imagine the sensor got extremely hot after that and it released the magic smoke.

Problem 2 - LM35 Output Voltage Decreases when Temperature Increases:
After the addition of a damper circuit and a decoupling capacitor, the output voltage of the LM35 Temperature Sensor got stable, so we decided to warm it up a little bit with our hot air station, but once again we were greeted with disappointment. The output voltage of the sensor started to decrease and the output value in the serial monitor window started to decrease. Along with all the above-mentioned problems, we have also encountered this issue.
So in the end, we were unable to solve the riddle of our mysterious LM35 sensor, and had to throw away all 85 of our sensors. We still don't know what the problem was: was it a manufacturing flaw or were those 85 sensors all counterfeit? What's left is a question for the rest of the community to answer. If anyone knows anything about this problem, do not hesitate to comment down below, and we will see you in our next project.
I just discovered all 10 of…
I just discovered all 10 of the LM35DZ sensors I purchased from an ebay vendor are also just plain NPN transistors and not temperature sensors as they should have been. These were purchased back in May of '23 and I'm just getting a chance to checking them out. When none of them gave the expected results with a 5V power supply and a multimeter, I placed them on a component tester and confirmed that they all are indeed just NPN transistors with LM35DZ labels. Unfortunately, this is still happening in 2023!

It is Fake LM35DZ. Its nothing more than a NPN transistor printed with the name of LM35DZ on it. You should report the supplier of these IC to texas instruments for misusing their brand name. Supplier of such fake components should be reported and reviewed to public so that other buyer may not waste their time and money on such fake components. There are many supplier of such fake components, who are selling these components online or offline to students, hobbyist and other buyers.