

While a lot of wireless technologies have been introduced in past decade, but Bluetooth is still the most popular tech for short range wireless communication. In embedded systems HC-05/06 is the most popular Bluetooth Module. We previously used this Bluetooth module in many projects to control home appliances, robots etc and interfaced it with other microcontroller:
- Interfacing Bluetooth HC-05 with STM32F103C8 Blue Pill: Controlling LED
- Bluetooth Module Interfacing with ESP8266: Controlling an LED
- Interfacing HC-05 Bluetooth module with AVR Microcontroller
- Voice Controlled LEDs using Arduino and Bluetooth
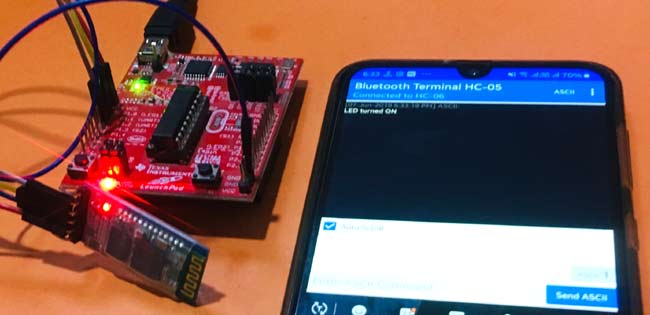
Today we will learn to interface Bluetooth module HC-05 with MSP430 Launchpad from Texas Instruments. In this interfacing example, we will control on-board LED of MSP430 from the smart phone by using an Bluetooth Terminal android application.
If you’re new to MSP430 then you can start with Getting Started with MSP430G2 using Energia IDE tutorial and can follow all the MSP430 Tutorials here.
Materials Required
- TI-MSP430 Launchpad
- HC-05 Bluetooth module
- Bluetooth Terminal App from Play Store
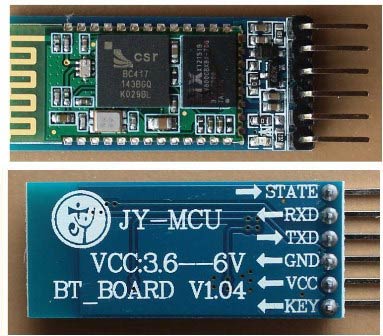
HC-05 Bluetooth Module
The HC-05 is an easy to use Bluetooth module. It uses serial communication protocol (USART) to communicate between devices. There are two operating modes for this module - first is Command mode and second is Operating mode. The command mode is used for configuring the device settings, like change password, baud rate etc. of module. Operating mode is used to send or receive data between devices.
In this tutorial we’ll be using default settings (default password is 0000 or 1234, device name is HC-05 and the default baud rate is 9600). Therefore, we will only work in operating mode.
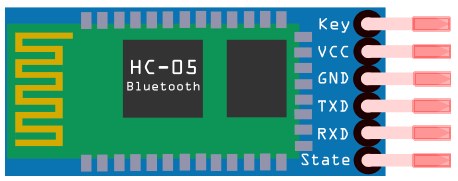
The operating voltage range is 4V to 6V (typically +5V) and operating current is 30 mA. The range of the module is 100 meters. There are total 6 pins on the HC-05 Bluetooth module, out of which EN and State pins are used in Command mode. The pin-out of HC-05 Bluetooth module is shown below:
Circuit Diagram
Circuit diagram to connect HC-05 Bluetooth Module with TI-MSP340 Board is shown below.

Here, we have done 4 connections from HC-05. The RxD and TxD pins of HC-05 are connected to P1.1 and P1.2 of MSP430 respectively for serial communication. And VCC and GND of HC-05 are connected to VCC and GND of MSP430.
Programming MSP430 Launchpad for Bluetooth Module HC-05
The programming for this Bluetooth Controlled LED using MSP430 is easy. MSP will be programmed using Energia IDE which is very similar to Arduino IDE so the Arduino acquainted people will not face any difficulty in understanding this. Complete code with a Demonstration Video is given at the end of the tutorial.
We start with defining a macro for the red LED we are using. This line is just for the sake of simplicity, so that we can use LED in place of RED_LED
#define LED RED_LED
Next is our setup() function, Serial.begin() function is used to set the baud rate for serial communication to 9600 because this is the default baud rate for HC-05. We’ve also used the pinMode() function to initialize the digital pin as output (which is LED in this case).
void setup() {
  Serial.begin(9600);
  pinMode(LED, OUTPUT);
}
In loop function, first we check if the data is available on serial port by Serial.available() function. Next define a variable data_recieved which is storing the value of Serial.read() function. This function is used to receive the data from bluetooth.
Next in if-else statement we are checking the data sent from the phone. If it is 1 then turn the LED on by using digitalWrite(LED, HIGH); and print message on the app that LED is turned on by using Serial.write() function. And if it is 2 then turn the LED off by using digitalWrite(LED, LOW); and print the message on the app that LED is OFF by using Serial.write() function.
void loop() {
    if (Serial.available())
    {
      char data_received;
      data_received = Serial.read();
      if (data_received == '1')
      {
        digitalWrite(LED, HIGH);
        Serial.write("LED turned ON");
      }
      else if (data_received == '2')
      {
        digitalWrite(LED, LOW);
        Serial.write("LED turned OFF");
      }
    }
}
Working of Bluetooth controlled LED using MSP430
Finally upload the code into MSP430 using Energia IDE, and download and install the Bluetooth Terminal app on your smart phone. The app will look like showing below:
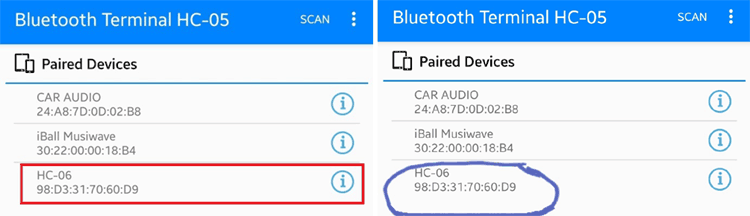
Now turn on the Bluetooth in your smart phone and connect with Bluetooth module by selecting HC-06 from the list of available devices. Use the password 0000 or 1234 to connect. After connection, a window will open titled with device name and connected written below it. This window will look like the figure below:
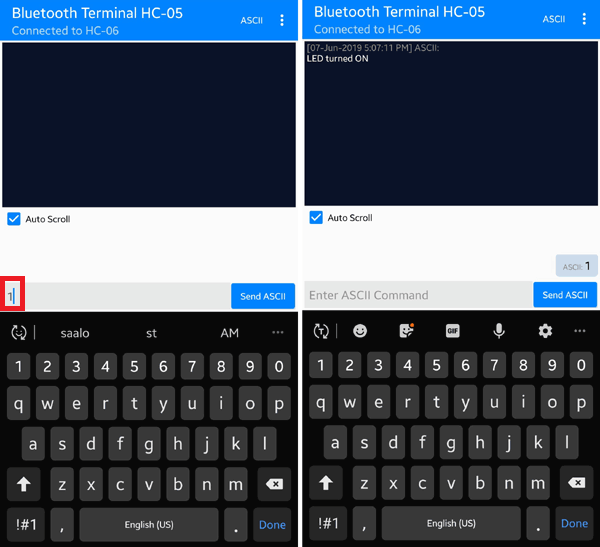
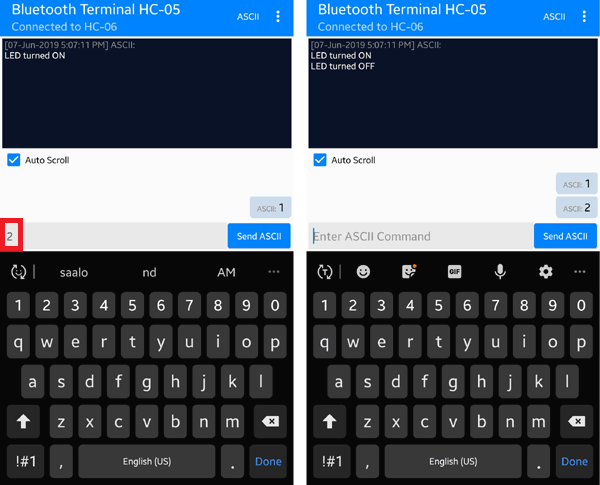
In this window, try sending 1 and 2 to MSP430 via Bluetooth module HC-05. Sending 1 will turn on the LED and the message will get printed on your phone that “LED turned ON” just like the figure below:
And sending 2 will turn off the LED and the message will get printed on your phone that “LED turned OFF” just like the figure below. And voila! You just controlled an LED through your phone using Bluetooth.
This is how an LED can be controlled wirelessly using bluetooth. It can be easily converted into a Home automation project by replacing the LED with a Relay and any home appliance.
Complete code with demonstration Video is given below.
Complete Project Code
#define LED RED_LED

void setup() {

  Serial.begin(9600);

  pinMode(2, OUTPUT);

}
void loop() {

    if (Serial.available())

    {

      char data_received;

      data_received = Serial.read();

      if (data_received == '1')

      {

        digitalWrite(LED, HIGH);

        Serial.write("LED turned ON\n");

      }

      if (data_received == '2')

      {

        digitalWrite(LED, LOW);

        Serial.write("LED turned OFF\n");

      }

    }

}
Comments
Also, can I send output from
Also, can I send output from the MSP and show it in the serial monitor on the smartphone App?

Hi, can you show how to use this using Code Composer Studio? Thanks!