

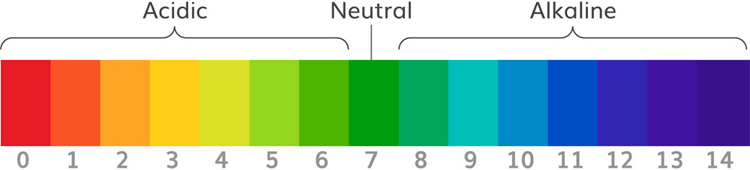
pH scale is used to measure the acidity and basicity of a liquid. It can have readings ranging from 1-14 where 1 shows the most acidic liquid and 14 shows the most basic liquid. 7 pH is for neutral substances that are neither acidic nor basic. Now, pH plays a very important role in our lives and it is used in various applications. For example, it can be used in a swimming pool to check the quality of water. Similarly, pH measurement is used in a wide variety of applications like agriculture, wastewater treatment, industries, environmental monitoring, etc.
If you have just started to work with Arduino do check out our Arduino Projects and Tutorials. We have a collection of almost 500+ Arduino projects with Code, Circuit Diagram, and detailed explanations completely free for everyone to build and learn on their own.
In this project, we are going to make an Arduino pH Meter and learn how to measure the pH of a liquid solution using a gravity pH sensor and Arduino. A 16x2 LCD is used to show the pH value on the screen. We will also learn how to calibrate the pH sensor to determine the accuracy of the sensor. So let’s get started!
Required Components
- Arduino Uno
- 16*2 Alphanumeric LCD
- I2C Module for LCD
- Gravity Analog pH sensor
- Connecting wires
- Breadboard
What is pH Value?
The unit that we use to measure the acidity of a substance is called pH. The term “H” is defined as the negative log of the hydrogen ion concentration. The range of pH can have values from 0 to 14. A pH value of 7 is neutral, as pure water has a pH value of exactly 7. Values lower than 7 are acidic and values greater than 7 are basic or alkaline.
How Does Gravity Analog pH Sensor Work?
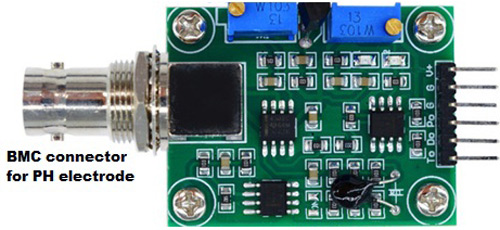
Analog pH sensor is designed to measure the pH value of a solution and show the acidity or alkalinity of the substance. It is commonly used in various applications such as agriculture, wastewater treatment, industries, environmental monitoring, etc. The module has an on-board voltage regulator chip which supports the wide voltage supply of 3.3-5.5V DC, which is compatible with 5V and 3.3V of any control board like Arduino. The output signal is being filtered by hardware low jitter.
Technical Features:
Signal Conversion Module:
- Supply Voltage: 3.3~5.5V
- BNC Probe Connector
- High Accuracy: ±0.1@25°C
- Detection Range: 0~14
PH electrode:
- Operating Temperature Range: 5~60°C
- Zero (Neutral) Point: 7±0.5
- Easy calibration
- Internal Resistance: <250MΩ

pH Signal Conversion Board:
Pin Description:
V+: 5V DC input
G: Ground pin
Po: pH analog output
Do: 3.3V DC output
To: Temperature output
pH Electrode Construction:
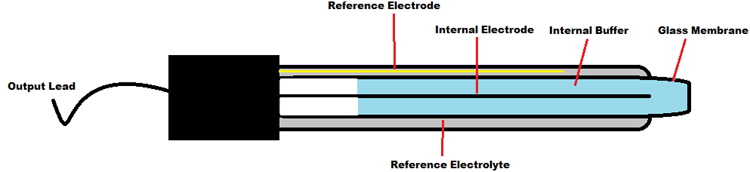
The construction of a pH sensor is shown above. The pH Sensor looks like a rod usually made of a glass material having a tip called “Glass membrane”. This membrane is filled with a buffer solution of known pH (typically pH = 7). This electrode design ensures an environment with the constant binding of H+ ions on the inside of the glass membrane. When the probe is dipped into the solution to be tested, hydrogen ions in the test solution start exchanging with other positively charged ions on the glass membrane, which creates an electrochemical potential across the membrane which is fed to the electronic amplifier module which measures the potential between both electrodes and converts it to pH units. The difference between these potentials determines the pH value based on the Nernst equation.
Nernst Equation:
The Nernst equation gives a relation between the cell potential of an electrochemical cell, temperature, reaction quotient and the standard cell potential. In non-standard conditions, the Nernst equation is used to calculate cell potentials in an electrochemical cell. The Nernst equation can also be used to calculate the total electromotive force (EMF) for a full electrochemical cell. This equation is used to calculate the PH value of a solution as well. The glass electrode response is governed by the Nernst Equation can be given as:
E = E0  - 2.3 (RT/nF) ln Q

Where
Q= Reaction coefficient
E = mV output from the electrode
E0 = Zero offset for the electrode
R = Ideal gas constant= 8.314 J/mol-K
T = Temperature in ºK
F = Faraday constant = 95,484.56 C/mol
N = Ionic Charge
Arduino pH Meter Circuit Diagram
Circuit diagram for this Arduino pH meter project is given below:

Connection of pH Signal Conversion Board with Arduino:
The connection between Arduino and PH signal conversion board is shown in the table below.
|
Arduino |
PH Sensor board |
|
5V |
V+ |
|
GND |
G |
|
A0 |
Po |

Programming Arduino for pH Meter
After successful hardware connections, now it’s time for programming the Arduino. The complete code for this pH meter with Arduino is given at the bottom part of this tutorial. The stepwise explanation of the project is given below.
The first thing to do in the program is to include all the required libraries. Here in my case, I have included “LiquidCrystal_I2C.h” library for using the I2C interface of an LCD display and “Wire.h” for using I2C functionality on Arduino.
#include <Wire.h>
#include <LiquidCrystal_I2C.h>
LiquidCrystal_I2C lcd(0x27, 16, 2);
Next, the calibration value is defined, which can be modified as required to get an accurate pH value of solutions. (This is explained later in the article)
float calibration_value = 21.34;
Inside setup (), LCD commands are written for displaying a welcome message on LCD.
  lcd.init();
  lcd.begin(16, 2);
  lcd.backlight();
  lcd.setCursor(0, 0);
  lcd.print("   Welcome to      ");
  lcd.setCursor(0, 1);
  lcd.print(" Circuit Digest    ");
  delay(2000);
  lcd.clear();
Inside loop(), read 10 sample analog values and store them in an array. This is required to smooth the output value.
for(int i=0;i<10;i++)
 {
 buffer_arr[i]=analogRead(A0);
 delay(30);
 }
Then, sort the Analog values received in ascending order. This is required because we need to calculate the running average of samples in the later stage.
 for(int i=0;i<9;i++)
 {
 for(int j=i+1;j<10;j++)
 {
 if(buffer_arr[i]>buffer_arr[j])
 {
 temp=buffer_arr[i];
 buffer_arr[i]=buffer_arr[j];
 buffer_arr[j]=temp;
 }
 }
 }
Finally, calculate the average of a 6 centre sample Analog values. Then this average value is converted into actual pH value and printed on an LCD display.
for(int i=2;i<8;i++)
 avgval+=buffer_arr[i];
 float volt=(float)avgval*5.0/1024/6;
 float ph_act = -5.70 * volt + calibration_value;
 lcd.setCursor(0, 0);
 lcd.print("pH Val:");
 lcd.setCursor(8, 0);
 lcd.print(ph_act);
 delay(1000);
}

Calibration of pH Electrode
Calibration of the PH electrode is very important in this project. For this, we need to have a solution whose value is known to us. This can be taken as the reference solution for the calibration of the sensor.
Suppose, we have a solution whose PH value is 7 (distilled water). Now when the electrode is dipped in the reference solution and the PH value displayed on LCD is 6.5. Then to calibrate it, just add 7-6.5=0.5 in the calibration variable “calibration_value” in the code. i.e. make the value 21.34 + 0.5=21.84. After making these changes, again upload the code to Arduino and recheck the pH by dipping electrode in the reference solution. Now LCD should show the correct pH value i.e. 7 (Little variations are considerable). Similarly, adjust this variable to calibrate the sensor. Then check for all other solutions to get the exact output.
Testing Arduino pH Tester
We have tried this Arduino pH meter by dipping it into pure water and Lemon water, you can see the result below.
Pure Water:

Lemon Water:

This is how we can build a pH sensor using Arduino and can use it to check the pH level of various liquids.
Complete code and demonstration Video are given below.
Complete Project Code
#include <Wire.h>
#include <LiquidCrystal_I2C.h>
LiquidCrystal_I2C lcd(0x27, 16, 2);
float calibration_value = 21.34;
int phval = 0;
unsigned long int avgval;
int buffer_arr[10],temp;
void setup()
{
 Serial.begin(9600);
  lcd.init();
  lcd.begin(16, 2);
  lcd.backlight();
  lcd.setCursor(0, 0);
  lcd.print("   Welcome to      ");
  lcd.setCursor(0, 1);
  lcd.print(" Circuit Digest    ");
  delay(2000);
  lcd.clear();
}
void loop() {
 for(int i=0;i<10;i++)
 {
 buffer_arr[i]=analogRead(A0);
 delay(30);
 }
 for(int i=0;i<9;i++)
 {
 for(int j=i+1;j<10;j++)
 {
 if(buffer_arr[i]>buffer_arr[j])
 {
 temp=buffer_arr[i];
 buffer_arr[i]=buffer_arr[j];
 buffer_arr[j]=temp;
 }
 }
 }
 avgval=0;
 for(int i=2;i<8;i++)
 avgval+=buffer_arr[i];
 float volt=(float)avgval*5.0/1024/6;
 float ph_act = -5.70 * volt + calibration_value;
 lcd.setCursor(0, 0);
 lcd.print("pH Val:");
 lcd.setCursor(8, 0);
 lcd.print(ph_act);
 delay(1000);
}Comments
Thank you!!!
Thank you!!!
We are glad that this tutorial was helpful

great video,
thanks for sharing your knowledge.
god bless
FC