
Microcontrollers have small internal memory which is not enough to save sensors generated data for long time, either you have to use some external memory device or can save the data on some cloud using internet. Also, sometime it becomes difficult to manage when the sensor is deployed in some extreme condition site where human cannot reach or it is difficult to visit there frequently. To rectify this kind of problems we always look into the ways where we want to monitor the sensor data in real time from anywhere without any physical presence at that place.
The real time databases can be used in this scenario where we just have to interface some controller which can be connected to internet and can be able to exchange data with cloud server. The server data can be useful in monitoring real time system behavior, database analytics, statistical analysis and processing, and interpretation for future use case. There are lots of IoT Hardware Platforms and Cloud platforms available to serve this purpose. If you find difficulties in finding the right Platform for your IoT application then follow the link.
Previously we already covered ThingSpeak, Adafruit IO and many other IoT softwares. Today we will be building similar project where we’ll use a temperature & humidity sensor DHT11 and a NodeMCU ESP8266 Module to log the temperature and humidity in real time on Google’s Firebase database server.
We will divide project in two sections. Firstly, we will start with assembling the hardware components and uploading firmware into it. And secondly we will use Firebase to setup with NodeMCU to exchange real time data. If you are new to ESP8266 or Firebase follow our previous tutorial on controlling LED using Firebase.
Components Required
- NodeMCU ESP8266 Module
- DHT11 Temperature and Humidity sensor
Circuit Diagram

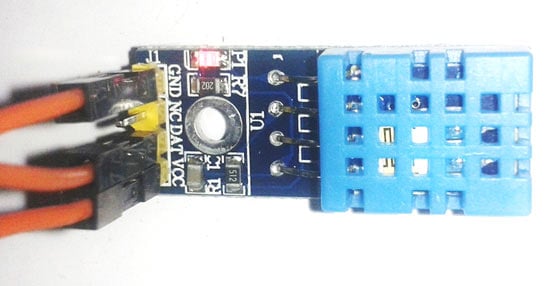
DHT11 Temperature and Humidity Sensor
DHT11 module features a humidity and temperature complex with a calibrated digital signal output means DHT11 sensor module is a combined module for sensing humidity and temperature which gives a calibrated digital output signal. DHT11 gives us very precise value of humidity and temperature and ensures high reliability and long term stability. This sensor has a resistive type humidity measurement component and NTC type temperature measurement component with an 8-bit microcontroller inbuilt which has a fast response and cost effective and available in 4-pin single row package.
We previously used ESP12E to update the DHT11 readings on webserver, other than that you can check all the DHT11 based projects where we have used DHT11 to interface with many other microcontrollers like Arduino, PIC, Raspberry and built weather station using them.
Programming NodeMCU ESP8266 Live Temperature and Humidity Monitoring
Complete program with working Video is given at the end. Here we are explaining few important parts of the code.
Firstly include the libraries for using ESP8266 and firebase.
#include <ESP8266WiFi.h
#include <FirebaseArduino.h
Download and install the libraries by following the below links:
https://github.com/FirebaseExtended/firebase-arduino/blob/master/src/Firebase.h
https://github.com/bblanchon/ArduinoJson
While compiling, if you get error that ArduinoJson.h library is not installed then please install it using link given above.
We will program NodeMCU to take readings from DHT11 sensor and push it to Firebase every 5 seconds of interval. We will set a path for pushing data. Right now two parameters viz. humidity and temperature are sent in same parent path and different child path.
These two parameters are very important to communicate with firebase. Setting these parameters will enable the data exchange between and ESP8266 and firebase. To find these parameters for your project, follow our previous tutorial on Firebase Setup.
 #define FIREBASE_HOST "your-project.firebaseio.com"                          // the project name address from firebase id
#define FIREBASE_AUTH "Uejx9ROxxxxxxxxxxxxxxxxxxxxxxxxfQDDkhN"            // the secret key generated from firebase
After successfully finding the credentials, just replace in the above code.
Enter your Wi-Fi SSID and Password to connect with your network.
#define WIFI_SSID "network_name"                                             // input your home or public wifi name
#define WIFI_PASSWORD "password"                                    //password of wifi ssid
Define the DHT data pin in NodeMCU. You can use any Digital GPIO pin in NodeMCU.
#define DHTPIN D4
The DHT library is made for all DHT variants and comes with option that which DHT sensor you want to use for e.g. DHT11 or DHT22. Just choose the right DHT sensor and proceed.
#define DHTTYPE DHT11                                                       // select dht type as DHT 11 or DHT22
DHT dht(DHTPIN, DHTTYPE);
Connect to the Wi-Fi network selected and also connect to the firebase database server.
WiFi.begin(WIFI_SSID, WIFI_PASSWORD);
Firebase.begin(FIREBASE_HOST, FIREBASE_AUTH);
Start taking reading at pin D4 of NodeMCU.
dht.begin();
Take humidity and temperature readings from DHT sensor and save as float value.
float h = dht.readHumidity();                                              // Reading temperature or humidity takes about 250 milliseconds!
  float t = dht.readTemperature();                                           // Read temperature as Celsius (the default)
Just check if the DHT sensor is properly wired or it is not damaged and controller can able to read readings from it. If the readings are not showing then probably the sensor is damaged, just show an error message and return to check again without proceeding ahead.
  if (isnan(h) || isnan(t)) {                                                // Check if any reads failed and exit early (to try again).
    Serial.println(F("Failed to read from DHT sensor!"));
    return;
  }
Print sensor data in serial monitor for debugging and save the values of temperature and humidity in string form to send this to the firebase. Also note that the minimum delay required between two readings from DHT11 sensor is 2 seconds, so always use delay greater than 2 seconds. To know more about the DHT11 you can look into official datasheet.
Serial.print("Humidity: "); Serial.print(h);
String fireHumid = String(h) + String("%"); //convert integer humidity to string humidity
Serial.print("% Temperature: "); Serial.print(t); Serial.println("°C ");
String fireTemp = String(t) + String("°C");
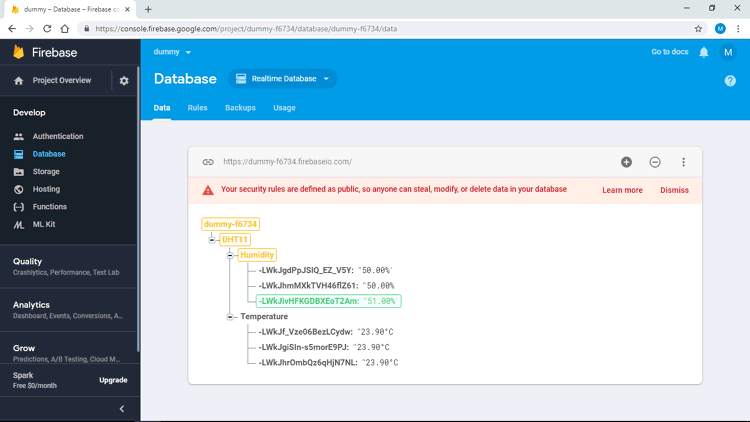
delay(4000);At last, send the temperature and humidity data to firebase at path “your-project.firebaseio.com/DHT11/Humidity/”.
  Firebase.pushString("/DHT11/Humidity", fireHumid);                                  //setup path and send readings
  Firebase.pushString("/DHT11/Temperature", fireTemp);                                //setup path and send readings
You can see all data in your firebase account. Just go to “Database” section in “Your Project” at “My console” In Firebase.
To setup Firebase for sending and monitoring the data you can refer our previous tutorial.
Complete code and Video for this IoT based temperature and Humidity monitoring is given below.
Complete Project Code
/* Sending Sensor Data to Firebase Database by CircuitDigest*/
#include <ESP8266WiFi.h>                                                    // esp8266 library
#include <FirebaseArduino.h>                                                // firebase library
#include <DHT.h>                                                            // dht11 temperature and humidity sensor library
#define FIREBASE_HOST "your-project.firebaseio.com"                          // the project name address from firebase id
#define FIREBASE_AUTH "Uejx9ROxxxxxxxxxxxxxxxxxxxxxxxxfQDDkhN"            // the secret key generated from firebase
#define WIFI_SSID "network_name"                                             // input your home or public wifi name
#define WIFI_PASSWORD "password"                                    //password of wifi ssid

#define DHTPIN D4                                                           // what digital pin we're connected to
#define DHTTYPE DHT11                                                       // select dht type as DHT 11 or DHT22
DHT dht(DHTPIN, DHTTYPE);
void setup() {
  Serial.begin(9600);
  delay(1000);
  WiFi.begin(WIFI_SSID, WIFI_PASSWORD);                                     //try to connect with wifi
  Serial.print("Connecting to ");
  Serial.print(WIFI_SSID);
  while (WiFi.status() != WL_CONNECTED) {
    Serial.print(".");
    delay(500);
  }
  Serial.println();
  Serial.print("Connected to ");
  Serial.println(WIFI_SSID);
  Serial.print("IP Address is : ");
  Serial.println(WiFi.localIP());                                            //print local IP address
  Firebase.begin(FIREBASE_HOST, FIREBASE_AUTH);                              // connect to firebase
  dht.begin();                                                               //Start reading dht sensor
}
void loop() {
  float h = dht.readHumidity();                                              // Reading temperature or humidity takes about 250 milliseconds!
  float t = dht.readTemperature();                                           // Read temperature as Celsius (the default)

  if (isnan(h) || isnan(t)) {                                                // Check if any reads failed and exit early (to try again).
    Serial.println(F("Failed to read from DHT sensor!"));
    return;
  }

  Serial.print("Humidity: ");  Serial.print(h);
  String fireHumid = String(h) + String("%");                                         //convert integer humidity to string humidity
  Serial.print("%  Temperature: ");  Serial.print(t);  Serial.println("°C ");
  String fireTemp = String(t) + String("°C");                                                     //convert integer temperature to string temperature
  delay(4000);

  Firebase.pushString("/DHT11/Humidity", fireHumid);                                  //setup path and send readings
  Firebase.pushString("/DHT11/Temperature", fireTemp);                                //setup path and send readings

}
Comments
I am trying to doing this project as i found it sound interesting. Would you please provide the link for download the <ESP8266wifi.h> library and <DHT.h> library as soon as possible? I couldnt find any download/clone option for the provided link of the <FirebaseArduino.h> library at github. It's only showing the option 'copy path'. It's really ugent to know.
Hi, I was trying on the similar steps and code. But my data couldn't be updated on my Firebase. Could you help me for this? Thank you.
First, thanks for the tutorial; I have two questions:
1) I don't understand, in this case, what is Firebase for? Only to send Temperature and Humidity data? And after sending this data, can the DHT11/22 be disconnected from NodeMCU ESP8266? In other words, what is the project's convenience in this case?
2) You say: At last, send the temperature and humidity data to firebase at path “your-project.firebaseio.com/DHT11/Humidity/”. I don't understand which way is this!?
Thanks
Fire base is online data base. for example you are going to measure your room tempreture data using tempreture sensor and same time you also want to save your tempreture reading then you have to use some data base where you can store data in real time. we are using firebase online real time data base here. When ever you need past temperature data then you can easily get in database. you can use this data stored for machine learning application also and path meaning using this line or URL you can see your data in database.

Hey, I was testing a similar project using Nodemcu and LM35 but the values obtained are not being uploaded to firebase. It would be really helpful if you could help me out.