

There are several critical machines or expensive equipments which suffer damages due to vibrations. In such a case, a vibration sensor is required to find out whether the machine or equipment is producing vibrations or not. Identifying the object which is continuously vibrating is not a tricky job if the proper sensor is used to detect the vibration. There are several types of vibration sensors available in the market which can detect the vibration bys sensing acceleration or velocity and could provide excellent result. However, such sensors are too expensive where the accelerometer is used. Accelerometer is very sensitive and can be used to make Earthquake detector circuit. But, there are few dedicated and cheap sensors are also available to detect the vibrations only, one such vibration sensor is SW-420 which we are going to interface with Arduino Uno.
So in this project, a basic vibration sensor module is interfaced with popular Arduino UNO and whenever the vibration sensor detects any vibration or jerk an LED will start blinking.
Vibration Sensor Module SW-420

This is an SW-420 vibration module, which can work from 3.3V to the 5V. The sensor uses LM393 comparator to detect the vibration over a threshold point and provide digital data, Logic Low or Logic High, 0 or 1. During normal operation, the sensor provides Logic Low and when the vibration is detected, the sensor provides Logic High. There are three peripherals available in the module, two LEDs, one for the Power state and other for the sensor’s output. Additionally, a potentiometer is available which can be further used to control the threshold point of the vibration. In this project, we will use 5V to power the module.
We used the same sensor in Anti-Theft Alert System using ATmega8 Microcontroller. Also a tilt sensor can be used to detect sudden accident.
Components Required
- Arduino UNO
- SW-420 Vibration Sensor Module
- 5mm LED (Any Color)
- Jumper Wires(Hookup Wires)
- USB Cable for Uploading Program
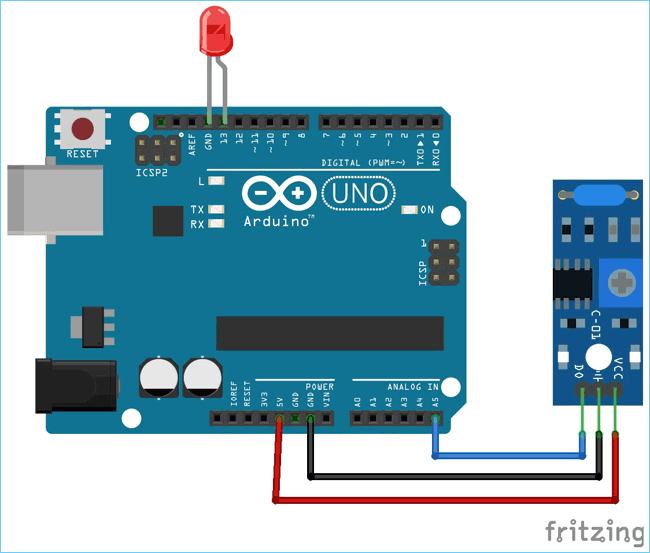
Arduino Vibration Sensor Circuit Diagram
The schematic for interfacing Vibration sensor with Arduino uno is given below.

The LED is connected in the D13 pin. The module is powered using the available 5V pin in the Arduino. The Ground and the 5V pin are used to power up the Arduino whereas the A5 pin is used to get the data from the vibration sensor.
The circuit is constructed where the SW-420 module and LED are connected with Arduino Uno.
Arduino Uno Vibration Sensor Programming
Programming the Arduino UNO to interface vibration sensor doesn’t require much effort as only the input pin should be monitored to make conclusion. The complete code and working video are attached at the end.
Initially the Header Files are included. The arduino header is included since this tutorial was written in Eclipse IDE with Arduino extension. This sketch will also work for Arduino IDE and while using this sketch in Arduino IDE, there is no need to include <Arduino.h> header.
#include <Arduino.h>
Here two macros are defined for ON and OFF.
#define ON 1
#define OFF 0
The below statement is used for integrating the LEDs and the Vibration Sensor. The vibration sensor is connected to pin A5. The inbuilt LED is also used which is directly connected in the board to pin 13. The 5mm LED is also connected to the pin 13.
/*
 * Pin Description
 */
int vibration_Sensor = A5;
int LED = 13;
Two integers are declared where the sensors present output and previous output will be stored, which will further used to detect whether the vibration is happening or not.
/*
 * Programme flow Description
 */
int present_condition = 0;
int previous_condition = 0;
The same pin which is declared as the peripheral connection, the direction of the pins are configured. The sensor pin as input and the LED pin as an output.
/*
 * Pin mode setup
 */
void setup() {
            pinMode(vibration_Sensor, INPUT);
            pinMode(LED, OUTPUT);
}
One function is written to blink the led twice. The delay can be configured by chaging the delay value.
void led_blink(void) {
            digitalWrite(LED, ON);
            delay(250);
            digitalWrite(LED, OFF);
            delay(250);
            digitalWrite(LED, ON);
            delay(250);
            digitalWrite(LED, OFF);
            delay(250);
}
In the loop function, present and previous condition is compared. If these two are not same, the leds start to blink until the both are same. In starting, the two variables hold 0 and the led remains off during the start of program. When there is some virbraion, present_condition variable becomes 1 and led start to blink. And again when vibrations stops both the vaiables becomes 0 and LED stops blinking.
void loop() {
            previous_condition = present_condition;
            present_condition = digitalRead(A5); // Reading digital data from the A5 Pin of the Arduino.
            if (previous_condition != present_condition) {
                       led_blink();

            } else {
                       digitalWrite(LED, OFF);
            }
}
This finishes the programming the arduino UNO with Vibration sensor. The final step will be testing the whole setup.
Testing the Arduino Vibration Sensor Circuit
The circuit doesn’t require additional breadboard. It can be simply tested using the Arduino UNO Board. The led is monitored when the vibration sensor is hit or if it changes its state. The led will blink connected to Pin 13 of Arduino UNO when there is some vibrations. If the vibration sensor doesn’t work then please check the connection and power. Avoid any loose connection between sensor and microcontroller.

So this is how a Vibration sensor can be interfaced with Arduino UNO. If you have any doubt or suggestion then you can reach us through forum or you can also comment below.
Complete Project Code
/*//==============================================================================//
 * Vibration Sensor interfacing with Arduino
 * Date: - 15-04-2019
 * Author:- Sourav Gupta
 * For:- circuitdigest.com
 */ //=============================================================================//
#include <Arduino.h>
#include <stdio.h>
#define ON 1
#define OFF 0
/*
 * Pin Description
 */
int vibration_Sensor = A5;
int LED = 13;
/*
 * Programme flow Description
 */
int present_condition = 0;
int previous_condition = 0;
/*
 * Pin mode setup
 */
void setup() {
pinMode(vibration_Sensor, INPUT);
pinMode(LED, OUTPUT);
}
/*
 * Led blink
 */
void led_blink(void);
/*
 * main_loop
 */
void loop() {
previous_condition = present_condition;
present_condition = digitalRead(A5); // Reading digital data from the A5 Pin of the Arduino.
if (previous_condition != present_condition) {
led_blink();
} else {
digitalWrite(LED, OFF);
}
}
void led_blink(void) {
digitalWrite(LED, ON);
delay(250);
digitalWrite(LED, OFF);
delay(250);
digitalWrite(LED, ON);
delay(250);
digitalWrite(LED, OFF);
delay(250);
}

I am trying to find the symbol of the SW 420 in the fritzing software but I cannot find it. Can you tell me what the name of it is in the software?