

After reading the heading of this post, you must be wondering, why are we posting an article which explains how to block ad-services? Isn't that how a company makes money? And you are not mistaking that Google’s AdSense is a big portion of our revenue, but we understand that many of you, who are determined enough to set-up something like this is probably using some kind of ad-blocking tool anyway.
So in this article, I am going to show you how you can configure Pi-hole, a DNS based filtering tool that can be used to block ads, tracking, and known malware on your entire network.
There are many generic ad-blocking tools out there, take the example of the chrome web store if you search for Adblock there, you can find many like Adblock, ublock, adguard and more which works great. But the problem is that it's browser-specific. Meaning it will work for only that browser, but some devices do not allow ad-blockers, for example, mobile games, your smart TV, Spotify, and more. That is where the Pi-hole comes in. it can block Ads swiftly and efficiently for your entire network.
Raspberry pi is a pocket sized computer and is suitable for creating many types of web based servers like:
- Raspberry Pi Print Server
- Plex Media Server on Raspberry Pi
- Raspberry Pi MineCraft Server
- Raspberry Pi NAS Server using Samba
- Raspberry Pi using Mopidy Music Server
What is Pi-hole?
Pi-hole acts as a private DNS server for your network. DNS is known as (Domain Name Server). When you type in an address to your browser like google.com, the DNS server is responsible for taking that name and converting it into an IP address. For many users, this service is running in the IPv4 setting in the windows.
But the windows cannot determine which IP address is for Ad services and which are for the actual content - but the Pi-hole does. Pi-hole stands in between known ad-services and response back with 0.0.0.0 so the ads do not get downloaded. This means the website you are looking for will load normally but without ads.
Enough intro, let's build the Pi-hole and see it in action. A video demonstration is given at the end of this article.
What You'll Need for Raspberry Pi- Pi Hole Setup?

To set this up, you'll need the obvious:
- A Raspberry Pi (I am using a Raspberry PI Zero)
- A Wi-Fi adapter or a USB to Ethernet Adapter (I am going to use the Wi-Fi adapter)
- A USB OTG cable
- A Power Brick can deliver sufficient current.
- A micro SD card.
- USB cable to power it.
Keep in mind that I am going to use the headless setup method to set up the Raspberry Pi. If you want to do it in any other ways, you can always attach a monitor and a keyboard but you have to need a separate USB hub for that and its Messi.
Coming up Next,
- Step 1: Setting up the Raspberry Pi
- Download the Raspberry PI OS
- Flash the SD Card
- Enable SSH in Headless Mode
- Connect to your Router in Headless Mode
- Assign a Static IP Address in the Router
- Step 2: Configuring the Raspberry Pi
- SSH to the Raspberry Pi
- Update and Upgrade the Pi
- Change the Default SSH Password
- Change the Hostname
- Step 3: Installing Pi-Hole on Raspberry Pi
If you are new to Raspberry pi, fall back to your Getting Started with Raspberry Pi tutorial.
Step 1: Setting up the Raspberry pi
Setting up your raspberry pi is very easy and requires very few steps. To set up a raspberry, you need to download the Raspberry Pi OS from the official Raspberry PI website and prepare the SD card and install Raspberry PI OS on it.
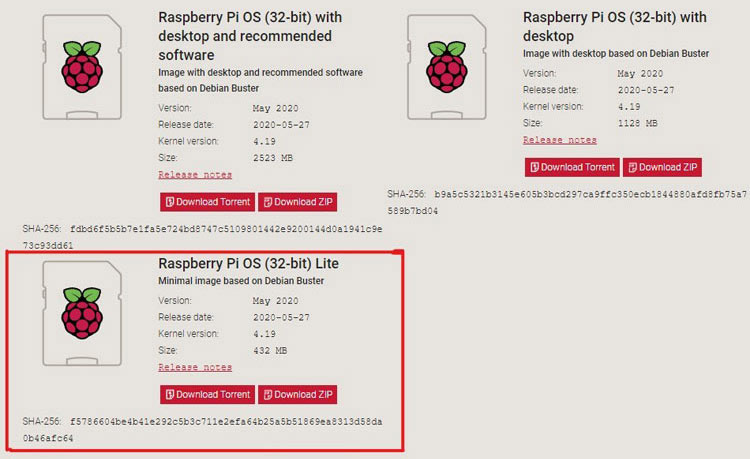
Download the Raspberry-PI OS:
I am using a Raspberry pi zero so I am going to download the Raspberry Pi OS (32-bit) Lite.
Flash the SD Card:
To flash that, we need a tool called balenaEtcher or you can use your favourite flashing tool.
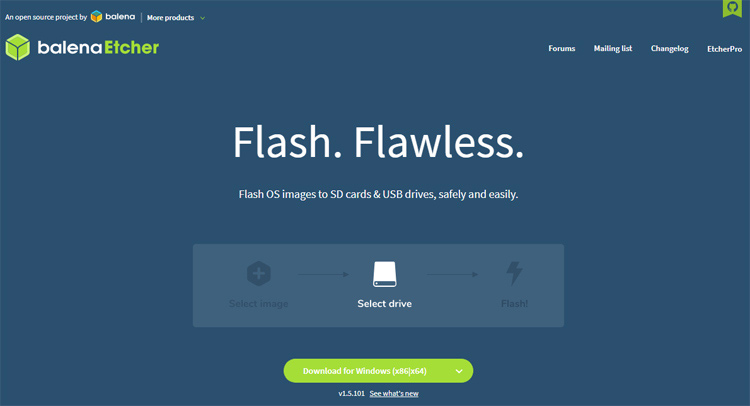
I recommend the portable version since it is not something that we need to install. Open Etcher > Choose Your File > Choose Your Target and just Flash it! And you’re done.
Once the Flashing process is finished, you will get a small 250MB partition named boot
Enable SSH in Headless Mode:
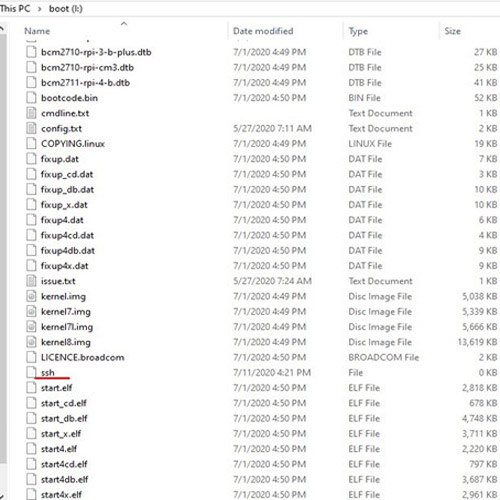
To set up the Headless SSH, you need to create an empty file named SSH. This simple step will enable SSH for the Raspberry Pi.
Connect to your Router in Headless Mode:
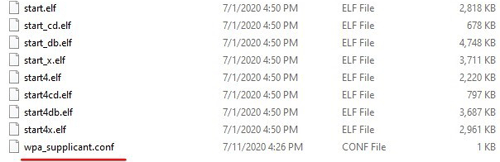
To set up Headless Wi-Fi, you need to make a file named wpa_supplicant.conf and save it into the boot partition, which I have previously mentioned.
The content inside the file listed below:
ctrl_interface=DIR=/var/run/wpa_supplicant GROUP=netdev
update_config=1
country=<Insert 2 letter ISO 3166-1 country code here>
network={
 ssid="Test_Raspberry-PI"
 psk="12345678"
}
You need to put the SSID and password of your router in the SSID and PSK section.
And That's it for the SD card part, now you need to put the SD-card onto your raspberry pi and power it up.
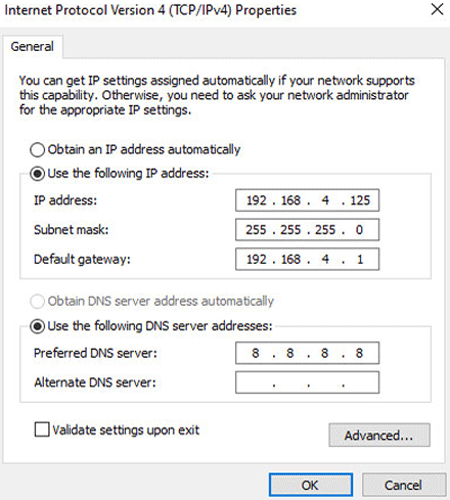
Assign a Static IP Address in the Router:
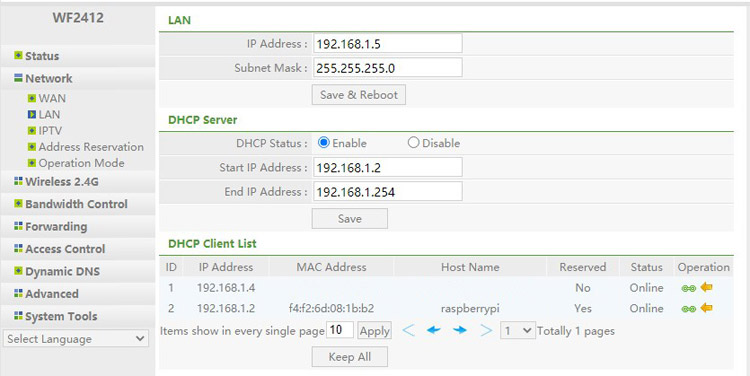
It's really important to assign a static IP address for the Raspberry PI, otherwise, it will change dynamically and cause us problems.
In my router, I have an operations tab, by clicking it in the green sign, I can reserve the IP address for the Raspberry Pi. If you are doing this, you need to find the process for your router.
Step 2: Configuring the Raspberry Pi
Now all the basic settings out of the way we need to configure the Raspberry Pi. To do that just follow the below steps-
SSH to the Raspberry Pi:
Now it's time to SSH to the raspberry pi, to do that, I am going to use the Git Bash from my windows PC, you can use PuTTY if that is your favourite app.
Enter the default password for the raspberry pi which is raspberry.

And everything works fine, then you will be prompted with pi@raspberry bash. Congratulations you have successfully SSH into your raspberry pi.
Update and Upgrade the Pi:
Now, first, update and upgrade your Raspberry PI OS, to do that type in the following command and hit enter.
sudo apt-get update && sudo apt-get upgrade
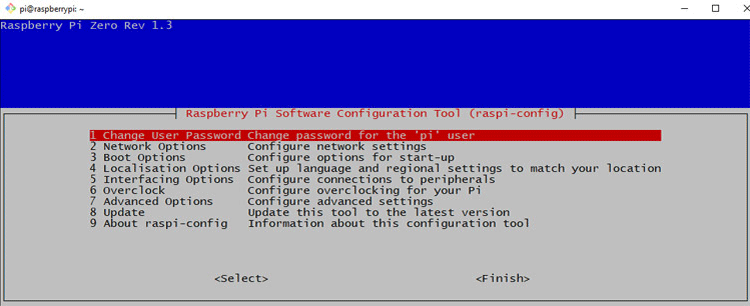
Change the Default SSH Password:
After, update and upgrade its very important to change the default SSH password for the Raspberry Pi else hackers can very easily SSH into your network and break the password.
To do that you need to type in sudo raspi-config and you will be presented with the following screen.
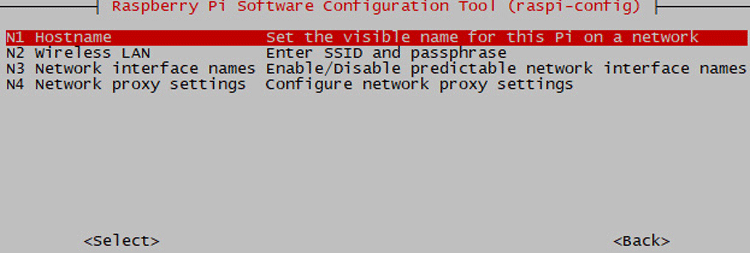
Change the Hostname:
To change the Hostname, go to the Network Options and hit enter, Now the first option is to change the Hostname click enter again and change the Hostname.
Now that's done we can finally Install the Pi-hole.

Installing Pi-Hole on Raspberry Pi
Once you have completed the above steps. You need to install the Pi-hole. You can do that by connecting a keyboard mouse or do that in a headless way. I am going to do it in a headless way.
To install Pi-hole on Raspberry Pi, run the following command.
curl -sSL https://install.pi-hole.net | bash
Alternatively, you can make a git clone and clone the GitHub repository of the Pi-hole and continue from there, to do that, you need to run the following commands.
git clone --depth 1 https://github.com/pi-hole/pi-hole.git Pi-hole
cd "Pi-hole/automated install/"
sudo bash basic-install.sh
But I am going to use the primary method to install Pi-hole. The installation process is very simple. All you have to do is SSH to the Raspberry Pi and paste in the curl code and hit enter if everything is good, then the download process will start and you will get a screen like an image below.
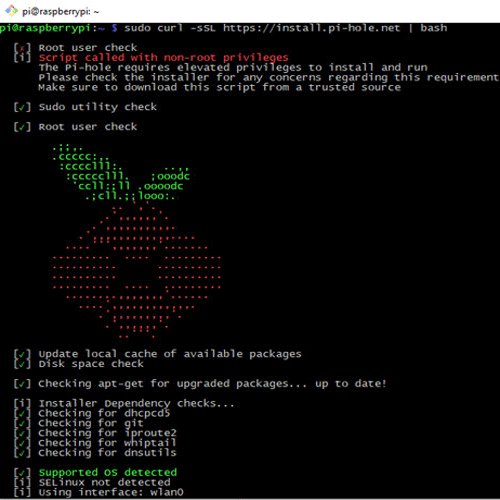
This is the setup process and it is checking for some basic prerequisites.
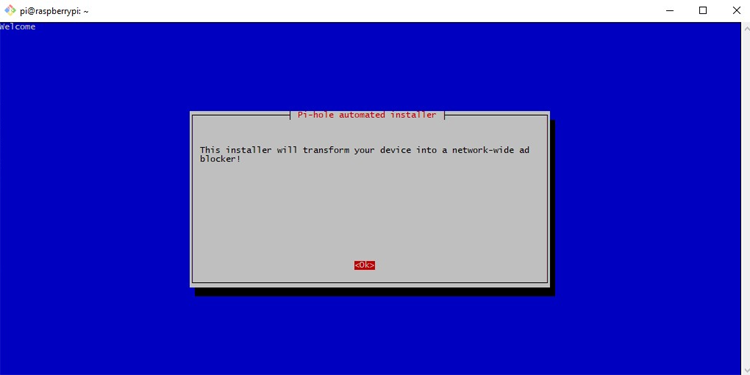
Next, you will be presented with the welcome screen, which is shown below.
The next screen is a screen about Pi-hole, hit enter to continue.
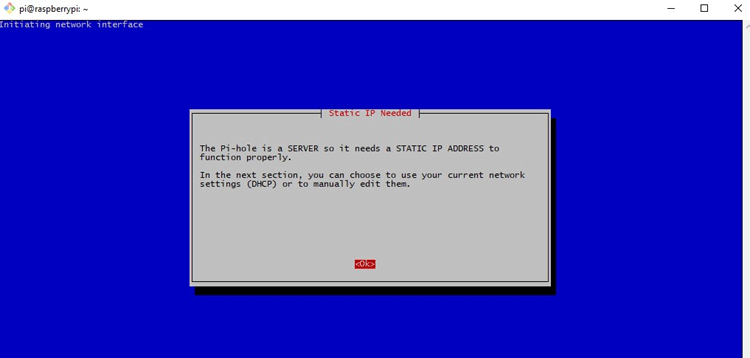
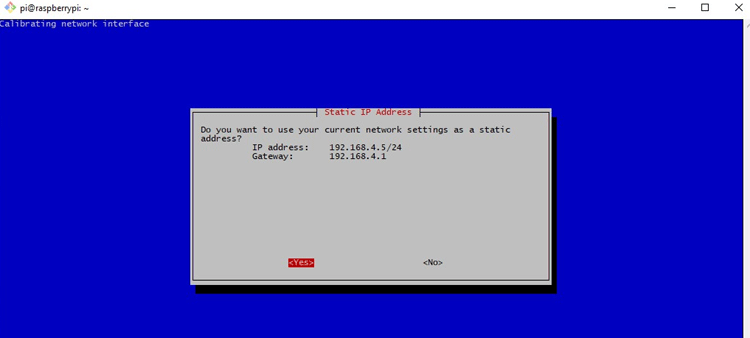
Next, the Pi-hole is asking about a Static IP if you have done the previous setup correctly, then simply hit enter to continue. The below image shows the screen.
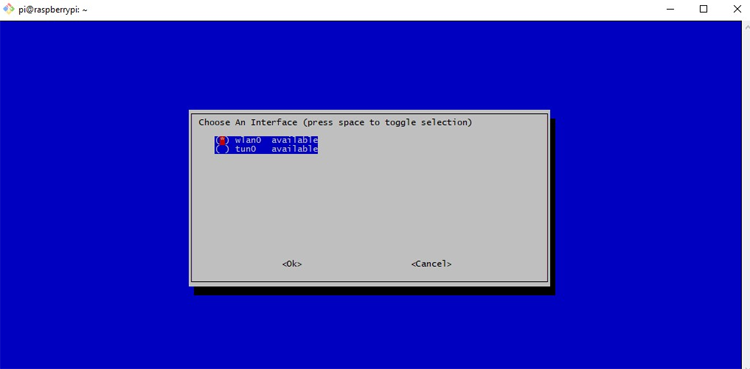
Next, the Pi-hole will ask you about an interface, in my case, its wlan0, hit enter to select it.
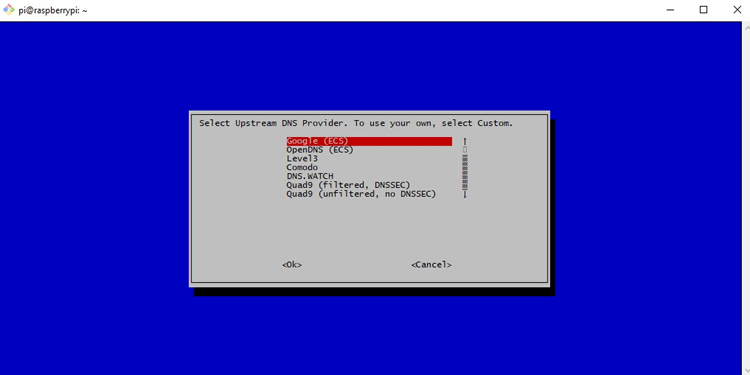
Next, the Pi-hole setup is asking about an Upstream DNS Provider, which means if the URL is not in the blacklist, the request will be forwarded to the selected DNS server. In my case, I choose Google.
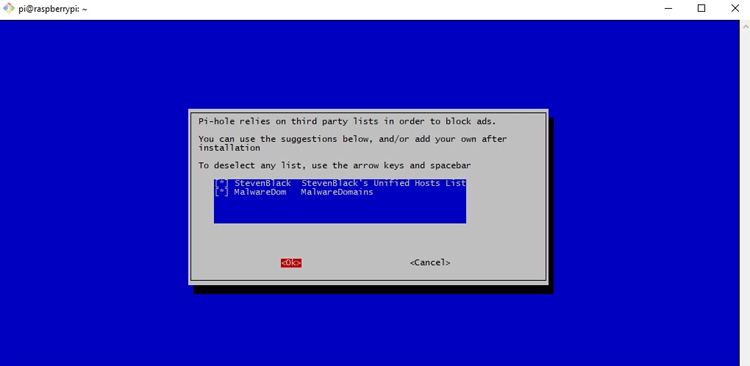
Next, the Pi-hole setup is asking us to select a list of name servers that serves as the inventory for the Pi-hole blocking list and it's also saying the default list is provided and maintained by a third-party provider. We can add mode after the installation is finished.
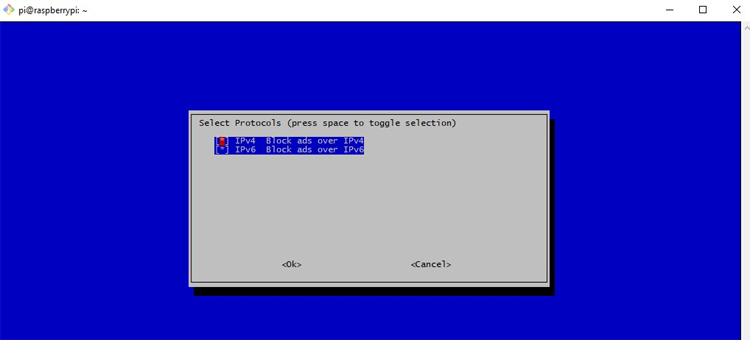
Next, it wants us to select protocols. Since we want to block unwanted ads regardless of the IP protocol version, we can leave it to both protocols activated by default.
Next, it shows our current IP address assigned by the router.
Next, it gives us a warning about conflicting IP, clicks OK.
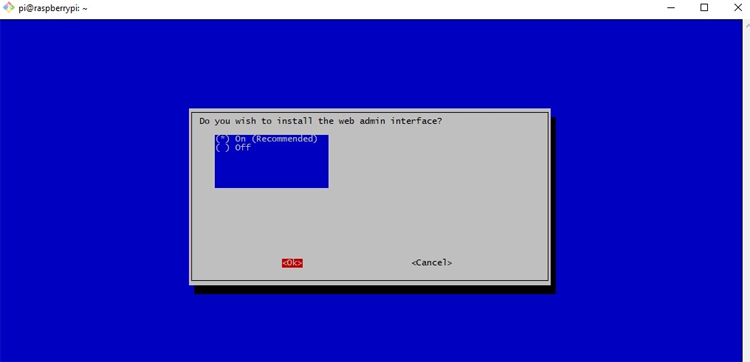
The next screen is very important as the pi-hole setup is asking if we want to install the web admin interface or not and yes we want to use the handy Dashboard later on. Because it makes blocking specific ads very easy.
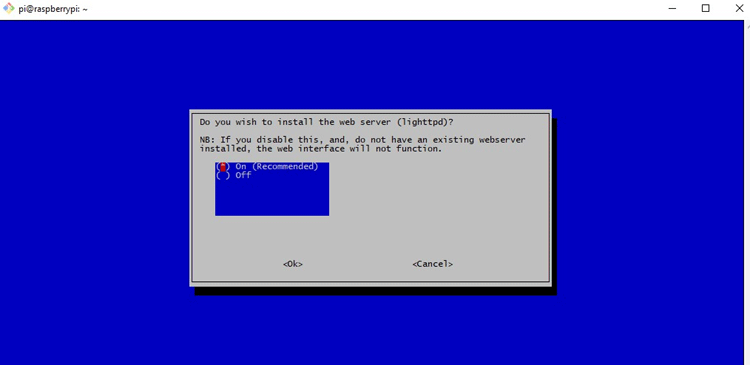
To run a webserver-based dashboard, we need a local server that runs locally. The next screen is exactly that and yes, we absolutely want to install the webserver.
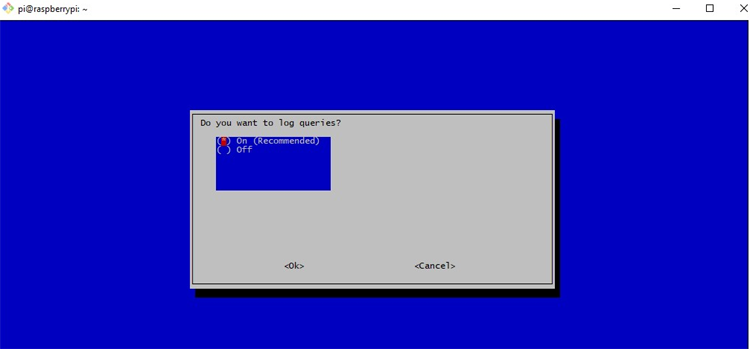
In the next screen, the setup is asking if we want to log the queries, and yes we want to do that because with the log enabled, we can clearly distinguish which add belongs to which URL.
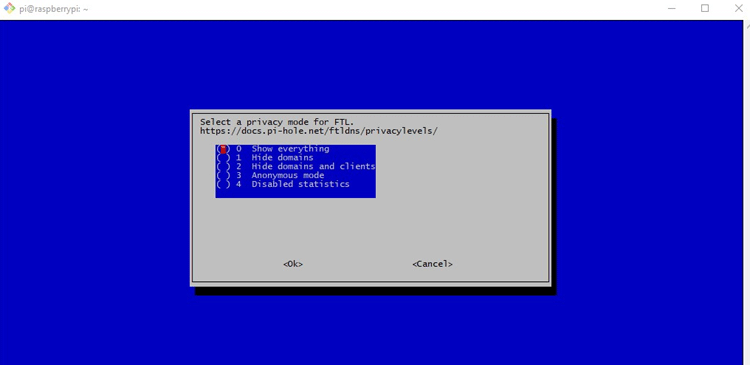
For the privacy mode, I have used the default option because I want to monitor everything that Pi-Hole blocks.
And it's almost done, hit OK and the Pi-hole setup will do its thing and install all the requirements. When everything is done, you will get the most important screen shown below.
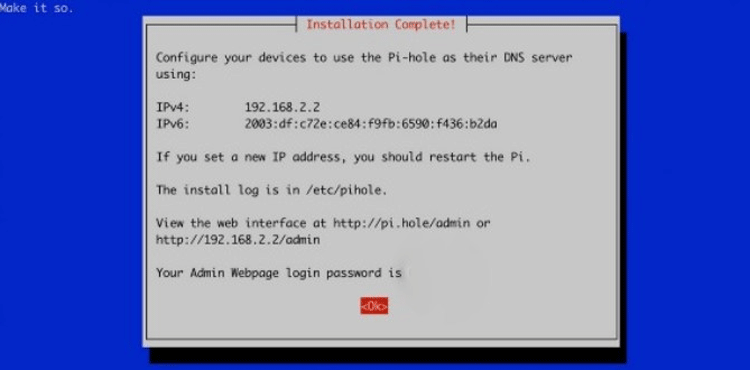
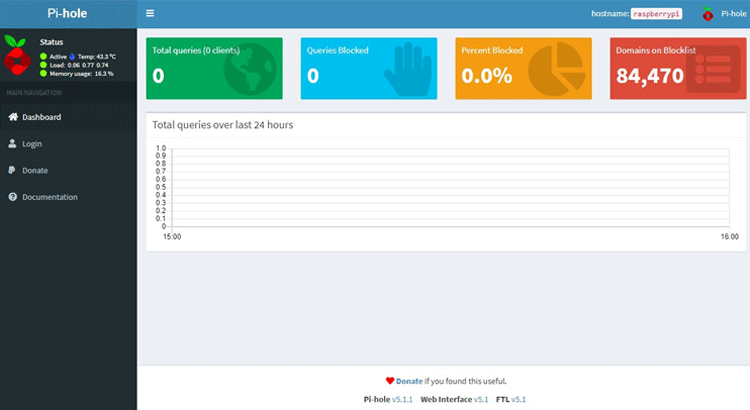
Now, at the bottom of the screen, you have the IP address and the password for the dashboard. For me, the admin URL was http://192.168.2.2/admin and the Password was XXXX. Paste the URL to your browser and you will get a page as shown below.
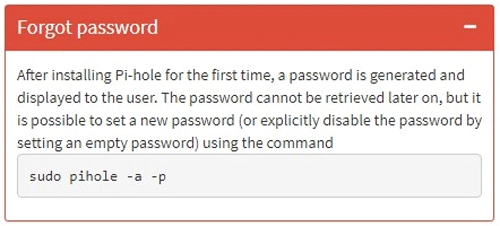
If you forgot the password you can SSH to Raspberry Pi and type the below command to reset the password.
Now, at this moment you can take a deep breath and relax, you have completed a part of the process. But the newly built Pi-hole cannot block all the ads, especially YouTube.
Ads are region specific so to block Indian ads I had to pull off some tricks which I am going to be discussing here,
In the console of the Pi-hole, there is a tab for blacklisted domains, this shows how many listed domains are there in that list, we need to update that list, to do so we need to go to
Group Management > Adlist
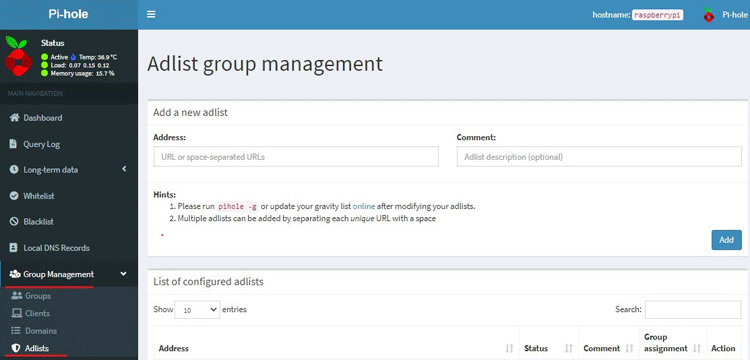
And in the Address section, we can add more blacklisted websites. To do that, I have just googled it and I have found some links that work well. It's listed below.
- https:// raw.githubusercontent.com/StevenBlack/hosts/master/hosts
- https:// mirror1.malwaredomains.com/files/justdomains
- https:// easylist-downloads.adblockplus.org/malwaredomains_full.txt
- https:// v.firebog.net/hosts/Easylist.txt
- https:// s3.amazonaws.com/lists.disconnect.me/simple_ad.txt
- https:// v.firebog.net/hosts/AdguardDNS.txt
- https:// static.doubleclick.net/instream/ad_status.js
You need to add them one by one followed by a space. After adding them, you need to update the list with the command pihole -g. Once that's done, the updated dashboard should look like the below image.
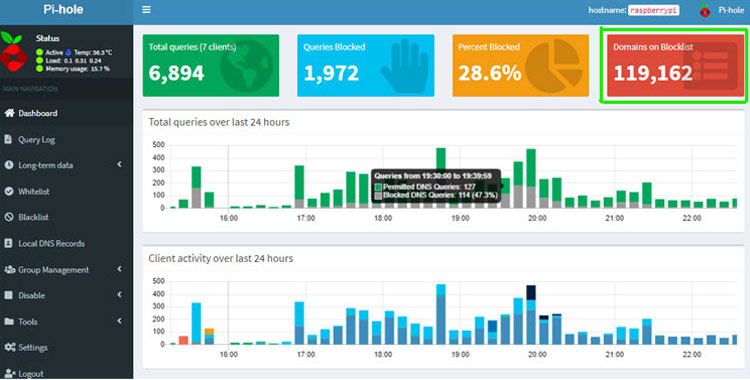
Now the list is upgraded, the Pi-hole should be able to block more ads.
If you are still getting ads, you improve your results by manually adding the add servers to the blacklist in your Raspberry Pi- Pi Hole Installation.
and... Done!
Congratulations! Your Raspberry Pi- Pi Hole setup is complete.
If you have any questions, leave them in the comment section below. Or you can also use our forums to post other technical questions.

Interesting project. I've purchased several hardware based ad-killers over the years. They all either didn't work because I was unable to configure them properly, or they worked minimally, or not at all for my region, or required too much maintenance to keep up with the ever-changing world of advertising. This one strikes me as one of the latter, but I'm willing to test it.
My problem, however, is that I doubt I'll be able to follow the many configuration steps without running into difficulties along the way. It would therefore be very useful to me if I could buy a pre-cofigured SD card that has all the software pre-loaded, plus a config file of sorts that the user can edit to input his IP and router information. The same or a similar file could then be used to update the Pi with new blacklist websites whenever new ads appear out of nowhere, which as we all know, are like weeds. They will always come back no matter what you do to prevent them. Is there such a card I could buy or download?
Thanks!