
Raspberry Pi is the pocket sized computer having almost all the feature of a normal computer including USB port, LAN port, audio/video output, HDMI port etc. It also has inbuilt Bluetooth and Wi-Fi connectivity which makes it perfect candidate to build various online servers like Webserver, Media server, Print Server, Plex server etc. So here we will be creating another server using Raspberry Pi- File Server or NAS (Network Attached Storage), where you can plug any storage device with Raspberry Pi and access it using any computer connected on the same network. Using NAS, you can share and access the files and folders without actually connecting the storage device to your system.
There are various methods to make Raspberry pi a NAS box. One of the method is to install disk image of OpenMediaVault (OMV) and NAS4Free. They are available for free and can be easily installed by burning the fresh image into SD card, but this way the original Raspbian OS will be lost. Once installed, you can easily access media using simple web based UI just by entering IP address of the Pi in web browser.
In this tutorial, we will install Samba in preinstalled Raspbian OS, so you don’t have to loose the default Raspbian OS. Samba is a re-implementation of the SMB (Server Message Block) networking protocol which integrates Linux computers with MAC and Windows based systems. There is another protocol named CIFS (Common Internet File System) which is an implementation of the SMB protocol. Nowadays, CIFs or SMB is used interchangeably, but most people use the term SMB.
Samba file server is easy to setup, which makes it one of the best solutions for setting up a NAS, especially with Windows machine. So here we will install and configure Samba on Raspberry Pi to make it a File server.
Requirements
- Raspberry Pi with Raspbian OS installed in it.
- Any external storage like harddrive, SD card (optional)
Here, we will use SSH to access Raspberry Pi on the laptop. You can use VNC or Remote Desktop connection on the laptop, or can connect your Raspberry pi with a monitor using HDMI cable. Learn more about setting up Raspberry Pi headlessly here without a monitor.
Setting up Samba File Server on Raspberry Pi
1. Before installing SMB packages make sure our Raspberry pi is up to date by running update command.
sudo apt-get update
sudo apt-get upgrade
2. Now install Samba packages using below command.
sudo apt-get install samba samba-common-bin
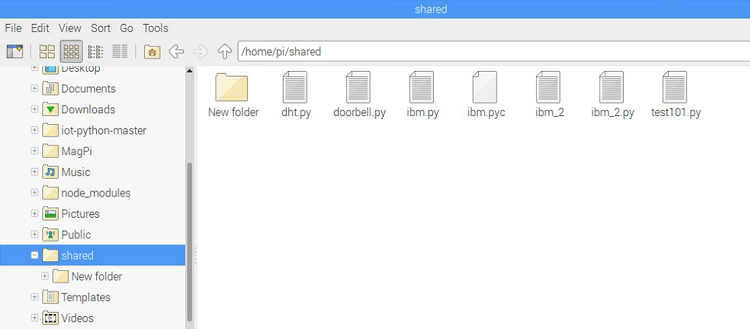
3. Then create a folder and share it on Network storage. This folder can be anywhere including the external storage devices. In this tutorial, we will create a folder in “pi” user but it can be created in external device connected to pi using same steps as mentioned below.
mkdir /home/pi/shared
4. Now, share this folder using samba server. To setup this we have to modify samba config file “smb.conf”. This file contains all the settings for sharing the media.
Open the file using below command
sudo nano /etc/samba/smb.conf
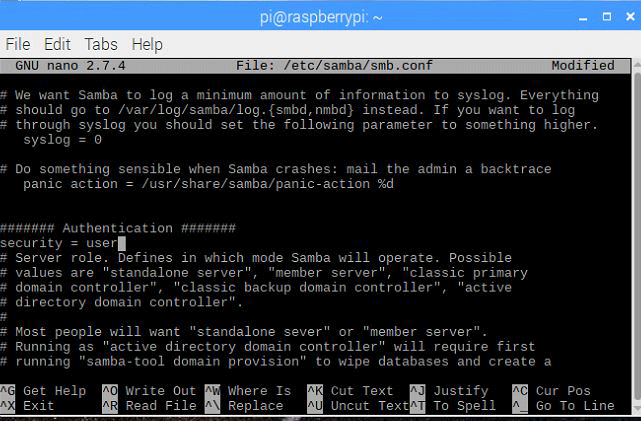
5. In this file look for “##### Authentication #####” and just below paste following line.
security = user
Now, go to bottom of this file and paste the following lines
[NAS]
path = /home/pi/shared
writeable=Yes
create mask=0777
directory mask=0777
public=no
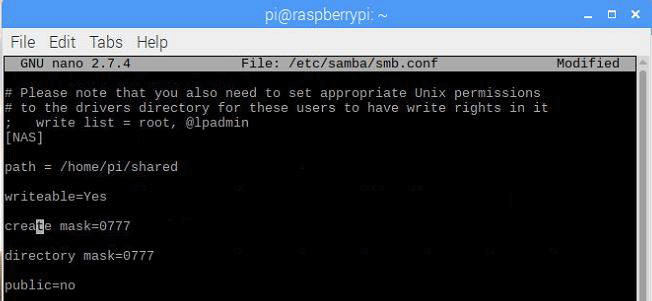
[NAS] defines the address and other configurations related to the shared folders. For example, the shared folders will be at the following address: //raspberrypi/NAS and this address will be used in later steps while searching the available network in Windows computer.
“path” – This option contains the address of the directory that is going to be shared.
“writeable” – This option allow the user to add files in the folder, if this option is set to yes then anyone can write in this folder.
“create mask” and “directory mask”– This option defines the permissions for both the files and folders and setting this to 0777 allows users to read, write, and execute.
“public” – This option used to give permission to any user to access the folders and if this is set to “no” then Raspberry Pi need a valid user to grant access to shared folders.
6. Now, save the file “smb.conf” using ctrl+x and hit enter. Next, make a user for Samba server on Pi to make a connection to the shared network drive.
We will make a user named “pi” (you can name it anything) and set a password whatever you want. Run the following command to setup the user.
sudo smbpasswd -a pi

7. As a final step, restart the samba service to load the configuration changes. Run following command to restart samba.
sudo systemctl restart smbd
Now, for sharing files and folders make sure you have connected Raspberry Pi with same Wi-Fi network as your laptop/PC is connected.
Connecting Windows to Raspberry Pi Samba Server
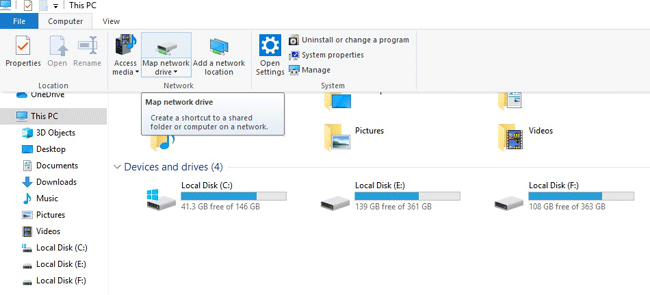
1. To access files and folders on windows system, we have to put the address of the shared media. Go to My computer/This PC and click on Computer tab and click on the option named “Map network drive” as shown below.
2. Now, put the address as \\raspberrypi\NAS (replace NAS with the name that you have given while setting up samba on pi) in Folder option and click on Finish as shown below. In case the connection fails, enter the pi’s IP address in place of raspberrypi in the address. You can find IP address using the command “hostname –I”.

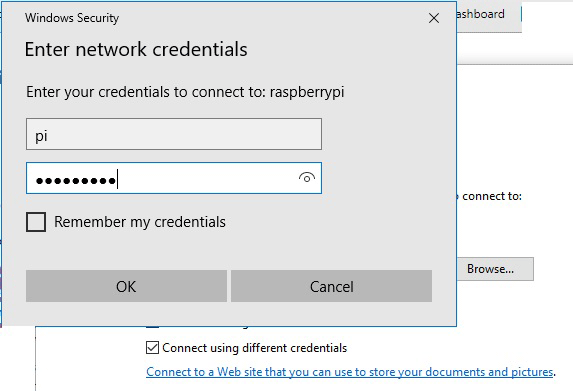
3. Next, enter the credentials that you setup previously using smbpasswd. In the example I set the user name as pi and password as raspberry.
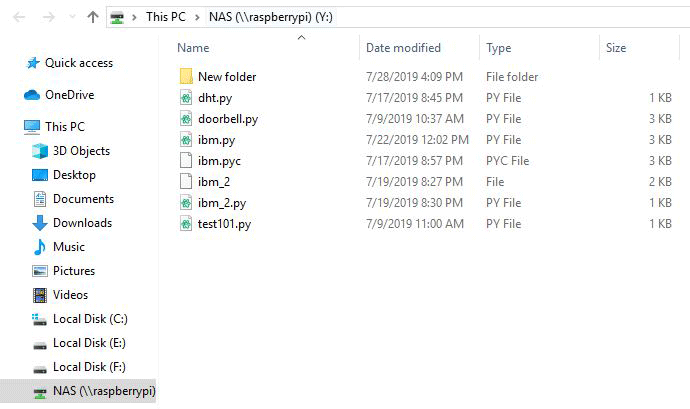
4. Now, you are able to see the shared network and the files in the shared folder as shown below. You can copy and paste anything in this folder and it will reflect in the Raspberry pi also.
Any external device like Hard Disk or SD card can be shared over the network just by following the above steps.
So this is how Raspberry Pi can be turned into a always running File server.

A good write up on the software side but nothing on setting up / connecting the hard drive or SSD. Can I suggest a follow up article on adding an SSD drive since they are now so cheap to the Pi and using it as a NAS.
I have a question, What is the purpose of the USB - microSD card device? Is that the storage media in your example? OR can the Pi boot from an SD card in a USB adapter?
I look forward to your reply.