

Often times, we need to secure a room at our home or office (perhaps a secret dexter’s laboratory) so that no one can access the room without our permission and ensure protection against theft or loss of our important accessories and assets. There are so many types of security systems present today but behind the scene, for authentication they all relay on fingerprint, retina scanner, iris scanner, face id, tongue scanner, RFID reader, password, pin, patterns, etc. Off all the solutions the low-cost one is to use a password or pin-based system. So, in this project, I have built an Arduino Keypad Door Lock which can be mounted to any of your existing doors to secure them with a digital password. Previously, we have also built other interesting door locks which are listed below.
- Arduino RFID Door Lock
- Arduino Solenoid Door Lock
- Raspberry Pi Digital Code Lock
- 555 Timer electronic Door lock
- RFID Door lock system using Arduino
Before building our password door locking project, first, we need to collect the required components and then go ahead and follow the step by step building process.
List of components
- Arduino Uno/Pro/Mini or Custom board using Atmega 328p Microcontroller
- 16 x 2 LCD (Liquid Crystal Display)
- 4 x 3 or 4 x 4 matrix keypad for Arduino
- Servo motor
- 3D printed door locker/customized door locker
- Additional components for power supply of 1 Amp 5 Volt mobile charger
- 4’’ / 6’’plastics boxes, jumper wires, nuts bolts, plastic casing, etc.
Circuit Diagram for Arduino Keypad Door Lock
The Complete circuit diagram for our Arduino based Digital Keypad Door Lock project is shown below.

First of all, we start from the brain of this project which is the Arduino UNO board. The Arduino board is connected to an LCD and a servo motor. The servo motor is used to push (lock) or pull (unlock) the latch on the door. A 16 x 2 LCD is required to display the message by Arduino, 16 x 2 means it has 16 number of columns and 2 number of rows. If you are completely new to 16x2 LCD Display Modules, you can check this Arduino LCD Interfacing tutorial to learn more about it.
Here, I am using a 5v Towerpro SG90 servo motor for making our customized door locker. It is a basic level servo motor and works fine with Arduino without any driving circuit or external module. Also, the cost of this servo motor is very less so you can easily afford to buy it. You can also check this Arduino Servo Motor Control tutorial to learn more about the servo motor and how it works. Connect the servo motor with Arduino Digital pin D9 and with a 5volt power supply. This servo motor has a total of 3 input lines (GND, +5V & SIGNAL LINE).
In this project, I have used a 4 x 4 matrix keypad (but the 4 x 4 keypad part is not available in fritzing for making this graphical representation), but don’t worry as 4 x 3 Matrix keypad also works fine with my coding. We need a keypad for password input and manually lock our customized door locker. It consists of 16 keys (soft switch) 4 keys in Rows (R1, R2, R3, R4) and 4 keys in Columns (C1, C2, C3, C4) when a key pressed, it establishes a connection in between the corresponding rows and columns. The below table shows how to connect your Arduino with Keypad.
| Keypad | Arduino |
| Pin 1 (row 1) | Digital Pin1 |
| Pin 2 (row 2) | Digital Pin 2 |
| Pin 3 (row 3) | Digital pin 3 |
| Pin 4 (row 4) | Digital pin 4 |
| Pin 5 (columns 5) | Digital pin 5 |
| Pin 6 (columns 6) | Digital pin 6 |
| Pin 7 (columns 7) | Digital pin 7 |
Arduino Code for Digital Keypad Door Lock
The complete Arduino Door Lock Code can be found at the bottom of this page. You can directly upload the code, but it is recommended to read the below paragraphs to understand how the code works. Also, it is important to make sure you have added the following keypad library to your Arduino IDE to compile the code successfully. To do that just open the link below and download the ZIP file. Then on your Arduino IDE navigate to Sketch -> Include Library -> Add.ZIP Library and browse for the file that you just downloaded.
After inserting all the header and library files, assign all the pin for LCD and define the password length and set the initial position of the servo to 0. After that, take a “char” datatype for declaring the number that can hold it including the null character.
//#include <Keypad.h>
#include <LiquidCrystal.h>
#include <Servo.h>
Servo myservo;
LiquidCrystal lcd(A0, A1, A2, A3, A4, A5);
#define Password_Lenght 7 // Give enough room for six chars + NULL char
int pos = 0;    // variable to store the servo position
char Data[Password_Lenght]; // 6 is the number of chars it can hold + the null char = 7
char Master[Password_Lenght] = "123456";
With this piece of code (char Master[Password_Lenght] = "123456";) -- under the Char Master, I declare the password of the door lock, then assign the number of rows and columns in the keyboard and also declare keyMaps and connect with rows and columns. Under the void setup, initialize the servo signal pin D9, servo status closed and print the name of the project/device/company with 3 seconds of delay on LCD time of starting the device.
void setup()
{
  myservo.attach(9);
  ServoClose();
  lcd.begin(16, 2);
  lcd.print(" Arduino Door");
  lcd.setCursor(0, 1);
  lcd.print("--Look project--");
  delay(3000);
  lcd.clear();
}
Under the loop function, the simple if-else condition is there. According to status (it’s locked automatically), print “Door is close” with 3 seconds of delay and servo rotate to close position, door data count as 1 otherwise door locker remains open and data count 0, servo open rotate to the position goes 0 degrees to 180 degrees and to close it goes from 180 to 0. The servo open and servo close functions are shown below.
void ServoOpen()
{
  for (pos = 180; pos >= 0; pos -= 5) { // goes from 0 degrees to 180 degrees
    // in steps of 1 degree
    myservo.write(pos);              // tell servo to go to position in variable 'pos'
    delay(15);                       // waits 15ms for the servo to reach the position
  }
}
void ServoClose()
{
  for (pos = 0; pos <= 180; pos += 5) { // goes from 180 degrees to 0 degrees
    myservo.write(pos);              // tell servo to go to position in variable 'pos'
    delay(15);                       // waits 15ms for the servo to reach the position
  }
}
Write the position of the servo with 15 seconds of delay to reach the servo position. Under the void open function, print on LCD “Enter Password” then the condition specifies that the entered password should be same with custom key, within this body data counted and stores char into the data array, incremented and input password printed on LCD if the data length (number of key) and input password matches with Data Master (where the pre-defined keys are present). Then as an action LCD clear, servo drive, print on LCD “Door is open” and the data counter is reset to 0.
If the input key does not match with Data Master, as an action on LCD clear print on LCD “Wrong Password “ to notify with 1 second of delay and remains in its lock position with data counter sets to 1 and continue this process in a loop.
if (data_count == Password_Lenght - 1) // if the array index is equal to the number of expected chars, compare data to master
  {
    if (!strcmp(Data, Master)) // equal to (strcmp(Data, Master) == 0)
    {
      lcd.clear();
      ServoOpen();
      lcd.print("  Door is Open");
      door = 0;
    }
    else
    {
      lcd.clear();
      lcd.print("  Wrong Password");
      delay(1000);
      door = 1;
    }
    clearData();
  }
Arduino Keypad DoorLock Assembling and Testing
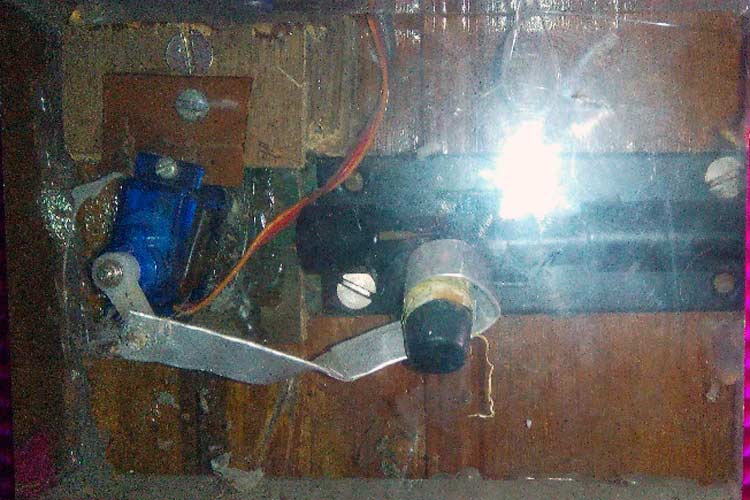
Now, fit everything on a 4 inch/ 6-inch plastic box and power it with a mobile charger, line up everything nicely using casing. Ideally, I could have used 3D printing to assemble my lock, but after designing my files, I found that 3D printing is very costly, so I just fixed the servo first, then connected the normal slide locker with my servo using metal plate and covered it up with glass fiber, although it is working fine, it is less secure.
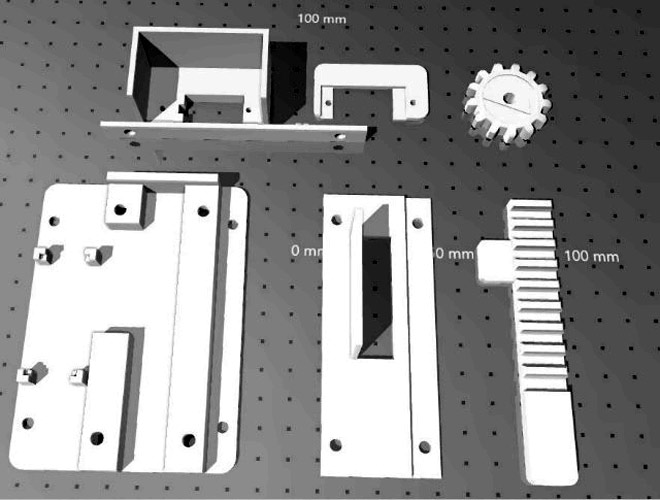
If you want more security, then you have to print a 3D door lock model that works internally with this servo. You can download the required STL files form the link below and 3D print them if you have access to a 3D printer.
Download STL files for 3D Printing
The design files are also shown in the picture below.
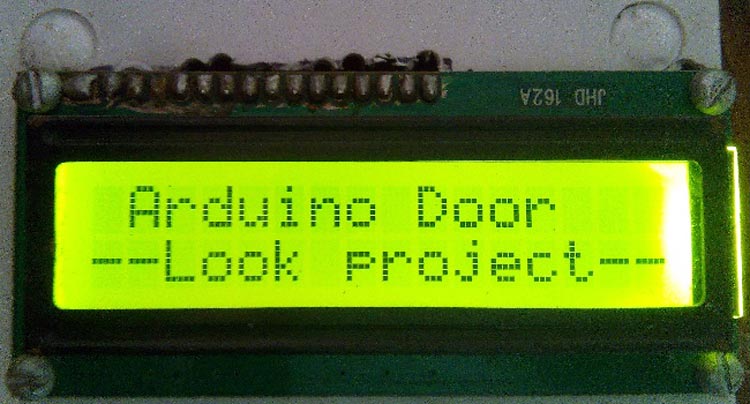
At the beginning of the project, the moment we power it up for the first time, we need to give the project name ( you can display the company name also) so it looks smart and exclusive like a commercial device (as you can see in the picture below).
With 3 seconds of delay, quickly lock the door and directly check the display for the status of the door lock as shown in the picture given below.
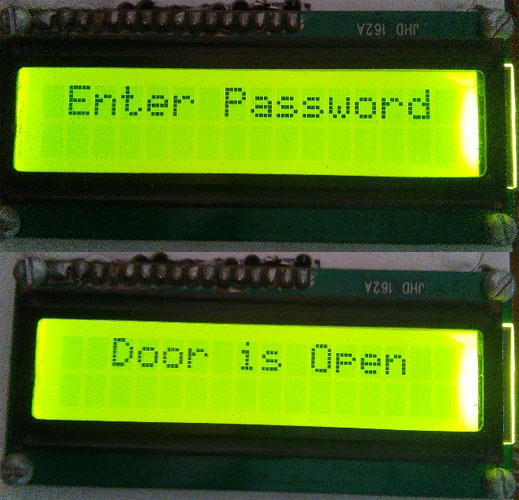
When you manually lock the door by pressing the “#” key, it first shows Door is closed for 1 second and then it displays Enter Password. On the other hand, when the door is unlocked by entering the correct password, it shows Door is Open.

If the door remains in unlock condition, it displays - Door is open as long as you manually lock the door according to the coding. I have given the code and you can customize the settings by changing the code display parameter as required. You can also check the complete working with the video linked at the bottom of this page.
Complete Project Code
#include <Keypad.h>
#include <LiquidCrystal.h>
#include <Servo.h>
Servo myservo;
LiquidCrystal lcd(A0, A1, A2, A3, A4, A5);
#define Password_Lenght 7 // Give enough room for six chars + NULL char
int pos = 0;    // variable to store the servo position
char Data[Password_Lenght]; // 6 is the number of chars it can hold + the null char = 7
char Master[Password_Lenght] = "123456";
byte data_count = 0, master_count = 0;
bool Pass_is_good;
char customKey;
const byte ROWS = 4;
const byte COLS = 3;
char keys[ROWS][COLS] = {
  {'1', '2', '3'},
  {'4', '5', '6'},
  {'7', '8', '9'},
  {'*', '0', '#'}
};
bool door = true;
byte rowPins[ROWS] = {1, 2, 3, 4}; //connect to the row pinouts of the keypad
byte colPins[COLS] = {5, 6, 7}; //connect to the column pinouts of the keypad
Keypad customKeypad( makeKeymap(keys), rowPins, colPins, ROWS, COLS); //initialize an instance of class NewKeypad
void setup()
{
  myservo.attach(9);
  ServoClose();
  lcd.begin(16, 2);
  lcd.print(" Arduino Door");
  lcd.setCursor(0, 1);
  lcd.print("--Look project--");
  delay(3000);
  lcd.clear();
}
void loop()
{
  if (door == 0)
  {
    customKey = customKeypad.getKey();
    if (customKey == '#')
    {
      lcd.clear();
      ServoClose();
      lcd.print("  Door is close");
      delay(3000);
      door = 1;
    }
  }
  else Open();
}
void clearData()
{
  while (data_count != 0)
  { // This can be used for any array size,
    Data[data_count--] = 0; //clear array for new data
  }
  return;
}
void ServoOpen()
{
  for (pos = 180; pos >= 0; pos -= 5) { // goes from 0 degrees to 180 degrees
    // in steps of 1 degree
    myservo.write(pos);              // tell servo to go to position in variable 'pos'
    delay(15);                       // waits 15ms for the servo to reach the position
  }
}
void ServoClose()
{
  for (pos = 0; pos <= 180; pos += 5) { // goes from 180 degrees to 0 degrees
    myservo.write(pos);              // tell servo to go to position in variable 'pos'
    delay(15);                       // waits 15ms for the servo to reach the position
  }
}
void Open()
{
  lcd.setCursor(0, 0);
  lcd.print(" Enter Password");
  customKey = customKeypad.getKey();
  if (customKey) // makes sure a key is actually pressed, equal to (customKey != NO_KEY)
  {
    Data[data_count] = customKey; // store char into data array
    lcd.setCursor(data_count, 1); // move cursor to show each new char
    lcd.print(Data[data_count]); // print char at said cursor
    data_count++; // increment data array by 1 to store new char, also keep track of the number of chars entered
  }
  if (data_count == Password_Lenght - 1) // if the array index is equal to the number of expected chars, compare data to master
  {
    if (!strcmp(Data, Master)) // equal to (strcmp(Data, Master) == 0)
    {
      lcd.clear();
      ServoOpen();
      lcd.print("  Door is Open");
      door = 0;
    }
      lcd.clear();
      lcd.print("  Wrong Password");
      delay(1000);
      door = 1;
    }
    clearData();
  }
    else
    {}
Comments
I think their is something
I think their is something problem in password entering coding part I didn't get it please give me some solution.
Missing ELSE
The problem I found was the loop closing the door in every cycle and clearing data. Solved it adding an else{ , and } at the end
if (Indice == LargoClave - 1) //Si el indice del array es igual al numero de caracteres esperado, compara la Clave introducida con la clave Maestra
{
if (!strcmp(Data, Master)) // equal to (strcmp(Data, Master) == 0)
{
lcd.clear();
ServoOpen();
lcd.print(" Door is Open");
door = 0;
}
else { <==================== Add here
lcd.clear();
lcd.print(" Wrong Password");
delay(1000);
door = 1;
}
clearData();
}
// else < ====== =======Coment this one
// {}
} //<============== Add here
Missing ELSE
The problem I found was the loop closing the door in every cycle and clearing data. Solved it adding an else{ , and } at the end
if (data_count == Password_Lenght - 1) // if the array index is equal to the number of expected chars, compare data to master
{
if (!strcmp(Data, Master)) // equal to (strcmp(Data, Master) == 0)
{
lcd.clear();
ServoOpen();
lcd.print(" Door is Open");
door = 0;
}
else { <==================== Add here
lcd.clear();
lcd.print(" Wrong Password");
delay(1000);
door = 1;
}
clearData();
}
// else < ====== =======Coment this one
// {}
} //<============== Add here

Hello sir I trying this project everything is going well but when I enter password it just take one number and LCD cursor not moving next to accept next no.please give me some solution.