

You just made payment to a restaurant and received a small bill or dispensed cash from an ATM and received the transaction receipt. These receipts are printed using a Thermal printer or receipt printer.
Thermal printer is the readily available and cost effective solution to print small bills or receipts. This easy to integrate solution is available everywhere. The printer uses thermochromic paper, a special type of paper which transforms into black color when it is exposed to a certain amount of heat. Thermal printer uses a special heating process to print on this paper. The printer head is heated in a special electrical to maintain a certain temperature. When the thermal paper passes through its head, its thermal coating turns into black where the head is heated.
In the previous project, we have interfaced Thermal printer with PIC Microcontroller. In this tutorial, we will interface a thermal printer with the Arduino Uno board. This project will work like this:-
- The printer will be connected with Arduino Uno.
- A tactile switch is being connected with the Arduino board to provide the ‘push to print’ option when pressed.
- Onboard Arduino LED will notify the printing status. It will glow only when the printing activity is going on.
Printer Specification and connections
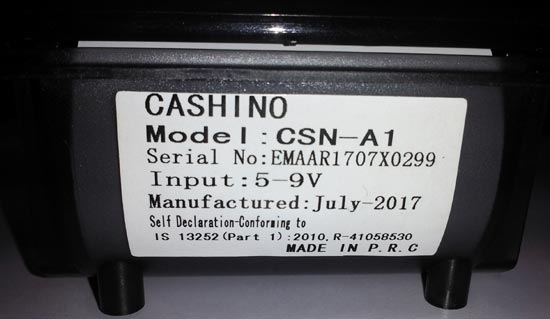
We are using CSN A1 Thermal Printer from Cashino, which is available easily and the price is not too high.
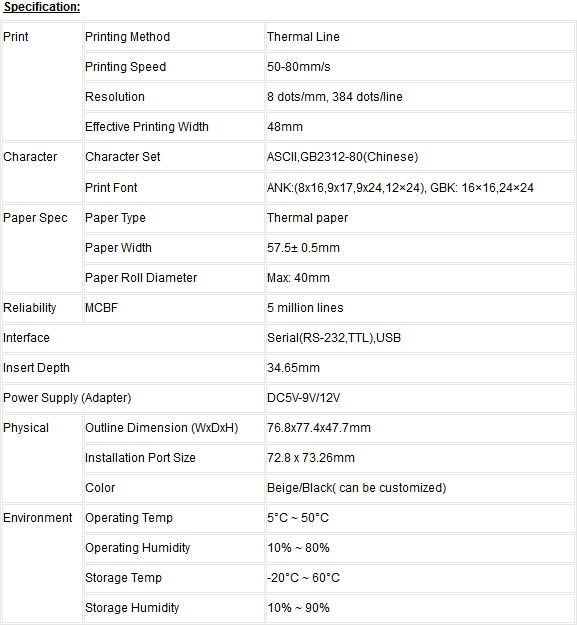
If we see the specification on its official website, we will see a table which provides the detailed specifications-
On the back side of the printer, we will see the following connection-
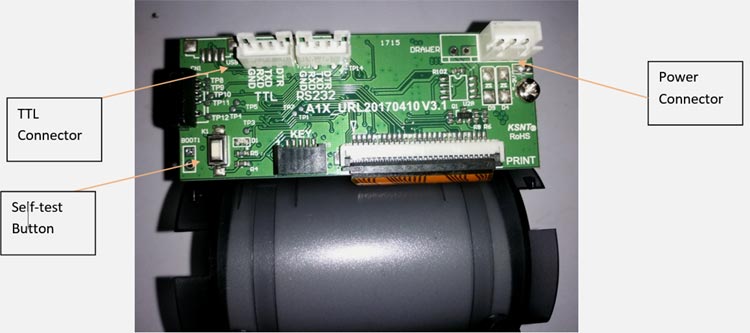
The TTL connector provides the Rx Tx connection to communicate with the microcontroller unit. We can also use the RS232 protocol to communicate with the printer. The power connector is for powering the printer and the button is used for printer testing purpose. When the printer is being powered, if we push the self-test button the printer, will print a sheet where specifications and sample lines will be printed. Here is the self-test sheet-
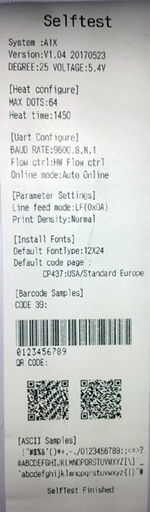
As we can see the printer use 9600 baud rate to communicate with the microcontroller unit. The printer can print ASCII characters. The communication is very easy, we can print anything by simply using UART, transmitting string or character.
The printer works from 5-9V, we will use a 9V 2A power supply which can power both the printer and the Arduino Uno. The printer needs more than 1.5A of current for heating the printer head. This is the drawback of the thermal printer as it takes huge load current during the printing process.
Prerequisites
To make the following project, we need the following things:-
- Breadboard
- Hook up wires
- Arduino UNO board with USB Cable.
- A computer with Arduino interface setup ready with the Arduino IDE.
- 10k resistor
- Tactile switch
- Thermal Printer CSN A1 with paper roll
- 9V 2A rated power supply unit.
Circuit Diagram and Explanation
Schematic for controlling printer with Arduino Uno is given below:

The circuit is simple. We are using a resistor to provide default state across the Switch input pin D2. When the button is pressed, D2 will become HIGH and this condition is used to trigger the printing. Single power supply of 9V 2A power supply is used to power the thermal printer and Arduino board. It is important to check the power supply polarity before connecting it to the Arduino UNO board. It has a barrel jack input with center positive polarity.
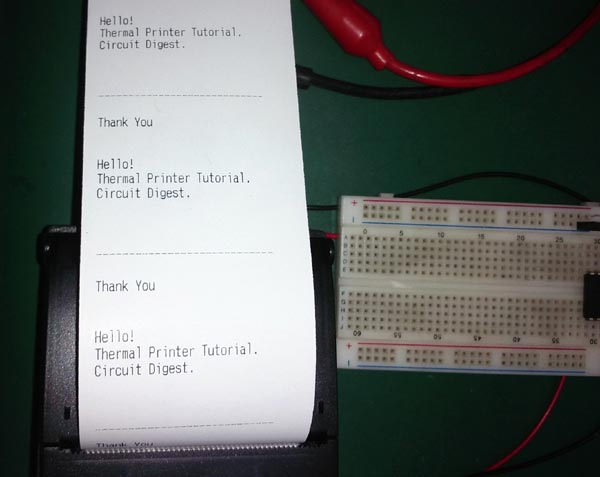
We constructed the circuit in a breadboard and tested it.

Arduino Program
Complete Arduino code with a Demo Video is at the end of the project. Here we are explaining few important part of the code.
At first, we declared the pins for pushbutton (Pin 2) and on board LED (Pin13)
int led = 13;
int SW = 2;
Then few variables are configured for debounce delay and switch press status
int is_switch_press = 0; // For detecting the switch press status
int debounce_delay = 300; //Debounce delay
In the setup function, we configured the LED pin as output and switch as input. We also configured the UART with 9600 baud rate.
void setup() {
/*
 *   This function is used to set the pin configuration
 */
 pinMode(led, OUTPUT);
 pinMode(SW, INPUT);
 Serial.begin(9600);
}
In the main loop, we first check whether the switch is pressed or not, then again we wait for sometime and again check to identify that the switch is truly pressed or not, if the switch is still pressed even after the delay, we print custom lines in the UART, so in the Thermal printer.
At the start of printing we set the onboard LED high and after printing, we turned it off by making it low.
void loop() {
  is_switch_press = digitalRead(SW); // Reading the Switch press status

  if (is_switch_press == HIGH){
    delay(debounce_delay); // debounce delay for button press
    if(is_switch_press == HIGH){
    digitalWrite(led, HIGH);
    Serial.println("Hello");
    delay(100);
    Serial.println("This is a Thermal printer interface");
    Serial.println("with Arduino UNO.");
    delay(100);
    Serial.println("Circuitdigest.com");
    Serial.println ("\n\r");
    Serial.println ("\n\r");
    Serial.println ("\n\r");
    Serial.println ("---------------------------- \n \r");
    Serial.println ("Thank You.");
    Serial.println ("\n\r");
    Serial.println ("\n\r");
    Serial.println ("\n\r");
    digitalWrite(led, LOW);
    }
  }

  else{
    digitalWrite(led, LOW);
  }
}
Check the complete Arduino code and Demonstration Video below.
Complete Project Code
/*

 * This code is to use in Arduino UNO for interfacing the Thermal Printer.

 * By:- Sourav Gupta

 * Date:- 14.11.2018

 * Circuitdigest.com

 */
//Pin declaration

int led = 13;

int SW = 2;
// Programe flow related operations
int is_switch_press = 0; // For detecting the switch press status

int debounce_delay = 300; //Debounce delay
void setup() {

/*

 *   This function is used to set the pin configuration

 */

 pinMode(led, OUTPUT);

 pinMode(SW, INPUT);

 Serial.begin(9600);

}
void loop() {

  is_switch_press = digitalRead(SW); // Reading the Switch press status
  if (is_switch_press == HIGH){

    delay(debounce_delay); // debounce delay for button press

    if(is_switch_press == HIGH){

    digitalWrite(led, HIGH);

    Serial.println("Hello");

    delay(100);

    Serial.println("This is a Thermal printer interface");

    Serial.println("with Arduino UNO.");

    delay(100);

    Serial.println("Circuitdigest.com");

    Serial.println ("\n\r");

    Serial.println ("\n\r");

    Serial.println ("\n\r");

    Serial.println ("---------------------------- \n \r");

    Serial.println ("Thank You.");

    Serial.println ("\n\r");

    Serial.println ("\n\r");

    Serial.println ("\n\r");

    digitalWrite(led, LOW);

    }

  }

  else{

    digitalWrite(led, LOW);

  }

}
Comments
Hello.
Hello.
I'm from Bulgaria. I have this mini thermal printer,
but my printer self-checks prints numbers and latin, but when i program it with arduino kod, it prints in chinese.
Tell me where I'm wrong. Help me find the right code and library for the Arduino - I will defend my dissertation with this printer.
Thanks.
Congratulations.

Hi good day...
Pls is it possible to get the cashino thermal printer here in nigeria
Or can I use another product of printer but with different specs and how