
 using ESP8266 and Arduino IDE")
This tutorial will help you to send SMS to any registered mobile number from ESP8266. The ESP8266 is a powerful Wifi module which has been dominating the world of IOT projects. This is a Microcontroller independent tutorial meaning; you do not need any UC/UP like Arduino or PIC. We will directly program the ESP8266 module using the Arduino IDE. Once it is programmed we can send text messages from it to any pre-programmed mobile number. I am using the IFTTT Applets to accomplish this task. If you are new to ESP8266 then kindly visit the tutorials below which will help you to get started with ESP8266 and teach you how to program your ESP8266 module using the Arduino IDE.
Other than this you do not need any pre-requisites for this tutorial for I will be explaining all the steps in details with Pictures and Videos. So let us get started....
Concept behind the Tutorial:
We know that the ESP8266 module can be configured both as AP or STA. Here we have configured it to work as station and have connected it to our Wifi Router. Once the connection is establish we have to find out a way to send SMS online. This online must also be easily accessible by out ESP8266 module. This is where we leverage the power of IFTTT (If This Then That) website. Using this website we can send SMS, E-mail, Whatsapp messages, Facebook updates, Twitter tweets and what not. They have a heck a lot of tools that can be used with little knowledge, but in this tutorial we are going to use the send message feature and leave the rest for other future tutorials.
After few tweaks in the IFTTT website we will able to get a HTTPS URL which when triggered will send a predefined Text message to a specific mobile number. Now, this URL has to be called by our ESP8266 module when needed and your SMS will be fired to your mobile number. Sounds fairly simple right!!? Let us see the steps involved.
Creating an IFTTT Applet:
Let us see how we can create an IFTTT Applet and get the URL for triggering the SMS to a specific mobile number. I have tried my best to explain them in steps, if you get stuck make use of the Video at the end of this tutorial.
Step 1: Visit www.IFTTT.com and sign up for new ID if you don’t have one already. After registering you will be sent a mail to your E-mail ID verify it and you will be logged into IFTTTT.
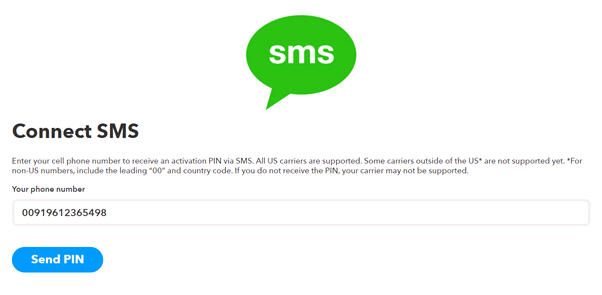
Step 2: Search for SMS Applet or visit this link. Now Register your Mobile number with that Applet here I have used the number “00919612365489” as an example number. Always include the leading “00” followed by your country code and then your mobile number. Here I am from India hence my country code is “91” and my mobile number is “96123456789”. Once the number is entered click on “Send Pin” and verify your mobile number
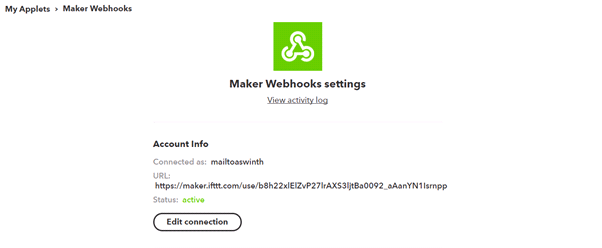
Step 3: Now we have configured one Applet, we will another Applet called Maker Webhooks, so search for it or use this link. Now click on “Connect” and you will get the following Screen.
Step 4: Now it is time to create our own Applet that could sync both the above applets. To do this navigate to My Applets -> New Applet, or follow this link. You will taken to this page.

Step 5: The term IF THIS THEN THAT means if something happens on the “This” then we have do something on “that”. Here if the Maker Webhooks Applet is Triggered then an SMS must be sent. So click on “this” (the blue colour plus icon) and search for Maker Webhooks then click on it. Now, you will be asked to choose a Trigger, so click on “Receive a web request”
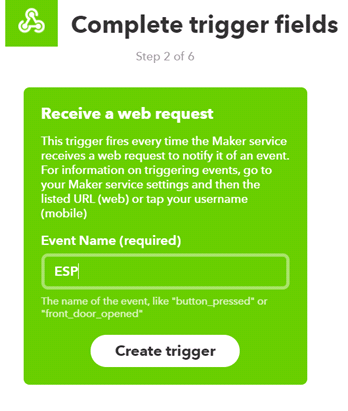
Step 6: Now you have to configure the Trigger by giving it an Event Name. I have named it “ESP” as shown below. You can use any event name, but remember this name for we have to use it later. Finally click on “Create Trigger”
Step 7: You should get the below Screen where, you have to configure the “That” Applet. Click on the Plus icon near “that”

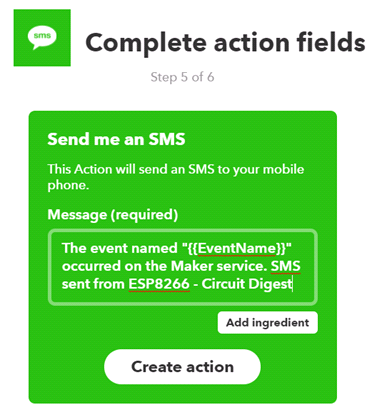
Step 8: Search for SMS Applet and click it. Then for choosing an Action click on “Send me SMS”. You will taken to the below screen, where you have to enter the text message that has to be sent to your mobile. Finally click on “Create action”
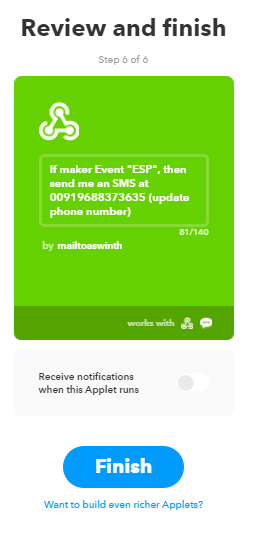
Step 9: You can review and Finish your Applet, it should be looking something like this below. Click on “Finish”
Step 10: Now, search for Maker Webhooks or use this link and click on “Documentation”. You should see something like this below
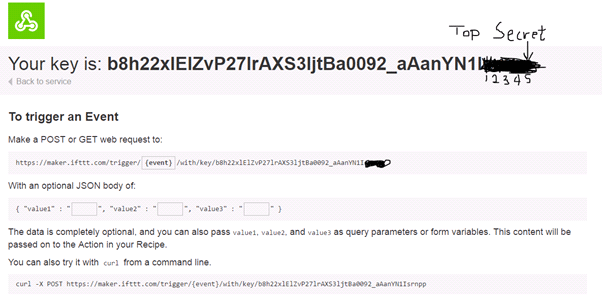
This is a very important page. This page will show you the key and instructions on how to trigger an event. Your page will display an unique key for your ID, keep it very confidential because anyone with this key can access all your Applets. I have hidden the last five digits of my API key so that it remains confidential.
Step 11: Now under “Make a Post or get web request”, you can see that we have an option to add the event name. Remember that in step 6 we created an Event named “ESP” so we have to use the same name and configure our URL like below.
![]()
Once you have changed the Event name click on “Test it”. You should receive a message to your registered mobile number. In our case the message should be “The even name ESP occurred on the Maker Service. SMS sent from ESP8266 –CircuitDigest” You can configure your own SMS as per your wish. You can also send sensor values from ESP module using the value 1 and value 2 option.
That is it we now have an HTTPS URL which when triggered will send a particular message to a specified number. You can copy this URL and keep it somewhere safe because we have to use this URL in our Arduino Program. You can also simply copy and paste this URL on any web browser and you can notice that the event is triggered. You will also get a reply like this shown below.

Programming your ESP8266 Module:
Now we have to program our ESP8266 Module using the Arduino IDE. In this program we simply have to connect to the Router and call for the HTTPS URL that we just demonstrated above and then the message will be triggered by that URL. The complete program is given at the end of this tutorial but few important chunks of code which needs modification are explained below.
const char* ssid = "BPAS home";
const char* password = "cracksun";
In the above line of code, use your own Wifi Credentials in my case “BPAS home” was my Wifi signal name and “cracksun” was my password.
String url = "/trigger/ESP/with/key/b8h22xlElZvP27lrAXS3ljtBa0092_aAanYN1IXXXXX";
Make sure you have modified the above line based on your Event name and Key, In my case the Event name was ESP (will be the same for you if you have named it ESP in step 6) and my API KEY was b8h22xlElZvP27lrAXS3ljtBa0092_aAanYN1IXXXXX. Change it to the key that you received
Note: This step is very important for your code to work.
The rest of the lines in the code are self explanatory anyhow if you have any doubts you can use the comment section.
Once your code is ready with modifications you are ready to upload it to your ESP8266 module. You can upload program from Arduino IDE as discussed in this tutorial “Programming your ESP8266 with Arduino IDE”
Output:
Once your upload is done open your serial monitor on Arduino IDE. You should see the following Debugging Information:
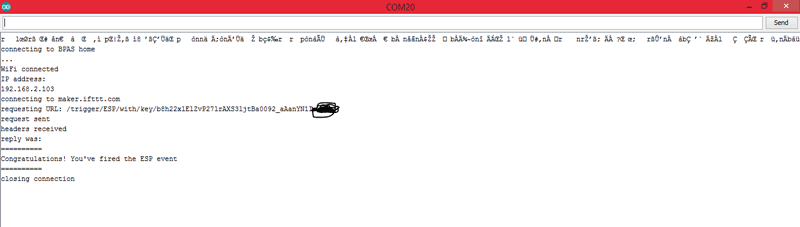
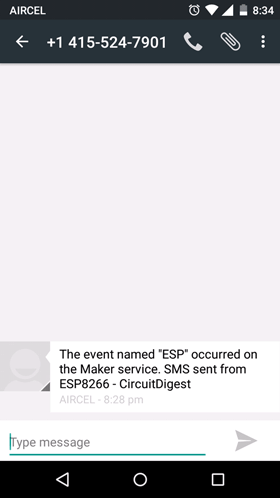
If your Serial monitor displays “Congratulation! You’ve fired the ESP event”, it means that everything has worked as it suppose to be. Now you can check your mobile and you should have received the message. The screenshot of the message is shown below
The video below will show you the complete working of the above discussed. Hope you have learnt how to send SMS from esp8266 using the IFTTT platform. You can also check out sending SMS from Nodemcu ESP8266 if you are from India, this tutorial uses the API from circuit digest and allows you to send SMS very easily.
Complete Project Code
/*Program to send SMS from ESP8266 via IFTTT.
 * For complete detials visit: www.circuitdigest.com
 * EXAMPLE URL: (do not use This)
 *  https://maker.ifttt.com/trigger/ESP/with/key/b8h22xlElZvP27lrAXS3ljtBa0092_aAanYN1IXXXXX
 *
 */
#include <ESP8266WiFi.h>
#include <WiFiClientSecure.h>
const char* ssid = "BPAS home";
const char* password = "cracksen";
const char* host = "maker.ifttt.com";
const int httpsPort = 443;

void setup() {
  Serial.begin(115200);
  Serial.println();
  Serial.print("connecting to ");
  Serial.println(ssid);
  WiFi.begin(ssid, password);
  while (WiFi.status() != WL_CONNECTED) {
    delay(500);
    Serial.print(".");
  }
  Serial.println("");
  Serial.println("WiFi connected");
  Serial.println("IP address: ");
  Serial.println(WiFi.localIP());

  WiFiClientSecure client;
  Serial.print("connecting to ");
  Serial.println(host);
  if (!client.connect(host, httpsPort)) {
    Serial.println("connection failed");
    return;
  }

  String url = "/trigger/ESP/with/key/b8h22xlElZvP27lrAXS3ljtBa0092_aAanYN1IXXXXX";
  Serial.print("requesting URL: ");
  Serial.println(url);
  client.print(String("GET ") + url + " HTTP/1.1\r\n" +
               "Host: " + host + "\r\n" +
               "User-Agent: BuildFailureDetectorESP8266\r\n" +
               "Connection: close\r\n\r\n");
  Serial.println("request sent");
  while (client.connected()) {
    String line = client.readStringUntil('\n');
    if (line == "\r") {
      Serial.println("headers received");
      break;
    }
  }
  String line = client.readStringUntil('\n');
  Serial.println("reply was:");
  Serial.println("==========");
  Serial.println(line);
  Serial.println("==========");
  Serial.println("closing connection");
}
void loop() {
}
Comments
Finding Host and portnumber
how to find httpsport number and host???
The invalid error key is
The invalid error key is because, you did not follow the step number 10 properly. Make sure the URL you are usig is a correct one. Simply load the URL on your browser and check if the message is received then proceed with the program.
ESP8266 - to IFTTT with values
Did you ever get any response to your question: "Do you have an example that shows how to send the optional json body as described in the Webhooks setup routine. I would like to send a text on or off depending on the status of a pin on the ESP8266."
Esp event fired successfully
Esp event fired successfully but no message came.
That sounds odd. Did you give
That sounds odd. Did you give your correct number with country code?
Message is coming one day
Message is coming one day late.why????
can u please tell me about
can u please tell me about using this" httpsPort = 443;" what does that mean??
That isp port number for
That isp port number for accessing IFTTT links. You dont have it change it. leave it as default
When I am putting my phone
When I am putting my phone number and requesting for 4 digit pin, the pin is coming one day late.As well as While Triggering the event the message is coming to my mobile one day late,why????
This problem is odd. Try
This problem is odd. Try using a different network carrier
Not connecting
Hello and my compliments on your tutorial! Very thorough. I have completed all of the steps incluging testing the "POST" command and all works fine but I don't seem to be able to connect to my network. It just gets stuck in the "while" loop at line 21:
while (WiFi.status() != WL_CONNECTED) {
delay(500);
Serial.print(".");
}
and prints dots forever. I'm using a Doit ESP12F Dev kit V3 (Node MCU).
Any suggestions?
Try some other example
Try some other example program and check if you ESP is able to function normally
Works brilliantly!
thanks for posting this excellent tutorial - I can now get a text every time the temperature in my kitchen falls below 16C
Still no help with JSON?
Can you please give a code example with the JSON post or Get as it is mentioned in the maker section of IFTTT? The format is something line this:
POST -H "Content-Type: application/json" -d '{"value1":val1,"value2":val2"value3":val3}' h.t.t.p.s://maker.ifttt.com/trigger/event_triggered/with/key/colT3-JdVm6xxxxxxxxxx (I put periods in the URL to make it not be a clickable link here)
But how does that look in your code that uses a string to hold the URL and then builds the GET?
Hi, it is possible to set the
Hi, it is possible to set the device for change my mobile number if I pressed some button? I want to make if I need to change mobile number, I only pressed the button. Thanks
IFTTT does not work with Airtel in India
Hi, I could not receive a PIN for my airtel no in India. Can you tell which carrier does your number belong in India? I dont think IFTTT works for Airtel in India.
Thank u for this tutorial, I
Thank u for this tutorial, I am working on a fall detection system.
please how do i get this to trigger when a fall has been detected ? Is there anything i need to add?
You can detect a fall using
You can detect a fall using accelerometer or gyroscope
send sensor value by sms
for my project i need to send the sensor value from arduino by sms to mobile . i dont understand how use that value option in step10 if you have any code or any solution related to that problem please mail it to my mail id . i really need it for my project to work.reply as fast as possible
What command should I give to
What command should I give to Arduino so that it should send an sms after that perticular code is executed like I want to send an sms after my flame sensor detects flame.
Plz help I have submission after two days
<html> in replay and not reciving sms
i did this project, every thing up to "headers recevied" is running correcty but in "reply was: " it is showing
"<html>" not "Congratulations! You've fired the ESP event" and sms is not comming
Reply to Balaji
I had the same issue with the response being <html>. The cause was a space character in the IFTTT event name.
For example I had the event name as "Fridge Alarm" and I get the error. I changed the event name to "Fridge_Alarm" in IFTTT and in the code and now it works correctly...
Sending text messages with no
Sending text messages with no problem with only one issue. What to do to receive just one text not one every few seconds. Is it possible by modification of your program ?
You can send message at
You can send message at required intervals by modifying the program. But you cannot read a message using this program
I have a temperature sensor.
I have a temperature sensor. I want to send a message saying "its greater than 30 degree Celsius" when the temperature goes above 30 degrees.
How do i send that information ?
How is the temperature sensor
How is the temperature sensor interfaced with ESP. If it requires an analog pin then ESP8266 might not be a good choice. Try ESP12 or ESP32.
OR if you want to send only text message, you can also use an Arduino UNO with GSM SIM900 module to send message.
usage limit
this applet has got a usage limit and stops working after showing a message usage limit exceeded.
good demo - no longer works?
Thanks fir putting together this demo. It help me understand many new things.
I followed your steps exactly, and the demo worked a couple of days ago but doesn't today.
For example when I test the trigger from the command line: C:\>curl -X POST https://maker.ifttt.com/trigger/ESPJ1/with/key/p8oBVLdFa4TMvNOlx3l-2ktW…
I get:
Congratulations! You've fired the ESPJ1 event
I wonder if either the Maker event or the IFTTT service has reached some limit and no longer works. I will try to enquire with IFTTT also.
Thanks again,
It Works but ...
It WORKS ! but only after sucessfully uploading the code. I assumed that after uploading the SMS would be triggered whenever the ESP8266 is powered on. Do I need to do something to reset the ESP8266?
I want to use this circuit to make a water level alarm which will trigger the event when a float switch detects that the water level in my basement sump has been high for a few minutes. In normal circumstances the pump starts and reduces the level before the high water level is reduced but if the pump does not operate or can't reduce the level quickly enough I need to know in order to prevent the basement flooding.
I have the code for this working on an Arduino so I assume I can insert some similar code to run on the ESP8266.
Any help or suggestions would be great
Nick
Yup code will be similar
Here the author has programed to send SMS every time you power up the ESP8266, but you can tweak it. Use a GPIO pin on ESP8266 to detect if the water reaches critical level and if yes then run this code for sending SMS
Hello, i really need your
Hello, i really need your help. I am with a problem, my sketch stops in this part, and i can't find the sollution:
connected with Ranata Dias, channel 5
dhcp client start...
ip:192.168.0.18,mask:255.255.255.0,gw:192.168.0.1
.
WiFi connected
IP address:
192.168.0.18
connecting to maker.ifttt.com
connection failed
Thank you!
Example no longer works
As others have reported, the example code no longer seems to work. Can you retest to ensure it still works with the latest github downloaded libraries?
Maybe this is my internet connection issue? Maybe the port is being blocked?
// Error
connecting to maker.ifttt.com
connection failed
Solution to maker.ifttt.com connection failed
After much reading I think I have found a solution to the connection failed issue based on the example sketch posted here.
Changes I did below. I can't say exactly which of these fixed the issue but I can confirm that it fixed the issue for me.
Change: WiFiClientSecure client;
To: BearSSL::WiFiClientSecure client;
Add lines
const int API_TIMEOUT = 10000; //keep it long if you want to receive headers from client
Add following lines in setup
client.setInsecure();
client.setTimeout(API_TIMEOUT);
Worked for me, maybe this will help others
sending sms from arduino uno to smartphone
Hello!
I saw your guide, it is really invested and full of explanations and helped me a lot, well done to you !!!
I am doing a project which has part that sending a message by controller Ardoino Uno with esp8266 platform'
But the code you wrote is not suitable for this controller because you use ESP8266 as a module in itself.
I would be very grateful if you could help me and tell what code I need to fit the program to Arduino uno with esp8266 module!!
Thanks bro really THANKING U
THANK U SIR ORAYIRAM THANK U THANK U VERY MUCH SIR MAY GOD BLESS U
I just tried to set up IFTTT
I just tried to set up IFTTT to send text messages. According to their web site, they stopped supporting sending SMS messages on May 21st 2019. There may be other alternative methods.
Serial.println();
Serial.println();
Serial.println("Starting connection to server...");
Serial.println(host);
// if you get a connection, report back via serial
if (client.connect(host, httpsPort)) {
Serial.println("Connected to server");}
try this code instead, let me know if it works
400 bad request
i always get the error 400 bad request when sending the request
client.print(String("GET ") + url + " HTTP/1.1\r\n" +
"Host: " + host + "\r\n" +
"User-Agent: BuildFailureDetectorESP8266\r\n" +
"Connection: close\r\n\r\n");
this is the code and the url is correct i've checked many times
getting this when i verify
 getting this when i verify the code , also nothing in serial port after uploding . I have directly connected my esp8266 to my laptop.
The code seemed to have
The code seemed to have compiled without any problem did you get errors while uploading it?. have you set the right baud rate in the serial monitor. Also make sure you ifttt recepie is working right

Do you have an example that shows how to send the optional json body as described in the Webhooks setup routine. I would like to send a text on or off depending on the status of a pin on the ESP8266. Thanks, Jim