

Raspberry Pi has always been the first choice for developing IoT based applications if some level of computation is involved. With the flexibility of python and strong developer community it is very easy to collect, log, analyze or report a set of data using the Pi. In this tutorial we will learn how to blend in the power of Raspberry Pi with the Amazon AWS service to publish data online to the Internet.
In this tutorial, we will use the DHT11 sensor to read the value of Temperature and Humidity, then connect to the AWS IOT service and update the sensor values using the AWS IOT SDK. This data then can be visualized in the Amazon IOT console to make sure we are getting the data published to the internet.
You can also use AWS Elastic Search Service to fetch these sensor vales and store it in a database and then use Kibana Dashboard service to visualize the sensor data as neat plotted graph. Interesting Enough?!!! So, Lets gets started...
Pre-requisites:
This tutorial assumes that you have already created your free AWS account and know the basics about AWS IoT service like creating a thing, certificate, policy and to publish values using it. If otherwise read the below tutorial.
It also assumes that you know how to interface a LCD and DHT11 sensor to Raspberry Pi and the libraries for doing the same is already installed on your Pi. If not, proceed with the below tutorial.
At the end of the above tutorial you would have created a thing on AWS-IOT and you should also have the broker address for your thing along with the certificates needed to access your thing. We also assume that your Raspberry pi is already set up with an OS and is connected to the internet. With these in place let’s proceed with the tutorial. If you are new to Raspberry Pi then go through Getting started with Raspberry pi first.
Installing the AWS IOT Device SDK for Python on Raspberry Pi:
To use the AWS service on Pi, we can install either of the two SDKs. One is the JavaScript SDK which uses JavaScript as programming language and the other is the Python SDK which obviously uses the python as programming language. Here we are choosing the Python as our SDK since we are bit more comfortable with Python than JavaScript.
The complete information on AWS IOT SDK is available on its GitHub page.
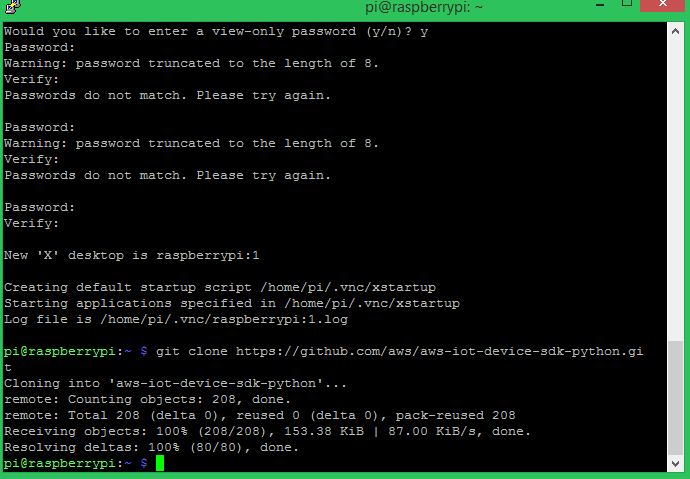
Step 1: To install the SDK on your Pi, open the terminal on type the following command
git clone https://github.com/aws/aws-iot-device-sdk-python.git
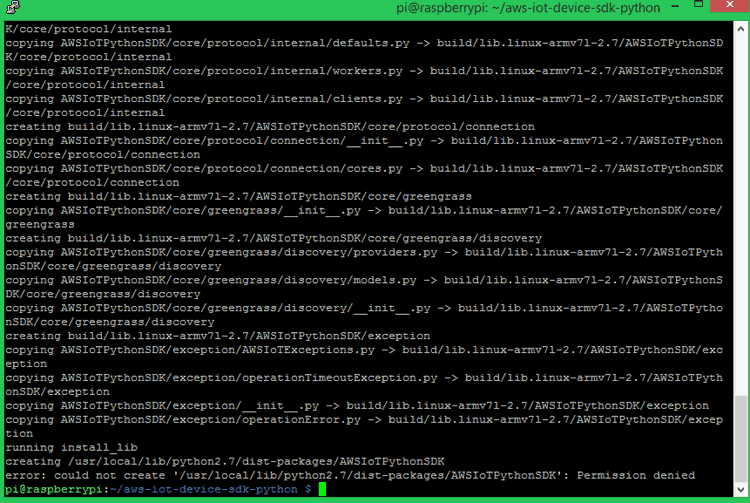
Step 2: This should have installed the aws directory on your Pi, now navigate into it using the following command.
cd aws-iot-device-sdk-python

Step 3: Inside the directory install the setup file using the line below
python setup.py install
Circuit Diagram:
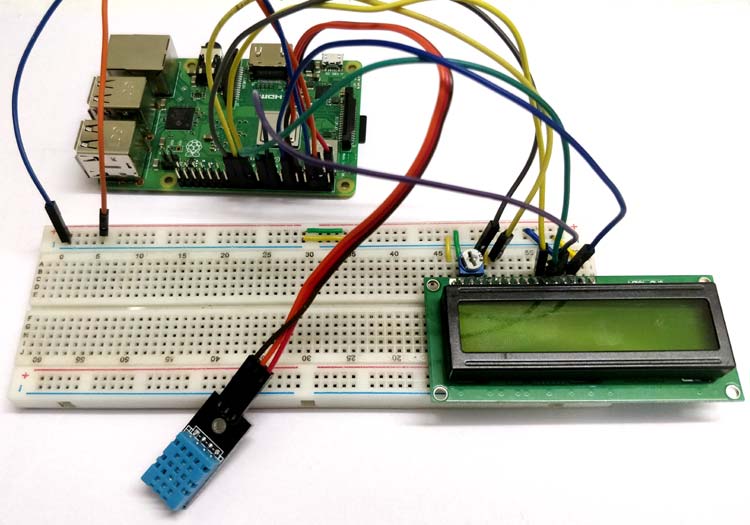
On the hardware side we have a Raspberry Pi connected to a DHT11 Sensor and a LCD screen. The DHT11 is used to get the value of Temperature and Humidity and LCD is used to display the values and de-bugging information. The circuit diagram for the same is shown below.

Both the LCD and DHT11 sensor works with +5V supply so we use the 5V pins on the Raspberry Pi to power both. A pull up resistor of value 1k is used on the output pin of the DHT11 sensor, if you are using a module you can avoid this resistor.
A trimmer pot of 10k is added to the Vee pin of the LCD to control the contrast level of the LCD. Other than that all the connections are pretty straight forward. But make a note of which GPIO pins you are using to connect the pins since we will need in our program. The below chart should allow you to figure out the GPIO pin numbers.
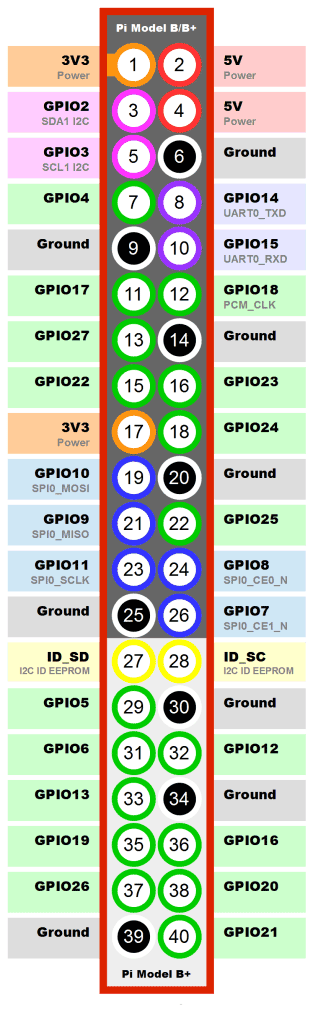
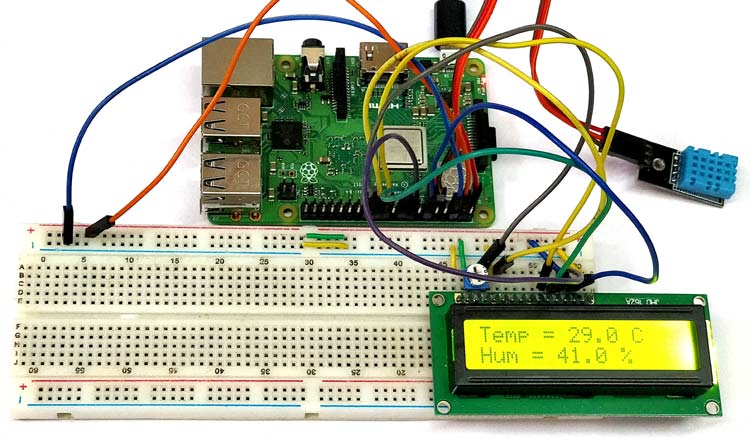
Use the chart and make your connections according to the circuit diagram. I used a breadboard and jumper wires to make my connections. Since I used a module I wired it directly to Raspberry Pi. My hardware looked like this below
Programming your Raspberry Pi:
In our python program we have to read the value of temperature and humidity, display it on the LCD screen and also publish both the values to the Amazon IOT thing that we have created already in previous tutorial. So make sure you have created the thing and you have all the three key files and the broker address of the thing that you have created.
In our python program we have to link the three key files so that Raspberry Pi can gain access to publish values on our thing. So copy all the three key files and paste it on the desktop of your Raspberry pi as we will need their path address in our program.
The complete python program can be found at the bottom of this page, you can use the program after editing the broker address and path directories according to the thing you created. Further bellow I have explained the code in small snippets.
We start by importing the libraries required for our project. The three main libraries are AWS SDK, LCD library and DHT Library, make sure you have installed all the three your Pi. The time and datetime library will be installed by default.
from AWSIoTPythonSDK.MQTTLib import AWSIoTMQTTClient #Import from AWS-IoT Library
import time#To create delay
from datetime import date, datetime #To get date and time
import Adafruit_CharLCD as LCD #Import LCD library
import Adafruit_DHT #Import DHT Library for sensor
In the next line we have to provide the Thing details like Broker address, Client name and path to the certificate and key files. Here I have used the client name as new_Client you can use the same or any name of your choice. The broker address should be changed to the address of the thing that you created and the path directory should also be changed according to your thing. Other than these 2 things you don’t have to change anything in the following lines.
myMQTTClient = AWSIoTMQTTClient("new_Client")
myMQTTClient.configureEndpoint("qwert1234567yuio89.iot.us-east-2.amazonaws.com", 8883)
myMQTTClient.configureCredentials("/home/pi/Desktop/ESP32_Thing certificates/CA.pem", "/home/pi/Desktop/ESP32_Thing certificates/private.pem.key", "/home/pi/Desktop/ESP32_Thing certificates/certificate.pem.crt")
myMQTTClient.configureOfflinePublishQueueing(-1)  # Infinite offline Publish queueing
myMQTTClient.configureDrainingFrequency(2)  # Draining: 2 Hz
myMQTTClient.configureConnectDisconnectTimeout(10)  # 10 sec
myMQTTClient.configureMQTTOperationTimeout(5)  # 5 sec
Next we have to specify the pin details of our connection. The GPIO pin number of each pin is allocated to its respective name. Here we have used the DHT sensor on pin 17 and LCD in 4-bit mode. The code for the same is shown below
sensor_name = Adafruit_DHT.DHT11 #we are using the DHT11 sensor
sensor_pin = 17 #The sensor is connected to GPIO17 on Pi

lcd_rs        = 7  #RS of LCD is connected to GPIO 7 on PI
lcd_en        = 8  #EN of LCD is connected to GPIO 8 on PI
lcd_d4        = 25 #D4 of LCD is connected to GPIO 25 on PI
lcd_d5        = 24 #D5 of LCD is connected to GPIO 24 on PI
lcd_d6        = 23 #D6 of LCD is connected to GPIO 23 on PI
lcd_d7        = 18 #D7 of LCD is connected to GPIO 18 on PI
lcd_backlight =  0  #LED is not connected so we assign to 0
Then we initialize the LCD and display a small intro message on the LCD screen. After that we will try to connect with the AWS thing using the broker address and key files entered above. If the connection is successful the LCD will display “Connected to AWS thing” or it will try for 10 seconds and if it failed then it will display Error message. If you receive error message make sure you have created the thing successfully and have linked it properly with the code. You can always go back to previous tutorial to see if you have created the thing properly in AWS.
if time.time() < connecting_time:  #try connecting to AWS for 10 seconds
    myMQTTClient.connect()
    myMQTTClient.publish("DHT11/info", "connected", 0)
    print "MQTT Client connection success!"
    lcd.message('Connected to \n AWS thing') #if connected
else:
    print "Error: Check your AWS details in the program"
    lcd.message('Error: \nInvalid details') #if not connected
Once the connection is established successfully, we enter into the infinite while loop to publish the value of time, temperature and Humidity as a payload. The payload here should always be a string in JSON format. So first we being by reading the current date and time and saving it in a variable by using the below lines
    now = datetime.utcnow() #get date and time
    current_time = now.strftime('%Y-%m-%dT%H:%M:%SZ') #get current time in string format
Then we read the humidity and temperature values form the DHT11 sensor and display it on a LCD screen. The variable humidity and temperature will hold the value of humidity and temperature respectively
humidity, temperature = Adafruit_DHT.read_retry(sensor_name, sensor_pin) #read from sensor
and save respective values in temperature and humidity varibale
    lcd.clear() #Clear the LCD screen
    lcd.message ('Temp = %.1f C' % temperature) # Display the value of temperature
    lcd.message ('\nHum = %.1f %%' % humidity)  #Display the value of Humidity
    time.sleep(2) #Wait for 2 sec then update the values
As told earlier the payload should be in the form of string with curly brackets around it we append the value of date, time, Temperature and humidity after converting the variable into strings as shown below.
    #prepare the payload in string format
    payload = '{ "timestamp": "' + current_time + '","temperature": ' + str(temperature) + ',"humidity": '+ str(humidity) + ' }'
Finally once the payload is ready we have to publish it to the MQTT Client. This can be done by using the myMQTTclient.publish command. While publishing to a thing we should also give it a name, here I have named it DHT11/data but you can name it anything you wish to. But make sure you remember the name since we will need to subscribe from our thing to view the data.
Testing the python program through Shell Window:
Once the program is ready, launch it using the choice of yours. I have used the Python IDE to launch the program on the shell window. If everything is okay you should get a message connection successful and all the payload should be displayed on the window. You can check if the values of temperature and humidity are being read correctly. The payload will be updated for every 5 seconds. The shell window will look something like this below
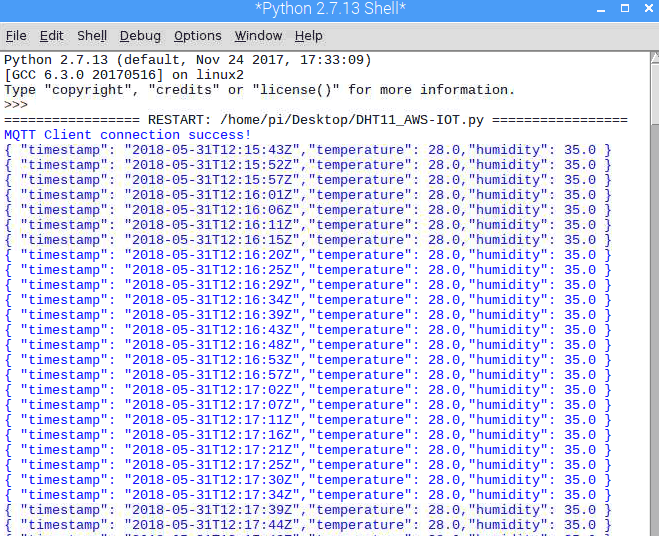
If you have any problem make sure you have given the correct key details and the broker address, also check that if the thing can be connected to using the MQTT.fx software. If the shell displays MQTT Client connection success and hangs there, it means that DHT11 sensor is not responding check if you have connected to the correct pin and the sensor is functional.
Working:
Once you launch the program and get the above details on the shell window it means that program is responding properly and the values are being uploaded to the Amazon AWS server. You can also notice the LCD display to check if it says Published to AWS-IoT every 5 seconds as shown below.

We can get into the MQTT.fx application and subscribe to the topic DHT11/data. Then we should be able to get all the data that is being published by the Raspberry Pi. This data will also be updated for every 5 seconds; your MQTT screen will look something like this below
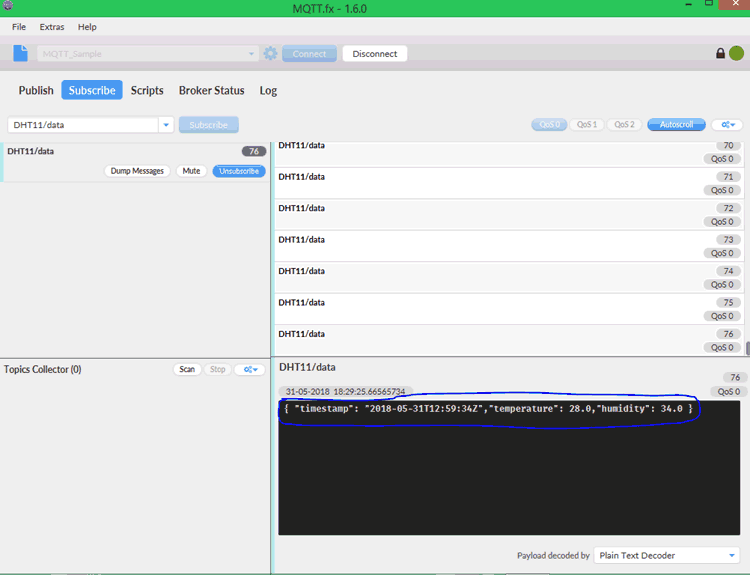
As you can see the payload is being received on the MQTT software as highlighted in blue. You can also watch the video below to know how the project works. Since now we have our data on the internet we can use it with other tools provided by Amazon like Elastic search and Lambda to save the data in a database or visualize then on a graph. There are much more applications, based on how we have to get benefited by the data.
Hope you understood the tutorial and enjoyed building something similar, if you have any problem in getting this done, post it on the comment section below or use the forums for technical help.
Complete Project Code
#Program to read the values of Temp and Hum from the DHT11 sensor and send it over to AWS-IOT
#Website: www.circuitdigest.com

from AWSIoTPythonSDK.MQTTLib import AWSIoTMQTTClient #Import from AWS-IoT Library

import time#To create delay

from datetime import date, datetime #To get date and time

import Adafruit_CharLCD as LCD #Import LCD library

import Adafruit_DHT #Import DHT Library for sensor

myMQTTClient = AWSIoTMQTTClient("new_Client")

myMQTTClient.configureEndpoint("a2b6vkjgdpftm1.iot.us-east-2.amazonaws.com", 8883)

myMQTTClient.configureCredentials("/home/pi/Desktop/ESP32_Thing certificates/CA.pem", "/home/pi/Desktop/ESP32_Thing certificates/private.pem.key", "/home/pi/Desktop/ESP32_Thing certificates/certificate.pem.crt")

myMQTTClient.configureOfflinePublishQueueing(-1)  # Infinite offline Publish queueing

myMQTTClient.configureDrainingFrequency(2)  # Draining: 2 Hz

myMQTTClient.configureConnectDisconnectTimeout(10)  # 10 sec

myMQTTClient.configureMQTTOperationTimeout(5)  # 5 sec

sensor_name = Adafruit_DHT.DHT11 #we are using the DHT11 sensor

sensor_pin = 17 #The sensor is connected to GPIO17 on Pi

lcd_rs        = 7  #RS of LCD is connected to GPIO 7 on PI

lcd_en        = 8  #EN of LCD is connected to GPIO 8 on PI

lcd_d4        = 25 #D4 of LCD is connected to GPIO 25 on PI

lcd_d5        = 24 #D5 of LCD is connected to GPIO 24 on PI

lcd_d6        = 23 #D6 of LCD is connected to GPIO 23 on PI

lcd_d7        = 18 #D7 of LCD is connected to GPIO 18 on PI

lcd_backlight =  0  #LED is not connected so we assign to 0
lcd_columns = 16 #for 16*2 LCD

lcd_rows    = 2 #for 16*2 LCD
lcd = LCD.Adafruit_CharLCD(lcd_rs, lcd_en, lcd_d4, lcd_d5, lcd_d6, lcd_d7,

                           lcd_columns, lcd_rows, lcd_backlight)   #Send all the pin details to library
lcd.message('AWS-IoT with Pi \n -CircuitDigest') #Give a intro message

time.sleep(2) #wait for 2 secs

lcd.clear() #clear the LCD
connecting_time = time.time() + 10
if time.time() < connecting_time:  #try connecting to AWS for 10 seconds

    myMQTTClient.connect()

    myMQTTClient.publish("DHT11/info", "connected", 0)

    print "MQTT Client connection success!"

    lcd.message('Connected to \n AWS thing') #if connected

else:

    print "Error: Check your AWS details in the program"

    lcd.message('Error: \nInvalid details') #if not connected


time.sleep(2) #wait for 2 secs

while 1: #Infinite Loop

    now = datetime.utcnow() #get date and time

    current_time = now.strftime('%Y-%m-%dT%H:%M:%SZ') #get current time in string format


    humidity, temperature = Adafruit_DHT.read_retry(sensor_name, sensor_pin) #read from sensor and save respective values in temperature and humidity varibale

    lcd.clear() #Clear the LCD screen

    lcd.message ('Temp = %.1f C' % temperature) # Display the value of temperature

    lcd.message ('\nHum = %.1f %%' % humidity)  #Display the value of Humidity

    time.sleep(2) #Wait for 2 sec then update the values
    #prepare the payload in string format

    payload = '{ "timestamp": "' + current_time + '","temperature": ' + str(temperature) + ',"humidity": '+ str(humidity) + ' }'
    print payload #print payload for reference

    myMQTTClient.publish("DHT11/data", payload, 0) #publish the payload


    lcd.clear() #Clear the LCD screen

    lcd.message ('Published to \n  AWS-IOT') # Display the value of temperature
    time.sleep(2) #Wait for 2 sec then update the values

Hi kindly send me abstract f this releted project