
Snake Game has been very popular since the beginning of the Mobile phones. Initially it was come in Black and white cell phones, and soon became very famous. Then with the advancement of the Cellphones, this game has also changed a lot, and now many graphical and colourful versions of this game are available.
Snake game has also become very popular DIY project for electronics Hobbyist and Students. So today we are going to demonstrate, Arduino Snake Game, with all its basic functionalities, while keeping it simple at the same time.
Components Used:
- Arduino UNO
- 8x8 LED Dot Matrix Display
- Shift Register 74HC595
- 16x2 LCD
- POT 1K
- Push Buttons
- Connecting wires
- Bread Board
- Power Supply
Working Explanation:
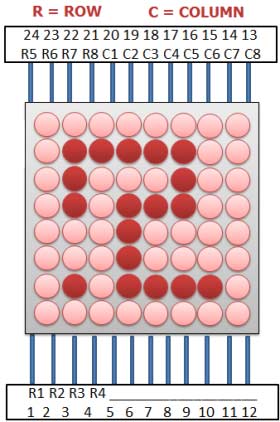
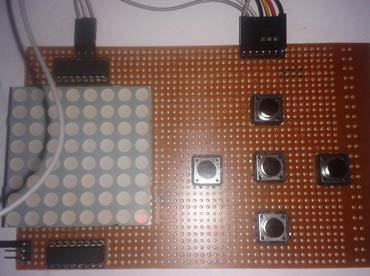
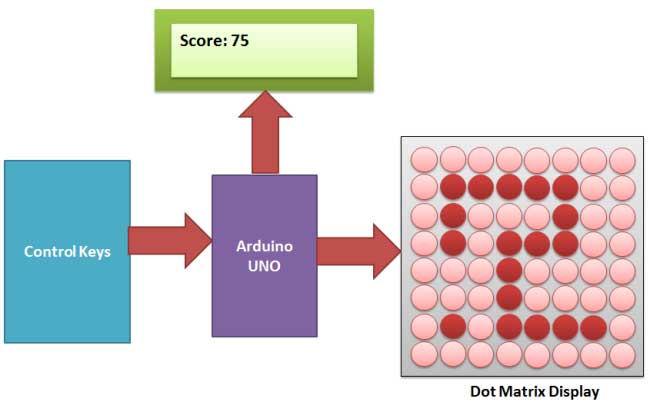
This is little complicated game to build. But in this tutorial, we have made it simple for you. To make this project, we have used an 8x8 red colour Dot matrix display for displaying the snake and its food dot, a LCD for displaying the points or score, 5 push buttons for giving directions and start the game and finally an Arduino UNO for controlling the whole the process. Pin diagram of 8x8 LED Dot Matrix Display with its original image has been given below:
When we power up the circuit, first we show a welcome message and then a “Press Start To Play” hint on the LCD. After this, LCD shows the score as zero and dot matrix display shows two dots as snake and a single dot as food.
Now user need to press the middle button to start the game and snake start moving in upward direction by default. Then user needs to give direction to snake by pressing the ‘Direction keys’ around the middle button. Here we have used five keys (push buttons) namely Left key, Right key, Up key, Down key and Start key. Whenever the snake reaches to the food dot or eats the food, score increases by 5 points each time and the Snake length is increased by one dot (LED) each time, also snake speed become faster than before. And whenever snake would strike at any wall or reach at the end of LED matrix, then it would end the game (“Game Over”). Then user needs to start game again by pressing start key.
Circuit Explanation:
Circuit of this Snake Game Project is little complex. Here we have connected dot matrix display by using Shift Register 74HC595. Here two shift registers are used, one for driving the columns and second for driving the rows. Control pins of both the registers, Column shift register and row shift register (SH, ST), are directly connected to Arduino’s pin number 14 and 16 respectively. And DS pin of column shift register and row shift register are directly connected to pin number 15 and 17 of Arduino. Start button for start the game is connected at pin number 3, left direction button at pin 4, right direction button at pin 6, up direction button at pin 2 and down direction button at pin 5. A LCD is also connected in our hardware to show score. RS and EN pins are directly connected at pin 13 and 12. RW pin is directly ground. And data pins d4-d7 are connected at pin 11, 10, 9, 8 of Arduino. Rest of connection are shown in the circuit diagram.

Programming Explanation:
To write this Arduino snake game code, first of all we include header files and define pins for LCD. And then define some pins for direction buttons and data pin for shift registers.
#include<LiquidCrystal.h>
LiquidCrystal lcd(13,12,11,10,9,8);

#define ds_col 15
#define sh_col 16
#define st_col 14
#define ds_row 17

#define start 3
#define up 2
#define down 5
#define left 4
#define right 6
Then we initialize all the things that we have used in the program. In the setup function we initialize LCD, giving direction to input output pins, pull-up the bits and showing welcome message on LCD.
void setup()
{
    lcd.begin(16,2);
    pinMode(ds_col, OUTPUT);
    pinMode(sh_col, OUTPUT);
    pinMode(st_col, OUTPUT);
    pinMode(ds_row, OUTPUT);
    pinMode(start, INPUT);
    ... ....
    .... ....
And then we start game in loop function.
void show_snake(int temp)
{
 for(int n=0;n<temp;n++)
 {
   int r,c;
  for(int k=0;k<21;k++)
  {
  ... ....
  .... ....
Here we have used the below function for reading input direction from the push button.
void read_button()
{
 if(!digitalRead(left))
 {
   move_r=0;
   move_c!=-1 ? move_c=-1 : move_c=1;
   while(!digitalRead(left));
   ... ....
   .... ....
Check the full C Code of Snake Game below.
Complete Project Code
#include<LiquidCrystal.h>
LiquidCrystal lcd(13,12,11,10,9,8);
#define ds_col 15
#define sh_col 16
#define st_col 14
#define ds_row 17
#define start 3
#define up 2
#define down 5
#define left 4
#define right 6
char Col[21],Row[21],move_c,move_r;
int colum_data(int temp)
{
  switch(temp)
  {
   case 1: return 1;break;
   case 2: return 2; break;
   case 3: return 4; break;
   case 4: return 8; break;
   case 5: return 16; break;
   case 6: return 32; break;
   case 7: return 64; break;
   case 8: return 128; break;
   default: return 0; break;
  }
}
int row_data(int temp)
{
  switch(temp)
  {
   case 1: return 1;break;
   case 2: return 2; break;
   case 3: return 4; break;
   case 4: return 8; break;
   case 5: return 16; break;
   case 6: return 32; break;
   case 7: return 64; break;
   case 8: return 128; break;
   default: return 0; break;
  }
}
void read_button()
{
 if(!digitalRead(left))
 {
   move_r=0;
   move_c!=-1 ? move_c=-1 : move_c=1;
   while(!digitalRead(left));
 }
 if(!digitalRead(right))
 {
   move_r=0;
   move_c!=1 ? move_c=1 : move_c=-1;
   while(!digitalRead(right));
 }
 if(!digitalRead(up))
 {
   move_c=0;
   move_r!=-1 ? move_r=-1 : move_r=1;
   while(!digitalRead(up));
 }
 if(!digitalRead(down))
 {
   move_c=0;
   move_r!=1 ? move_r=1 : move_r=-1;
   while(!digitalRead(down));
 }
}
void show_snake(int temp)
{
 for(int n=0;n<temp;n++)
 {
   int r,c;
  for(int k=0;k<21;k++)
  {
   int temp1=Col[k];
   c=colum_data(temp1);
   int temp2=Row[k];
   r=0xff-row_data(temp2);
   for(int i=0;i<8;i++)
   {
         int ds=(c & 0x01);
         digitalWrite(ds_col, ds);
         ds=(r & 0x01);
         digitalWrite(ds_row, ds);
         digitalWrite(sh_col, HIGH);
         c>>=1;
         r>>=1;
         digitalWrite(sh_col, LOW);
    }
    digitalWrite(st_col, HIGH);
    digitalWrite(st_col, LOW);
    read_button();
    delayMicroseconds(500);
  }
 }
}
void setup()
{
    lcd.begin(16,2);
    pinMode(ds_col, OUTPUT);
    pinMode(sh_col, OUTPUT);
    pinMode(st_col, OUTPUT);
    pinMode(ds_row, OUTPUT);
    pinMode(start, INPUT);
    pinMode(up, INPUT);
    pinMode(down, INPUT);
    pinMode(left, INPUT);
    pinMode(right, INPUT);
    digitalWrite(up, HIGH);
    digitalWrite(down, HIGH);
    digitalWrite(left, HIGH);
    digitalWrite(right, HIGH);
    digitalWrite(start, HIGH);
    lcd.setCursor(0,0);
    lcd.print("  Snake game    ");
    lcd.setCursor(0,1);
    lcd.print("Circuit Digest  ");
    delay(2000);
    lcd.setCursor(0,0);
    lcd.print("   Press Start  ");
    lcd.setCursor(0,1);
    lcd.print("     To Play    ");
    delay(2000);
}
void loop()
{
  int j,k,Speed=40,score=0;
  j=k=move_c=0;
  move_r=1;
  lcd.clear();
  lcd.setCursor(0,0);
  lcd.print("Score: ");
  lcd.print(score);
  while(1)
  {
   for(int i=3;i<21;i++)
   {
     Row[i]=100;
     Col[i]=100;
   }
   Row[0]=rand()%8+1;
   Col[0]=rand()%8+1;
   Row[1]=1;
   Col[1]=1;
   Row[2]=2;
   Col[2]=1;
   j=2,k=1;
   while(k==1)
   {
    move_c=0;
    move_r=1;
    show_snake(1);
    lcd.setCursor(7,0);
    lcd.print(score);
    if(!digitalRead(start))
    {
     k=2;
     Speed=40;
     score=0;
    }
   }

  while(k==2)
  {
        show_snake(Speed);
        if(Row[1]>8 || Col[1]>8 || Row[1]<0 || Col[1]<0)
        {
         Row[1]=1;
         Col[1]=1;
         k=1;
         lcd.setCursor(0,1);
         lcd.print("Game Over");
         delay(5000);
         score=0;
         lcd.clear();
         lcd.setCursor(0,0);
         lcd.print("Score: ");
         lcd.print(score);
        }
        if(Row[0]==Row[1]+move_r  &&  Col[0]==Col[1]+move_c)
       {
         j++;
         Speed-=2;
         score=score+5;
         lcd.setCursor(7,0);
         lcd.print(score);
         Row[0]=rand()%8+1;
         Col[0]=rand()%8+1;
  }
  for(int i=j;i>1;i--)
  {
   Col[i]=Col[i-1];
   Row[i]=Row[i-1];
  }
  Col[1]=Col[2]+move_c;
  Row[1]=Row[2]+move_r;
  }
  }
}
Comments
snake not displaying
Hi can someone explain the connection between the two 74HC595 shift register and the 8x8 led dot matrix and the arduino ? As I tried to follow the connection on the schematic provided but still I cannot manage to make the 8x8 led dot matrix work (no two dots representing the snake and the single dot the food). knowing that the start button is working I mean when I press it after couple of second either I get on my LCD display the following messages "Game over" either "score : 5".
Is it a problem with the code or it is just a problem related to connection ?
Please can someone help with this regard.
Thanks in advance.
i am suffering the same
i am suffering the same problem now, did you ever fix this?
Why we are using shift
Why we are using shift register?? Can anyone Explain it Clearly
there two resons:
there are two reasons:
1. to show 8-bit data to dot matrix display in a single time. and make code smaller.
2. to save pin of arduino for another purpose
shift resistor is a serial in parallel out IC, which takes input serially data pin and control pin and send to dot matrix parallel.
pins used:
dot matrix 8x8= 16 pin required
16x2 LCD = 6 pin required
push buttons = 5 pin required
total pin required= 27 pin
arduino has 21 input output pins
so we used shift resistor:
Now pin requirements
dot matrix = 6
LCD = 6
push buttons = 5
total 17
Now you have a little idea why did we use that?
in snake game can u explain
in snake game can u explain connection b/w 8x8 and shift register
is the above code is same for arduino mega
Related to snake game
Can , anyone tell me the changes in circuit of snake game if we use 8*8 dot matrix having max7219 IC .
Program and connection
THE PROGRAM OF THIS PROJECT IS WORKING? OR THERE IS A PROBLEM IN THE CONNECTION WHICH ONE IT IS
query regarding dot matrix display?
do we have to use a special type of dot matrix display?comman anode of comman cathod? I have made the same project from the site but I m getting random patterns on the led dot matrix display in the output.please help!!
Learn more about this LED
Learn more about this LED matrix here: https://circuitdigest.com/microcontroller-projects/8x8-led-matrix-with-…
is this code working? and can
is this code working? and can anyone give explanation of this code
information required
can you please give the whole circuit and components diagram because the thing connected with dot matrix is not mentioned clearly here..........
Is it possible to make this
Is it possible to make this without score display? And if so, wich part of the code do I delete?
circuit simulation
which softwares could be used for the simulation of above circuit using arduino ?
You can use Proteus and
You can use Proteus and arrange the LEDs like here:8x8 LED Matrix Interfacing with AVR Microcontroller
How to connect the 8x8 matrix?
Any idea how to connect the 8x8 matrix? I tried to follow the instructions and every led in the matrix is always on no matter what I do. Please help! URGENT!
Snake game not working
I have made same circuit and uploaded same code in arduino uno, but all led's of the led matrix are glowing the game is not going on. Please help.
I've noticed that when you
I've noticed that when you press a button, the game freezes. To fix this, make a new Var "buttonLock" for each button. The code would be:
if(digitalRead(button) == HIGH) {
if(buttonLock == 0) {
//put stuff the button will trigger here
buttonLock = 1;
}
} else {
buttonLock = 0;
}

sir we can use microcontroller