
Security is a major concern in our day to day life, and digital locks have become an important part of these security systems. There are many types of security systems available to secure our place. Some examples are PIR based Security System, RFID based Security System, Digital Lock System, bio-matrix systems, Electronics Code lock. In this post, we will Interface a Fingerprint Sensor Module with Arduino and will build a Fingerprint based Biometric Security System with door locking. Finger Print is considered one of the safest key to lock or unlock any system as it can recognize any person uniquely and can’t be copied easily.
Components Required:
- Arduino Uno
- Finger Print Module
- Push Button -4
- LEDs -2
- 1K Resistor -3
- 2.2K resistor -1`
- Power Supply
- Connecting wires
- Cardboard Box
- Servo Motor -1
- 16x2 LCD -1
- Bread Board -1
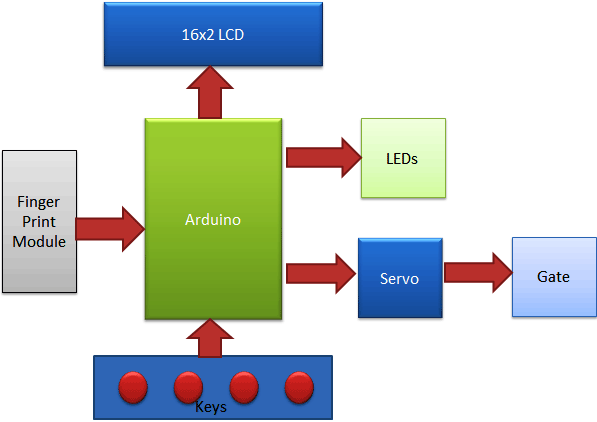
Finger Print Sensor Module with Arduino:
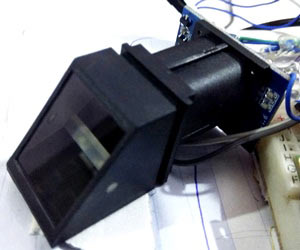
Finger Print Sensor Module or Finger Print Scanner is a module which captures finger’s print image and then converts it into the equivalent template and saves them into its memory on selected ID (location) by Arduino. Here all the process is commanded by Arduino like taking an image of finger print, convert it into templates and storing location etc.
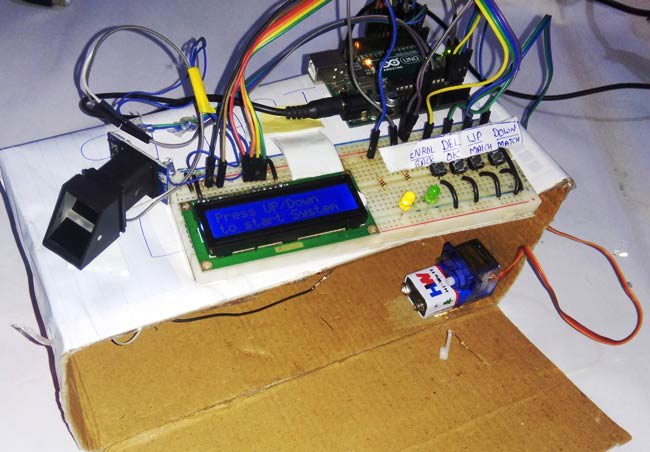
In this Arduino Fingerprint Sensor Project, we have used Fingerprint Sensor Module to take finger or thumb impression as input in the system. Here we are using 4 push buttons to Enroll/back, Delete/OK, UP and Down. Every key has double features. Enroll key is used for enrolling new finger impression into the system and back function as well. Means when the user wants to enroll new finger then he/she needs to press enroll key then LCD asks for the ID or Location where user wants to store the finger print output. Now if at this time user do not want to proceed further then he/she can press enroll key again to go back (this time enroll key behave as Back key). Means enroll key has both enrollment and back function. DEL/OK key also has same double function like when user enrolls new finger then he/she need to select finger ID or Location by using another two key namely UP/MATCH AND DOWN/MATCH (which also has double function) now user needs to press DEL/OK key (this time this key behaves like OK) to proceed with selected ID or Location. UP/DOWN keys also support Finger print match function. Check the Video at the end for full demonstration.

Here we have also attached a cardboard box with a Servo Motor to act as a security gate, which will only open when the system will read correct Finger Print. Yellow LED indicates gate is closed and Green LED indicates gate is opened.
Working Explanation:
Working of this Fingerprint Sensor Door Lock is easy. In this project, we have used a gate that will be open when we place stored finger at the finger print module. First of all, the user needs to enroll finger with the help of push button/keys. To do this user need to press ENROLL key and then LCD asks for entering location/ID where finger will be a store. So now user needs to enter ID (Location) by using UP/DOWN keys. After selecting Location/ID user needs to press an OK key (DEL key). Now LCD will ask for placing finger over the finger print module. Now user needs to put his finger over finger print module. Then LCD will ask to remove the finger from finger print module and again ask for placing the finger. Now user needs to put his finger again over finger print module. Now finger print module takes an image and converts it into templates and stores it by selected ID in to the finger print module’s memory. Now user can open the gate by placing the same finger that he/she have added or enrolled into the system and then press MATCH key (UP/Down key). By the same method, the user can add more fingers. Check the Video below for full demonstration.
Now if the user wants to remove or delete any of stored ID then he/she need to press DEL key, after pressing DEL key, LCD will ask for select location means select ID that to be deleted. Now user needs to select ID and press OK key (same DEL key). Now LCD will let you know that finger has been deleted successfully. Now the user may check it was deleted or not by placing the same finger over the finger print module and pressing MATCH key (UP/Down key).
When placed finger will be valid Green LED will glow for five second and gate also opens at the same time. After 5-seconds gate will be closed automatically. The user may customize gate/door opening and closing according to their requirement. Servo motor is responsible for open and closing of the gate.
Circuit Explanation:
The circuit of this Arduino Fingerprint Security System is very simple which contains Arduino which controls whole the process of the project, push button, buzzer, and LCD. Arduino controls the complete processes.

The push button is directly connected to pin D14(ENROL),D15(DEL), D16(UP) and D17(DOWN) of Arduino with respect to ground And Yellow LED is connected at Digital pin D7 of Arduino with respect to ground through a 1k resistor and Green LED is connected to D6 of Arduino with the same method. Finger Print Module’s Rx and Tx directly connected at Software Serial or Digital pin D2 and D3 of Arduino. 5v supply is used for powering finger print module taken from Arduino board and Servo motor is also connected to PWM pin D5 of Arduino. A 16x2 LCD is configured in 4-bit mode and its RS, EN, D4, D5, D6, and D7 are directly connected at Digital pin D13, D12, D11, D10, D9, and D8 of Arduino.
Note: here D14, D15, D16, D17 are A0, A1, A2, A3 respectively.
Program Explanation:
In a program, we have used Adafruit Fingerprint Sensor Library for interfacing fingerprint module with Arduino board. You can check the complete Code below, it can be easily understood. Here we are explaining main functions of the Arduino Program.
Below piece of code is used to take Finger Print as input and take action according to validation of finger. If finger will be validated gate will be open otherwise remain closed.
for(int i=0;i<5;i++)
  {
    lcd.clear();
    lcd.print("Place Finger");
    delay(2000);
    int result=getFingerprintIDez();
    if(result>=0)
    {
        digitalWrite(openLight, HIGH);
        digitalWrite(closeLight, LOW);
        lcd.clear();
        lcd.print("Allowed");
        lcd.setCursor(0,1);
        lcd.print("Gete Opened   ");
        myServo.write(0);
        delay(5000);
        myServo.write(180);
        digitalWrite(closeLight, HIGH);
        digitalWrite(openLight, LOW);
        lcd.setCursor(0,1);
        lcd.print("Gate Closed   ");
Given void checkKeys() function is used for checking Enroll or DEL key is pressed or not and what to do if pressed. If the ENROL key pressed the Enroll() function is called and DEL key press then delete() function is called.
void checkKeys()
{
   if(digitalRead(enroll) == 0)
   {
    lcd.clear();
    lcd.print("Please Wait");
    delay(1000);
    while(digitalRead(enroll) == 0);
    Enroll();
   }

   else if(digitalRead(del) == 0)
   {
    lcd.clear();
    lcd.print("Please Wait");
    delay(1000);
    delet();
   }
}
Given function is used for entering ID to be deleted and calling uint8_t deleteFingerprint(uint8_t id) function that will delete finger from records.
void delet()
{
   int count=0;
   lcd.clear();
   lcd.print("Delete Finger    ");
   lcd.setCursor(0,1);
   lcd.print("Location:");
   while(1)
   {
     lcd.setCursor(9,1);
     lcd.print(count);
     if(digitalRead(up) == 0)
     {
       count++;
       if(count>25)
       count=0;
       delay(500);
     }
.... .....
..... .....
Given function is used for delete finger print from the record of selected ID.
uint8_t deleteFingerprint(uint8_t id)
{
  uint8_t p = -1;
  lcd.clear();
  lcd.print("Please wait");
  p = finger.deleteModel(id);
  if (p == FINGERPRINT_OK)
  {
    Serial.println("Deleted!");
    lcd.clear();
    lcd.print("Figer Deleted");
    lcd.setCursor(0,1);
    lcd.print("Successfully");
    delay(1000);
  }

  else
  {
    Serial.print("Something Wrong");
    lcd.clear();
    lcd.print("Something Wrong");
    lcd.setCursor(0,1);
    lcd.print("Try Again Later");
    delay(2000);
    return p;
  }
}
Given Function is used to taking finger print image and convert them into the template and save it by selected ID into the finger print module memory.
uint8_t getFingerprintEnroll()
{
  int p = -1;
  lcd.clear();
  lcd.print("finger ID:");
  lcd.print(id);
  lcd.setCursor(0,1);
  lcd.print("Place Finger");
  delay(2000);
  while (p != FINGERPRINT_OK)
  {
    p = finger.getImage();
..... .....
....... ....
So that is how we can use Arduino with Finger Print Reader Module for Security System.
Complete Project Code
#include<LiquidCrystal.h>

LiquidCrystal lcd(13,12,11,10,9,8);

#include <SoftwareSerial.h>

SoftwareSerial fingerPrint(2, 3);

#include<Servo.h>
Servo myServo;
#include <Adafruit_Fingerprint.h>

uint8_t id;

Adafruit_Fingerprint finger = Adafruit_Fingerprint(&fingerPrint);
#define enroll 14

#define del 15

#define up 16

#define down 17

#define openLight 6

#define closeLight 7

#define servoPin 5
void setup()

{

    delay(1000);

    myServo.attach(servoPin);

    myServo.write(180);

    pinMode(enroll, INPUT_PULLUP);

    pinMode(up, INPUT_PULLUP);

    pinMode(down, INPUT_PULLUP);

    pinMode(del, INPUT_PULLUP);

    pinMode(openLight, OUTPUT);

    pinMode(closeLight, OUTPUT);

    lcd.begin(16,2);

    lcd.print("Security System");

    lcd.setCursor(0,1);

    lcd.print("by Finger Print");

    delay(2000);

    lcd.clear();

    lcd.print("Circuit Digest");

    lcd.setCursor(0,1);

    lcd.print("Saddam Khan");

    delay(2000);

    finger.begin(57600);

    Serial.begin(9600);

    lcd.clear();

    lcd.print("Finding Module");

    lcd.setCursor(0,1);

    delay(1000);

    if (finger.verifyPassword())

    {

      Serial.println("Found fingerprint sensor!");

      lcd.clear();

      lcd.print("Found Module ");

      delay(1000);

    }

    else

    {

    Serial.println("Did not find fingerprint sensor :(");

    lcd.clear();

    lcd.print("module not Found");

    lcd.setCursor(0,1);

    lcd.print("Check Connections");

    while (1);

    }

}
void loop()

{

 lcd.setCursor(0,0);

 lcd.print("Press UP/Down ");

 lcd.setCursor(0,1);

 lcd.print("to start System");

 digitalWrite(closeLight, HIGH);

 if(digitalRead(up)==0 || digitalRead(down)==0)

 {

  for(int i=0;i<5;i++)

  {

    lcd.clear();

    lcd.print("Place Finger");

    delay(2000);

    int result=getFingerprintIDez();

    if(result>=0)

    {

        digitalWrite(openLight, HIGH);

        digitalWrite(closeLight, LOW);

        lcd.clear();

        lcd.print("Allowed");

        lcd.setCursor(0,1);

        lcd.print("Gete Opened   ");

        myServo.write(0);

        delay(5000);

        myServo.write(180);

        digitalWrite(closeLight, HIGH);

        digitalWrite(openLight, LOW);

        lcd.setCursor(0,1);

        lcd.print("Gate Closed   ");

        return;

     }

   }

 }

 checkKeys();

 delay(1000);

}
void checkKeys()

{

   if(digitalRead(enroll) == 0)

   {

    lcd.clear();

    lcd.print("Please Wait");

    delay(1000);

    while(digitalRead(enroll) == 0);

    Enroll();

   }
   else if(digitalRead(del) == 0)

   {

    lcd.clear();

    lcd.print("Please Wait");

    delay(1000);

    delet();

   }

}
void Enroll()

{

   int count=0;

   lcd.clear();

   lcd.print("Enroll Finger    ");

   lcd.setCursor(0,1);

   lcd.print("Location:");

   while(1)

   {

     lcd.setCursor(9,1);

     lcd.print(count);

     if(digitalRead(up) == 0)

     {

       count++;

       if(count>25)

       count=0;

       delay(500);

     }
     else if(digitalRead(down) == 0)

     {

       count--;

       if(count<0)

       count=25;

       delay(500);

     }

     else if(digitalRead(del) == 0)

     {

          id=count;

          getFingerprintEnroll();

          return;

     }
       else if(digitalRead(enroll) == 0)

     {

          return;

     }

 }

}
void delet()

{

   int count=0;

   lcd.clear();

   lcd.print("Delete Finger    ");

   lcd.setCursor(0,1);

   lcd.print("Location:");

   while(1)

   {

     lcd.setCursor(9,1);

     lcd.print(count);

     if(digitalRead(up) == 0)

     {

       count++;

       if(count>25)

       count=0;

       delay(500);

     }
     else if(digitalRead(down) == 0)

     {

       count--;

       if(count<0)

       count=25;

       delay(500);

     }

     else if(digitalRead(del) == 0)

     {

          id=count;

          deleteFingerprint(id);

          return;

     }
       else if(digitalRead(enroll) == 0)

     {

          return;

     }

 }

}
uint8_t getFingerprintEnroll()

{

  int p = -1;

  lcd.clear();

  lcd.print("finger ID:");

  lcd.print(id);

  lcd.setCursor(0,1);

  lcd.print("Place Finger");

  delay(2000);

  while (p != FINGERPRINT_OK)

  {

    p = finger.getImage();

    switch (p)

    {

    case FINGERPRINT_OK:

      Serial.println("Image taken");

      lcd.clear();

      lcd.print("Image taken");

      break;

    case FINGERPRINT_NOFINGER:

      Serial.println("No Finger");

      lcd.clear();

      lcd.print("No Finger");

      break;

    case FINGERPRINT_PACKETRECIEVEERR:

      Serial.println("Communication error");

      lcd.clear();

      lcd.print("Comm Error");

      break;

    case FINGERPRINT_IMAGEFAIL:

      Serial.println("Imaging error");

      lcd.clear();

      lcd.print("Imaging Error");

      break;

    default:

      Serial.println("Unknown error");

       lcd.clear();

      lcd.print("Unknown Error");

      break;

    }

  }
  // OK success!
  p = finger.image2Tz(1);

  switch (p) {

    case FINGERPRINT_OK:

      Serial.println("Image converted");

      lcd.clear();

      lcd.print("Image converted");

      break;

    case FINGERPRINT_IMAGEMESS:

      Serial.println("Image too messy");

       lcd.clear();

       lcd.print("Image too messy");

      return p;

    case FINGERPRINT_PACKETRECIEVEERR:

      Serial.println("Communication error");

      lcd.clear();

      lcd.print("Comm Error");

      return p;

    case FINGERPRINT_FEATUREFAIL:

      Serial.println("Could not find fingerprint features");

      lcd.clear();

      lcd.print("Feature Not Found");

      return p;

    case FINGERPRINT_INVALIDIMAGE:

      Serial.println("Could not find fingerprint features");

      lcd.clear();

      lcd.print("Feature Not Found");

      return p;

    default:

      Serial.println("Unknown error");

      lcd.clear();

      lcd.print("Unknown Error");

      return p;

  }


  Serial.println("Remove finger");

  lcd.clear();

  lcd.print("Remove Finger");

  delay(2000);

  p = 0;

  while (p != FINGERPRINT_NOFINGER) {

    p = finger.getImage();

  }

  Serial.print("ID "); Serial.println(id);

  p = -1;

  Serial.println("Place same finger again");

   lcd.clear();

      lcd.print("Place Finger");

      lcd.setCursor(0,1);

      lcd.print("   Again");

  while (p != FINGERPRINT_OK) {

    p = finger.getImage();

    switch (p) {

    case FINGERPRINT_OK:

      Serial.println("Image taken");

      break;

    case FINGERPRINT_NOFINGER:

      Serial.print(".");

      break;

    case FINGERPRINT_PACKETRECIEVEERR:

      Serial.println("Communication error");

      break;

    case FINGERPRINT_IMAGEFAIL:

      Serial.println("Imaging error");

      break;

    default:

      Serial.println("Unknown error");

      return;

    }

  }
  // OK success!
  p = finger.image2Tz(2);

  switch (p) {

    case FINGERPRINT_OK:

      Serial.println("Image converted");

      break;

    case FINGERPRINT_IMAGEMESS:

      Serial.println("Image too messy");

      return p;

    case FINGERPRINT_PACKETRECIEVEERR:

      Serial.println("Communication error");

      return p;

    case FINGERPRINT_FEATUREFAIL:

      Serial.println("Could not find fingerprint features");

      return p;

    case FINGERPRINT_INVALIDIMAGE:

      Serial.println("Could not find fingerprint features");

      return p;

    default:

      Serial.println("Unknown error");

      return p;

  }


  // OK converted!

  Serial.print("Creating model for #");  Serial.println(id);


  p = finger.createModel();

  if (p == FINGERPRINT_OK) {

    Serial.println("Prints matched!");

  } else if (p == FINGERPRINT_PACKETRECIEVEERR) {

    Serial.println("Communication error");

    return p;

  } else if (p == FINGERPRINT_ENROLLMISMATCH) {

    Serial.println("Fingerprints did not match");

    return p;

  } else {

    Serial.println("Unknown error");

    return p;

  }


  Serial.print("ID "); Serial.println(id);

  p = finger.storeModel(id);

  if (p == FINGERPRINT_OK) {

    Serial.println("Stored!");

    lcd.clear();

    lcd.print("Stored!");

    delay(2000);

  } else if (p == FINGERPRINT_PACKETRECIEVEERR) {

    Serial.println("Communication error");

    return p;

  } else if (p == FINGERPRINT_BADLOCATION) {

    Serial.println("Could not store in that location");

    return p;

  } else if (p == FINGERPRINT_FLASHERR) {

    Serial.println("Error writing to flash");

    return p;

  }

  else {

    Serial.println("Unknown error");

    return p;

  }

}
int getFingerprintIDez()

{

  uint8_t p = finger.getImage();


  if (p != FINGERPRINT_OK)

  return -1;
  p = finger.image2Tz();

  if (p != FINGERPRINT_OK)

  return -1;
  p = finger.fingerFastSearch();

  if (p != FINGERPRINT_OK)

  {

   lcd.clear();

   lcd.print("Finger Not Found");

   lcd.setCursor(0,1);

   lcd.print("Try Later");

   delay(2000);

  return -1;

  }

  // found a match!

  Serial.print("Found ID #");

  Serial.print(finger.fingerID);

  return finger.fingerID;

}
uint8_t deleteFingerprint(uint8_t id)

{

  uint8_t p = -1;

  lcd.clear();

  lcd.print("Please wait");

  p = finger.deleteModel(id);

  if (p == FINGERPRINT_OK)

  {

    Serial.println("Deleted!");

    lcd.clear();

    lcd.print("Figer Deleted");

    lcd.setCursor(0,1);

    lcd.print("Successfully");

    delay(1000);

  }


  else

  {

    Serial.print("Something Wrong");

    lcd.clear();

    lcd.print("Something Wrong");

    lcd.setCursor(0,1);

    lcd.print("Try Again Later");

    delay(2000);

    return p;

  }

}
Comments
Hello sir,,,it is very helpfull
plz help......code do not work
main code send plz
good day sir, please sir, i am currently working on this project as my final year project, i have purchased everything and just when i tried to compile the code in my ide, i got this error message "'class Adafruit_Fingerprint' has no member named 'deleteMode " and then i removed that very line of code and re compiled it but i got another error message "collect2.exe: error: ld returned 1 exit status" i am very confused right now, i need your help. i have less than a month to submit this project to my department...than you
sir plz help me....i have faced the same problem...how can i fix it...
add fingerprint library into your ide
do we need to add database for fingerprint?
hii sir can u please send me the full discription or ppt about this project.
Sir. I have error when i Placed my finger error msg is " Finger not found try again later "
Need to create data base ?
Please advise
Thank you
Dear Sir
Can store the access log in to the system with time ?
Thank you
This project is very helpful for my final year project. Sir I need to save the finger print access whenever user access the fingerprint. i want save the access log report with time. Please give code for eeprom and rtc with this program. Thank you
[]
hello my friend how are , i have this project for the final project i want to operate the circuit but i dont know because there's problem but i don't know how to solved it , if have any ideas please reply me .
thanks ✋
Hlo sir, I really like this project and I'm choosing it for my final year project. Please I would like to know if there is any improvement that can be add on on this project. I would really appreciate it if there is.
Since this is an Arduino, I am thinking of interfacing a GSM module like SIM900 to send an SMS to the owner if wrong finger print is detected. I think you can also use this as an improvement.
dear i m also working on security system based on gsm and finger print sensor with arduino
i need some help
I’m working in this project now .im doing this as my major project . Can you tell me the solution .the lcd is not working and the code too
that idea i use now to my final project but my problem is about code
thanks,Did you develop this system on Sim 900a? Can you share it with me?
i need this project am working on it for final project so please send me dear
Where is fingerprint stored.. Arduino or Computer?
please help to me!!!
how can i use this code using fingerprint GT511CS?
what i can change like library what else??
What a wonderful project bro. everything working fine. can edit code and change the working format as well. Thank you so much.
But the code was not even compiling with arduino ide 1.6 or 1.7, the code compiles successfully with Arduino IDE 1.8.
I am getting a blank display in lcd what should i do.
thats exactly what i m getting
if you find a breakthrough please let me know sir
Can you please let me know which software is being used for the sensor..Can u help me with this as its my final year project...Do reply ASAP.....
Could you send me description video because using the same code i have done it the program is uploaded but fingerprint module is not showing any light in it
Where to download serial software hex?
There are many error in the code plz send me a rigjt code
Plz i need it
Its my final year project
what if sir if there are two person who wants to enter and only one person had the access ..
sir, i wanted to change the servo and add a 12v solenoid lock plzz could you help me out in changing the codes and adding any required components
sir i have been receiving this code error
In function 'uint8_t getFingerprintEnroll()':
warning: return-statement with no value, in function returning 'uint8_t {aka unsigned char}' [-fpermissive]
return;
please help
Sir, I am interested in your project and want to make it. Can you tell me what Arduino model you have used here? Or the link Where I can get it. Actually, I don't want lose my money on false Arduino.
Thank you, sir.
I am eagery waiting for your response.
Hi Sudip, there is no such thing as a false Arduino.
They are called Arduino clones and they work well. The one used in this project is a clone as well. So if you wanna save some money buy a clone itself it works for just like the original
Arduino: 1.8.5 (Windows 7), Board: "Arduino/Genuino Uno"
\Documents\Arduino\biometric\biometric.ino:9:34: fatal error: Adafruit_Fingerprint.h: No such file or directory
#include <Adafruit_Fingerprint.h>
^
compilation terminated.
exit status 1
Error compiling for board Arduino/Genuino Uno.
This report would have more information with
"Show verbose output during compilation"
option enabled in File -> Preferences.
You did not install the adafruit fingerprint library. Add it to your IDE ad it should work
same problem....
plz help
Sir I am working on this project for my mini project but can i get the same process with GT511C3 finger print sensor plz help me with this sir
Thank u for posting such a wonderful project sir,
Can this project be compitable with GT511 type finger print module
hiii sir,
the problem i'am facing here in the display of lcd , it displays the boxes initially as shown in your video but after that nothing displays but if it is incorporated with another arduino then it displays.....what may be the problem....mine arduino board is in operational mode no problem with arduino kit....
I am using fingerprint module r307 and LCD together. In that, I am using 2,3 digital pins of arduino for data transfer to the fingerprint.(I tried other pin configurations for this but it didn't work) But as I am connecting LCD, it also requires same 2,3 digital pins of arduino and it is not possible for me to use 2 and 3 pins of Arduino for both lcd and fingerprint sensor for data transfer. Can you please suggest an alternative to this. Can we use analog pins of arduino as digital ones and if so the how?? PLEASE HELP... Thank you!!
how do I run this project in Proteus Simulator.
IT WORKED.THANK YOU SO MUCH SIR.

I want to make it very well