
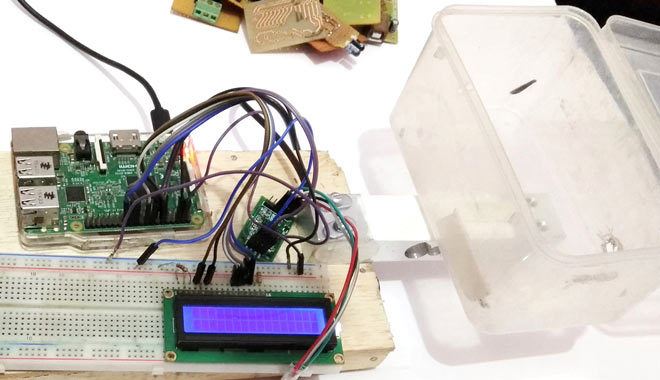
You might have heard about Smart Refrigerator which can automatically order the food items which are running low in refrigerator, so inspiring from that we are here building a Raspberry Pi Smart Container using Load Cell and HX711 Weight Sensor. This Smart Container can tell you about its status like whether it is full or empty, by sending a mail to your Email ID. We can also monitor the weight of container in real time using web browser, and that’s make it a IoT project where you can monitor your container from anywhere using internet. Here the weight of the container will be updated in every 5 seconds on the web browser, this duration can be easily changed in HTML code file. We have set the threshold weight value of 300 gram to send the email about that “Container is Full”, this limit can also be changed. Check the Video at the end of this tutorial.
If you are not familiar with Load cell and HX711 module check our previous projects Raspberry Pi Based Weight Sensing Automatic Gate and Arduino Weight Measurement using Load Cell and HX711 Module.
Required Components:
Here we are using Raspberry Pi 3 Raspbian Jessie OS. All the basic Hardware and Software requirements are previously discussed, you can look it up in the Raspberry Pi Introduction and Raspberry PI LED Blinking for getting started, other than that we need:
- Raspberry Pi (any model should work)
- Load cell
- HX711 Load cell Amplifier Module
- 16x2 LCD
- Power source or power bank
- Connecting wires
- Breadboard
- Nut bolts, Frame and base
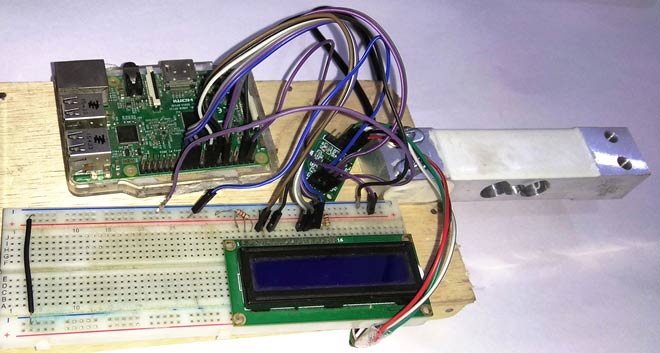
Here we have attached a wooden base with the Load cell for stability, with the help of nuts and bolts, as shown below. Learn more about Load cell and HX711 weight sensor module here.
Email Setup in Raspberry Pi for sending Alert mails:
For sending the mail from Raspberry Pi, which contain the status of Container (Full or empty), we need to install a software. Here we are using ssmtp which is an easy and good solution for sending mail using command line or using Python Script. We need to install two Libraries for sending mails using SMTP:
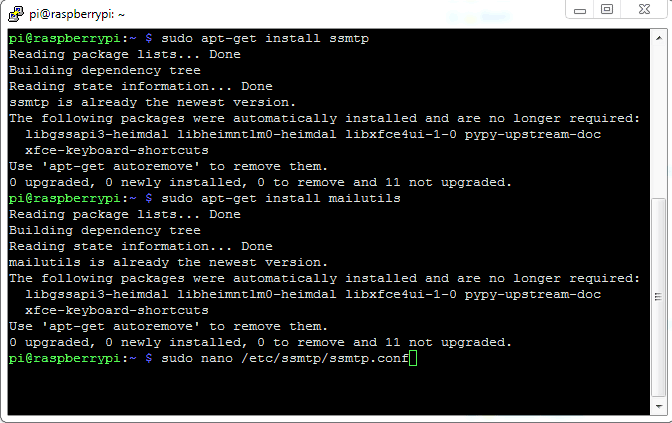
sudo apt-get install ssmtp sudo apt-get install mailutils
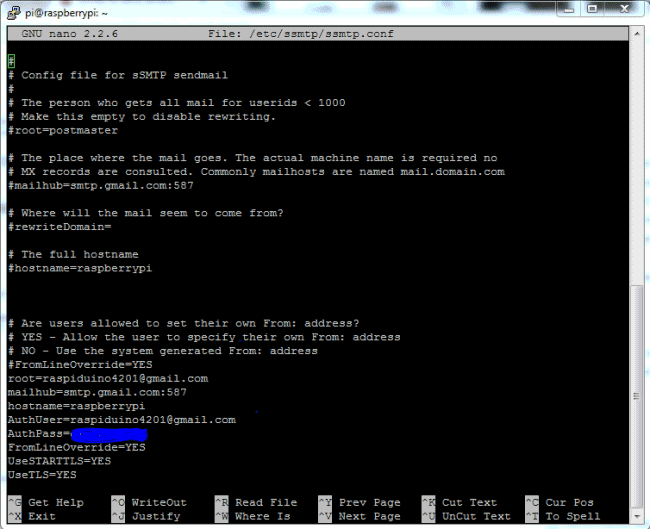
After installing libraries, user needs to open ssmtp.conf file and edit this configuration file as shown in the Picture below and then save the file. To save and exit the file, Press ‘CTRL+x’, then ‘y’ and then press ‘enter’.
sudo nano /etc/ssmtp/ssmtp.conf
root=YourEmailAddress
mailhub=smtp.gmail.com:587
hostname=raspberrypi
AuthUser=YourEmailAddress
AuthPass=YourEmailPassword
FromLineOverride=YES
UseSTARTTLS=YES
UseTLS=YES
We can also test it by sending a test mail by issuing below command, you shall get the mail on the mentioned email address if everything is working fine:
echo "Hello saddam" | mail -s "Testing..." saddam4201@gmail.com
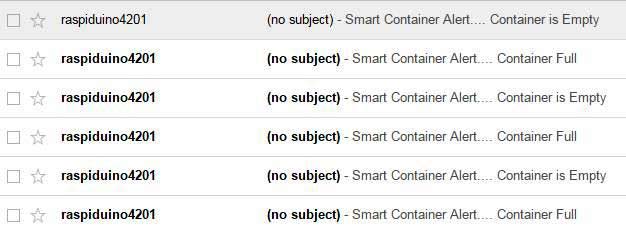
Below is the snapshot of Alert Emails which we got during our testing.
Flask Setup in Raspberry Pi:
Here, we have created a web server, which provides a way to send the Weight Value of the container from Raspberry Pi to network using Flask in a web browser. Flask allows us to run our python scripts through a webpage and we can send & receive data from Raspberry Pi to web browser and vice versa. Flask is a microframework for Python. This tool is Unicode based having built-in development server and debugger, integrated unit testing support, support for secure cookies and its easy to use, these things make it useful for the hobbyist.
Install a flask support package into the Raspberry Pi by using given command:
$ pip install Flask
Then we can use the Flask by just importing it in our program, like we have imported following packages of flask for this project:
from flask import Flask, render_template, request, jsonify
You can learn more about the programming using Flask here, also check our previous project where we have used Flask to send the message from Webpage to Raspberry Pi.
HTML code for webpage:
We have also created a web page using HTML language for displaying the weight and alert message on web browser. We have used a little jQuery script to load the page (by calling /show_weight) in every 5 seconds so that we can get the weight value in real time. Below is the HTML code for webpage including the jQuery:
<head>
<script src="https://ajax.googleapis.com/ajax/libs/jquery/3.1.1/jquery.min.js"></script>
</head>
<div><center>
<h1><span style="color:#5C5C5C;">Circuit</span><span style="color:#139442"> Digest</span></h1>
<h2>Smart Container using Raspberry Pi and Weight Sensor</h2>
<h3>Weight of Container: <span id="result" style="color:#C33; font-size:28px">302</span> gram</h3>
<span>(Updating every 5 seconds)</span>
<div id="alert" style="color:#F00; font-size:20px; "><br><br><b>Alert!!!<br>Container is full<br>Email sent.</b></div>
</center></div>
<script>
setInterval(
function()
{
$.getJSON('/show_weight',function(data) {
$("#result").text(data.result);
if( data.result > 300 ) {
$("#alert").show();
}
else {
$("#alert").hide();
}
});
},
5000);
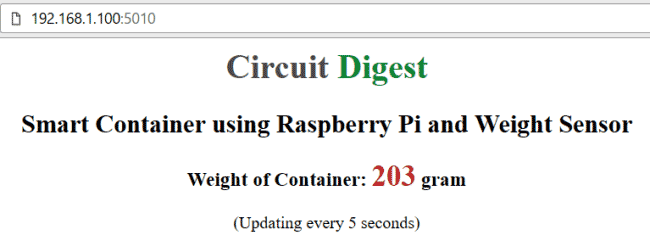
</script>User needs to copy-paste the above given HTML code in some text editor (notepad) and save the file with .HTML extension (web.html). Then put this HTML file in the /templates folder with respect to your python script location. Means you need to create a folder named templates, where you have put your Python Code file for this Raspberry Pi Smart container, then put web.html file in this templates folder. This step is important, otherwise our project won’t work. You can directly open the web.html file by double click on it to get the output of HTML code and you will see the webpage like shown below. Further check the whole process in Demonstration Video at the end. After we have done with the programming and all, we can just run the Python code in Raspberry Pi and open the IP_address_of_your_Pi:5010 in web Browser (like http://192.168.1.100:5010)
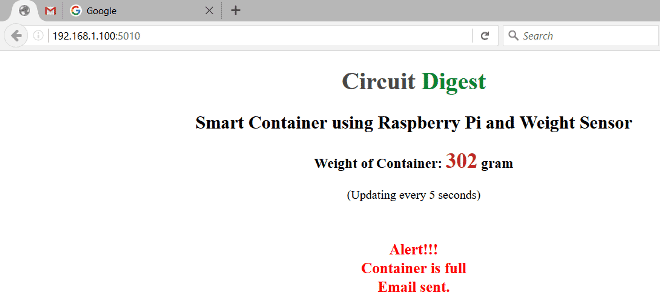
Webpage will also show a ALERT message when the weight of the container goes beyond 300 gram like below:
You can check the IP address of your Raspberry Pi by using ifconfig command:
ifconfig
Circuit Explanation:
Connections for this IoT Smart Container are easy and schematic is given below. 16x2 LCD pins RS, EN, d4, d5, d6, and d7 are connected with GPIO pin number 18, 23, 24, 25, 8 and 7 of Raspberry Pi respectively and HX711 Module’s DT and SCK pins are directly connected with Raspberry Pi's GPIO pin 27 and 17. Load cell connections with HX711 module are already explained earlier and also shown in the below circuit diagram.


Working Explanation:
Working of this Smart Container is easy. In this project, we have used Raspberry Pi 3 to control whole the process. Load cell senses the weight of the container and supplies a electrical analog voltage to HX711 Load Amplifier Module. HX711 is a 24bit ADC, which amplifies and converts the Load cell output into digital form. Then this amplified value is fed to the Raspberry Pi. Now Raspberry Pi calculates the output of HX711 and converts that into the weight value.
Then this weight value is compared with the predefined threshold value (300 gram) using Raspberry Pi and Python code, if the weight of container goes beyond 300gm then Raspberry Pi sends a email stating that "Smart Container Alert.... Container Full". And if weight remains under 300gm then Raspberry Pi sends email stating “Smart Container Alert.... Container is Empty”.

The weight can also be monitored using web browser, you just need to open your Raspberry Pi IP address with port 5010 like http://192.168.1.100:5010 (replace IP address with your address). Here we have used Flask to send the data from Raspberry Pi to webpage over the network. This page will automatically refresh in every 5 seconds and we get updated data, for this we have used jQuery as explained earliar.
A optional 16x2 LCD has also been used to display the weight and status messages.
Complete Python code is given below, where we have written functions for driving LCD, for reading weight value from Load cell, for displaying data on webpage etc. You can understand them easily or if you are a beginner then check our previous Raspberry Pi Tutorials.
Complete Project Code
import RPi.GPIO as gpio
import serial
import time
import random
from flask import Flask, render_template, request, jsonify
import smtplib
RS =18
EN =23
D4 =24
D5 =25
D6 =8
D7 =7
DT =27
SCK=17
led=22
buz=5
m1=19
m2=26
HIGH=1
LOW=0
sample=0
val=0
flag=0
gpio.setwarnings(False)
gpio.setmode(gpio.BCM)
gpio.setup(RS, gpio.OUT)
gpio.setup(EN, gpio.OUT)
gpio.setup(D4, gpio.OUT)
gpio.setup(D5, gpio.OUT)
gpio.setup(D6, gpio.OUT)
gpio.setup(D7, gpio.OUT)
gpio.setup(led, gpio.OUT)
gpio.setup(buz, gpio.OUT)
gpio.setup(m1, gpio.OUT)
gpio.setup(m2, gpio.OUT)
gpio.setup(SCK, gpio.OUT)
gpio.output(led , 0)
gpio.output(buz , 0)
gpio.output(m1 , 0)
gpio.output(m2 , 0)

app = Flask(__name__)
a=1
@app.route("/")
def index():
 return render_template('web.html')

@app.route('/show_weight')
def show_weight():
    count= readCount()
    w=0
    w=(count-sample)/106
    print w,"g"
    setCursor(0,0)
    data=str(w);
    lcdprint(data)
    lcdprint("g   ")
    global flag
    if w>300:
      if flag == 0:
        lcdclear()
        lcdprint("Container Is Full")
        setCursor(0,1);
        lcdprint("Sending Email")
        server = smtplib.SMTP('smtp.gmail.com', 587)
        server.starttls()
        server.login("saddam4201@gmail.com", "password")
        msg = "Smart Container Alert.... Container Full"
        server.sendmail("saddam4201@gmail.com", "sk9610126059@gmail.com", msg)
        server.quit()
        lcdclear()
        lcdprint("Email Sent")
        flag=1;
        lcdclear()
    elif w<300:
      if flag==1:
        lcdclear()
        lcdprint("Container Empty")
        setCursor(0,1);
        lcdprint("Sending Email")
        server = smtplib.SMTP('smtp.gmail.com', 587)
        server.starttls()
        server.login("saddam4201@gmail.com", "Password")
        msg = "Smart Container Alert.... Container is Empty"
        server.sendmail("saddam4201@gmail.com", "sk9610126059@gmail.com", msg)
        server.quit()
        lcdclear()
        lcdprint("Email Sent")
        flag=0;
        lcdclear()
    return jsonify(result=w)
def begin():
  lcdcmd(0x33)
  lcdcmd(0x32)
  lcdcmd(0x06)
  lcdcmd(0x0C)
  lcdcmd(0x28)
  lcdcmd(0x01)
  time.sleep(0.0005)

def lcdcmd(ch):
  gpio.output(RS, 0)
  gpio.output(D4, 0)
  gpio.output(D5, 0)
  gpio.output(D6, 0)
  gpio.output(D7, 0)
  if ch&0x10==0x10:
    gpio.output(D4, 1)
  if ch&0x20==0x20:
    gpio.output(D5, 1)
  if ch&0x40==0x40:
    gpio.output(D6, 1)
  if ch&0x80==0x80:
    gpio.output(D7, 1)
  gpio.output(EN, 1)
  time.sleep(0.005)
  gpio.output(EN, 0)
  # Low bits
  gpio.output(D4, 0)
  gpio.output(D5, 0)
  gpio.output(D6, 0)
  gpio.output(D7, 0)
  if ch&0x01==0x01:
    gpio.output(D4, 1)
  if ch&0x02==0x02:
    gpio.output(D5, 1)
  if ch&0x04==0x04:
    gpio.output(D6, 1)
  if ch&0x08==0x08:
    gpio.output(D7, 1)
  gpio.output(EN, 1)
  time.sleep(0.005)
  gpio.output(EN, 0)

def lcdwrite(ch):
  gpio.output(RS, 1)
  gpio.output(D4, 0)
  gpio.output(D5, 0)
  gpio.output(D6, 0)
  gpio.output(D7, 0)
  if ch&0x10==0x10:
    gpio.output(D4, 1)
  if ch&0x20==0x20:
    gpio.output(D5, 1)
  if ch&0x40==0x40:
    gpio.output(D6, 1)
  if ch&0x80==0x80:
    gpio.output(D7, 1)
  gpio.output(EN, 1)
  time.sleep(0.005)
  gpio.output(EN, 0)
  # Low bits
  gpio.output(D4, 0)
  gpio.output(D5, 0)
  gpio.output(D6, 0)
  gpio.output(D7, 0)
  if ch&0x01==0x01:
    gpio.output(D4, 1)
  if ch&0x02==0x02:
    gpio.output(D5, 1)
  if ch&0x04==0x04:
    gpio.output(D6, 1)
  if ch&0x08==0x08:
    gpio.output(D7, 1)
  gpio.output(EN, 1)
  time.sleep(0.005)
  gpio.output(EN, 0)
def lcdclear():
  lcdcmd(0x01)

def lcdprint(Str):
  l=0;
  l=len(Str)
  for i in range(l):
    lcdwrite(ord(Str[i]))

def setCursor(x,y):
    if y == 0:
        n=128+x
    elif y == 1:
        n=192+x
    lcdcmd(n)
def readCount():
  i=0
  Count=0
 # print Count
 # time.sleep(0.001)
  gpio.setup(DT, gpio.OUT)
  gpio.output(DT,1)
  gpio.output(SCK,0)
  gpio.setup(DT, gpio.IN)
  while gpio.input(DT) == 1:
      i=0
  for i in range(24):
        gpio.output(SCK,1)
        Count=Count<<1
        gpio.output(SCK,0)
        #time.sleep(0.001)
        if gpio.input(DT) == 0:
            Count=Count+1
            #print Count

  gpio.output(SCK,1)
  Count=Count^0x800000
  #time.sleep(0.001)
  gpio.output(SCK,0)
  return Count
print "Hello"
begin()
lcdcmd(0x01)
lcdprint("Smart Container   ")
lcdcmd(0xc0)
lcdprint("    Using RPI     ")
time.sleep(3)
lcdcmd(0x01)
lcdprint("Circuit Digest")
lcdcmd(0xc0)
lcdprint("Welcomes You")
time.sleep(3)
sample= readCount()
lcdclear()
while 1:
  print "Start"
  if __name__ == "__main__":
   app.run(host='0.0.0.0',port=5010)
Comments
Hi, i am going to attempt this project but i am fairly new to the whole Raspberry Pi programming side of things.
Is there a way to use Push notifications instead of or as well as emails for when certain weights are achieved?
Hi,
i have started this project but am stuck at the "Complete Python code'' section, it says check you previous tutorials if you are a but i cant find any reference as to what file i write this into or any instructions on what to do with it,
Please can you help me out with this as it has brought me to a complete stand still and i really want to finish this.
Hi Sadam,
I have completed this project but the Raspberry Pi is receiving random numbers every 5 seconds instead of a fixed weight?,
I can not get a steady weight like you have on the web page?
Please can you let me know where i am going wrong and how to rectify this?
Hi steve save your breath, it seems like sadam is not supporting this post and from what i can tell the project doesnt seem to work anyway?
Hi Sadam,
As with Steve Above, i cant seem to calibrate the scale and am getting random weight values back in the range of -3500 to -100.
Please can you elaborate on this and give some more indepth information and information on how to calibrate without the 16x2 lcd screen
Hi Steve and Ian
I also had few problems to get start with a load cell. Finally I found out that it all depends on how we mount the load cell. As sadam has shown here it is very important to fix one end of the load cell to a constant base with nuts and bolt.
I have not proceeded with flask yet, I started with Arduino and HX711 Amplifier Module to read values from load cell. Then moved on to raspberry pi and just read the values of weight from Load cell and displayed it on the shell.. the values seem to be satisfying. My code was taken from here
https://circuitdigest.com/microcontroller-projects/raspberry-pi-weight-sensing-automatic-gate
Will update you once i am completely done
Hi Aisha,
Thanks for the reply, the cell is screwed down to a plastic base at the moment i will try attaching it to a wood base as sadam did but i cant imagine it making much difference,
Can you post the code you are using here so i can try it and see it it makes a difference along with the pins you are using on the pi please mate?
Thanks for your help
Hi Aisha, i would also like your code to please, and also if possible pictures of the wiring for your lcd screen specifically at the resistor as i cant seem to get mine to work?
Thanks again for the reply
Hi Aisha, no Joy, i got a slightly smaller range of numbers but they are still completely random?
Hi Sadam,
The Web.html has to be constantly open or your script freezes after 4-5 hours until it is opened and then carries on as normal until you close the web interface at which point a few minutes later it freezes again.
id there a fix for this?
can you post a breadboard layout diagram for this please
I have successfully executed this project with 1 load cell, i need help to connect 2nd load cell and get the weight display on website
Thanks
Shashank
Hi can you show me how you wired up the screen? im dont know how to read the diagram used here and just want to repoduce using the screen? i have completed the project which was simple enough but didnt know how to wire in the screen.
can u give us ur email id ....
i need some help in this project.
Hi Shashank,
I am Sneha. I have successfully connected the connection and even code works perfectly. But the weight sensor is not reading the weight but gives an output with random numbers and gets an exit. Can you help me, please. My mail id would be snehamane81@gmail.com:Awaiting for your help and reply. Kindly please do the needful.Thanks in Advance
Have a nice day.
Bro i have just now started the project. u mentioned that u have already completed it. Please provide me with ur email adsress. please help me.
my email :jatinponnaluri@gmail.com
shashank help mee
Bro i have just now started the project. u mentioned that u have already completed it. Please provide me with ur email adsress. please help me.
my email :jatinponnaluri@gmail.com
Hello Everyone,
I have successfully connected the connection and even code works perfectly. But the weight sensor is not reading the weight but gives an output with random numbers and gets an exit. Can you help me, please. My mail id would be snehamane81@gmail.com:Awaiting for your help and reply. Kindly please do the needful. Thanks in Advance
Have a nice day.

How to add the above python code in raspberry pi along with the html